

Friday Night Lights: InfiRay T2 Pro – Smartphone Thermal Sensor

It is Friday and that means another Friday Night Lights. Last week we talked about the Z-Bolt Blazer IR LED head. This week we take a look at an inexpensive thermal sensor that plugs directly into your phone. This one is made by InfiRay and they call it the T2 Pro.
InfiRay Thermal @ TFB:
InfiRay T2 Pro Smartphone Thermal Camera

The InfiRay T2 Pro is similar in function to the Flir One or Seek Thermal Compact. It is a small thermal sensor that plugs straight into your phone. InfiRay sent this T2 Pro in for review. They make a version for Android or iPhone. I opted for the iPhone version. You can see this T2 Pro has a Lightning plug sticking out of it so you can plug it straight into an iPhone. There is a slight standoff so it does work with low-profile iPhone cases.


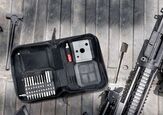
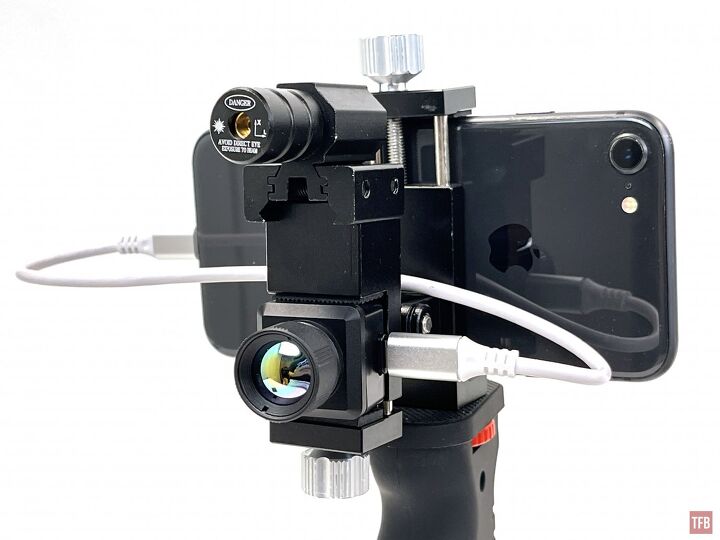
The T2 Pro also comes with some accessories for mounting it in front of your phone. This consists of a metal universal phone holder with a sort of GoPro-style attachment point on the front. Then there is a bracket attached to that mount that holds the T2 Pro thermal sensor. This bracket has a dovetail machined into it to mount a visible laser. Since the T2 Pro is now mounted on this articulating bracket, InfiRay includes a short Lightning extension cable to connect the T2 Pro to your phone. Another accessory they included is a pistol grip that has a 1/4-20 screw to mount under the universal phone holder.


The bracket has an articulation point where it connects to the universal phone holder. See the photo below for the range of articulation. If you do not mount the laser, the bracket can tilt even further.

The bracket for the T2 Pro sensor has a dovetail machined into it, however, it is not compatible with standard Weaver or Picatinny. The dovetail on the bracket is smooth so there are no recoil lugs. The only thing holding the laser is the clamping force of the laser mount and the friction it creates.

I question the purpose of a laser for the T2 Pro. It is not slaved at all. While you can zero this laser, the T2 Pro cannot see it. So only VIS/NIR imaging devices as well as your eyes can see the laser. You could possibly point out where a thermal signature is but I do not see this working all that well.
Using The T2 Pro
In order to use the T2 Pro, you need to download an app called Xinfared. Your phone becomes the screen and controls for the T2 Pro. Here is a screenshot from my iPhone.

On the rleft side are four icons:
- Photo capture
- Video capture
- Album (mountain icon)
- Settings (hamburger icon)
The first two are straightforward. I am not sure why InfiRay thought an icon of a mountain is suitable for the photo album but that is what it does. When you tap the settings icon, you can change the isotherm temperature from Celsius to Fahrenheit and back. There are settings for temperature compensation and temperature measurement distance. Next are 12 toggle options:
- Show Logo (enables Xinfrared logo on the screen)
- Take Mirror (mirrors the image)
- Camera System (shows what your phone camera sees in a small window)
- Temperature Switch (displays temperature reading where you point the cross hair)
- Auto Refresh (NUC)
- Speedometer (I am not sure what this does)
- location (displays GPS coordinates of your phone)
- rotate 180º (rotates image 180º)
- picture in picture (displays a zoomed in PIP window at the top if the screen)
- camera sound (enables camera shutter sound)
- time (displaces time and date)
- image mode (I am not sure what this does)
The camera system feature is a little bit neat. It shows what your phone camera sees. However it only shows 1x. You can move this PIP-style window anywhere you want on the screen of your phone. But it is very zoomed out compared to the image the T2 Pro produces. See the screenshot below. There are two girls talking on the street corner. You can barely make them out in the dark “camera system” PIP window just below the street lamp.

I wish you could zoom in on this PIP or switch to the long-range higher magnification lens of my iPhone 12 Max Pro. But alas you cannot. I would also like to have a fusion option where you can superimpose the phone camera image on top of the thermal image with an opacity drop or outline edge detect but that is not a feature programmed into this app. The FLIR ONE has an MSX mode that fuses the day camera image with the thermal image because the thermal sensor resolution is so bad it cannot show you detail. The T2 Pro has a 256×192 resolution sensor. So the resolution is not great but not terrible. It would just be nicer to see more with day fusion.
The 180º rotation is important when you mount the T2 Pro in the bracket. Normally the T2 Pro is oriented with the lighting plug going into your phone. But you can mount the T2 Pro the opposite way and you end up inverting the image so the Rotate 180º corrects this. Look at the photo below. You can see I used the lighting extension cable with the plug oriented to the left. Normally the T2 Pro would be plugged directly into the iPhone and the plug would be oriented to the right. By mounting the T2 Pro like this, the thermal image shows up upside down in the app. Select the Rotate 180 option to correct this.

You can also just orient the T2 Pro with the lightning plug pointed the other way and you won’t have to use the Rotate 180 option.

The Picture In Picture (PIP) option shows you a slightly magnified image of the center of your thermal image.

You cannot control the level of magnification in the PIP window. You can see it is just slightly bigger than what your screen shows. I did not find this feature to be that useful. It blocks a significant portion of your thermal image and you cannot relocate it like the Camera System PIP image.
If you look at the right side the the thermal image above, there are four circles:
- Color Palette
- Reticle
- Hot Spot indicator
- NUC refresh
Under color palettes you have the following options:
- White Hot
- Black Hot
- Red Hot (white hot with the hottest areas highlighted in red)
- Iron Rainbow
- Rainbow
- Search (black hot with more contrast to eliminate false positives)
The reticle option is interesting but questionable. When you select it, a scope-like reticle shows up on your screen. You can poke the reticle and move it anywhere you want on the screen. There is a large white circle next to it. You can move this around too. The white circle is a directional pad and adjusts the reticle in small increments. The center button is for locking the reticle into position.

Why did I say this is questionable? At first glance, you could zero the reticle to a gun. While that seems like a great idea, how would you mount the phone to maintain zero? You can also spread two fingers across your screen and digitally zoom the thermal image but the reticle stays the same size making it in effect a second focal plane reticle. The BDC-looking subtensions are nice but they don’t mean anything until you get dope and figure out what distance your bullet drop matches that point on the reticle.
Thermal Fusion T2 Pro, Sort Of . . .
I plugged the T2 Pro into my iPhone 5 which I use to film through my PVS-14. Since the phone is so old it does not always work with the app and T2 Pro. I was able to get it to work though and can show you a screencap below.

I have a night vision image and enabled the Camera System setting. So now the night vision image is displayed over my thermal image. But I have the same problem as before. The image is zoomed out too much compared to the T2 Pro thermal image. I circled the van in both the night vision and thermal image. The size difference is staggering and that is the same van. If only I could zoom in on the night vision image so it showed me the same image as the T2 Pro thermal image it might be useful.

Stabilizing the T2 Pro
The T2 Pro is rather zoomed in. When you try to zoom out the lowest magnification level is displayed. It says 2.0x. But I compared that to the 8x magnification of my Vortex Razor laser range finder and found the images to be of a similar size. That makes holding the iPhone and T2 Pro a bit of a challenge. Often my videos are shaking. Small movements of the phone show up as large movements of the thermal image. So I tried using a DJI OSMO to stabilize my phone.

While this works, I did not like the slowness of the stabilizer. It was too slow to adjust as I am panning and I would try to manually move the gamble with the thumb stick on the DJI OSMO but it moves the gimble too fast for my taste. While the DJI OSMO technically works, I ended up returning it.
Weapon Mounting The T2 Pro

I used a simple Picatinny mount tripod screw to mount the T2 Pro bracket and phone holder to the top of my 10/22. The articulating bracket does not exude confidence it will hold zero. If the T2 Pro thermal sensor bracket moves, your zero will shift. Also, the phone holder is only held in place with a single screw and friction. It is too easy for the entire phone holder to spin resulting in a loss of zero. This is why I think the adjustable reticle is basically useless. If you could mount the phone and T2 Pro in a more solid mount that holds zero, this could be viable for shooting small game up close.
Final Thoughts On The infiRay T2 Pro
The T2 Pro is reasonably priced at just under $400. I think the pistol grip, phone holder and bracket are useless. I rather have the simplicity of plugging the T2 Pro directly into my phone and manipulating my phone to use the thermal camera.
Check Prices on InfiRay T2 Pro Smartphone Thermal Sensors
The resolution is better than the low-res FLIR ONE and older Seek Thermal smartphone thermal sensors. But the T2 Pro is not as good as their other thermal devices with 640 resolution. InfiRay claim you can detect a bear 1,340 yards away. I have my doubts about that. Below is a photo of the Space Needle taken through the T2 Pro. It is very pixelated and this is the best I could focus the T2 Pro.

Here is a town with a river. The buildings are just over 1,000 yards away. I don’t know if I could detect an animal like a bear unless you are closer.

I brought the T2 Pro with me on an Alaskan Cruise and while I was playing with the T2 Pro, it detected something in the trees. See the Red Crosshair point out the hottest object in the thermal image? There is another heat signature off to the left.

They were bald eagles perched on the trees about 180 yards away. The T2 Pro clearly detected them but it was impossible to recognize what they were. Sure something hot in a tree is most likely a bird but that is from deduction and not the resolution of the image. So while the T2 Pro does work, I had to identify them using my eyes and day camera.

For more information go to InfiRay’s website.
We are committed to finding, researching, and recommending the best products. We earn commissions from purchases you make using the retail links in our product reviews. Learn more about how this works.
More by Nicholas C
![[IWA 2023] Three New Products from InfiRay Outdoor](https://cdn-fastly.thefirearmblog.com/media/2024/05/19/14750734/iwa-2023-three-new-products-from-infiray-outdoor.jpg?size=350x220)


![[SHOT 2024] TiON Releases Three New Dragoon Mini Suppressors](https://cdn-fastly.thefirearmblog.com/media/2024/05/16/14529319/shot-2024-tion-releases-three-new-dragoon-mini-suppressors.jpg?size=350x220)


![[SHOT 2024] SIM-X Launches New Rangecore Practice Ammo](https://cdn-fastly.thefirearmblog.com/media/2024/05/19/14783236/shot-2024-sim-x-launches-new-rangecore-practice-ammo.jpg?size=350x220)


![[SHOT 2024] Adler Brings New Rimfire Rifles To U.S. Market](https://cdn-fastly.thefirearmblog.com/media/2024/05/16/14526913/shot-2024-adler-brings-new-rimfire-rifles-to-u-s-market.jpg?size=350x220)


Comments
Join the conversation
I saw review about this before. And with a picatinny adapter shell. It can be mounted on weapons. https://youtu.be/A2JKBXFf-Sw