 Your Privacy Choices
This is a review of the InfiRay Clip 1 CE2 and Jerry C C5 clip-on thermal imagers (COTI). These small wonders of technology will snap directly onto the ring of a PVS-14 night vision device. Once set and installed, you will get configurable thermal detection capabilities on top of your night vision.
InfiRay @ TFB:
- TFB Review: InfiRay Tube TH50 Thermal Imaging Riflescope
- TFB Review: InfiRay FH35R Finder II Thermal Monocular
- iRAY USA RICO HD RS75 – 1280×1024 Resolution Thermal Weapon Sight
- Friday Night Lights: InfiRay T2 Pro – Smartphone Thermal Sensor
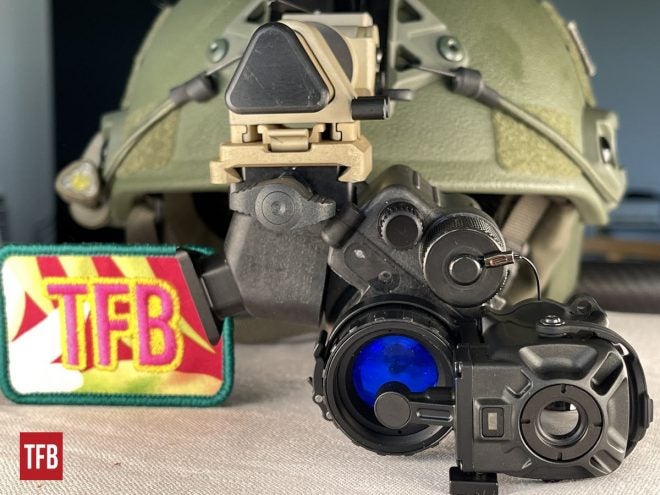
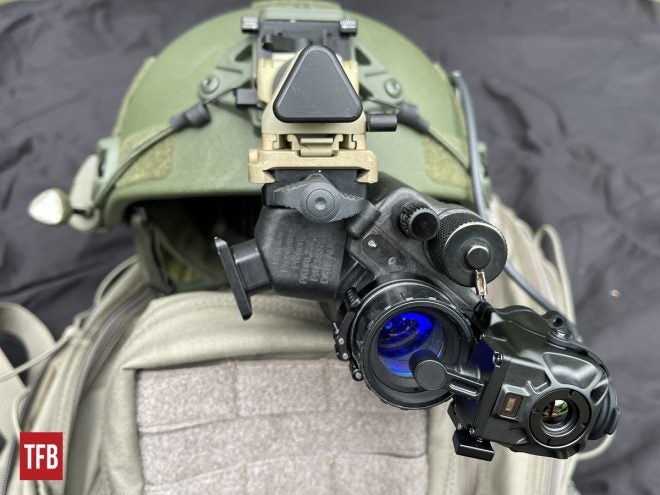
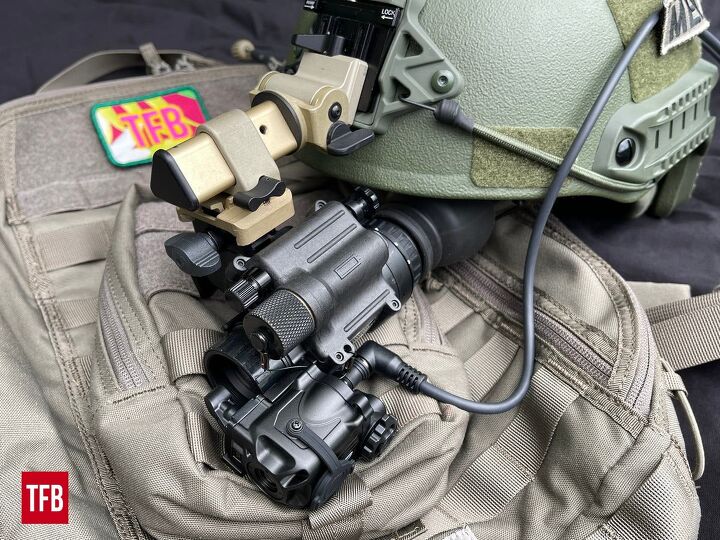
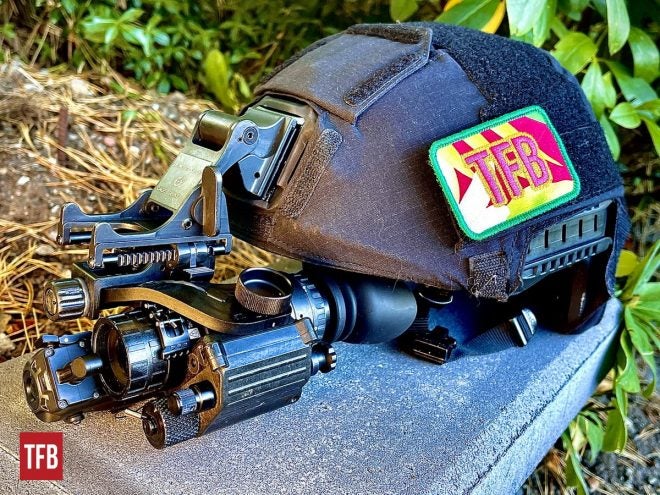
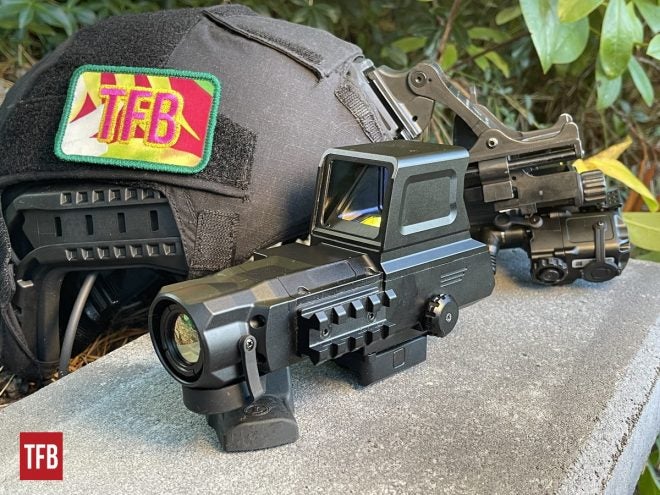
Below: A PVS-14 with a clip-on thermal imager. You can see the round “mirror” germanium lens and the injection arm that goes out to the center of the analog night vision. The user will not see the arm, only the thermal image that’s displayed on the small screen.
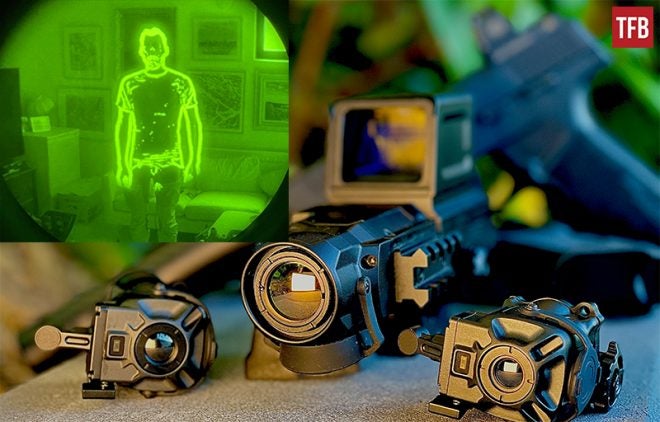
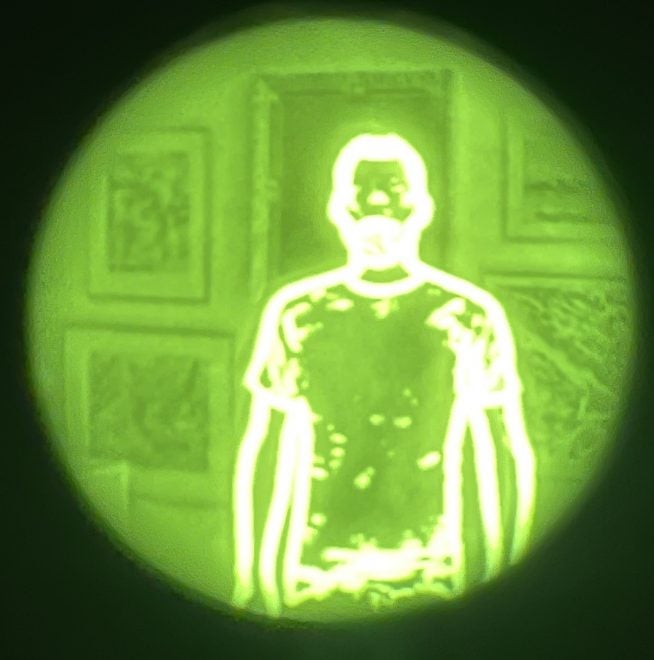
These clip-on thermal imagers add a digital thermal “overlay” to the analog image intensified night vision, but the systems work independently of each other. The “fusion” will happen in your brain, in front of your eyes, so to speak. This will increase the user’s situational awareness, especially when there is little or no light and when there is a big difference between cold and warm objects. Below you can see an example of how it may appear, in outline thermal mode. The image below is taken close with an iPhone and it’s over-exposed as the camera has no idea what’s going on, but it’s possible to adjust the strength of the thermal overlay. An image will tell a thousand words? If it was pitch black in this room, you would not see the person at all with analog night vision only.
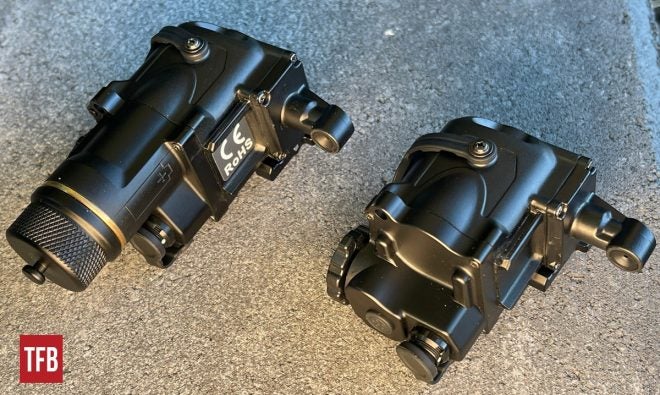
Below: The InfiRay Clip 1 CE2 to the left, and the JerryC C5 to the right. Most of the size difference comes from the battery compartment of the C5, but the C5 packs a much more powerful thermal sensor and a wider field of view.

Below: InfiRay Clip 1 CE2 to the right.
Below: The clip-ons are delivered in excellent protection cases, with a custom padded material.
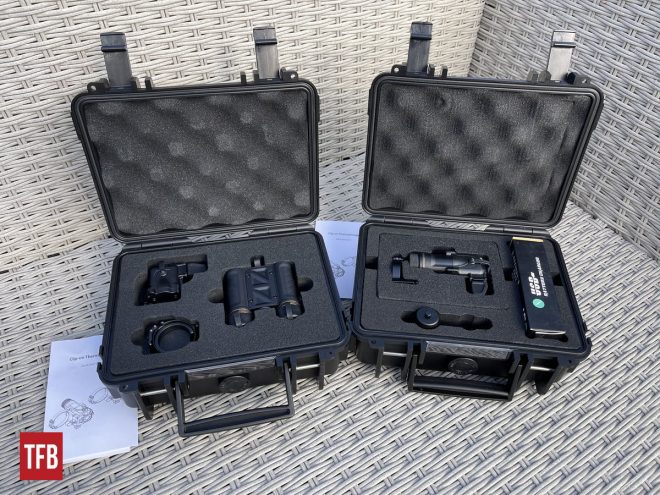
Below: The InfiRay Clip 1 CE2 to the left is absolutely tiny for a thermal. The battery pack is to the right. The quality is excellent.
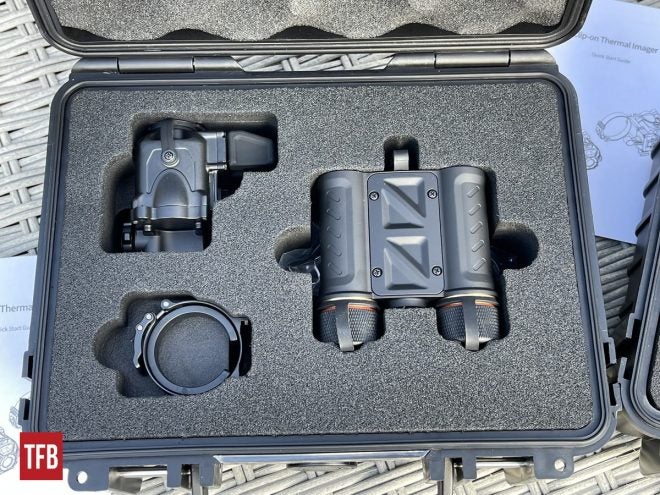
Below: The InfiRay JerryC C5 has an internal battery compartment, but it’s also possible to use the same external battery compartment that the CE2 is using.

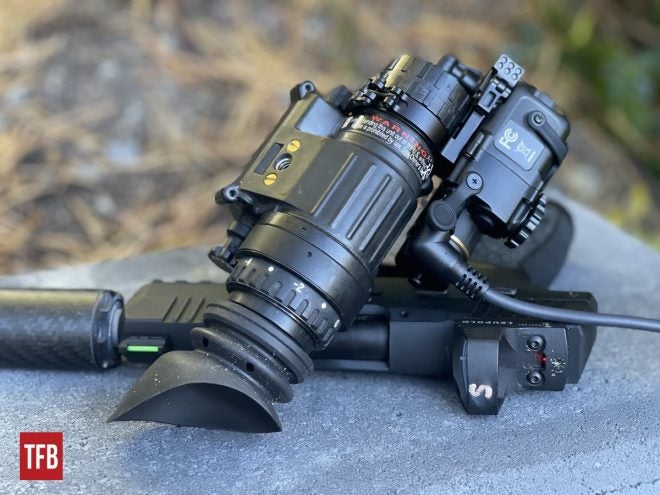
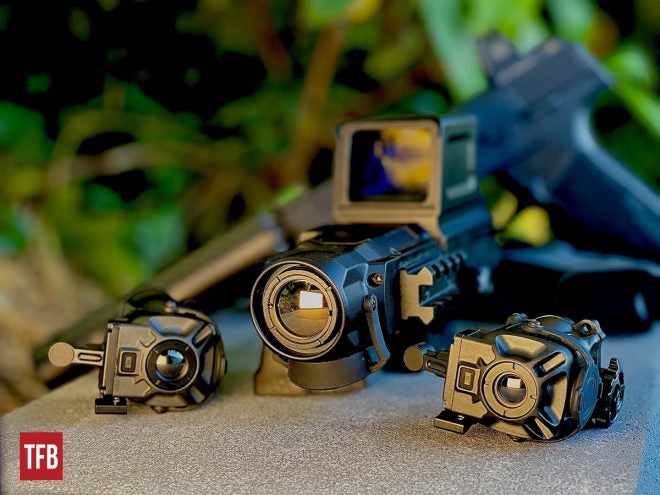
Clip-on thermal imagers by InfiRay. CE2 (right) offers a 384×288 thermal sensor and the C5 has 640×512. The knife is an automatic Microtech Cypher, with double serrations.

Let’s go through the two models and their main features:
InfiRay Clip 1 CE2 Clip-On Thermal Imager
The InfiRay Clip 1 CE2 features a 384×288 resolution, 12µm thermal sensor, 9,5 mm lens with a 50Hz refresh rate. It provides 20 degrees of thermal overlay (Field Of View). This model has an external battery pack (hence the “E” in the product name), which can be carried at the back of the helmet or on your body, to balance or reduce the overall weight carried on the helmet. The battery pack is said to offer 8 hours of continuous use. The user can calibrate the location of the thermal image so that it lines up with your analog night vision. I understand previous versions didn’t have this feature, but it works great on this unit. The display modes are White Hot, Highlight and Outline (aka “God Mode”).

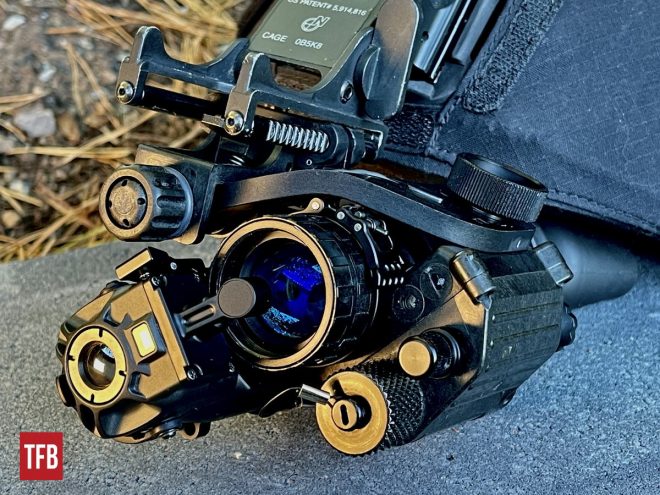
The Clip 1 CE2 is tiny, and probably the smallest thermal device I’ve ever seen. In fact, InfiRay claims it to be the world’s lightest clip-on thermal imager for night vision devices. It weighs only 78 grams, but it’s IP67-rated and very rugged. I’ve handled a few InfiRays lately, and I think the overall “feel” and surface finish are better on Clips and Jerries. The scroll wheel and button work really well, with a good tactile feel. Just be careful with the lens, don’t damage it!
The thermal detection range is said to be around 1000 meters, and the optical zoom is 1x. I didn’t have the possibility to check if the 1000-meter claim is correct, but knowing from other thermals, the performance seems reasonable.
The external battery pack of Clip 1 CE2 takes batteries like 17335, 18500 and 18650 according to the specifications. I had issues sourcing these batteries, so I used CR123s.

And now onto the next model, which has a higher specification (and price):
InfiRay Jerry C C5 Clip-On Thermal Imager
Overall, this model is very similar in shape, feel and finish to the CE2 described above, except it has an internal battery compartment and therefore is bigger. The thermal performance is greater, with a 640×512 resolution, 12µm thermal sensor, 11,5 mm lens and 50Hz refresh rate. It provides 30.5 degrees of thermal overlay (Field Of View), about 10 degrees more than the Clip 1. Most of the time I used it with the external battery pack rather than the internal. The image quality is great. Beware not to turn the batteries the wrong way on the C5.
The NETD value is rather high at ≤60mK, but since you’re mostly looking for a system like this to detect and discover things (where is the threat?), rather than to identify them in the first place, it works fine. NETD is like a “thermal contrast”, and a measure of how well a thermal imaging detector is able to distinguish between very small differences in thermal radiation “downrange”. The lower the value, the more fine details you’ll see (source). To compare, the best high-end commercial thermals today offer NETD values around ≤25mK, just remember that they’re gigantic compared to these units, and at least 5-6 times more in weight.
There are two main controls on the C5, one confirmation button and one multi-function scroll wheel. A long-pressing on the confirmation button will take you to the menu. There are three display modes: full thermal, highlight and outline. You also control the gain with the scroll wheel. There’s also a “Pulse Mode”, also controllable, which will make the thermal effect come in a gentle wave on and off so that you can see the difference between any thermal signatures and the analog image.
It’s pretty cool to discover all these features. I wouldn’t say that it’s difficult to set up, but it can be a little frustrating to change settings with miniature controls. Ideally, you want to control this directly with your thoughts, but we’re not there just yet!
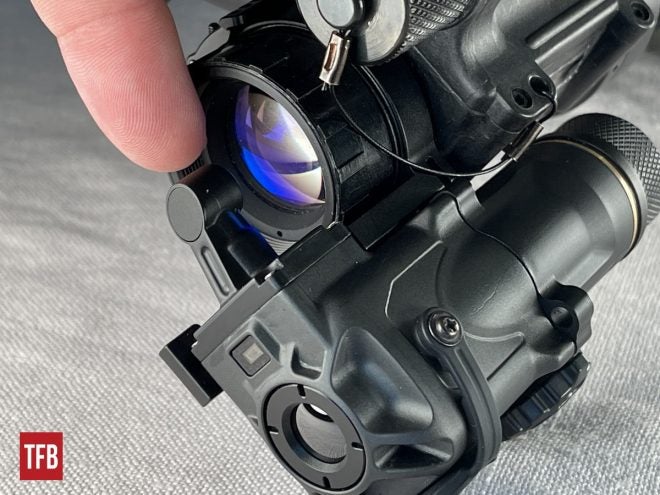
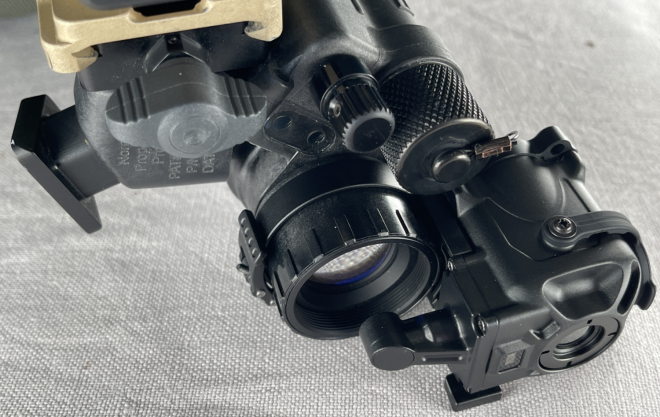
Below: Whoever invented this is a genius! Note the “injection” arm, giving you a thermal image on top of the NVG. I couldn’t find any information as to what kind of screen is being used, but it has to be tiny. Through the lens, you can control image calibration, background calibration and shutter calibration. There are also controls for image brightness, contrast adjustment and threshold adjustment. You can see part of the scroll wheel bottom right, with a click function.
Due to the miniature size, it can be a little tricky to configure them, and the software isn’t always logical, but you’ll get there. Note that it has to be dark for you to see the effects of the device at all. There is also an optional “viewing piece” that you can slide on if you want to configure the devices off the NVGs.
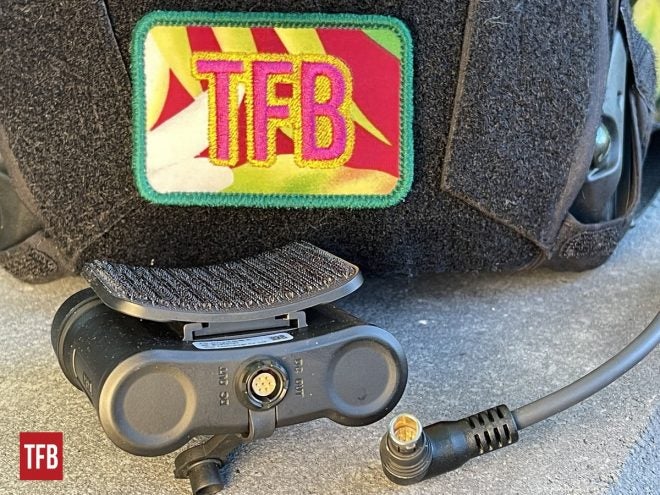
Below: The battery pack. Note the Velcro curved attachment point and high-quality contacts. All the signs of a high-quality product are there.
Below you will find various pictures from the testing and configuration.
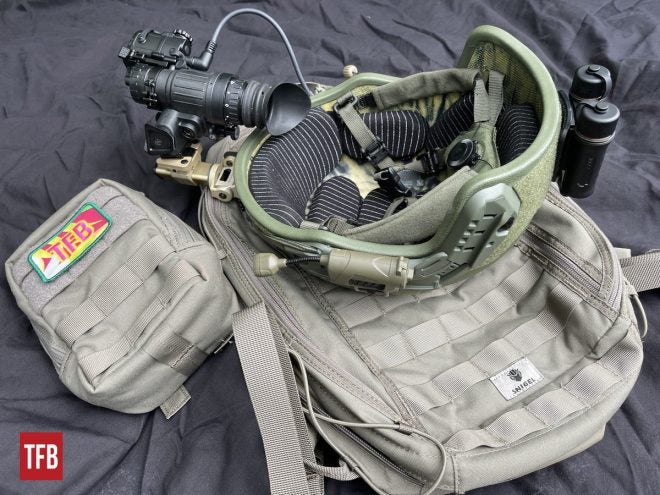
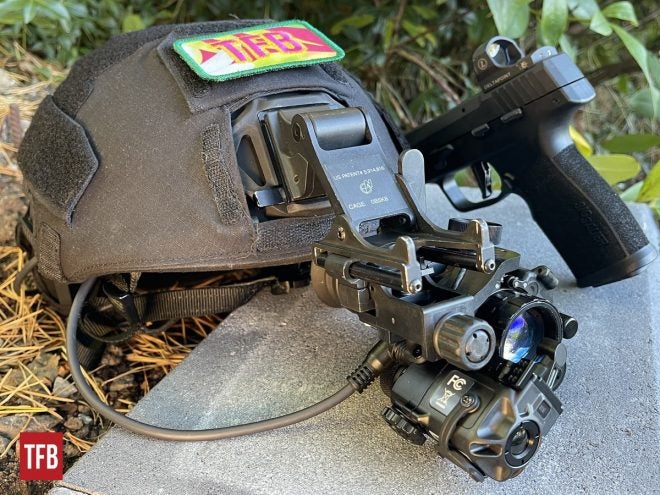
The green helmet is an ARCH Ballistic Helmet from Protection Group Denmark. The ARCH is  a high-cut helmet for ballistic protection according to
  NIJ IIIA, up to
  .44 Magnum. The weight is
  1.35 kg / 2.97 lbs (size Large). This helmet was bought at Varusteleka in Finland.
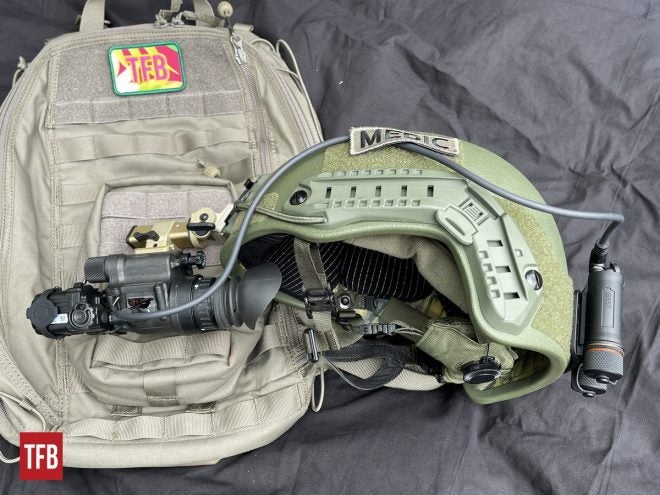
The backpack is from Snigel in Sweden, and is called “15-20L All pack“. At first, I was skeptical, but this backpack has grown on me and it’s now my favorite. It’s highly recommended.
Below: There are much better ways to arrange the cord than this, but you get the idea.

The operating temperature for these devices is between -40C to +60C. Note how Clip 1 blends in on the NVG and seems to be a natural part of everything.
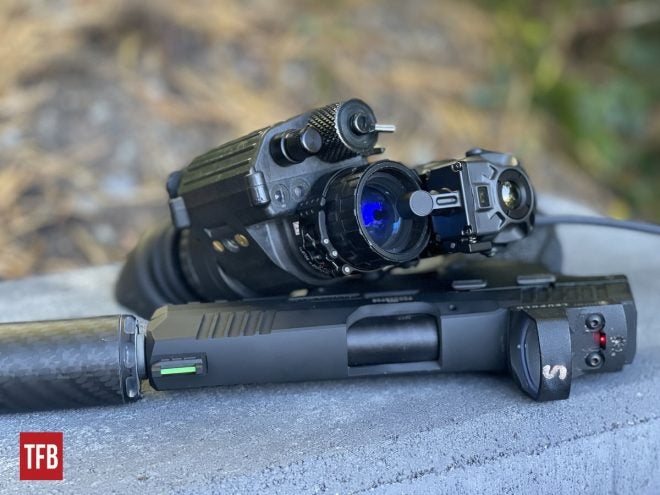

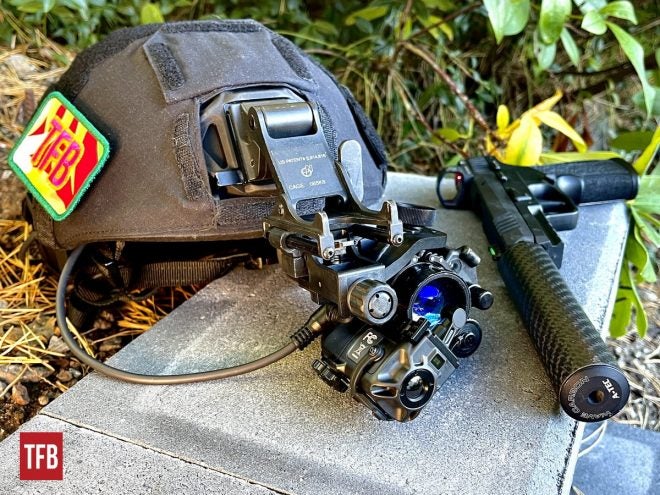
System setup. The pistol is a SIG Sauer P322 22LR, Leupold DeltaPoint red dot and an A-TEC Wave Carbon suppressor from Norway. The weight of the suppressor is only 88 grams, about the same as the thermal clip-on.
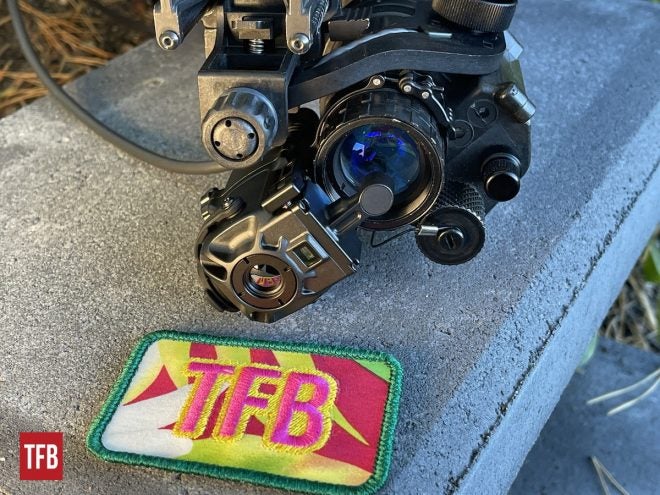
What do you think about the TFB patch?

I just love the combination of all the technologies here. Lightweight composites, fabrics, carbon, woven Aramid fibers, lightweight aluminum, analog and digital thermal night vision. The best from the digital and analog worlds to protect the user and allow him or her to operate at any time of the day (or night rather).
This black helmet is an Ops-Core FAST SF High Cut Helmet System, a tactical ballistic helmet.

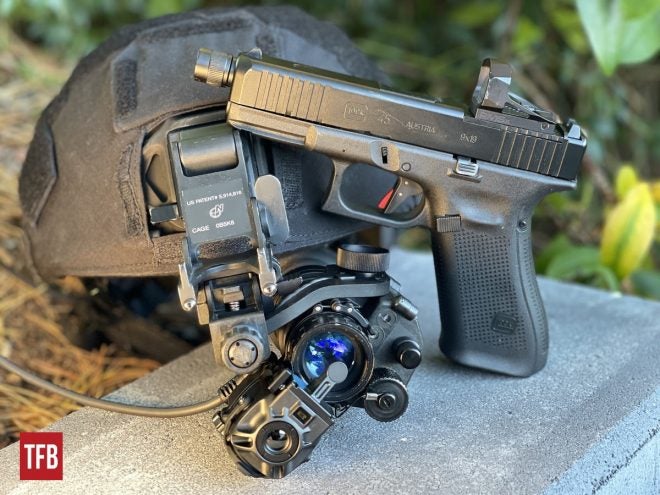
The Glock 45 MOS, FS (Front Serrations), TB (Threaded Barrel) in 9×19 mm. Note the Shield sight and Timney trigger. The best Glock on the market? (apart from the Glock 18, obviously). Just like the Glock has its upgrade and perks, the NVG has gone thermal…
Below: We also had the brand new InfiRay FAST FAL19 Thermal Fusion around, which is under review as well. The FAST FAL Holosight gives you a reticle with a thermal overlay that can be configured or turned off.
For a video, TFB’s Nicholas C tested the Clip 1 CE2 here:
The manuals are simple and sometimes the translations may come out as a little odd. You may get stuck with some issues here and there, but with some Google-fu and common sense, you’ll get there.

Below: From left to right: Infiray JerryC C5 (640×512 sensor), InfiRay FAST FAL19 Thermal Fusion Holosight (384×288 sensor, 19 mm lens) and Infiray Clip 1 CE2 (384×288 sensor).
Prices and Availability
When you hear terms like “the world’s smallest“, “thermal” and “night vision” together, you don’t really expect the expense to do anything but take a huge chunk out of your fundings. Sorry to say, this is no exception. But the money will also buy you some of the coolest things on Earth.
The price I’ve seen for the Clip 1 C2 is $2,699 (CAN). The JerryC C5 goes for $4,199. Cold Harbour Supply in Canada has a very good website for these devices: https://coldharboursupply.com/
The Clips are also available for purchase here and here, and you can find a direct link to the Clip 1 here. (US $3,199.00 at the time of writing).
The devices are made by IRay Technology Co., Ltd., in China. There seems to be a standard 2-year warranty on these devices.
Conclusion
If you own analog night vision, this is a great way of upgrading your system for thermal fusion. In simple terms, it’s a product line that should attract a lot of TFB readers. If you don’t have anything yet, but looking at getting night vision for your helmet, and have the means to go “all in”, you should consider these InfiRay thermal upgrades as well.
What’s not to like? It’s pretty easy really: They will set your economy back a few months (or years), and they add some weight and a little bulk to your helmet. They can also run out of batteries. Given all the advantages and how cool they are, if you can afford them, I’d say go for it. This is about as much fun as you can have in the dark.