 Your Privacy Choices
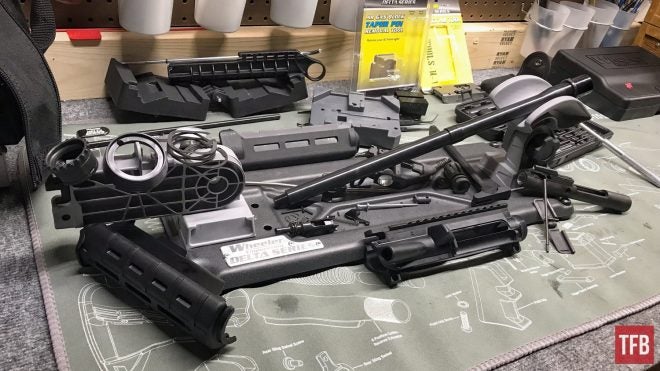
Welcome everyone to the TFB Armorer’s Bench! As mentioned in the little blurb, this series will focus on a lot of home armorer and gunsmith activities. In this article sponsored by Wheeler, Tipton, Caldwell, and Frankford Arsenal, we’ll show how to completely disassemble an AR15 upper receiver. I am well aware that most of the folks who pass through these parts are into the new, cool, and tacticool. I personally love older and obsolete stuff but I also like to take things apart and put them back together. That being said we here at TFB thought it would be nice to have a resource available for disassembling and assembling an AR15. Smith & Wesson was gracious and kind enough to help us out and sent us one of their Sport II models. Now that we have taken apart our Lower Receiver and Bolt Carrier Group we can jump into the AR15 upper receiver disassembly. Let’s dive right in!
Disclaimer: It is stating the obvious when I say do not attempt this if you do not have confidence you can. There is no shame in not taking your gun apart. Consult a competent gunsmith/armorer for advice or if they would do the goal you wish to achieve. Refer to the first Armorer’s Bench article So, You Like Taking Guns Apart? where we talk about knowing your limitations.
TFB Armorer’s Bench: Complete AR15 Disassembly – Bolt Carrier Group
Welcome to our recurring series of Armorer’s Bench which is made possible and brought to you by Wheeler, Tipton, Caldwell, and Frankford Arsenal who are our sponsors. Here, we at TFB hope to inform, entertain, and even inspire any would-be gunsmith or armorer out there. Ideally, with the information I provide and with the help of our sponsors, you can have some useful knowledge pertaining to the conservation and improvement of firearms technology while at the same time sharing experiences and teaching each other new tips and tricks along the way in the comments. Digging deep into what it is to be an armorer or gunsmith has significance but what is important is what those people do to show they’ve earned that title. I am happy to share my experiences and knowledge and hope it is informative!
Make your personal safety a priority:
- Practice proper gun safety. Always make sure before the firearm hits your bench that it is unloaded and safe to be handled.
- Wear the proper safety equipment. The main one would be safety glasses (decent ones) since parts are often under spring tension and you may work with high RPM tools. Other honorable mentions would be latex gloves or a respirator when working with potentially harmful solvents and oils. Also hearing protection when working with loud machinery or test-firing firearms.
- Modifications, alterations, and customizations will void your firearm’s warranty 9.5 times out of 10. Please take that into consideration before attempting any at-home gunsmithing.
- If you are unsure about proper safety practices, disassembly procedures, or warranty standards, stop, put down the tools, and consult a competent gunsmith.
Step One: Complete AR15 Disassembly – Upper Receiver
If you haven’t already make sure to remove the upper receiver from the lower receiver, make sure that the bolt is not locked to the rear before attempting to remove the receivers. Removing the upper from the lower can be done by first pushing out the takedown pin at the rear till it becomes captive and then doing the same to the front pin called the pivot pin.
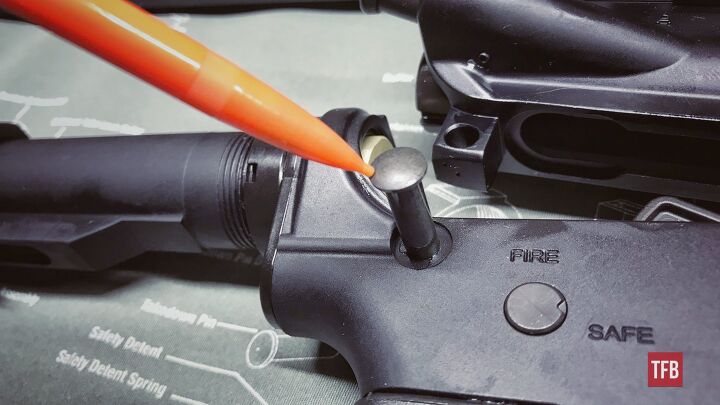
By doing this the upper can be lifted off the lower.
Step Two: Complete AR15 Disassembly – Upper Receiver
With the upper off the lower, we can take out our bolt carrier group and then the charging handle. Start by bringing your charging handle all the way back till it stops and then remove the bolt. If you missed the BCG disassembly article, it can be found at the link here.
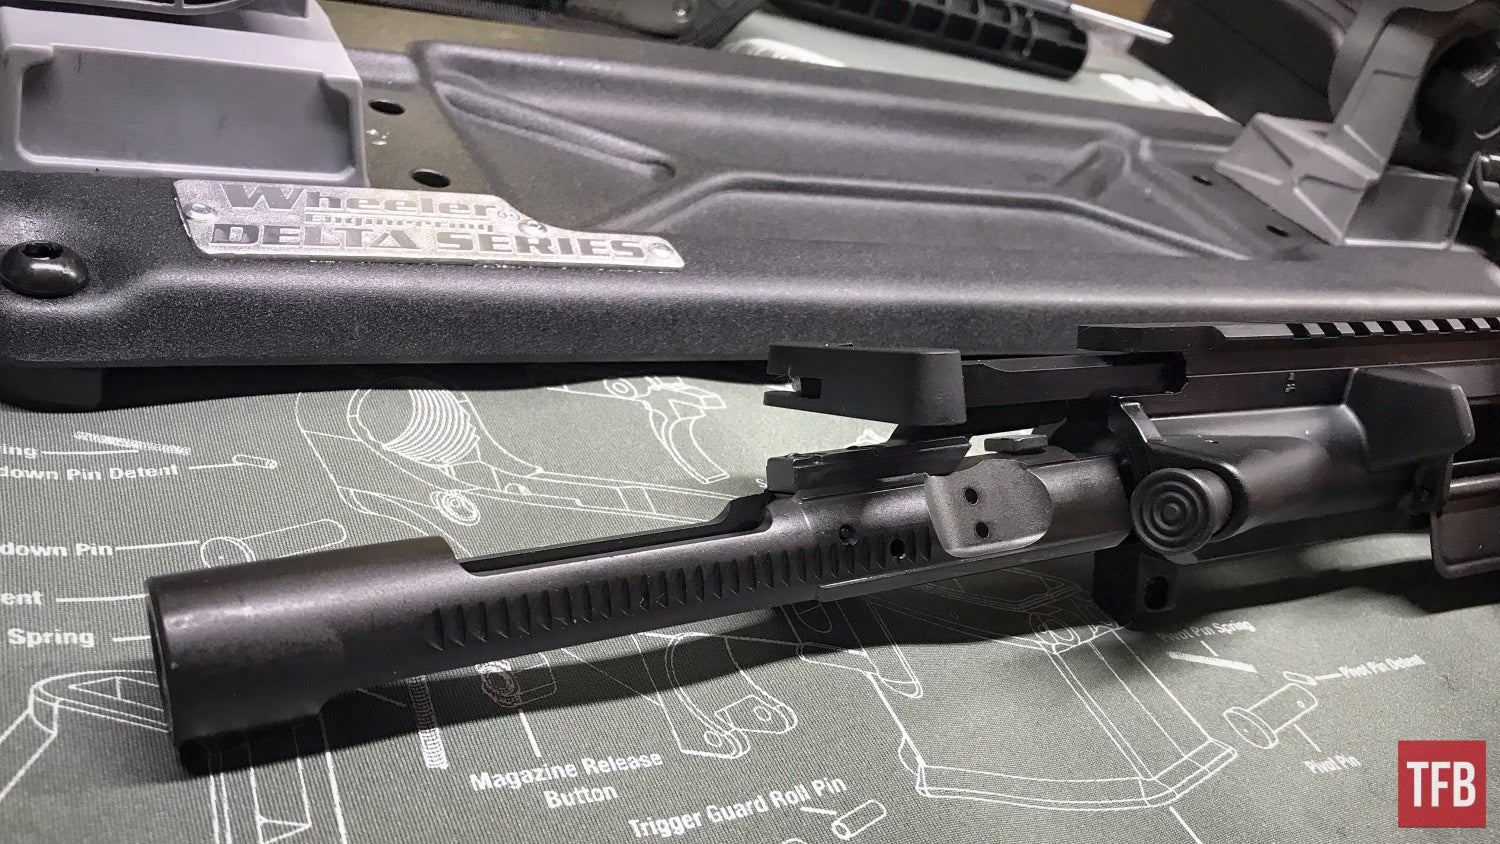
After the bolt is removed you can take the charging handle out by letting it fall out of its cutout and brought to the rear.
Step Three: Complete AR15 Disassembly – Upper Receiver
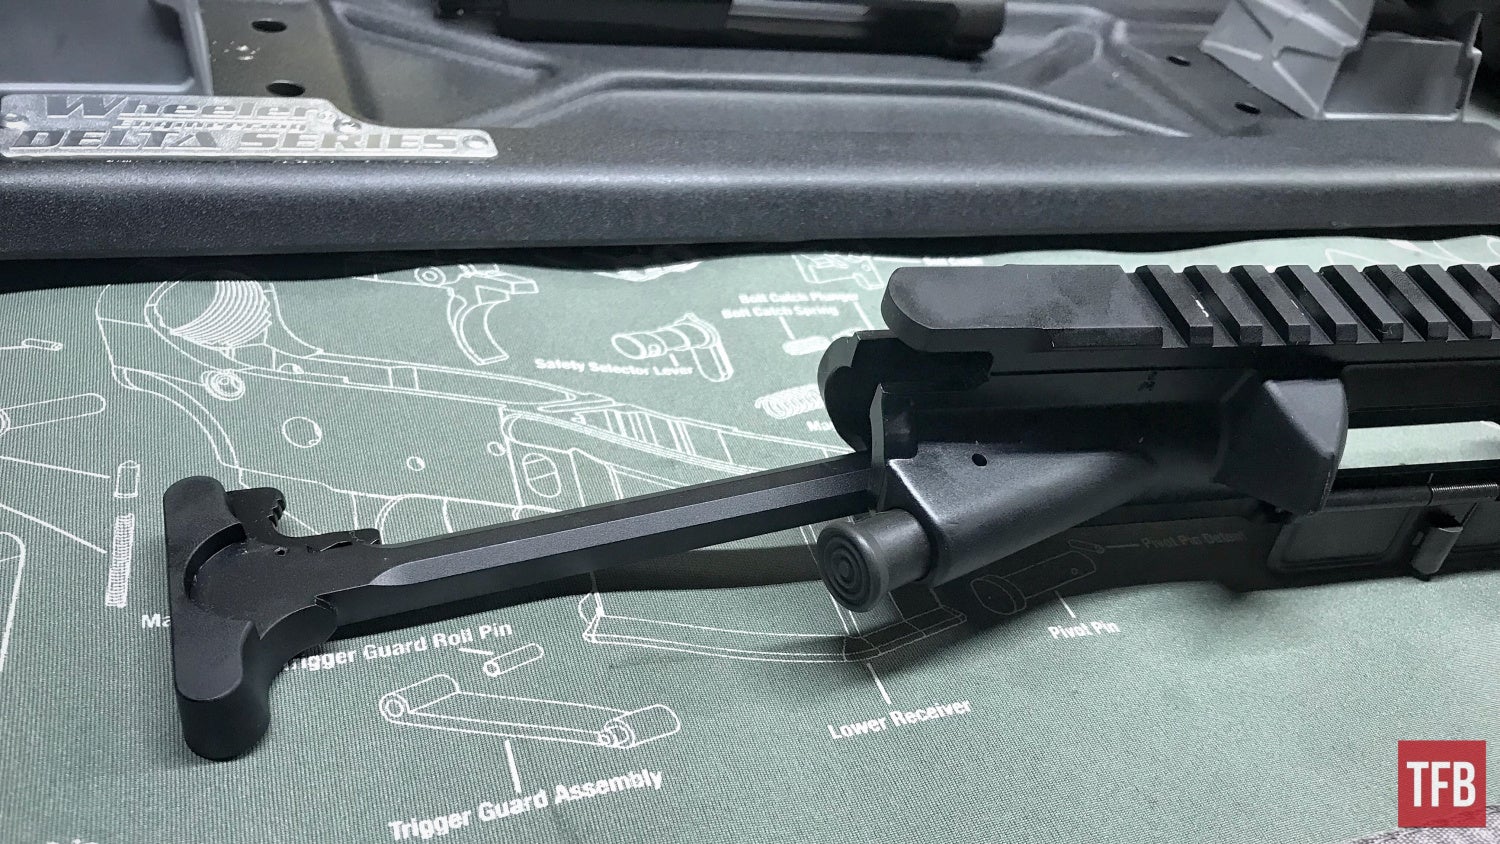
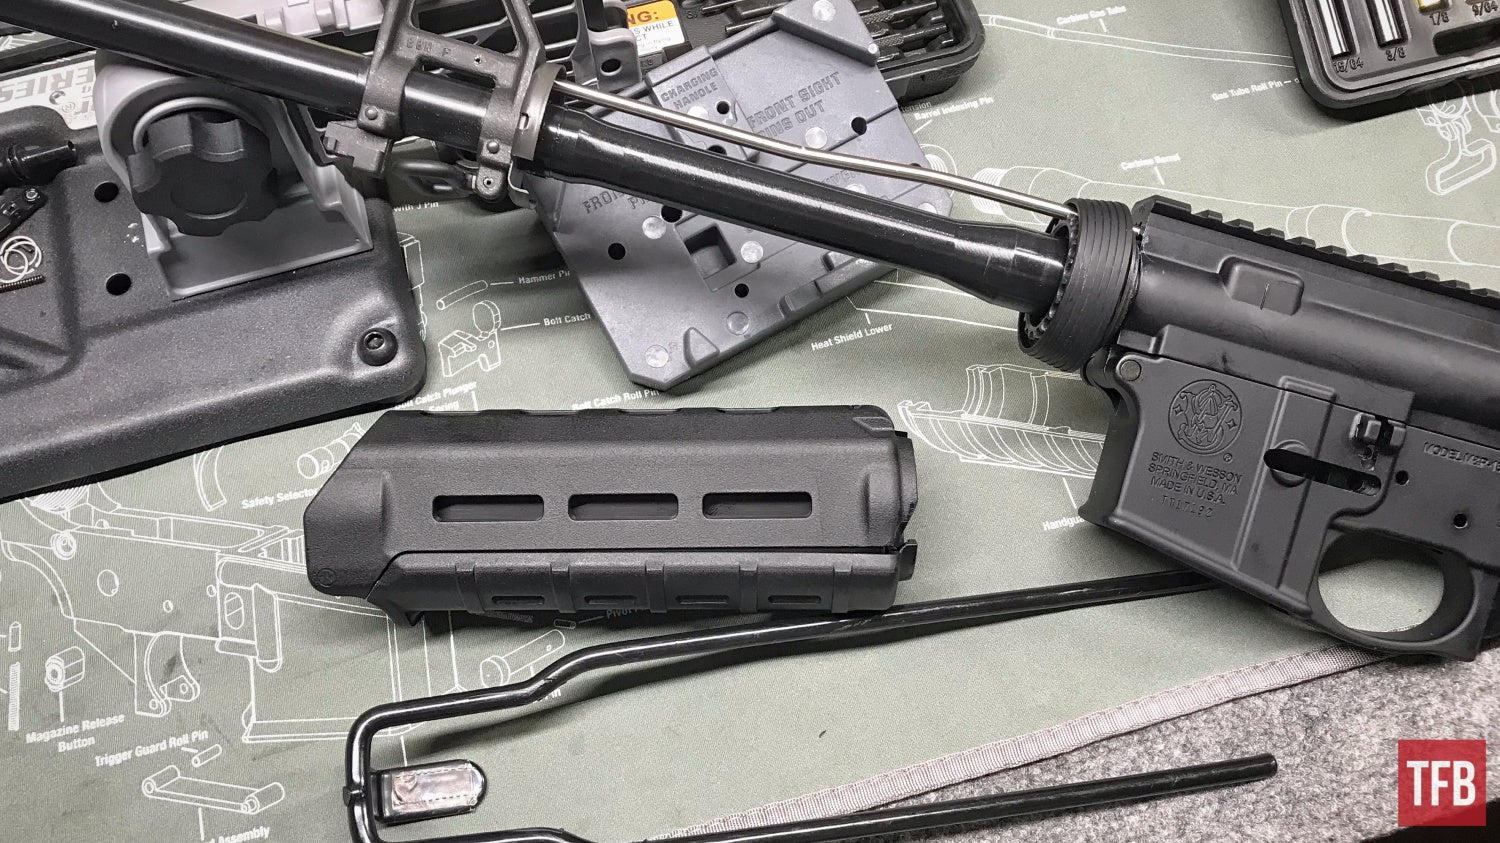
With the main guts removed from the upper, we can move to the handguard. If you have a free-float handguard you will have to skip this step till later or just loosen whatever screws secure the handguard to its barrel nut.
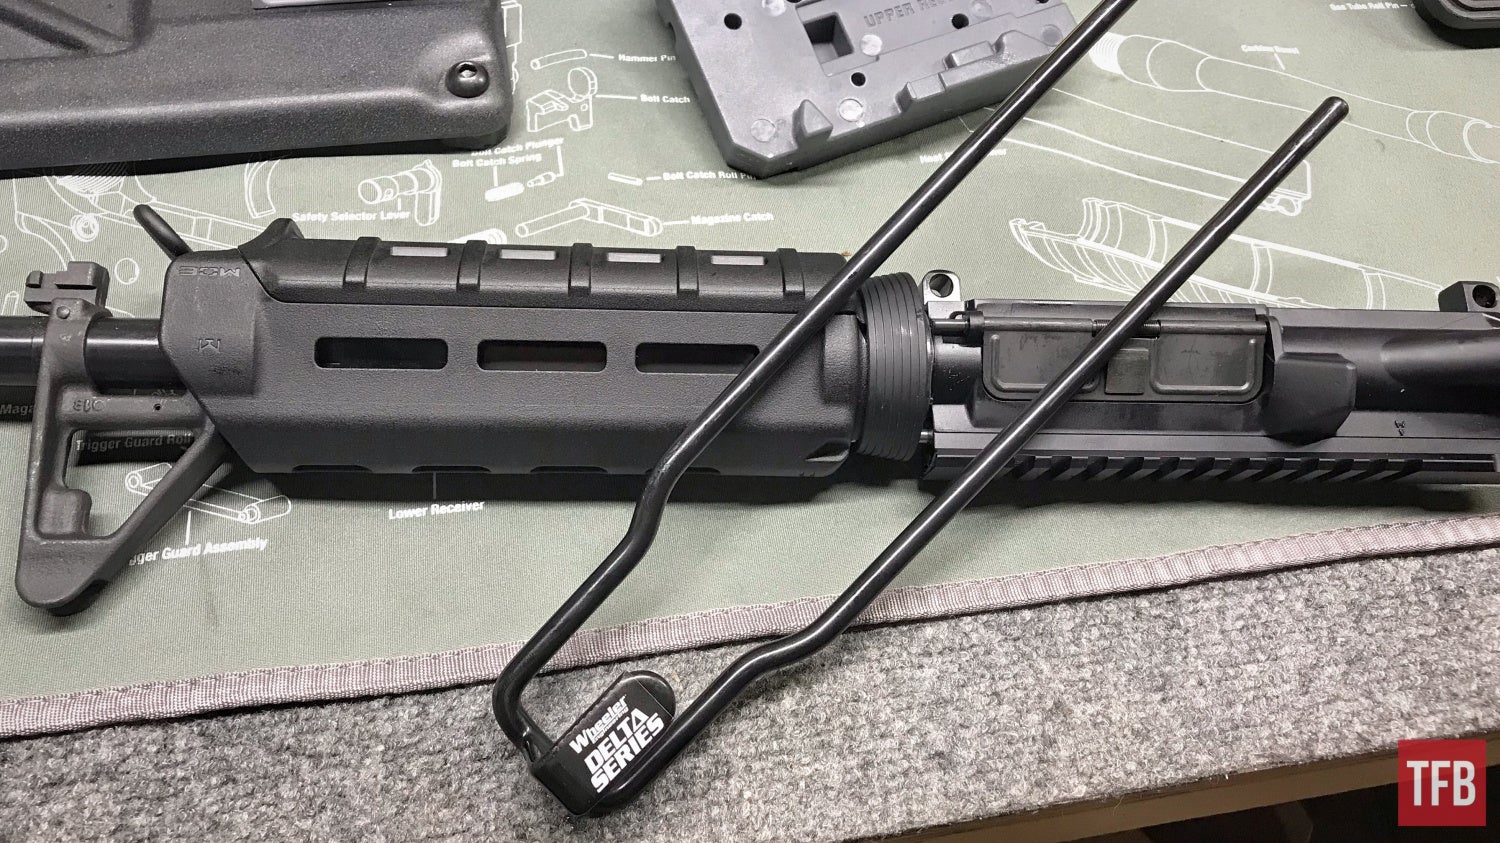
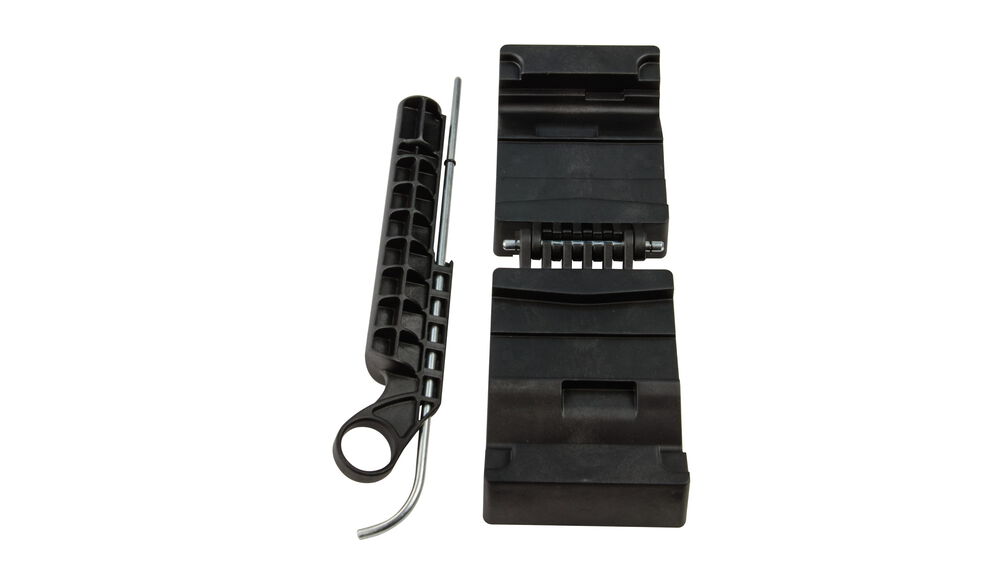
This handguard is one that utilizes both the delta ring at the rear and a chunk of bent sheet steel at the front secured by whatever gas block is there. I used a handy handguard removal tool that Wheeler offers and included in their armorers kit. Without the tool, you use your hand to pull back on the delta ring in order to free one end of the handguard. This can be stiff especially on newer tighter guns so the aid of leverage with this tool makes a world of difference.
Note: The lower does in fact need to be present and attached to the upper receiver in order for THIS tool to function properly. It relies on the mag well for its leverage. No lower parts beyond the pivot pin and takedown pin need to be present. Obviously, if you decide to do this by hand you can skip putting the lower on.
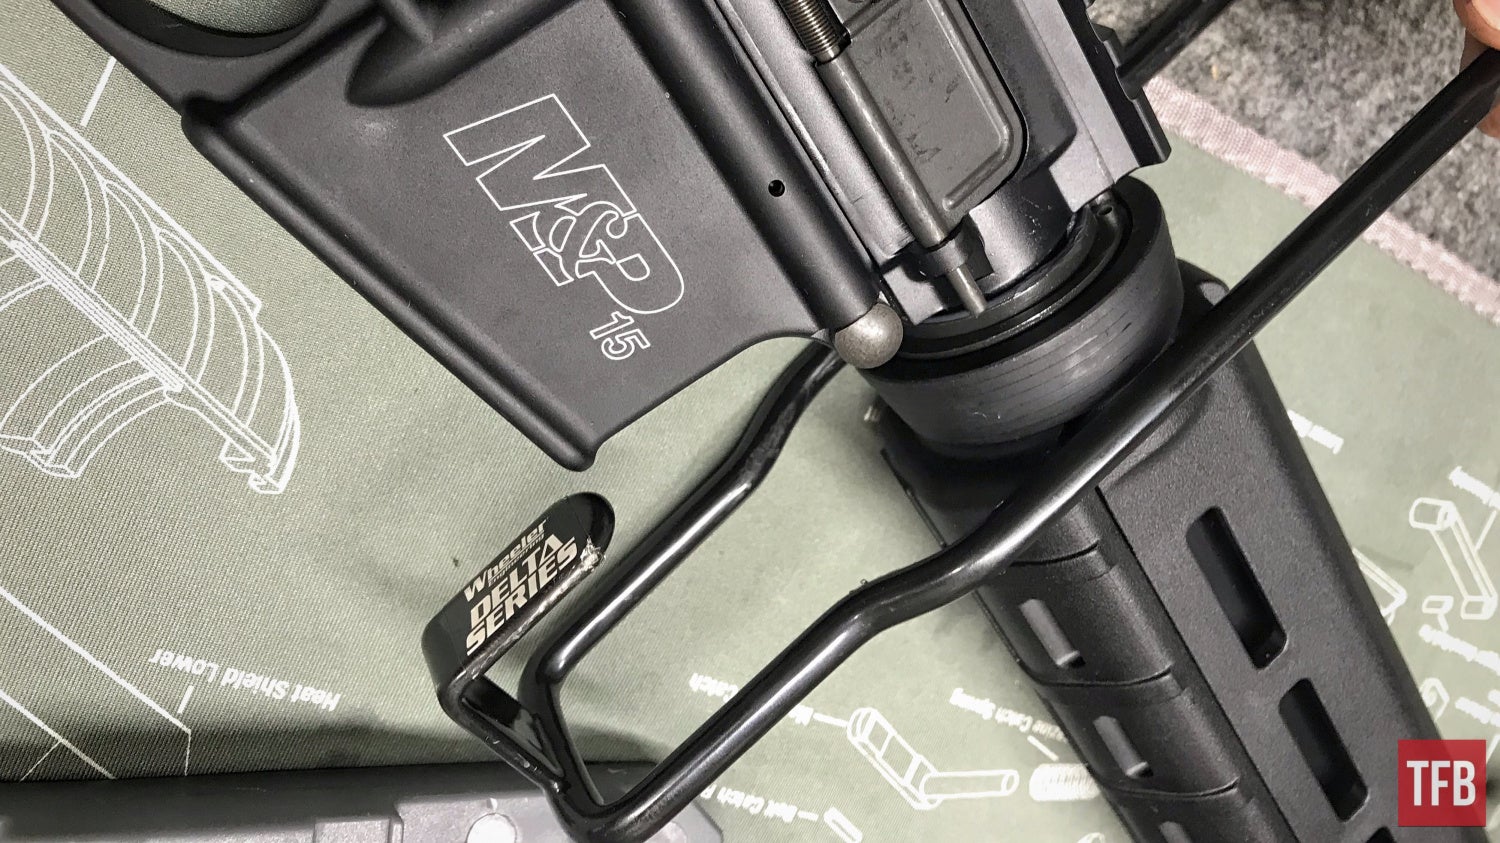
Hook the flat lip of the delta ring tool in the inside front face of the magazine well like in the photo shown below. Take note of how the arms of the delta ring tool are situated on the delta ring.
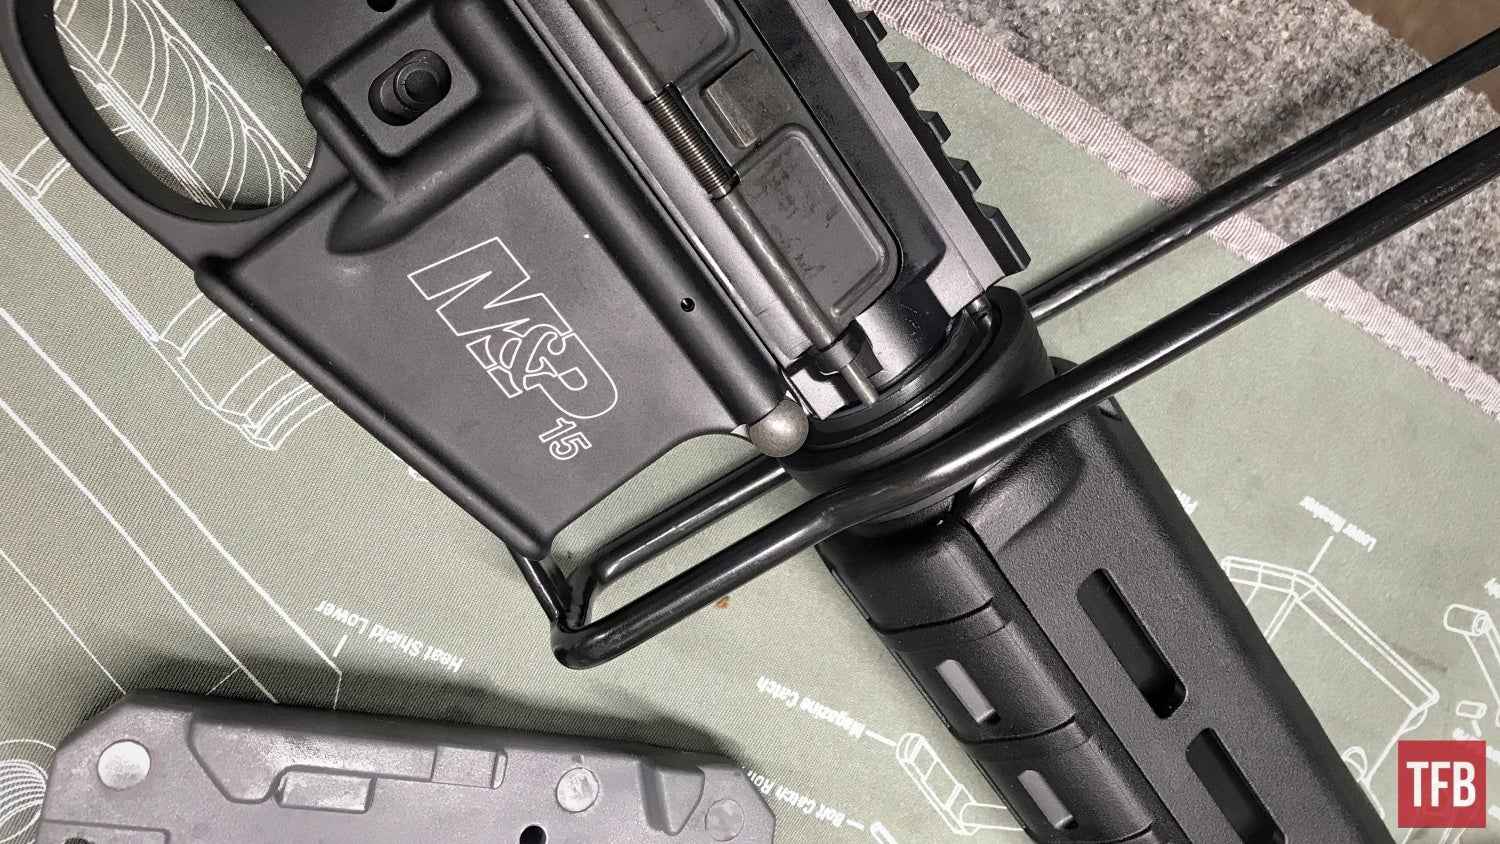
Using the two long arms and grasping them tightly you can lever toward the receiver in order to depress the entire delta ring. This will free up one end of the two handguard pieces.
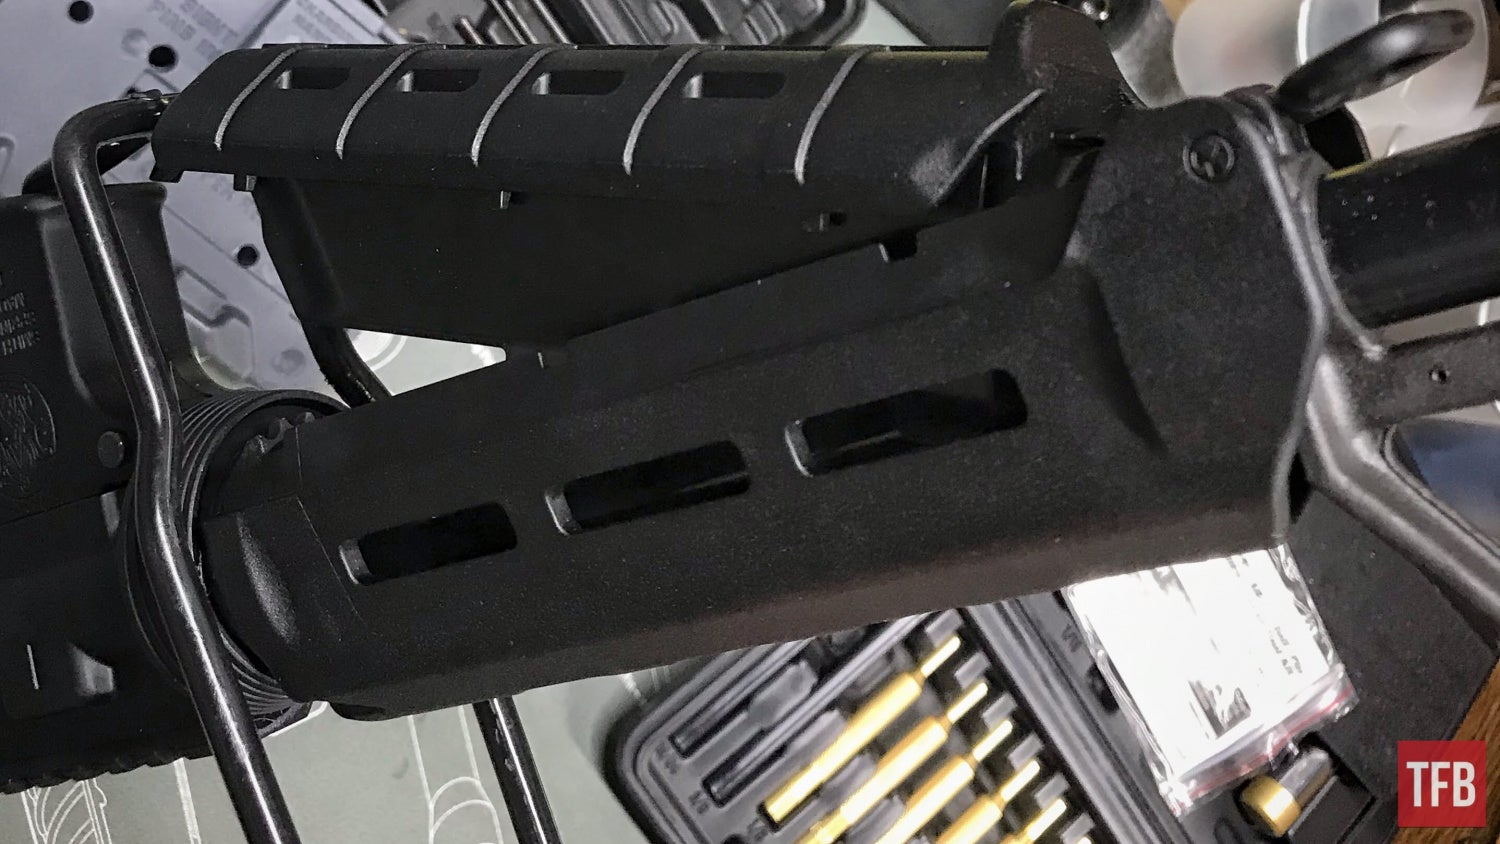
Pivot out both halves of the handguard to remove them. Take note of the gas tube and make sure not to bump or bend it while it is out in the open.
Note: If you are new to this, the gas tube may already look bent and that is because it is supposed to be bent in the way it sits currently. Do not straighten out your gas tube! It is bent how it is, so it is able to properly insert into the upper.
Step Four: Complete AR15 Disassembly – Upper Receiver
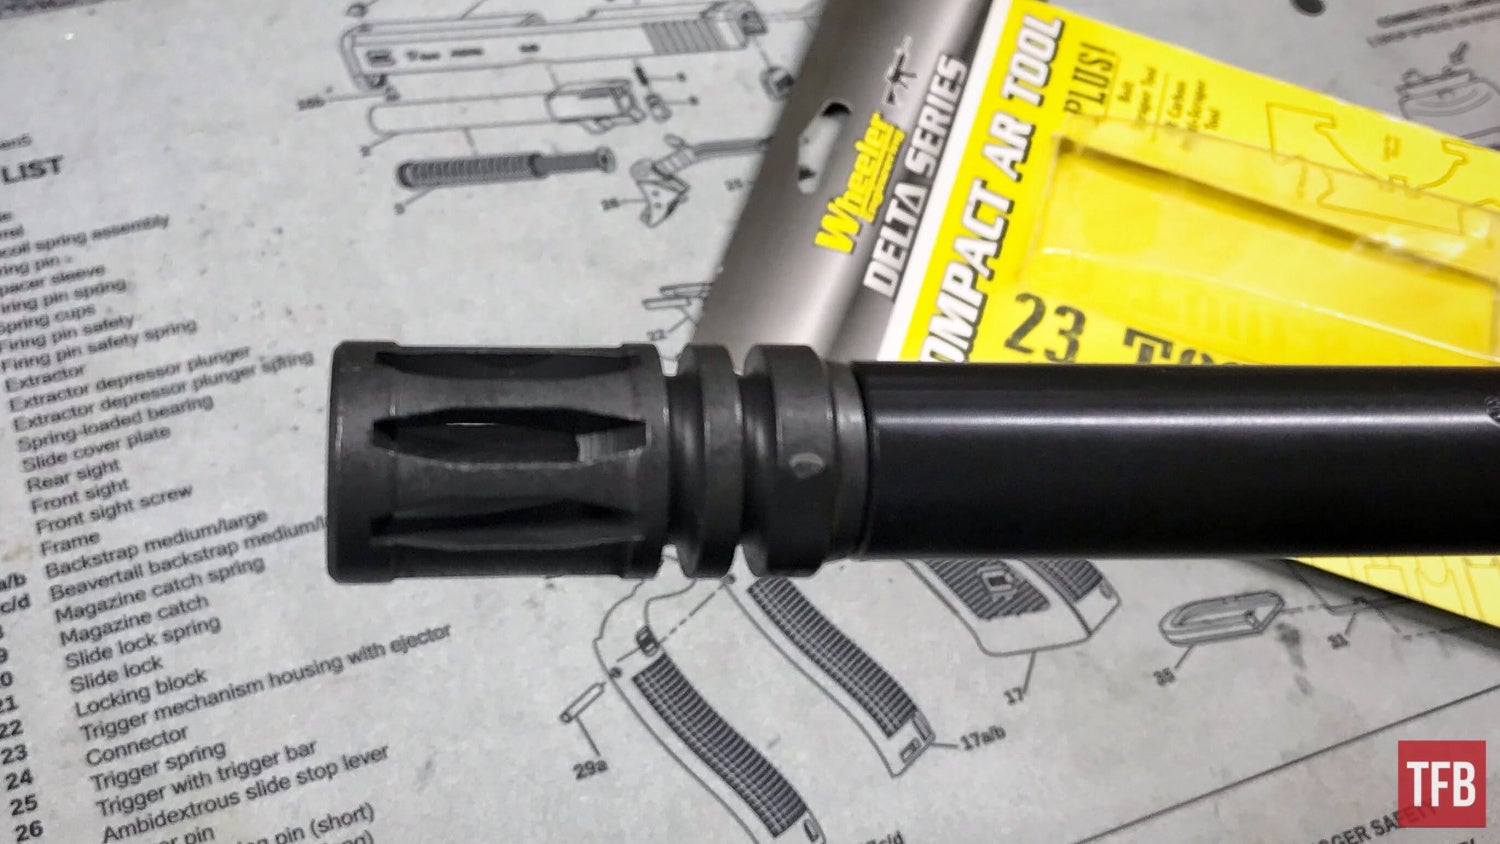
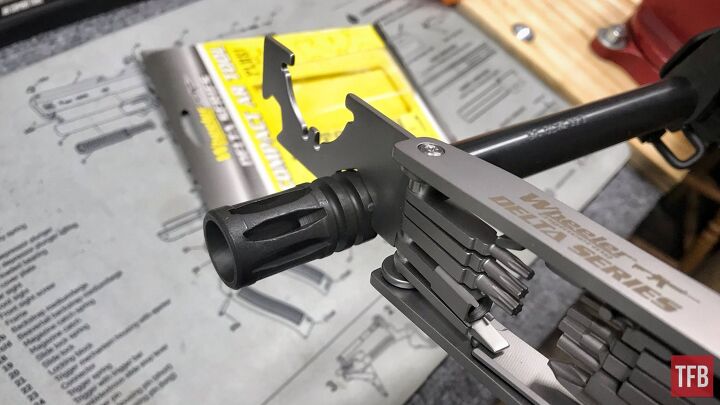
This portion is entirely dependent on the type of muzzle device that is on the upper receiver. This one has a very generic birdcage or A2 flash hider and crush washer. Some muzzle devices may require you to use two separate wrenches in order to remove them.
In order to best disassemble things on the muzzle end of the upper receiver, it is safer for you and the upper to have it clamped into a vise with the aid of a vise block or jig. The Wheeler AR15 Armorers kit comes with a fantastic set of blocks.
Note: There are upper inserts that are made to prevent the crushing and twisting of a receiver within a vise block. These are recommended as well.
The birdcage has convenient flat sides in which a ¾ wrench can be applied to remove it. Looking from the muzzle end you rotate it left or counterclockwise.
Note: Most AR15 armorer wrenches will have this feature built-in but there are also bits that can be bought and inserted into the birdcage itself and then applied with a wrench with the correct insert end. I used a compact AR15 multi-tool by Wheeler just to test out how well it works and it did just fine!
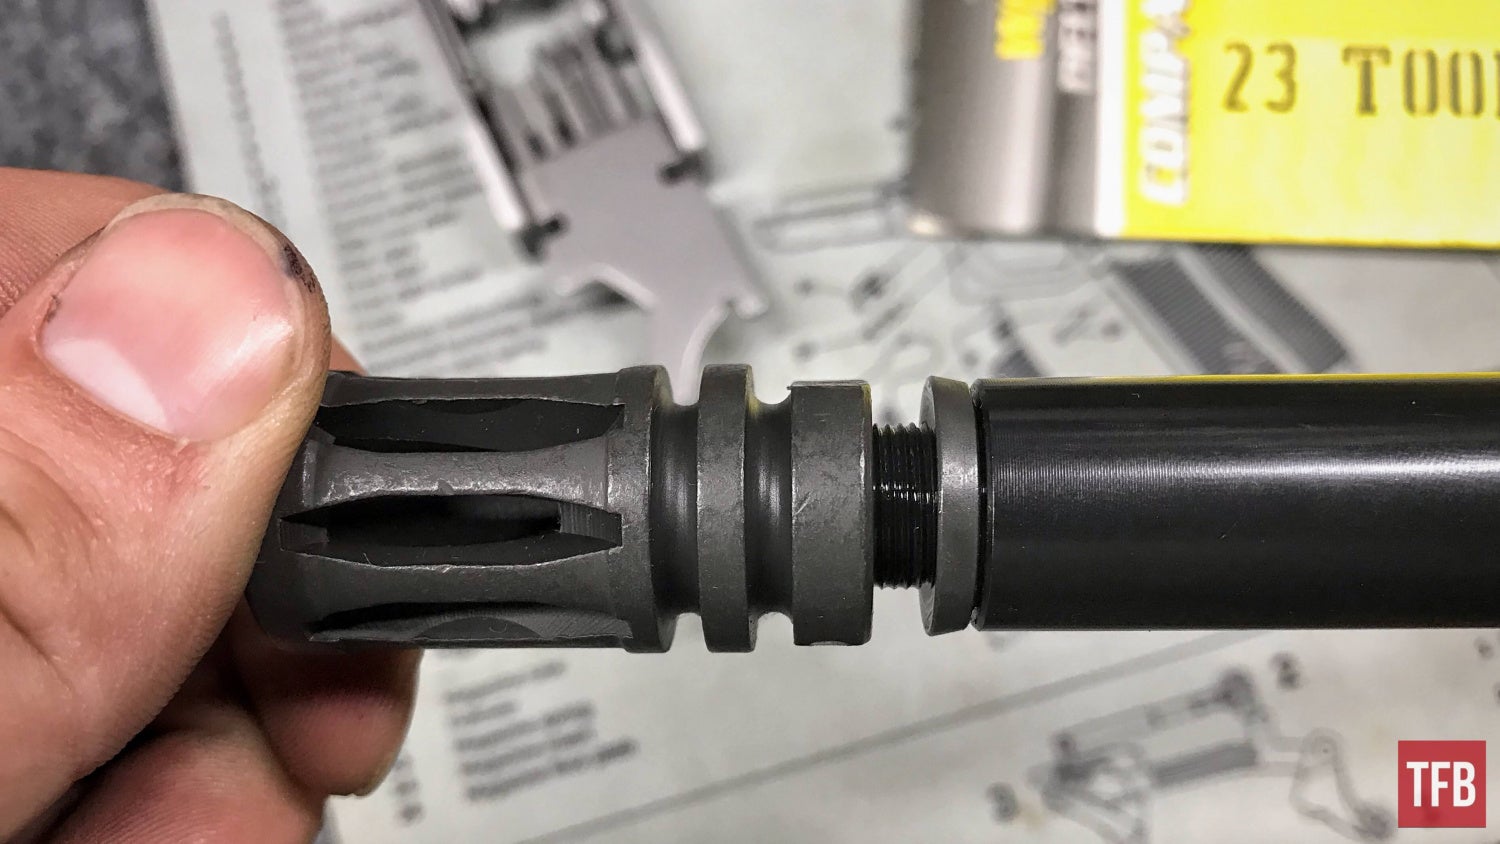
With the A2 flash hider off of the muzzle, it is good to take a look at how the crush washer is orientated for future or later assembly. The wider and also concave side faces the muzzle device while the flat side faces the barrel.
Step Five: Complete AR15 Disassembly – Upper Receiver
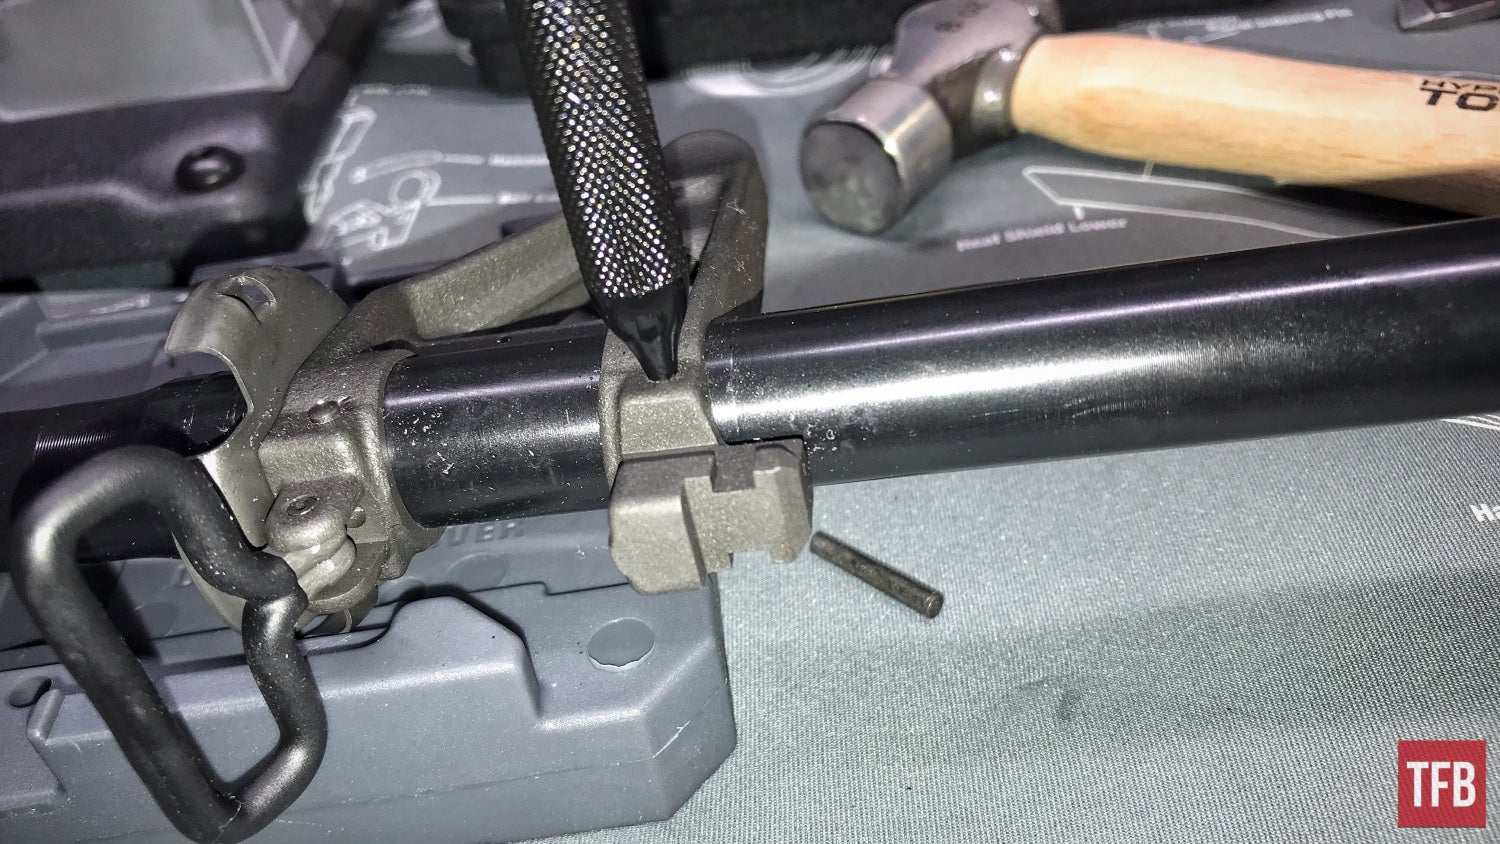
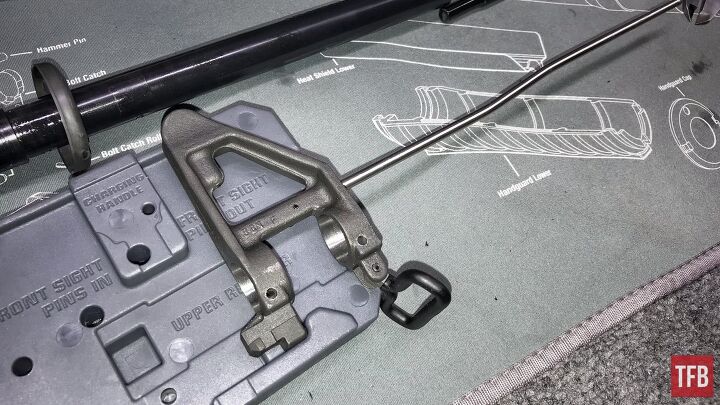
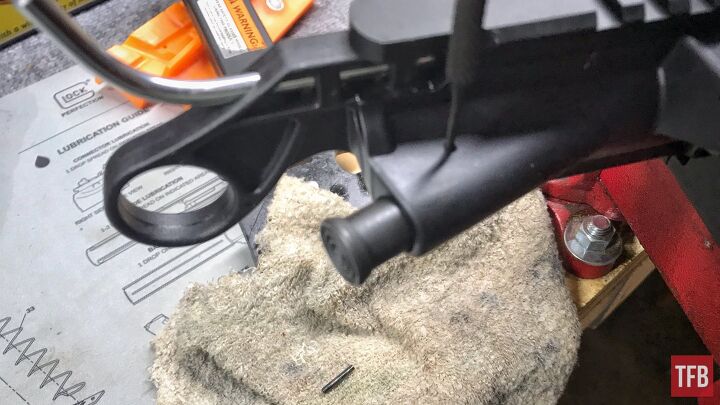
Now onto the dreaded gas block removal! This portion is something that gives everyone a headache and is probably the number one AR15 disassembly-related problem I see customers having when they come into our shop with a problem, especially with these A2 gas block front slights. The reason for all the agony of the A2 is the two tapered pins (these only go in and come out one way) you see at the bottom of the gas block. One is located just above the bayonet lug and the other is just above the sling swivel.
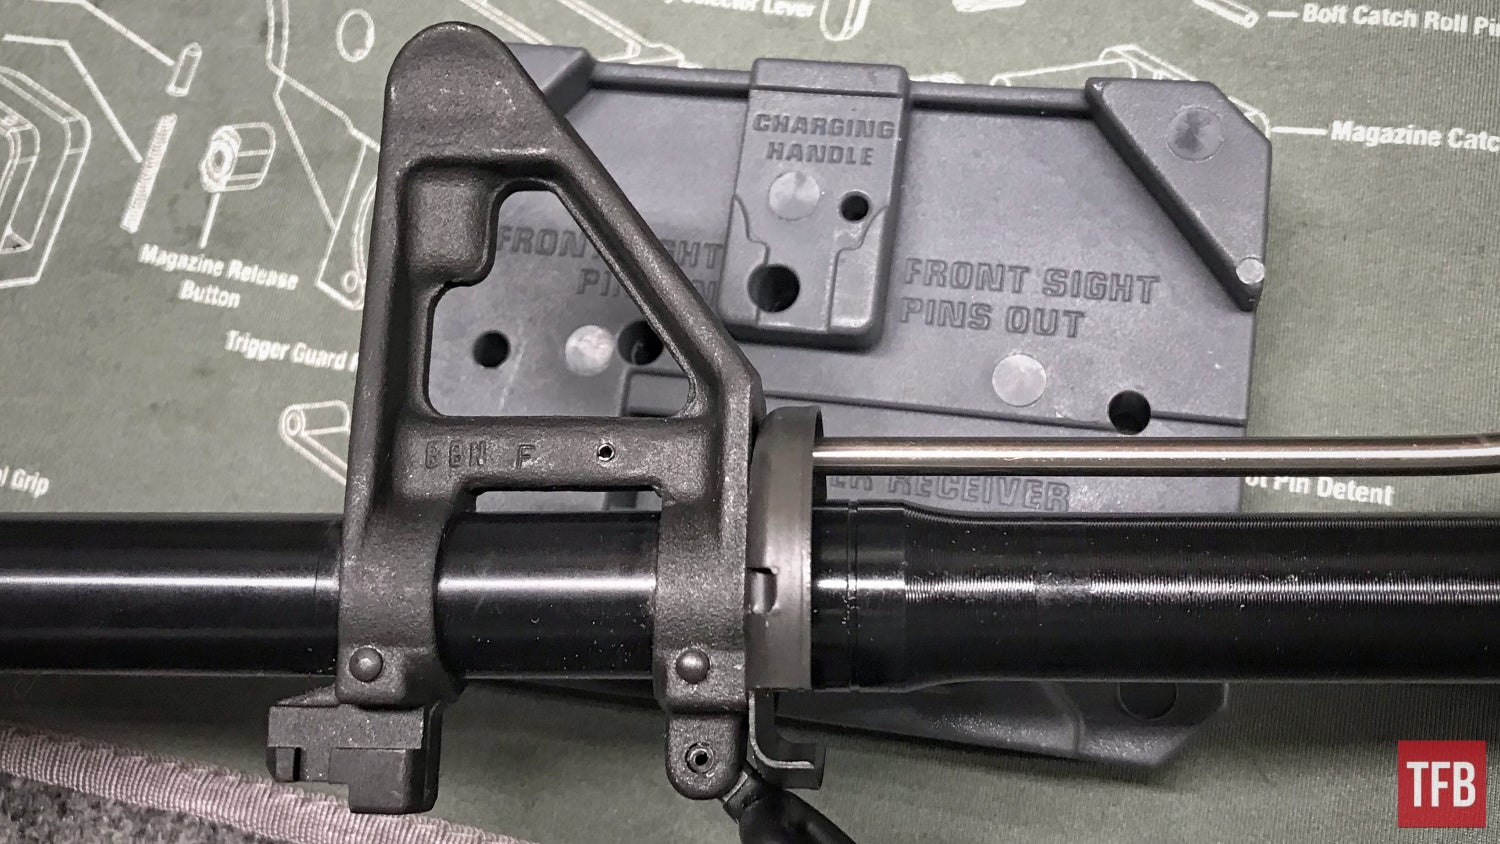
Wheeler offers yet another extremely useful tool in the AR15 bench block which has a cut-out for the A2 style sight. It even has holes to capture punched-out pins perfectly where they need to be. One downside is that I could not use the bench block as intended since Smith & Wesson’s tapered A2 gas block pins are inserted the opposite as other AR15s or at least the batch that I have seen. I double-checked that this was not just a fluke at work and sure as can be the ones there were the same. The most common way that these pins come out is left to right.
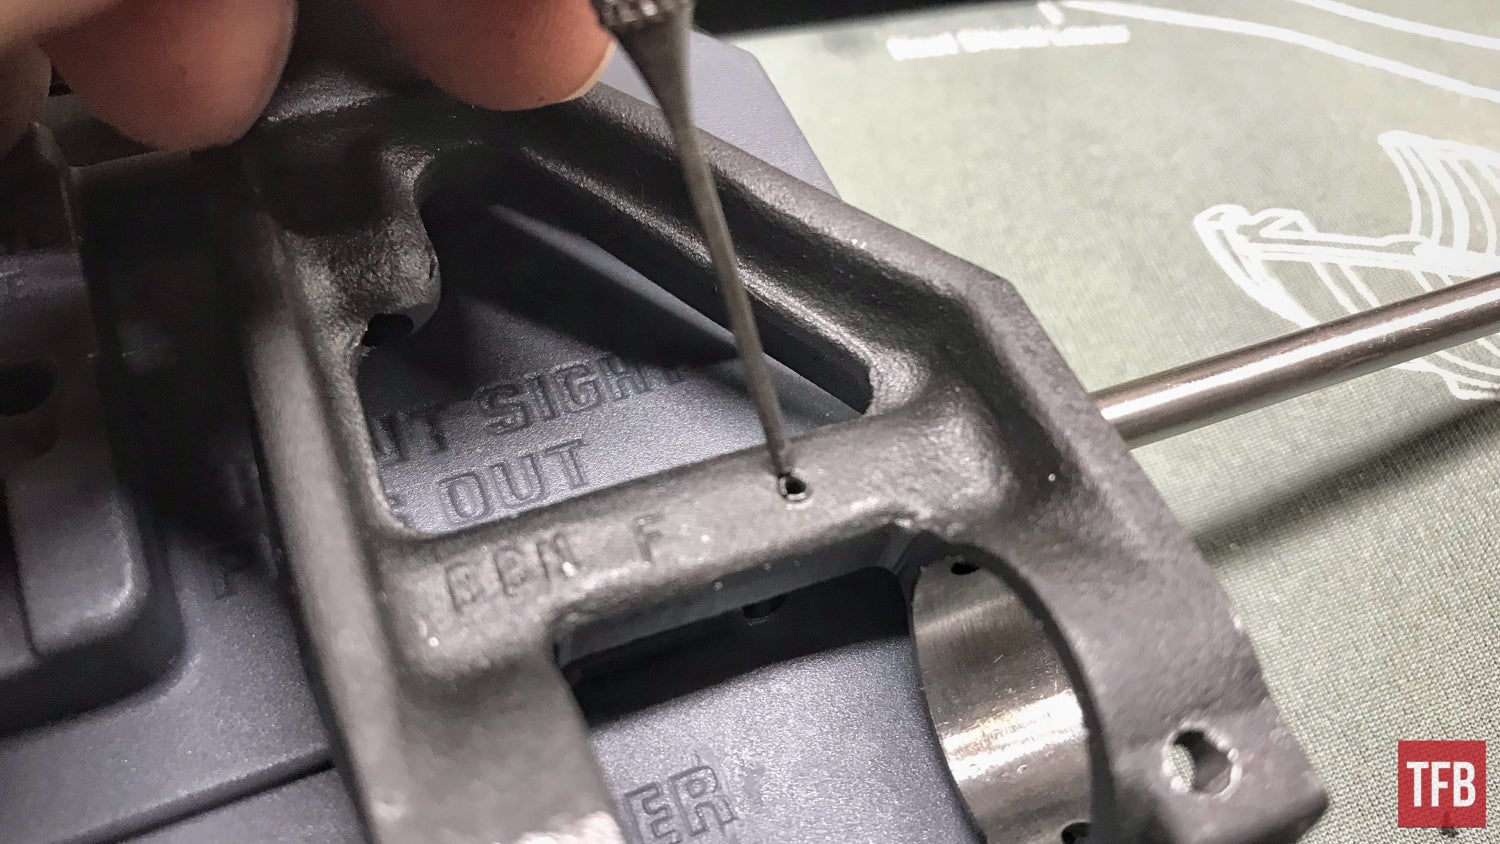
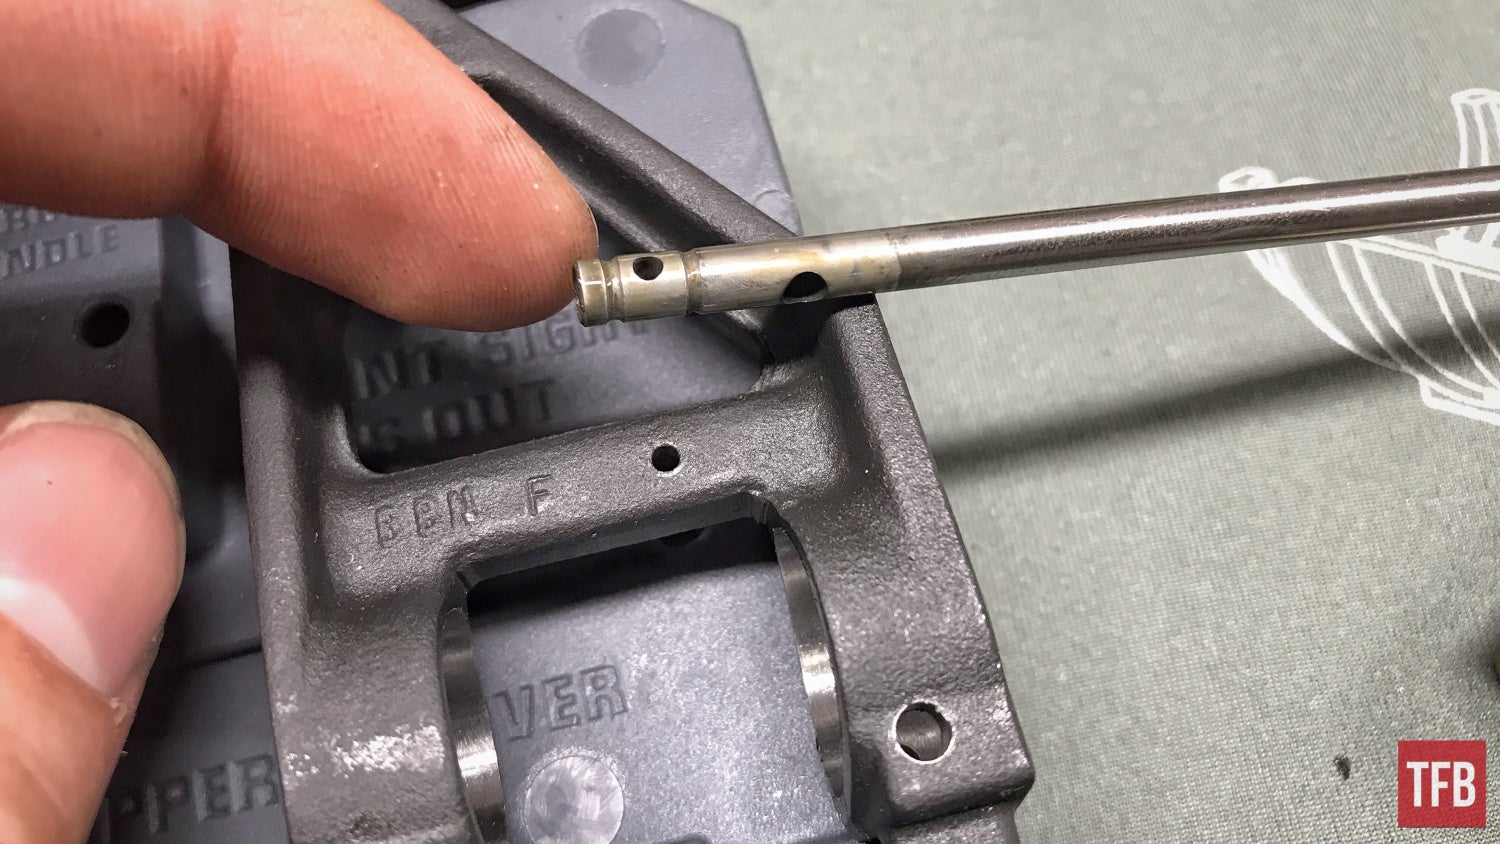
Note: Double checking which way these pins are intended to come out is a very smart thing to do because it will save you from a lot of pain and anguish. The big tip here is to simply use a caliper like this one from Frankford Arsenal to measure the ends of the pins on each side. This is how I made sure that I was not going to just force these pins in deeper.
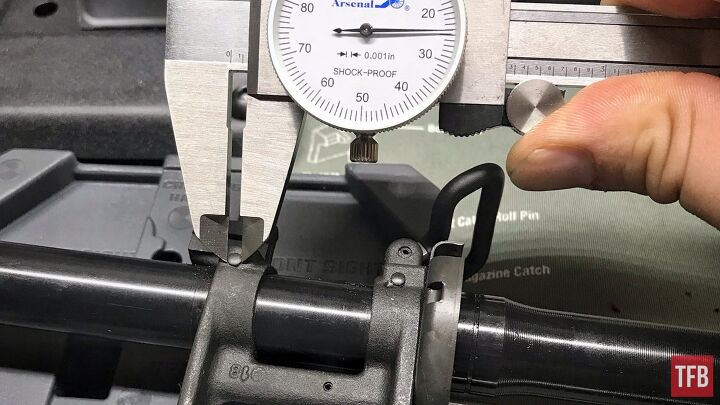
Right side of the gas block. On this gun these pins are smaller than the left.
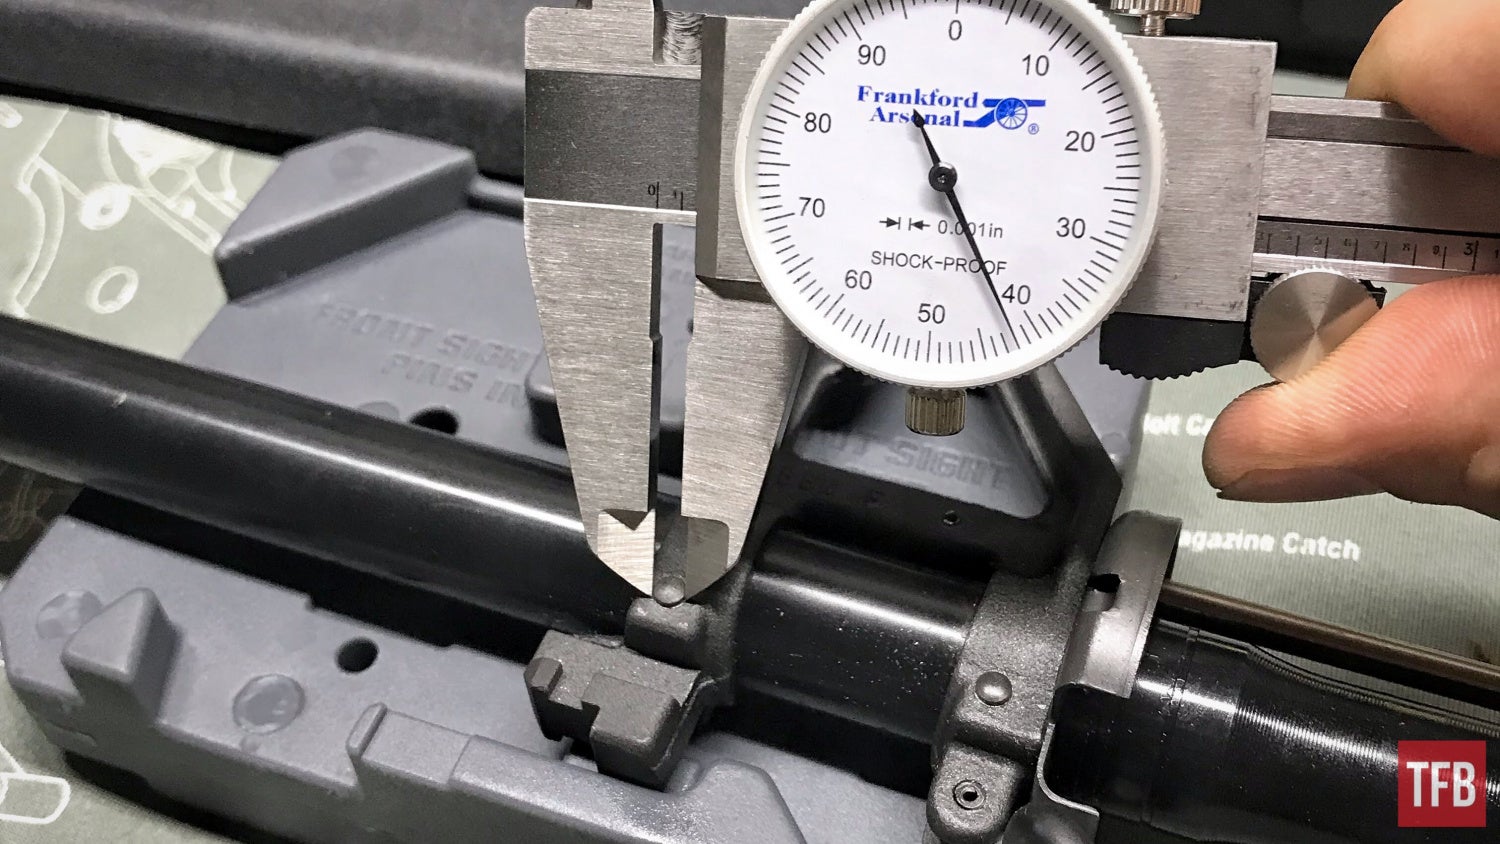
Left side pins are larger on this gun.
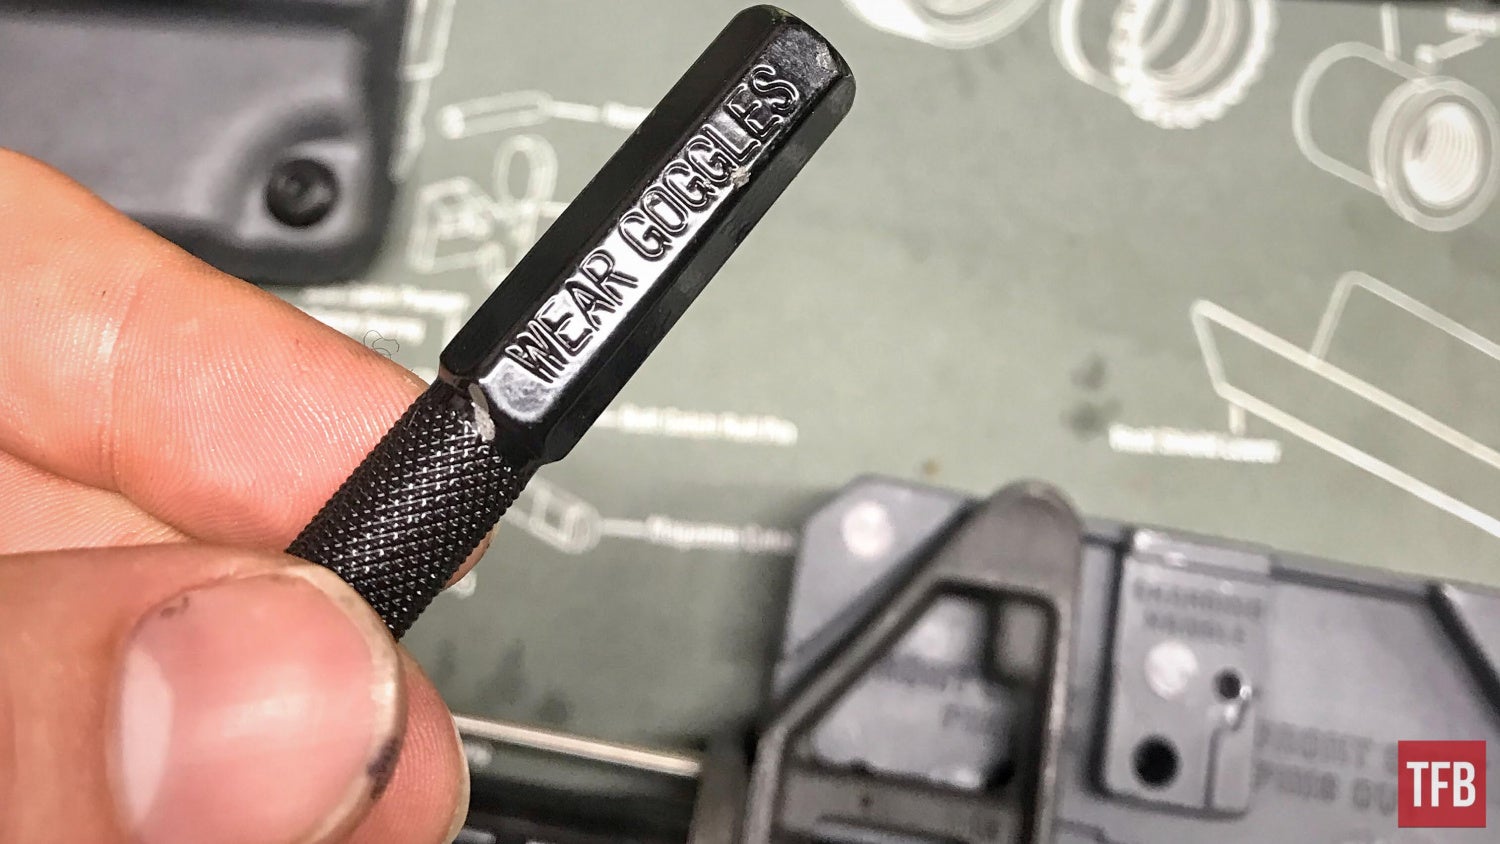
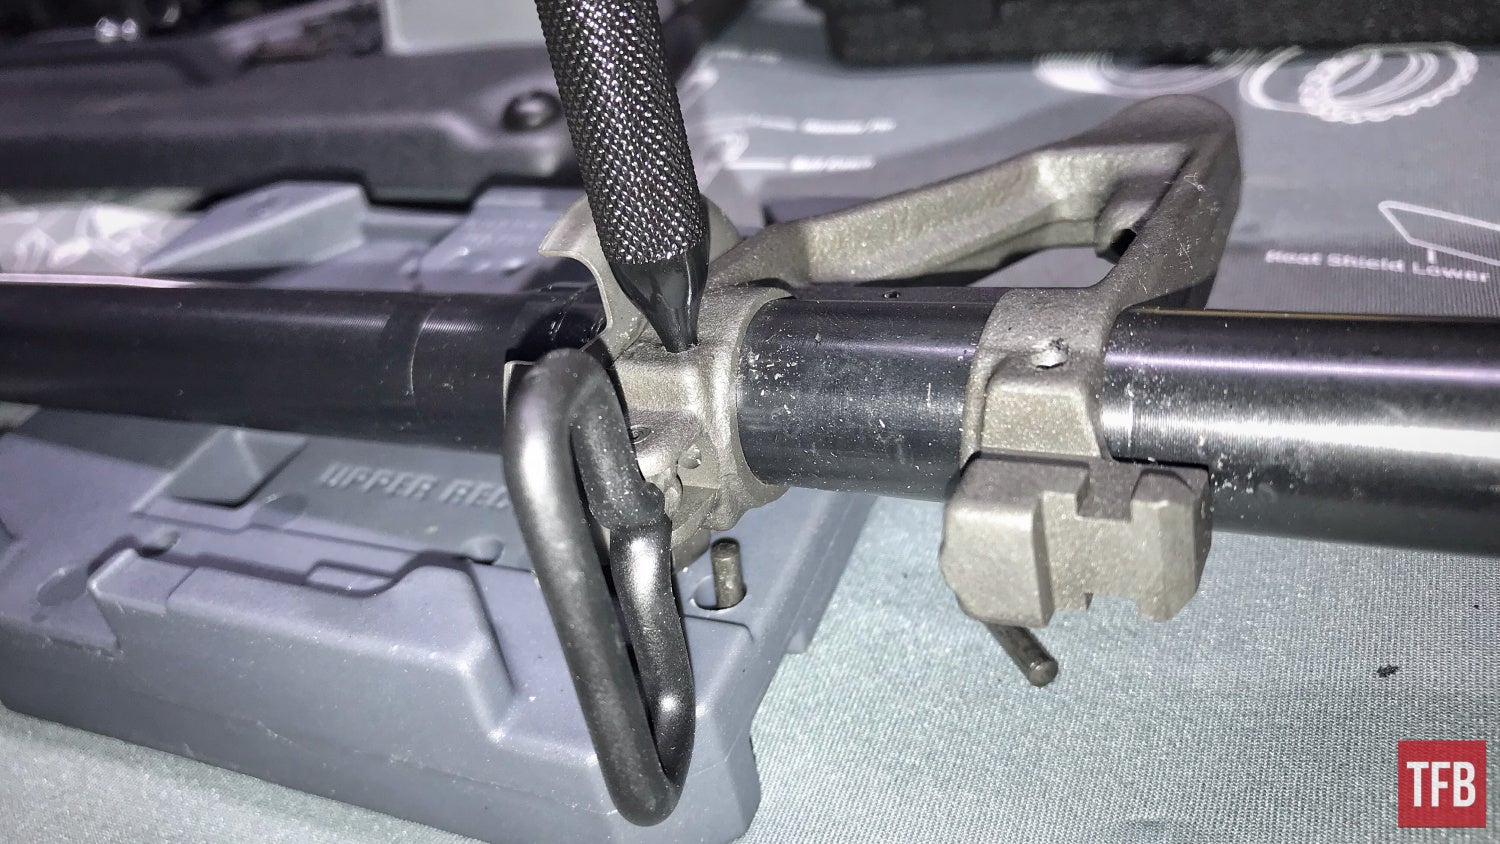
Wheeler sells a gas block taper pin removal kit and it comes with two punches. One is very large and is made to start the taper pin moving. The idea is that the punch puts as much surface area in contact with the pin as possible.
Note: These say “wear goggles” for a reason. When working with these pins, for whatever reason they can throw sparks and even create smoke! Crazy I know but it is true. I apologize that I do not know the science behind it but I am sure someone will be happy to explain or take a guess in the comments.
Using a wider-faced punch, punch down the taper pin till it is flush or sometimes just below flush with the gas block.

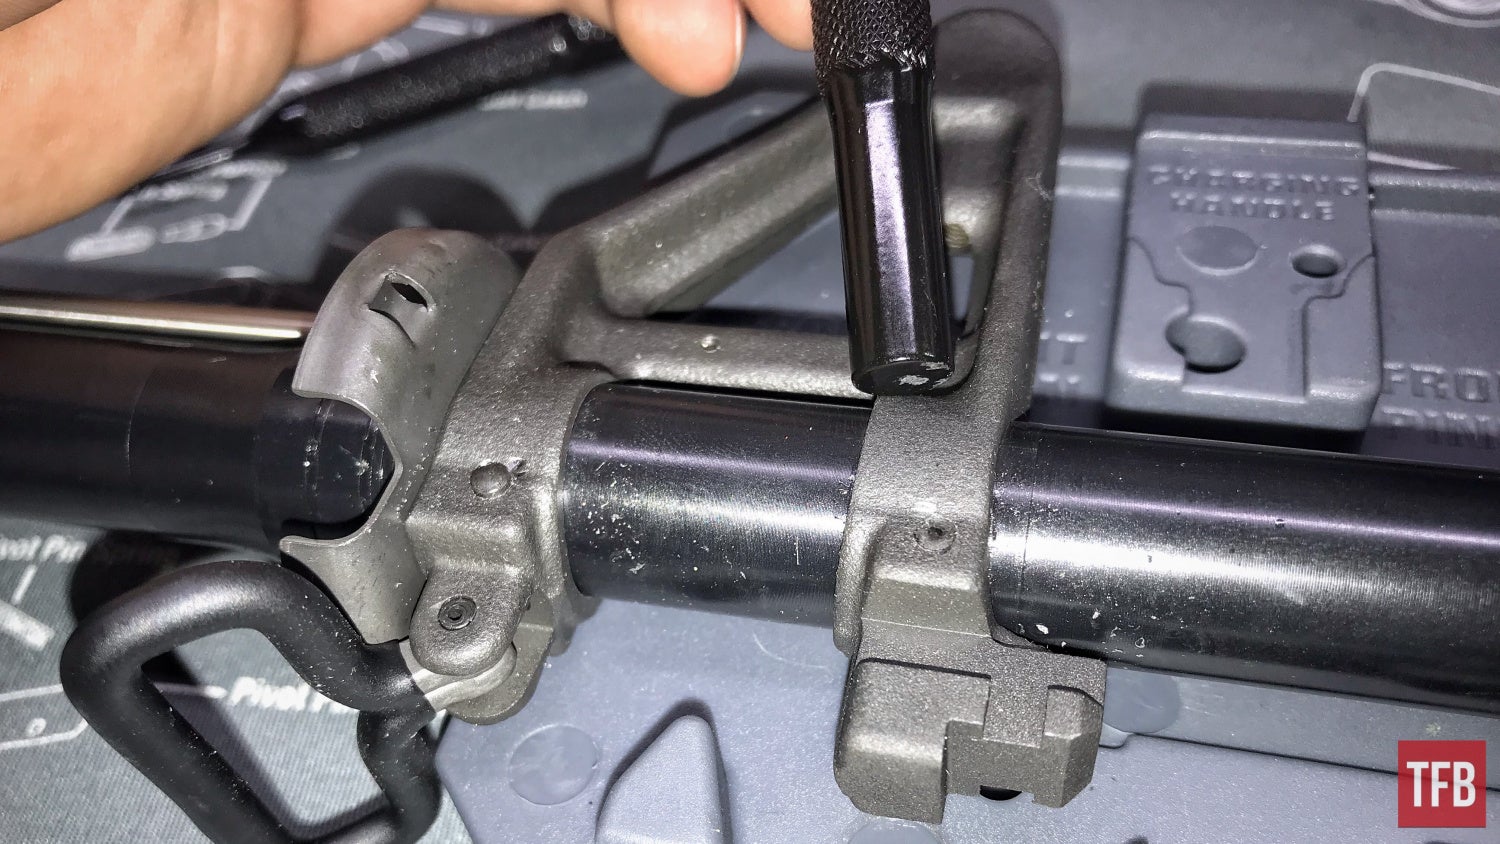
Using a 3/32 punch (I believe) you can start to punch out the gas block taper pin after in has been started by the much larger punch. These pins can be very snug so make sure the work surface you are working on is not wobbly or soft because bouncing can make you fight against your own power.
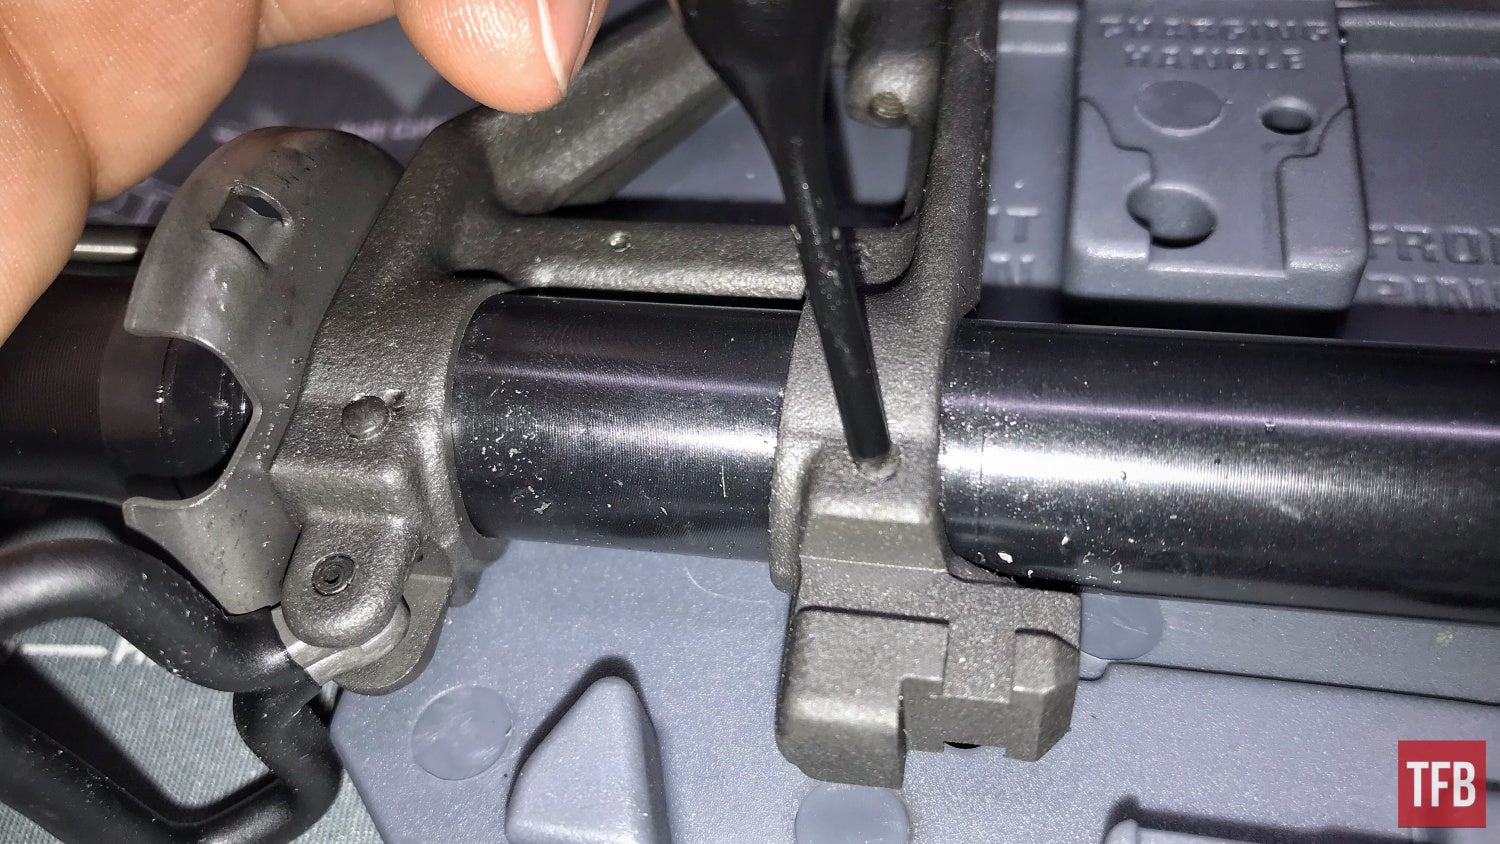
Do not worry about anything being under spring tension or anything like that when removing your punch from the gas block. This is one of those rare parts in an AR15 that does not rely on spring tension to function. Just be mindful of your gas tube since it is still attached to your gas block.
The gas block/A2 sight can be removed with the persuasion of a nylon or a soft-sided hammer. Just tap light taps toward the muzzle until you are able to slide it off. Be aware that some gas blocks have set screws located on the bottom of the block and may need to be removed or loosened.
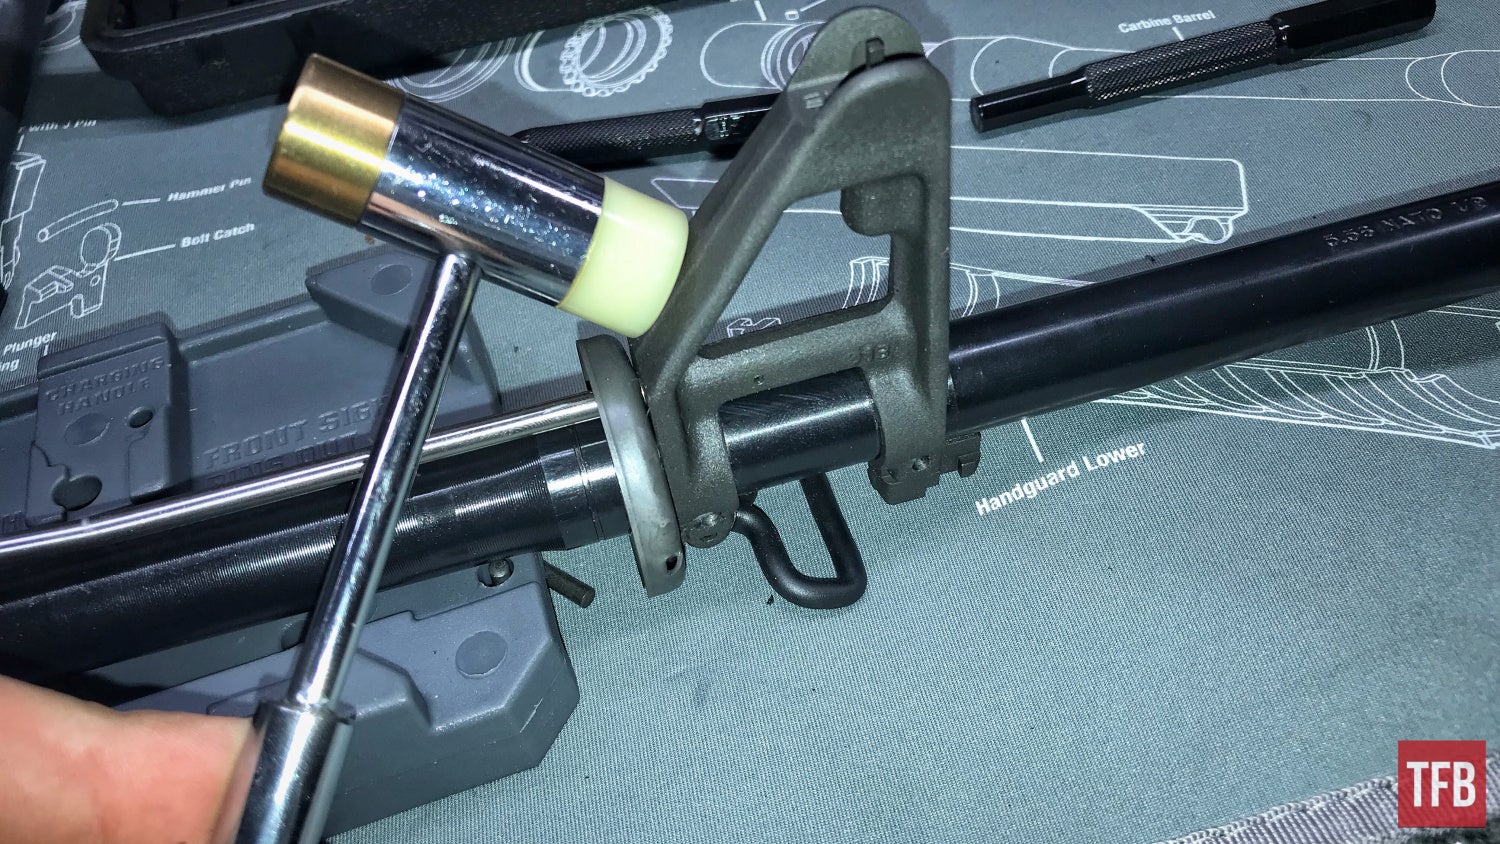
With the gas block removed, the front handguard retaining piece can be slide off of the barrel.
Step Six: Complete AR15 Disassembly – Upper Receiver
With the gas block removed from the barrel, we can remove the gas tube from the gas block itself. Fortunately, Wheeler’s AR bench block helps keep the A2 sight still and has a cutout for the roll pin to fall into.
The gas block roll pin can usually be driven out either way but as a rule of thumb, I always try to drive pins out left to right unless it is obvious they need to go the other way. As far as what punch sizes I have seen a few different sizes used but the most common seems to be a 1/16 roll pin punch.
Here the roll pin has been driven out and the gas tube pulled free from its recess. Note the orientation and how there is a wide hole at the bottom. This wide hole hovers over a very small vent hole in the barrel in which gasses are vented and the subsequent gas that leaks into that hole flows to the bolt carrier group and pushes it sharply rearward to where it is cushioned by the buffer and spring and then returned to battery.
Step Seven: Complete AR15 Disassembly – Upper Receiver
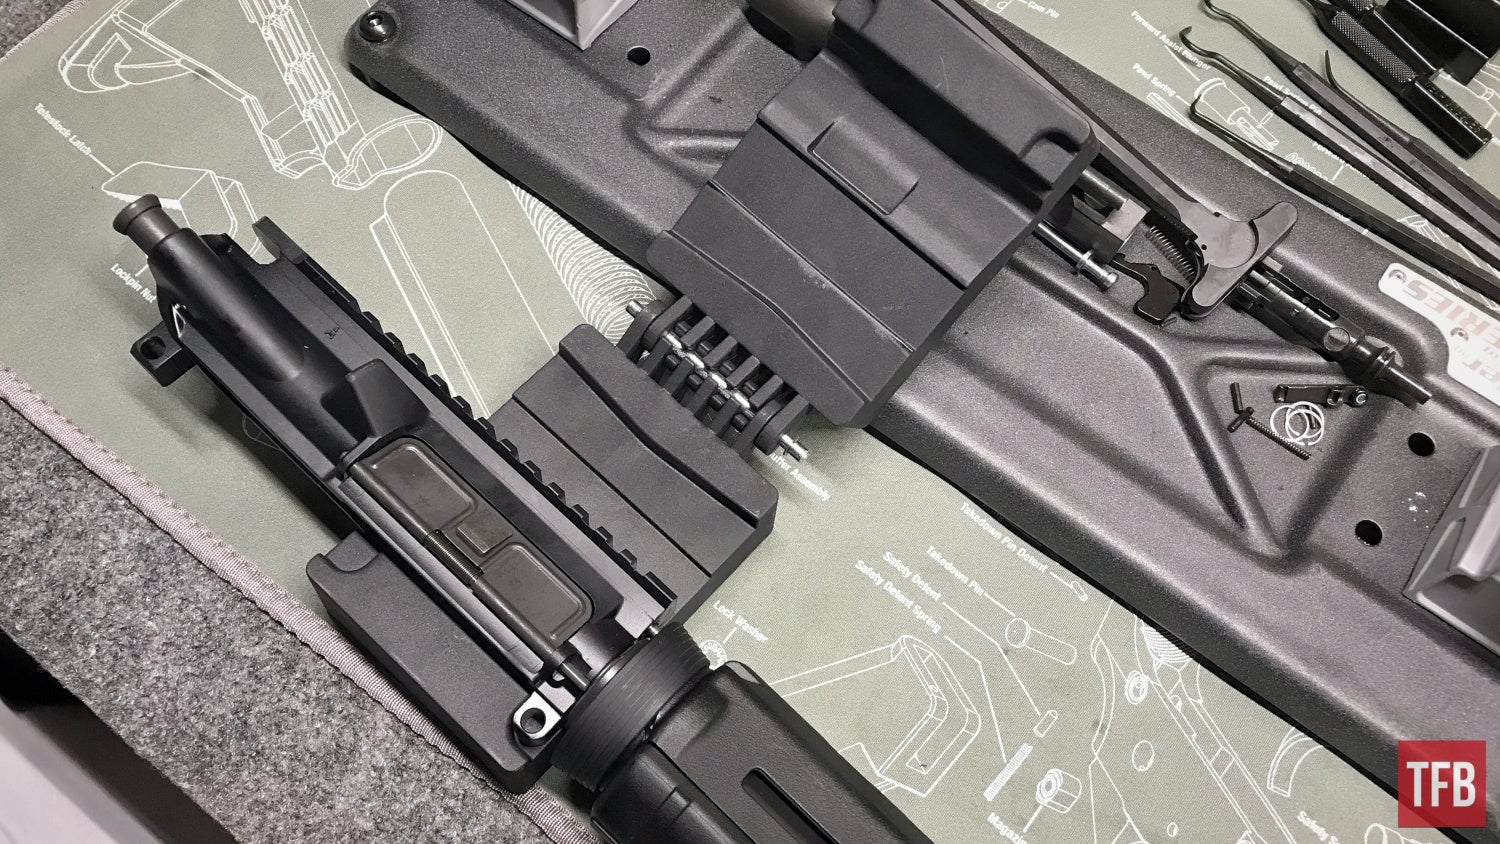
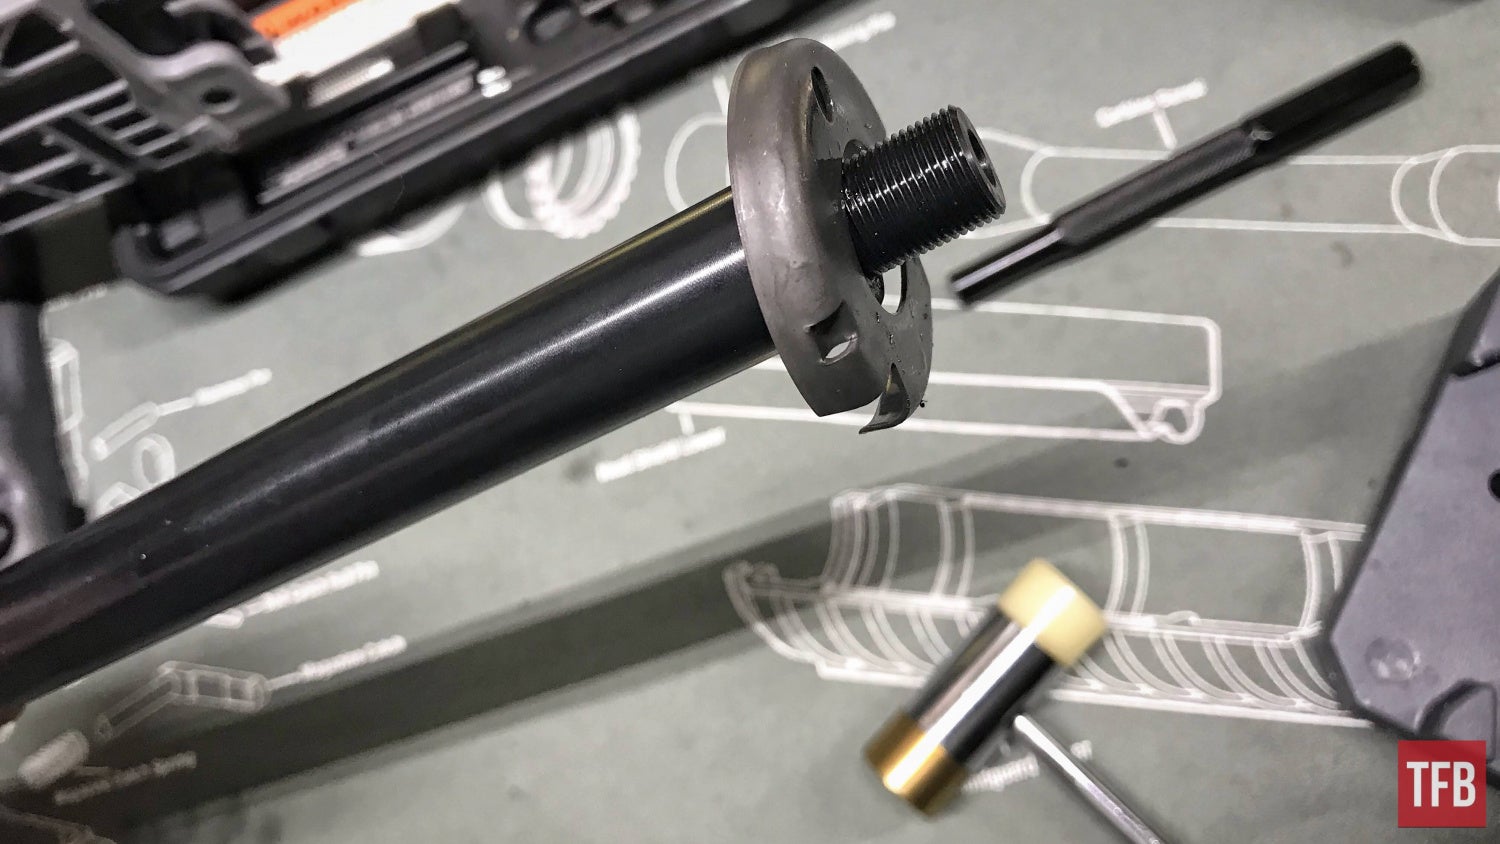
Back to our clamped in receiver, we can take note of the circular chunk at the back which is the delta ring assembly. This delta ring assembly includes four total parts; the delta ring, the barrel nut, the barrel snap ring, and the weld spring. The barrel nut portion of the assembly is the chunk that looks like a gear and will be our main focus of removal.
Note: An AR15 wrench with a built-in barrel nut wrench is almost essential to remove this. If you need one I have linked to it here.
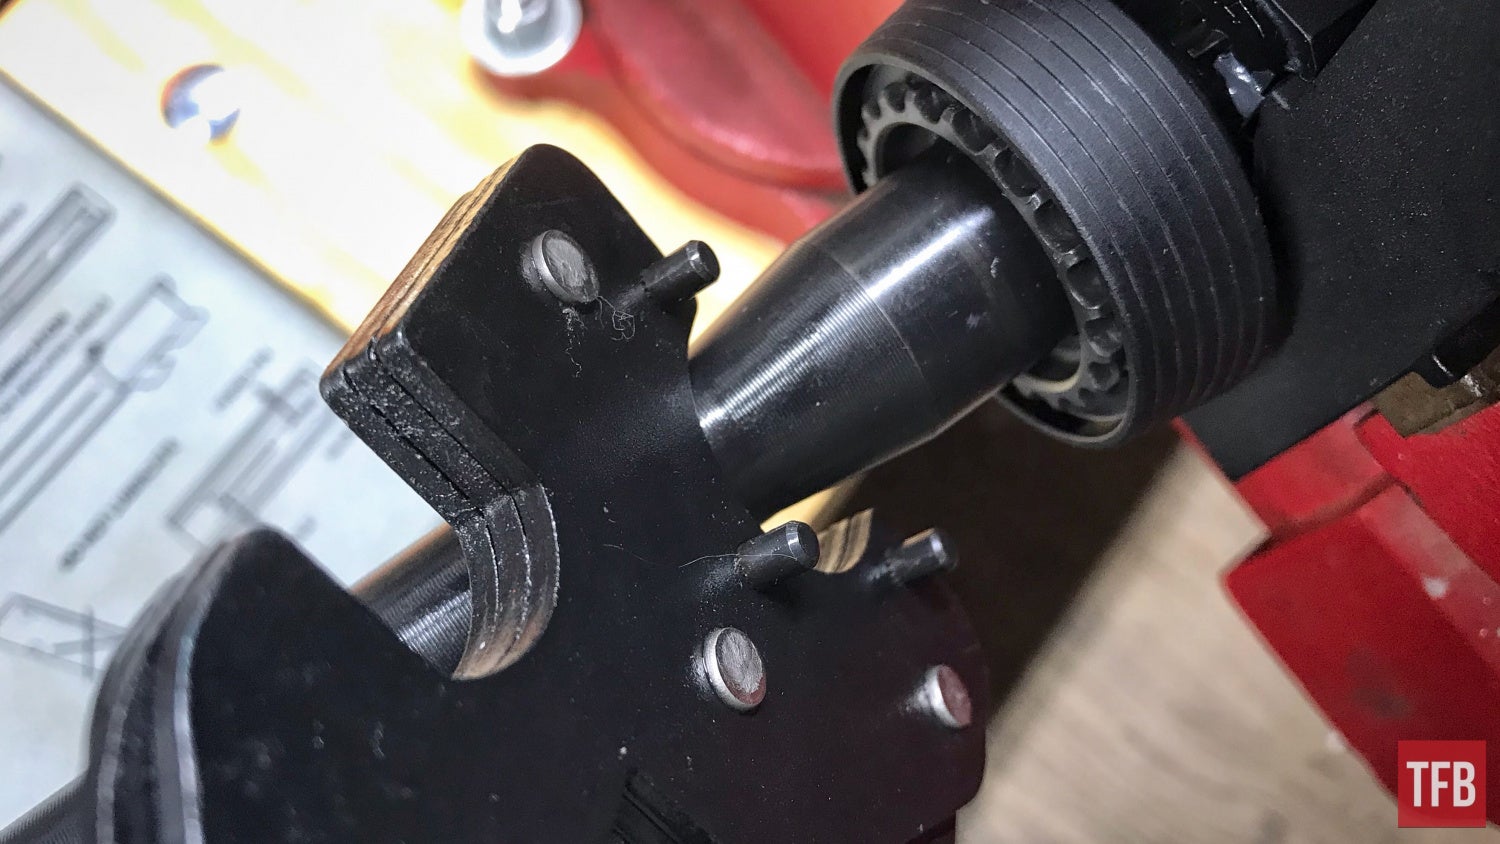
A barrel nut wrench can be identified by the pegs sticking out as shown above. They are inserted into the corresponding notches in the barrel nut.
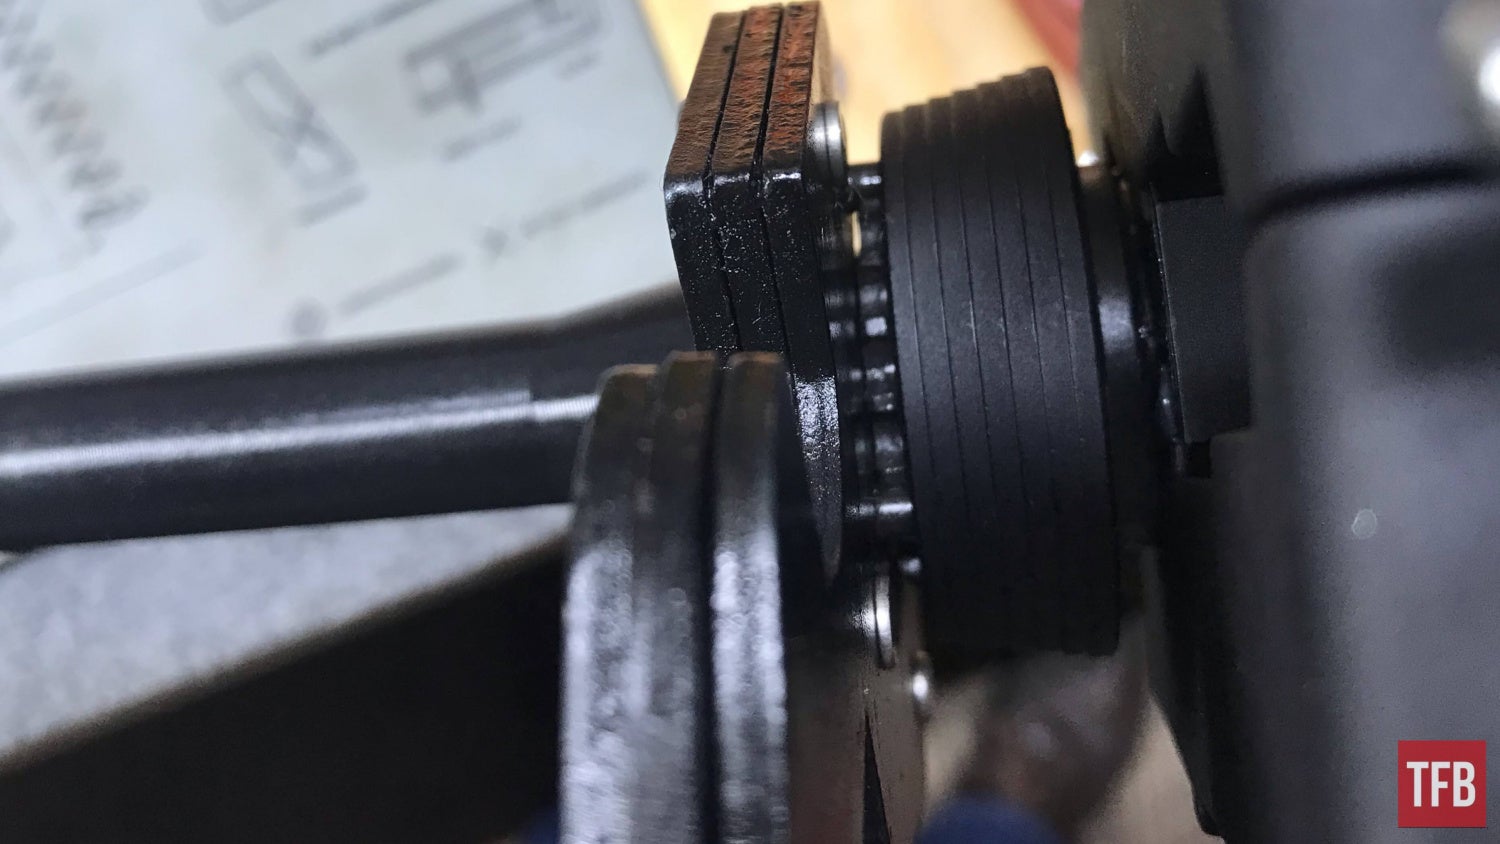
The barrel nut is rotated counterclockwise when looking down the barrel.
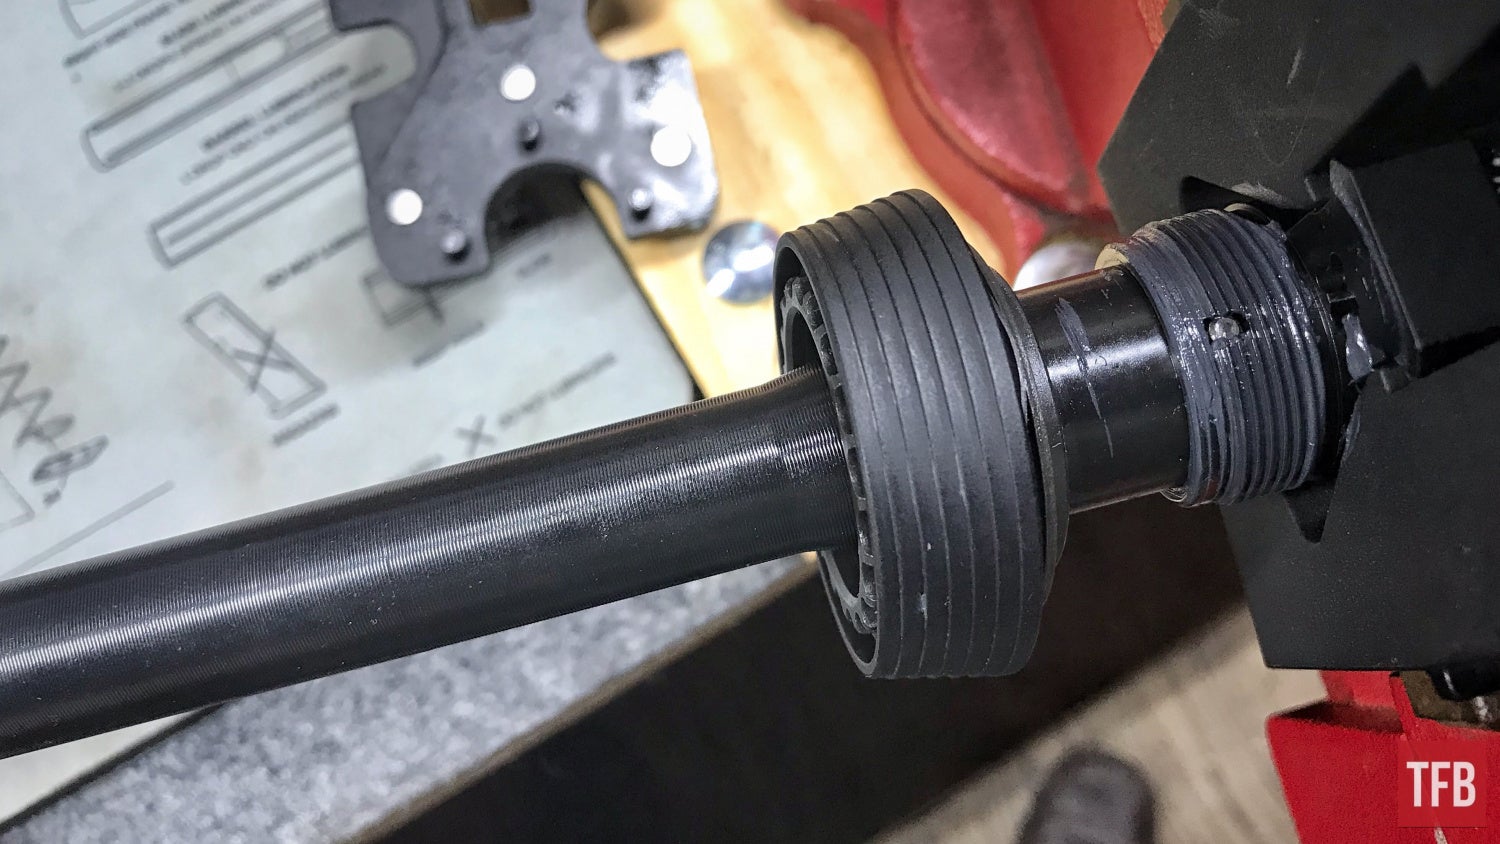
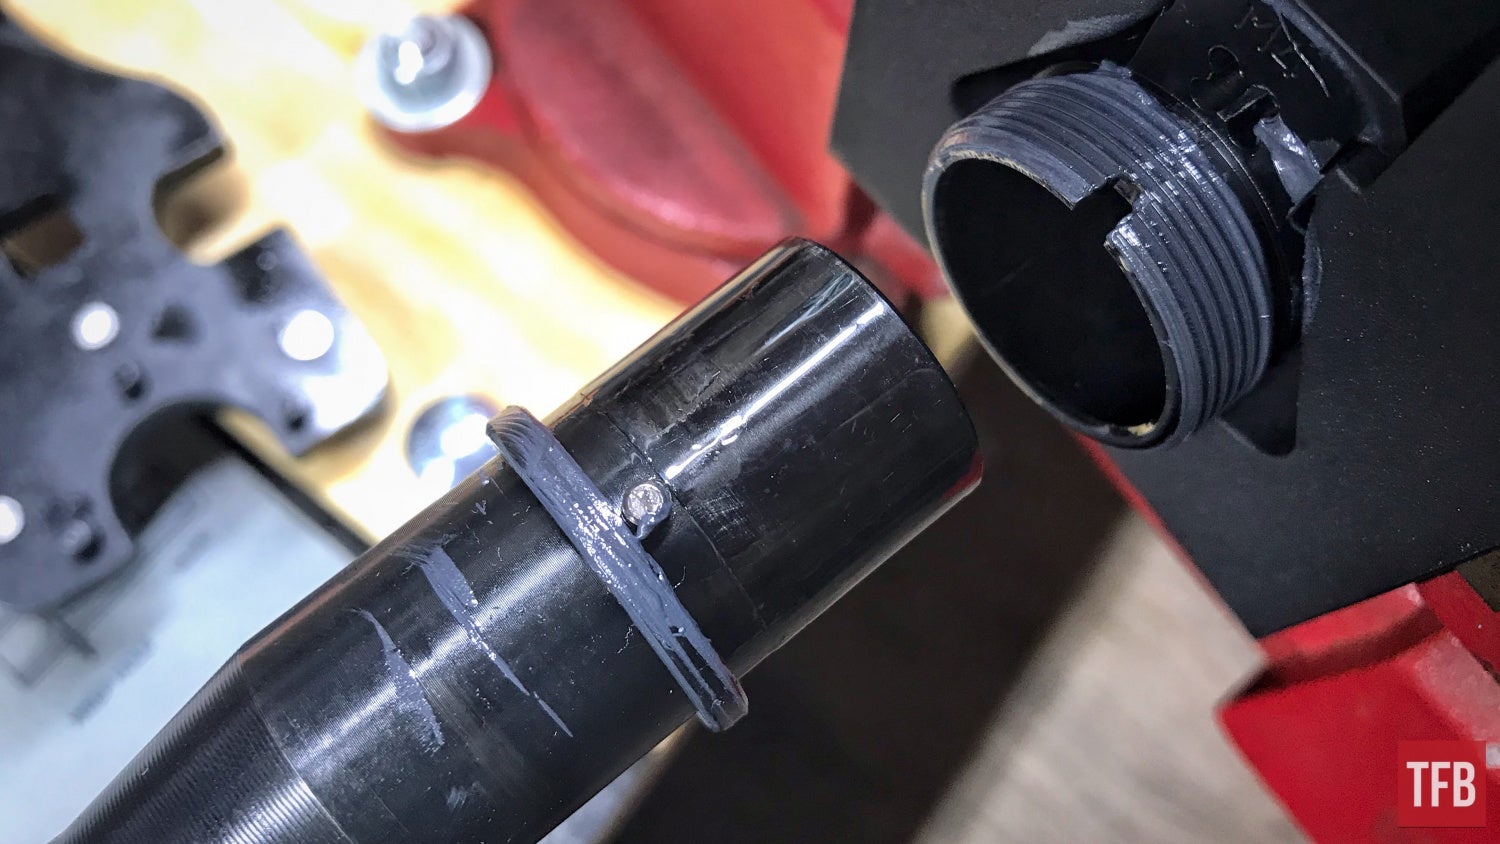
Take note of the grease on the receiver threads where the barrel nut once was. This is to prevent rusting and seizing of the threads. It also stains everything it touches, so be careful if you handle it. The delta ring assembly can be slid off the end of the barrel.
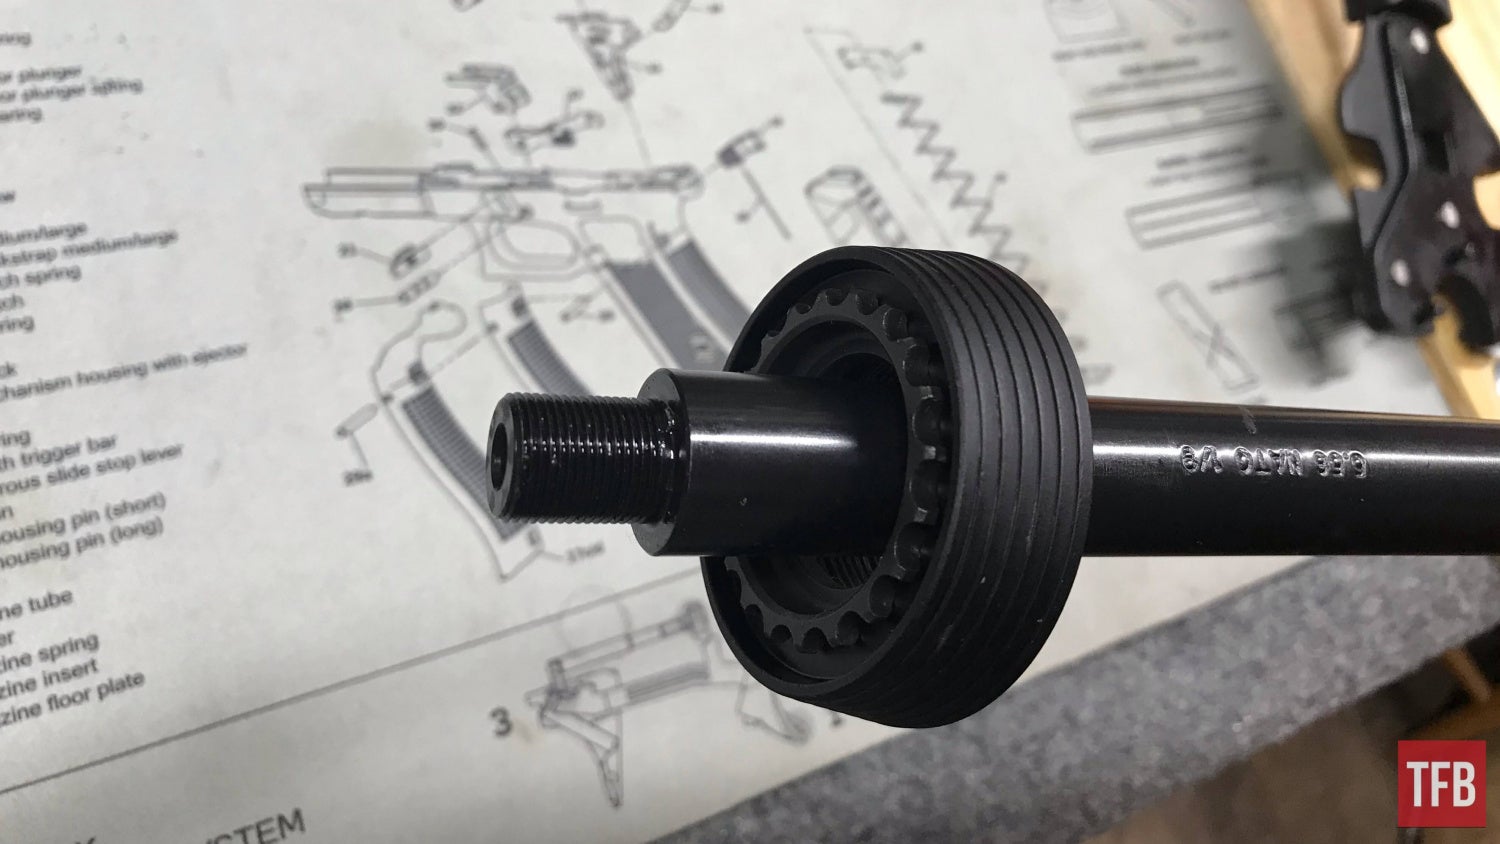
After the delta ring assembly is removed you can also slide the barrel out from the upper receiver. Take note of the indexing pin that coincides with the cut-out in the receiver threads.
Step Eight: Complete AR15 Disassembly – Upper Receiver
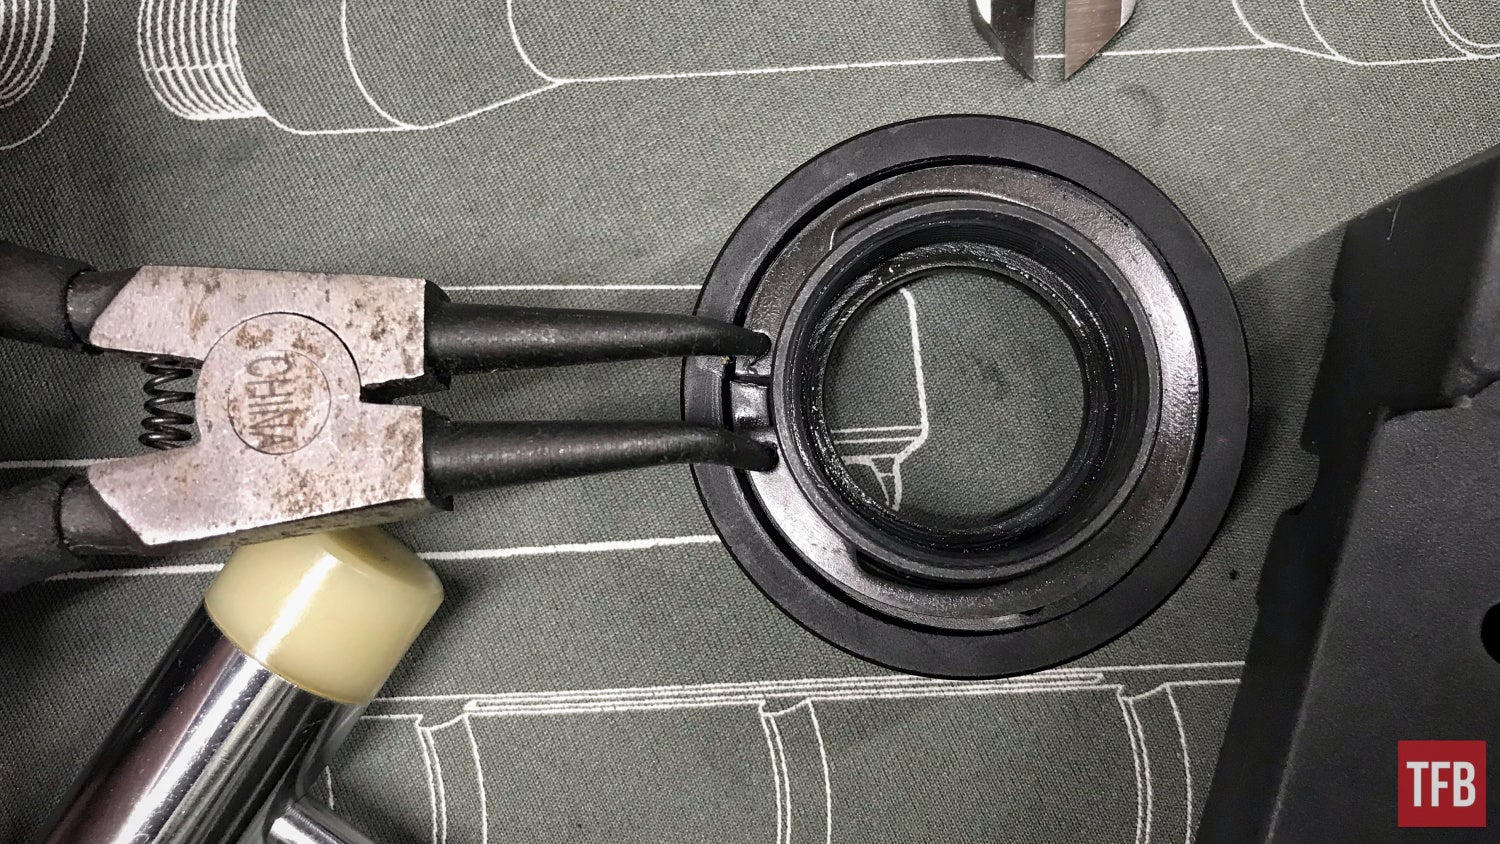
This step is completely unnecessary much like the disassembly of the charging handle but for the sake of consistency, let us take apart the delta ring assembly!
Hint: You will need a pair of snap ring pliers.
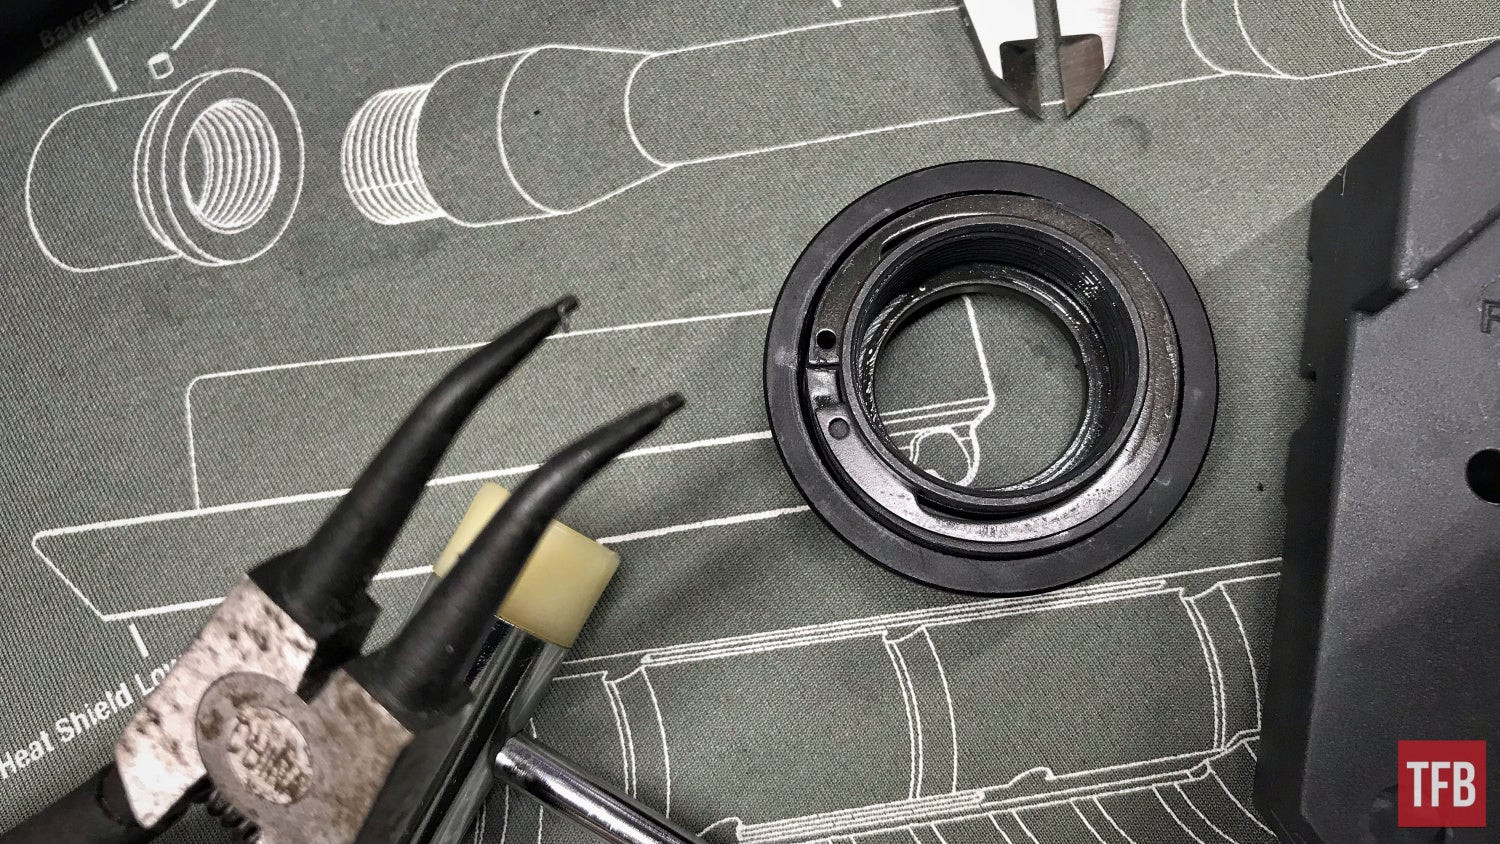
With a pair of snap ring pliers, you can plug the tips into the holes on the barrel snap ring and pry it apart until it can be lifted from the assembly.
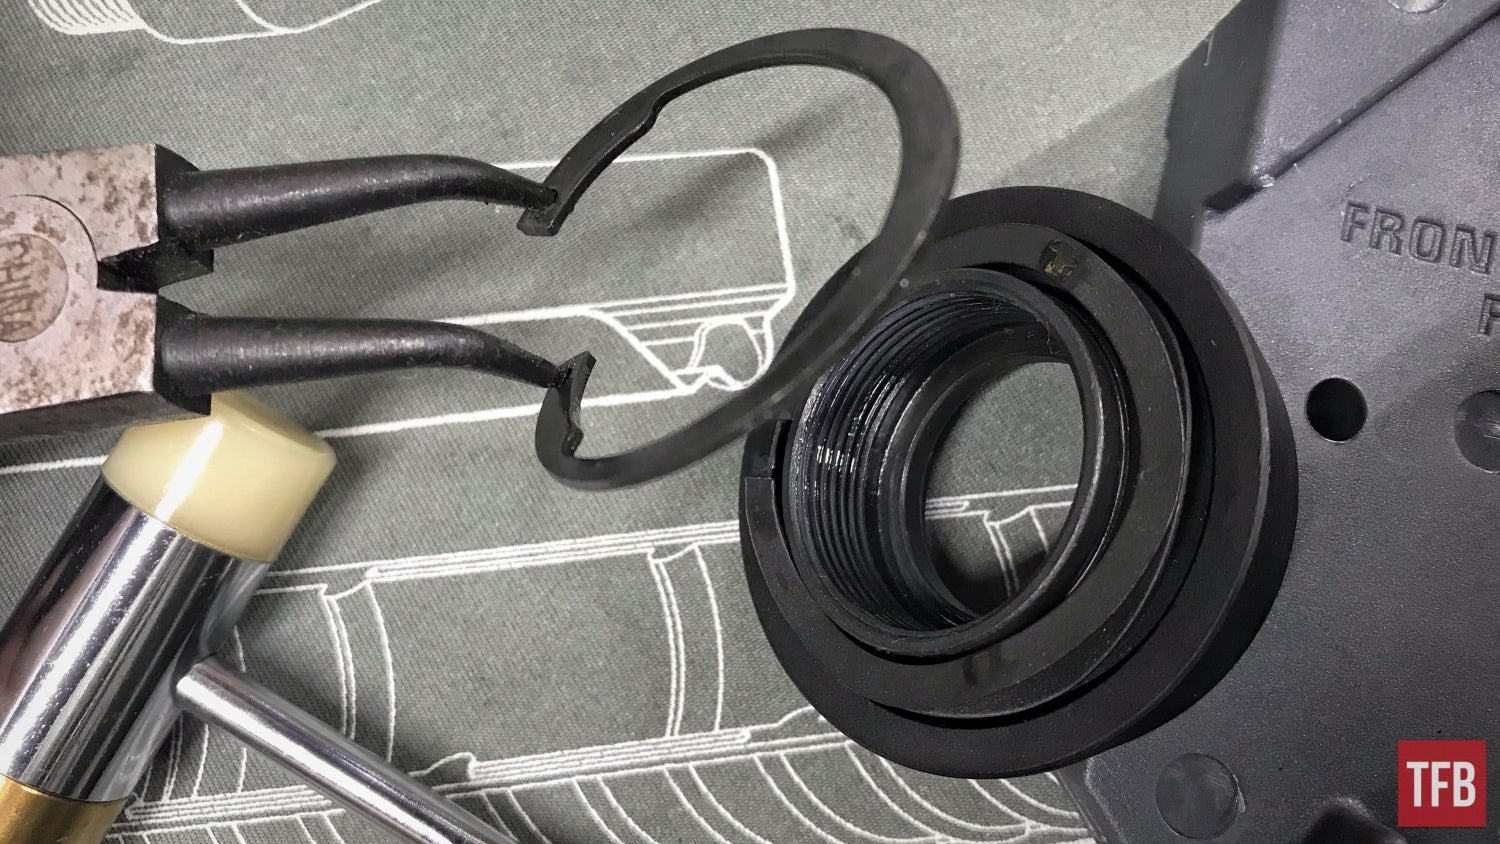
With the barrel snap ring removed from the delta ring assembly, the weld spring can be removed and the remaining delta ring and barrel nut pulled apart.
To reassemble simply do the reverse or stay tuned for a future assembly article.

Step Nine: Complete AR15 Disassembly – Upper Receiver
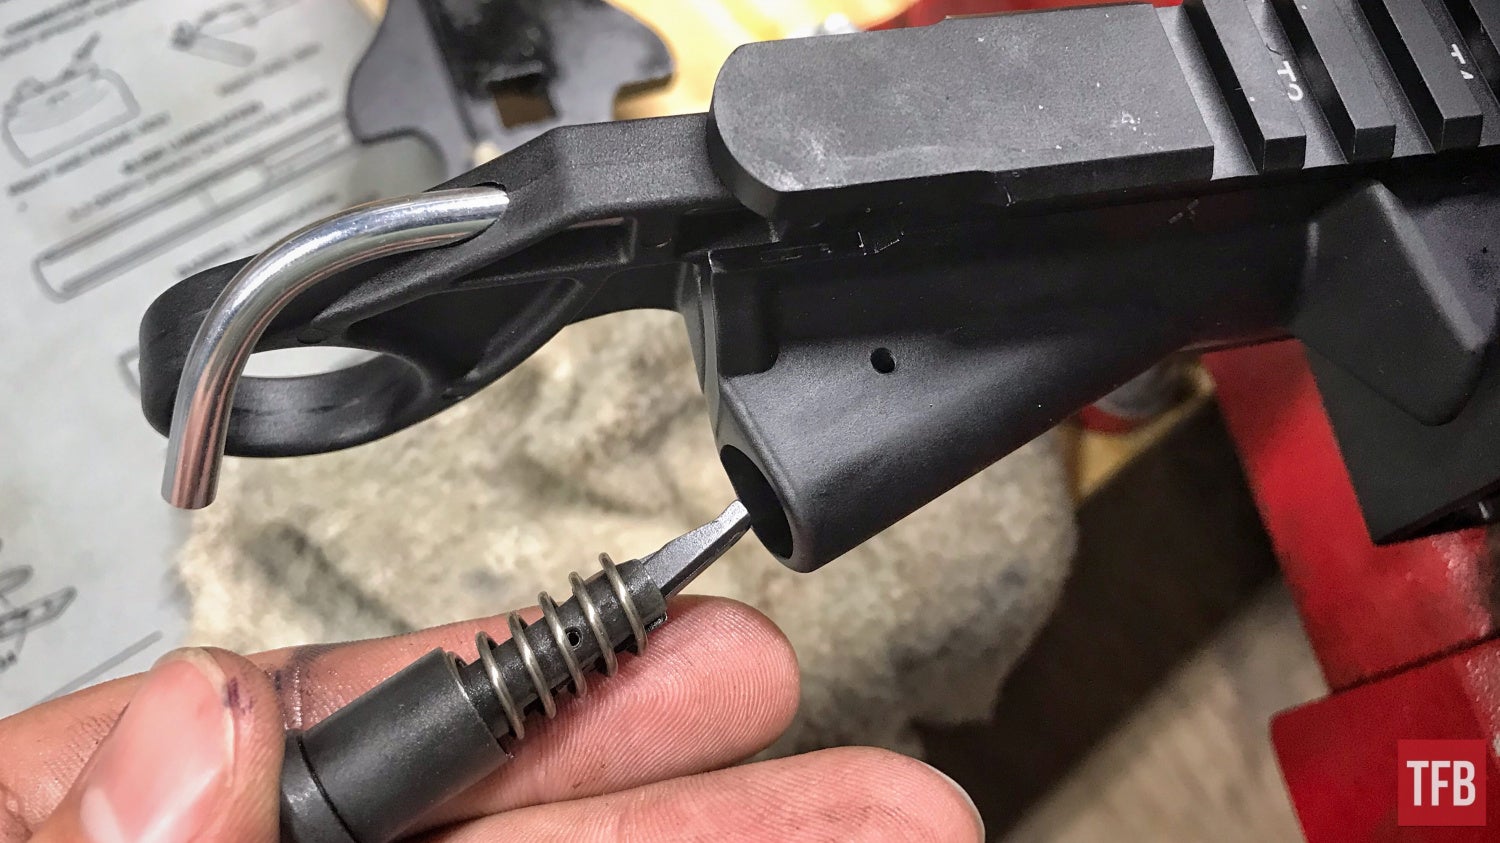
Removing the forward assist is fairly simple. There is a roll pin and it is located above and below the forward assist protrusion like shown below.
I used a 5/64 roll pin punch in order to punch out the roll pin. I am unaware of a different size punch being used in other instances.
When you punch the pin out be aware that the forward assist button is under spring pressure and removal of the punch will result in it dislodging itself.
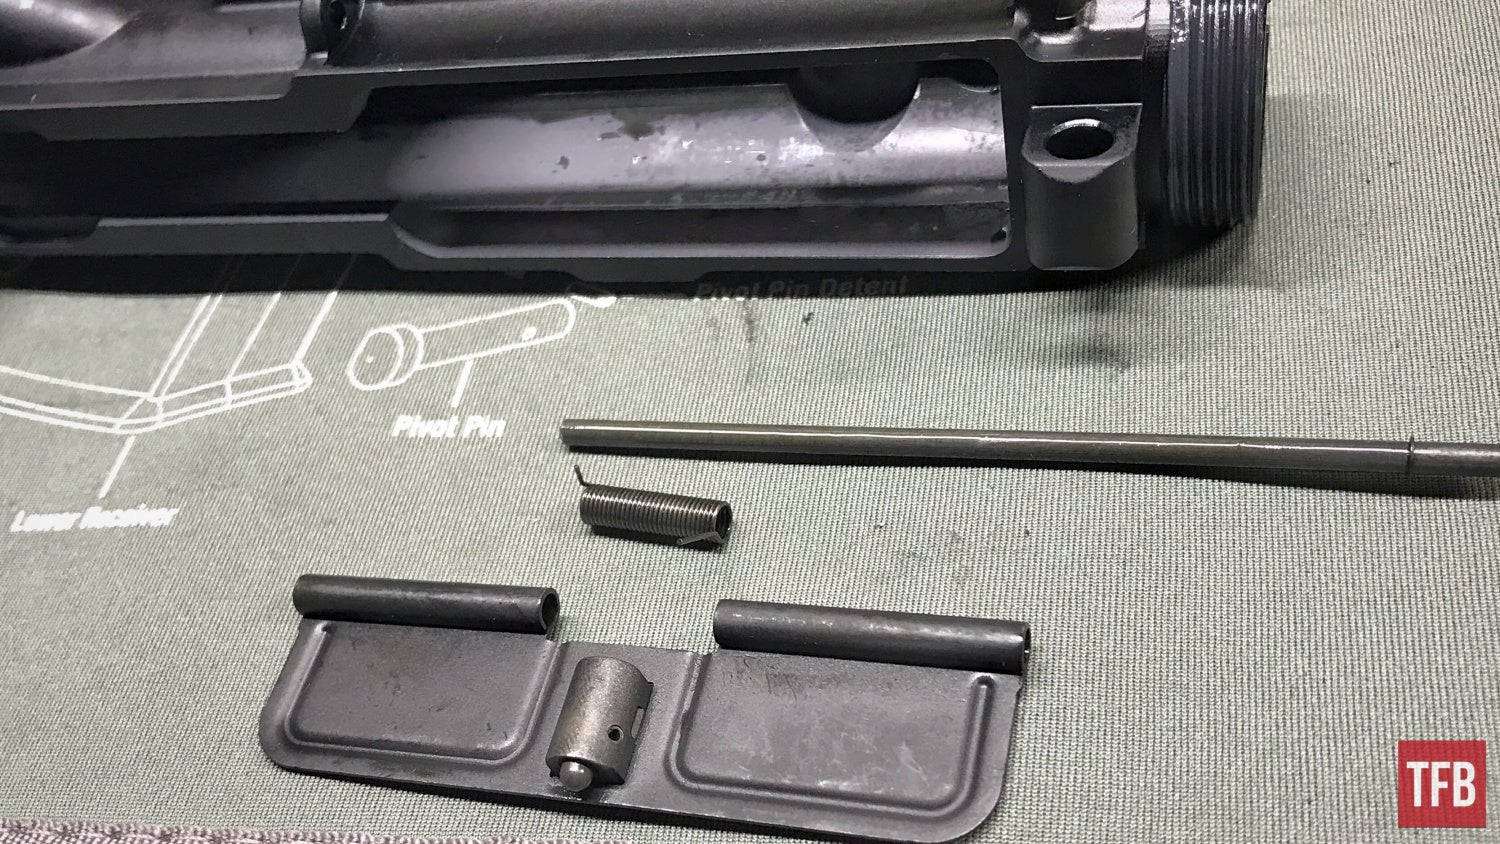
Step Ten: Complete AR15 Disassembly – Upper Receiver
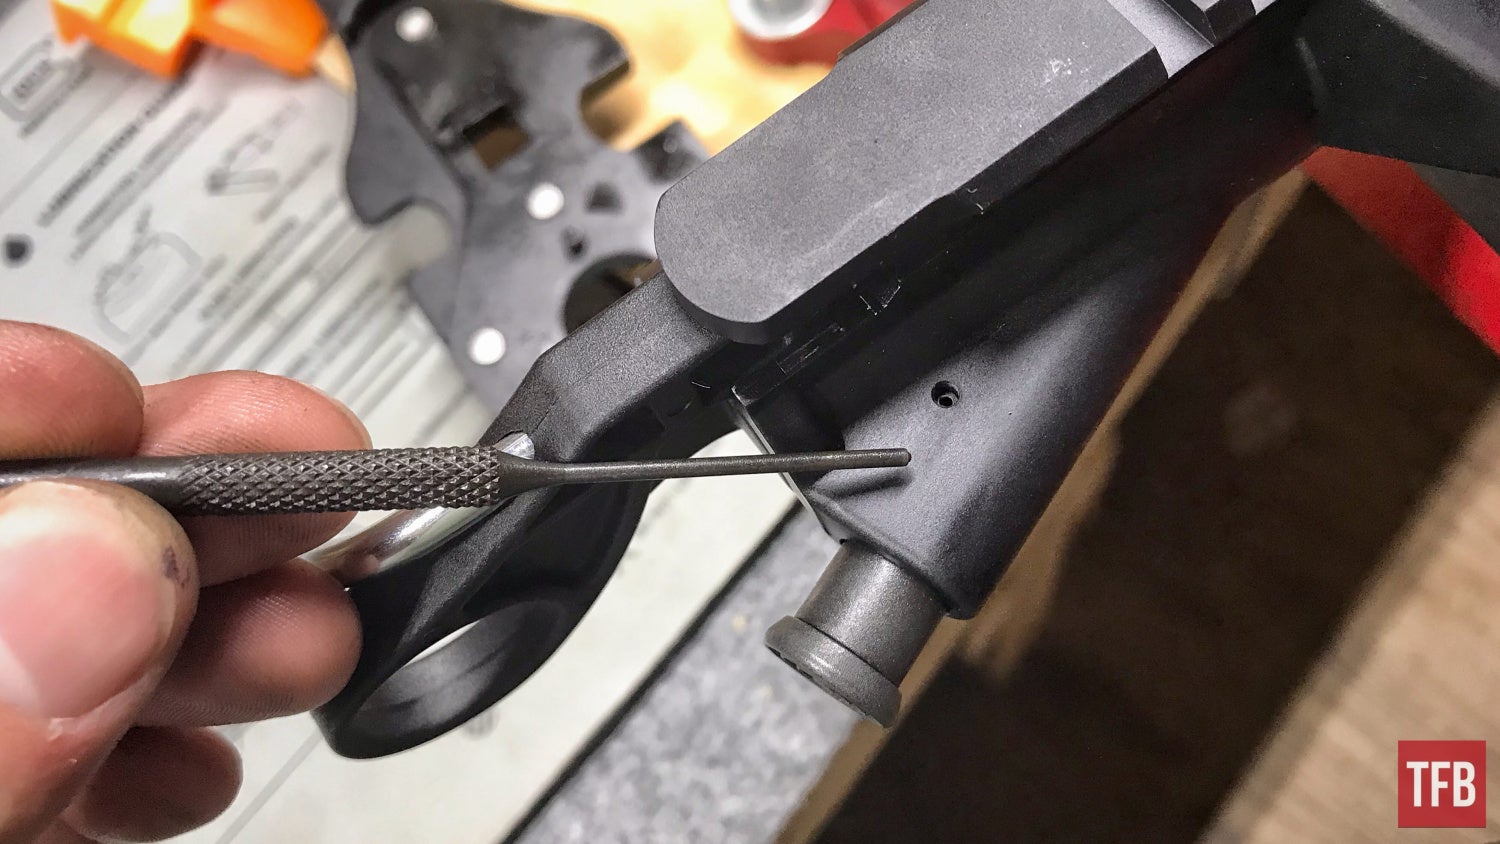
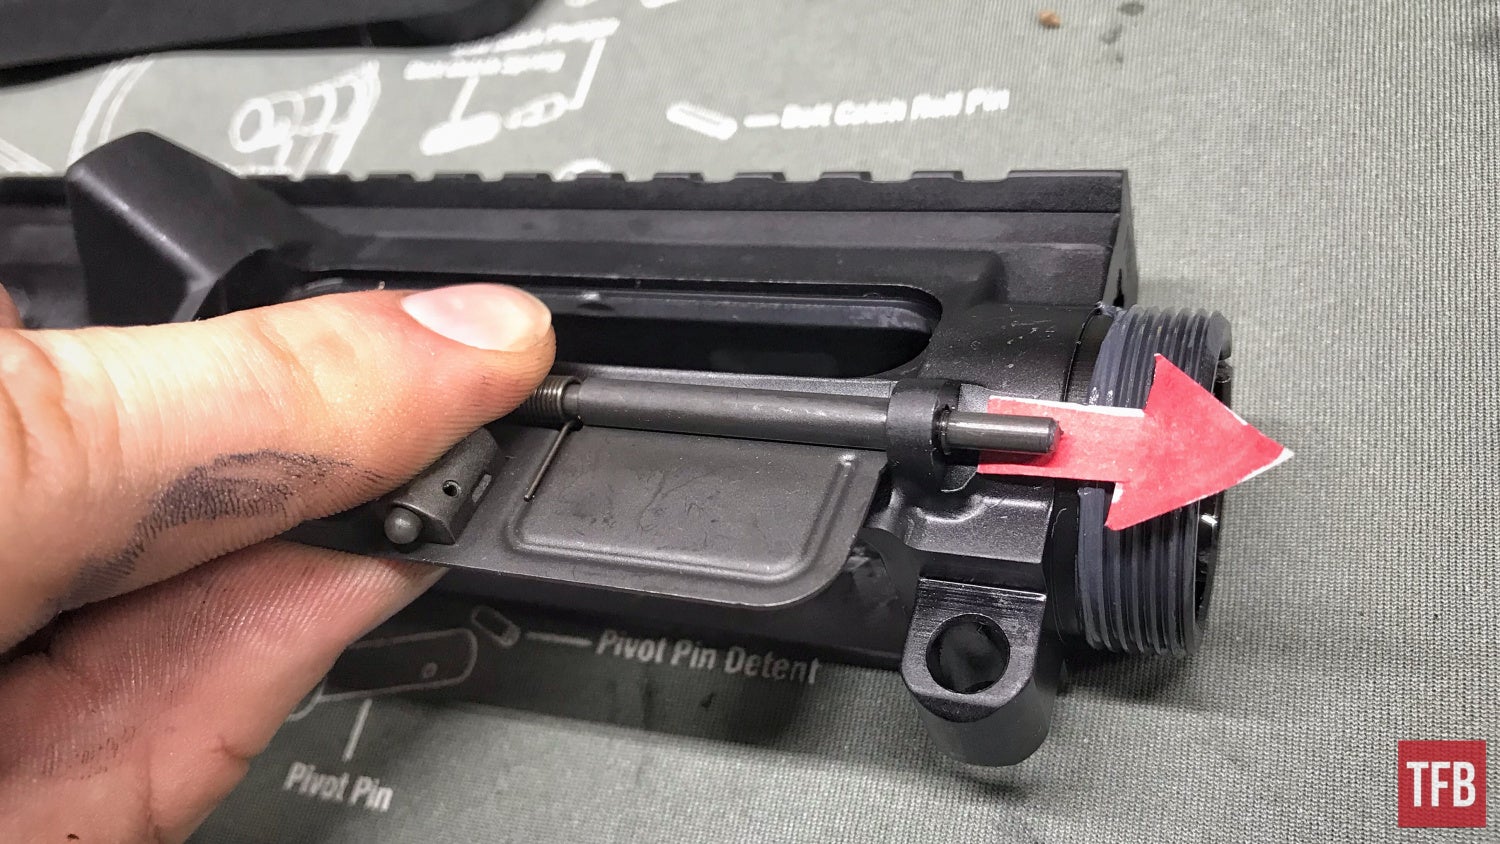
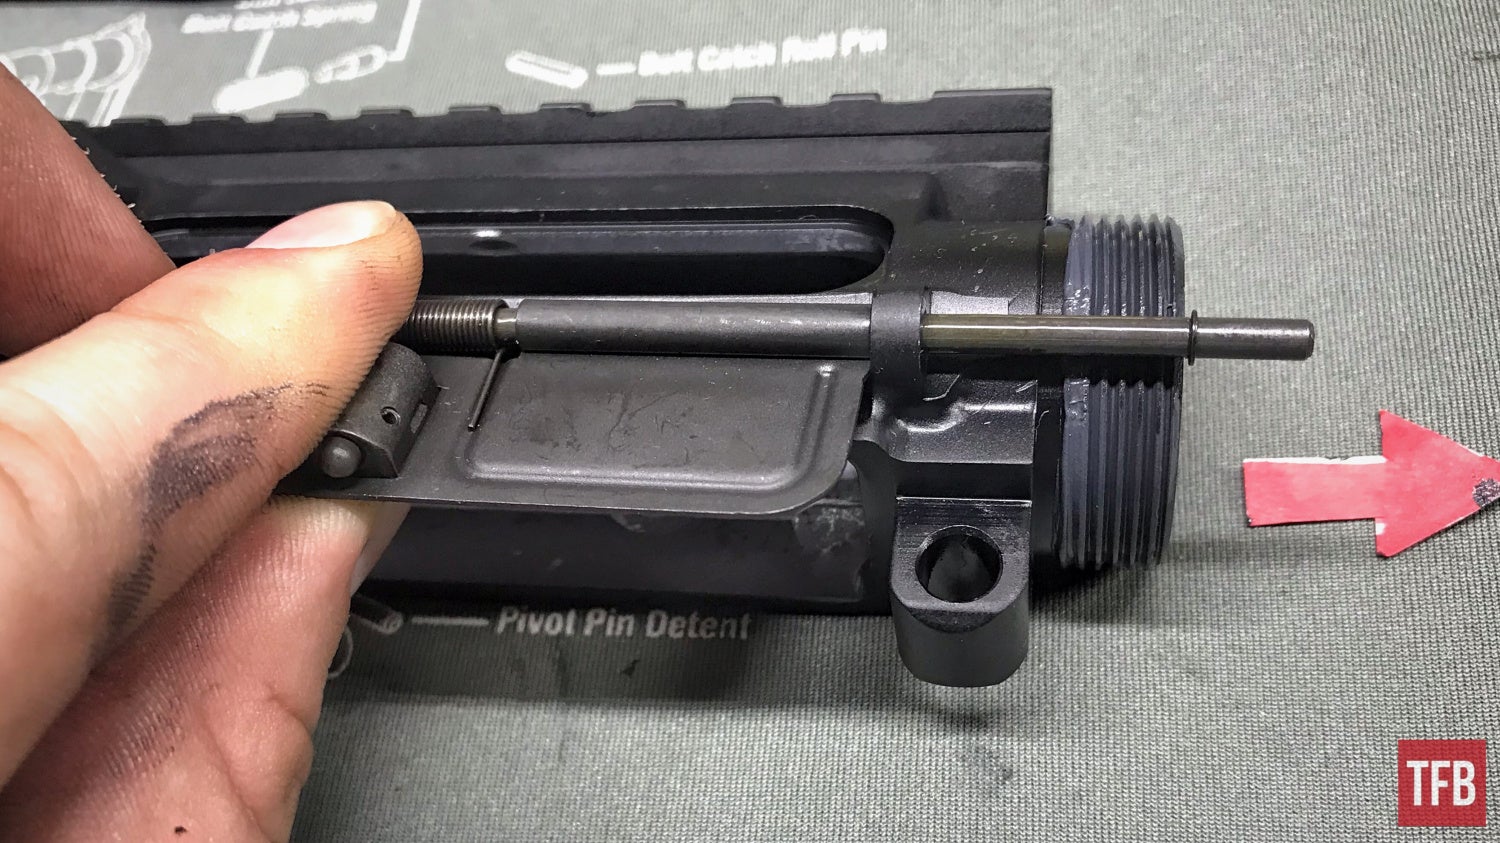
Last but not least, we have the dust cover removal. This part was/is able to be removed as soon as the delta ring assembly which blocks it was removed. As my little red arrow demonstrates you can pull this rod forward and out of its guides.
Note: Place your fingers over the coil spring as shown in order to prevent it from launching itself across the room.

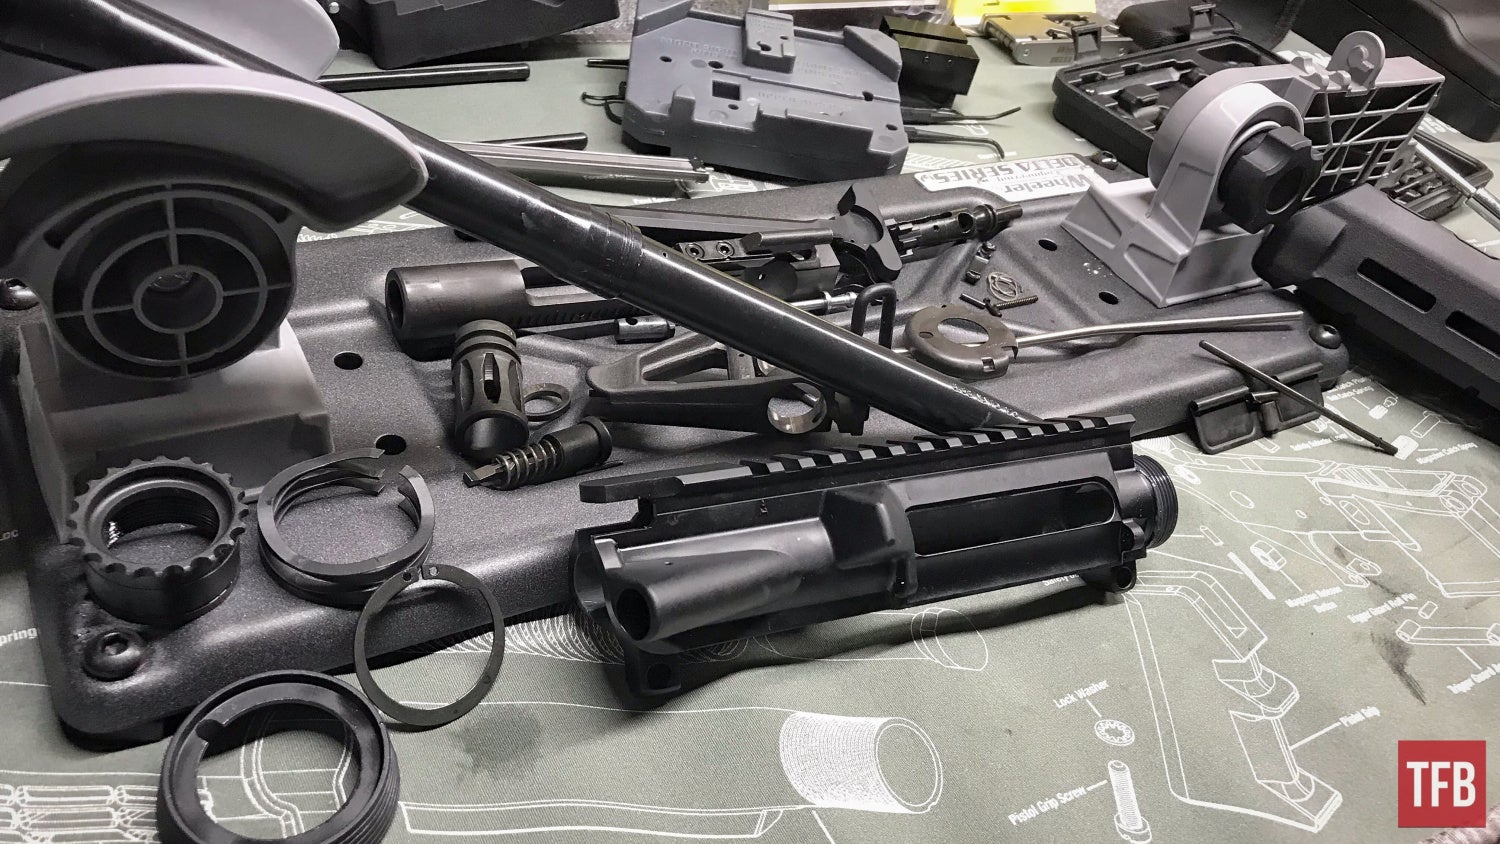
End of Upper Receiver – Complete AR15 Disassembly
Just like that I have an AR15 completely disassembled in a box waiting for whatever is next. Do not worry! At some point, we will go over the assembly of everything that has been taken apart so far. If anyone has their own tips and tricks or recommendations for anyone out there that needs a hand with their upper receiver, feel free to talk amongst each other in the comments. Maybe at some point, we can do a separate tips and tricks article! Keep in mind that some folks may be new to this sort of thing and be considerate of any questions they may have. Thanks for tagging along so far and see you next time!
One last thing! We are curious what you guys and gals may consider common upgrades or changes to an everyday AR15. We could potentially turn them into future articles along with assembly. Take care everyone and be safe out there!
As always, thank you for reading TFB! Be safe out there, have fun while shooting, and we will see you next time for the TFB Armorer’s Bench brought to you by Wheeler, Tipton, Caldwell, and Frankford Arsenal! Also, let us know what you think in the comments below! We always appreciate your feedback.

Pro Range Glasses, Clear

The Caldwell® Pro Range Glasses feature a stylish wrap-around design and are a great choice for all shooters. They feature an adjustable nose piece and temples for all day comfort. The scratch resistant lens meets ANSI Z87.1 standards and offers 99.9% UV protection.
AR Armorer’s Bench Block

Tired of trying to secure your AR parts while installing a pin, detent or spring? The AR-15 Bench Block is the answer! Specifically designed for AR-15 assembly and disassembly, the AR-15 Bench Block is the perfect tool. It securely holds the upper receiver, lower receiver, front sight and charging handle during assembly, disassembly and maintenance.
Delta Series AR-15 Upper Vise Block Clamp
The Delta Series AR-15 Upper Vise Block is optimized for left hand and right hand Mil Spec A2 upper receivers with carry handles, as well as flattop style receivers. Other AR-15 variants may be adapted with special attention to potentially non-conforming surfaces or features. The Delta Series AR-15 Upper Vise Block allows you to safely clamp on to your AR-15 upper receiver in a vise holding it securely without twisting, crushing or marring the finish. This block is the perfect product for torqueing a barrel on, removing a stubborn barrel nut or for simple gun maintenance and cleaning. It is made of a high pressure, solvent resistant polymer material which can withstand almost anything you can throw at it. The Delta Series AR-15 Upper Vise Block truly is the all-around product for your AR-15 gunsmithing, maintenance or cleaning needs. As an added bonus it includes a receiver insert with a gas tube alignment system, making sure your gas tube is always in line when installing a barrel and torqueing a barrel nut. Durable design holds receiver securely and fits both left and right-hand Mil Spec A2 upper, as well as flat top receivers.
Hammer and Punch Set, Plastic Case

The Wheeler® Hammer and Punch Set includes a polymer/brass combination hammer, eight precision brass punches, four steel punches and two plastic punches. It comes in a handy molded case. It makes for a great tool for driving pins or drifting sights at the shooting range, or on your gunsmithing bench.
Stainless Steel Dial Caliper
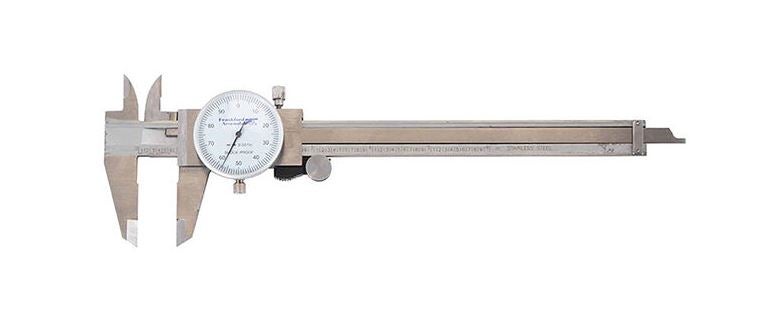
Reloading ammunition requires attention to many critical cartridge dimensions, including case length, neck and base diameters, overall length, primer pocket depth, etc. Verifying these dimensions is quick and convenient with the Frankford Arsenal® Stainless Steel Calipers. These calipers are accurate to within .001″. The calipers allow you to measure inside and outside diameters, plus depths. You will find them useful for many measuring tasks on and off the reloading bench. Packaged in a convenient and protective case.
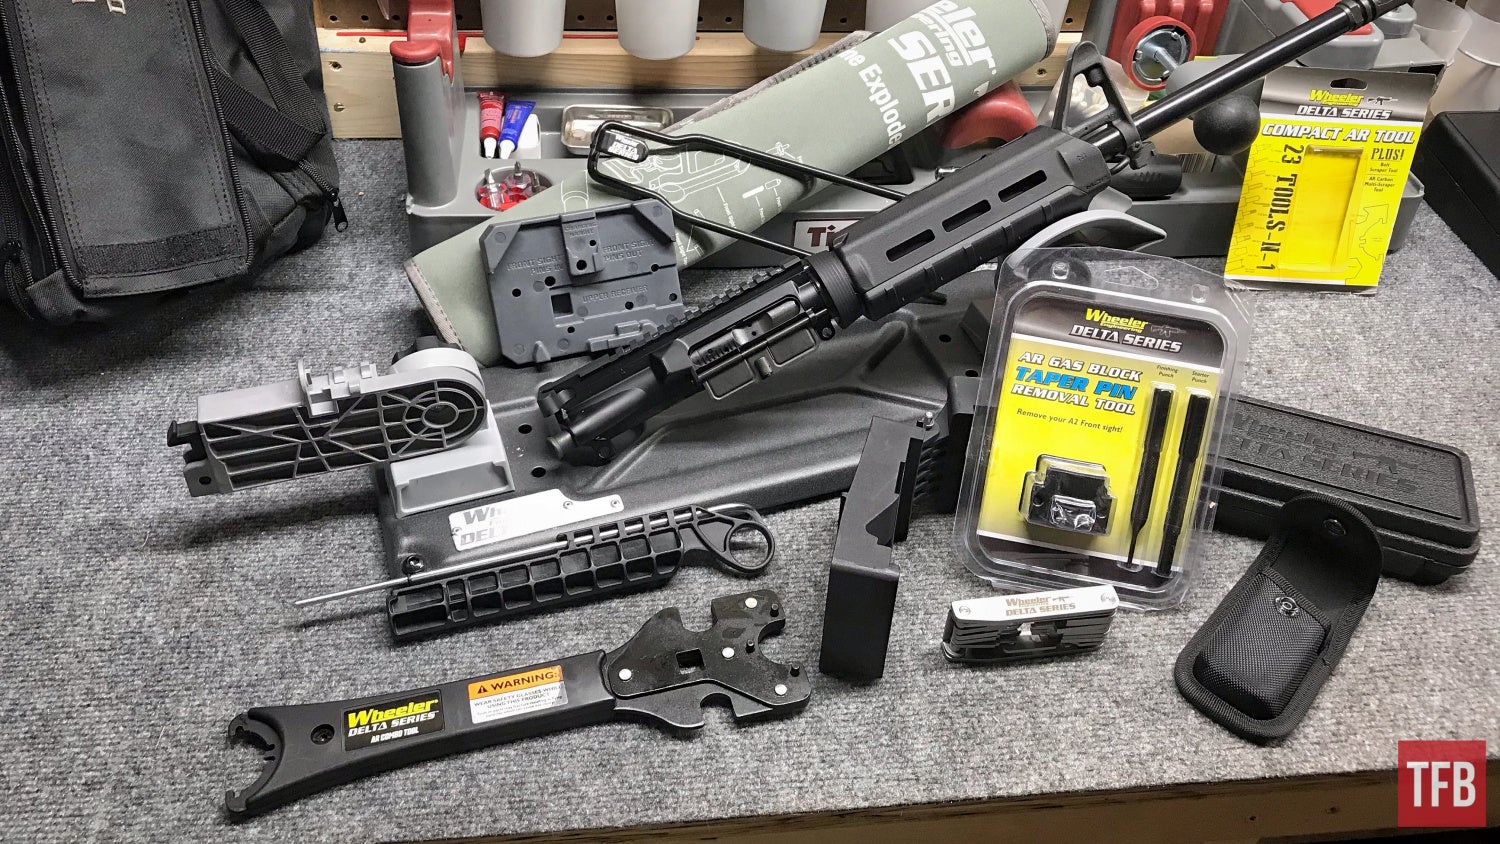
Wheeler AR Armorer’s Ultra Kit

Ultra Kit includes: AR-15 AR Armorer’s Vise, AR-15 Combo Tool, Torque Wrench, AR-15 Armorer’s Bench Block, AR-15 Roll Pin Installation Tool Kit, Upper Vise Block Clamp with Gas Tube Alignment Tool, Maintenance Mat with Exploded AR-15 Diagram, Pivot Pin & Roll Pin Installation Tool, AR Front Sight Tool, Delta Ring Tool, Strap Wrench, AR-15 Bore Guide, AR-15 Adjustable Receiver Link, .22 Cal Bore Brush, Bolt Carrier Brush, Chamber Brush, Magazine/Upper Receiver Brush, Nylon Brush Handle, Double-ended General Cleaning Brush, Cleaning Pick Set, and Custom Fitted Carrying Case.