
Friday Night Lights: iRay RH25 Rico Micro – All-In-One Thermal Monocular, Clip-On, Weapon Sight


Friday the 13th is here but rather than consider it to be unlucky you have Friday Night Lights to shine a light and give you hope. Today we will take a close look at a thermal device that has got the thermal users all excited. The IRay USA RH25 Rico Micro. It is an all-in-one thermal device that works as a monocular, clip-on and thermal weapon sight. The best part is that there is not much compromise and the price is actually not terrible. So let’s get into it and check out the RH25 Rico Micro!
iRay @ TFB:
IRay USA RH25 Rico Micro
iRay USA is a distributor for InfiRay and they have brought to the US the RH25 Rico Micro. The RH25 is probably one of the most anticipated thermal devices in the past couple of years. First, it was the InfiRay MH25 which people called “The China Skeet” as a Chinese alternative to the BAE/Trijicon SKEETIR. What settles MH25 apart from the SKEETIR is the fact it cannot be weapon mounted. Well, the RH25 is an all-in-one device like the SKEETIR or Pixels On Target Voodoo-S.
The RH25 has a 640×480 50hZ 12μm thermal. It has a 25mm objective lens.
Let’s take a look at its monocular abilities first. The RH25 comes with the two mounts on the left. The giant block on the left is a recoil-reducing Picatinny mount. The small trapezoid plate is for some form of helmet mount that is not out yet. iRay USA made the Pictail and had ADM make their MQD mount to work with the Pictail so you can mount the RH25 to a Picatinny rail as well.

Probably the greatest accessory is the Pictail. It is sold separately but I would say it is a must-have for the RH25. The Pictail gives you a single slot Picatinny rail and a dovetail. You can also see they drilled and tapped it for 1/4×20 so you can mount it to a tripod.


You can mount some accessories to the Pictail like a laser to help designate objects you see and detect with the RH25.


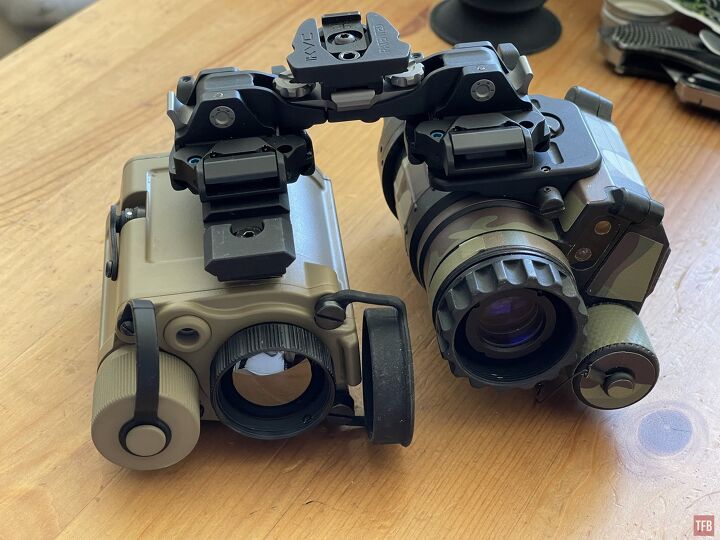
The dovetail section on the Pictail is designed for bridging and helmet mounting. You can use a Mod Armory, Wilcox or KVC/RQE bridge. One thing to consider is bridging it with a night vision monocular. The Pictail inverts the RH25 and the software will change the image for helmet-mounted use and show you a 1x image. If you mount it upright it will go into handheld or clip-on mode which I will explain in a bit. Look at the bridge PVS-14 and RH25 below. Since the RH25 is inverted, this positions the battery compartment to the right, if you are wearing them. This would interfere with the PVS-14 since the dovetail adapter it has positions the battery housing to the left. If I switched the RH25 and PVS-14, so the PVS-14 was on my right eye, the respective battery compartments will hit each other and not work properly.
What you need is an obverse dovetail for either the PVS-14 or RH25. According to my contact at IRay USA, the Obverse helmet shoe is not available yet. But it is mentioned in the RH25 manual.

So in order to mount the RH25 over my left eye, I had to use a MUM-14 with an RQE dovetail.


With the MUM-14 you can mount it using the rail on the other side and an RQE dovetail. So now I can mount the RH25 micro over my right eye if I so desired.


The RH25 weighs 13.5 oz. While that is not ridiculously heavy, the SkeetIR-L weighs just 9 ounces and the Flir Breach weighs just 7.5 ounces. So bridging the RH25 with a PVS-14 or other monocular will not be a lightweight setup.

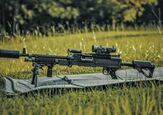
Weapon Mounting The RH25
Since the Pictail dovetail is suited for bridging it is not like the same dovetail on your binocular NVGs, it is a little longer and similar in shape to the Wilcox dovetail on a SKEETIR. So I was hoping I could use a Wilcox FTS (Flip To Side) mount for the RH25. That way I can use it as a clip-on and flip the RH25 out of the way if I wanted to use my day optic.

Unfortunately, IRay USA did not design the Pictail with the Wilcox FTS in mind. I might try and have a friend mill away some material to make it fit since that slot you see below, circled in yellow, does nothing with regards to the Picatinny rail mount.

With the ADM MQD mount, you can attach the Pictail to the Picatinny rail of your gun.

The RH25 comes with a large objective lens eyecup to help block out light getting between your objective lens and the eyepiece.


The ADM MQD mount and Pictail is a perfect lower 1/3 height. You can see how it lines up with the Vortex UH1 and magnifier behind it.

I do not recommend using the RH25 in front of a red dot. It will be like the CNVD-T from L3. Your thermal image will be minuscule. It is better suited with a 3x or higher magnifier.


The RH25 comes with a shock isolating mount but it is very tall and does not line up that well with optics.

Here is a video I filmed in slow motion to show the RH25 recoil dampening mount. Watch the Elcan dance.
The recoil dampening mount does help a bit but on a SCAR17S there is still enough recoil to cause the video recording to glitch a little bit. Click here to watch a video recording with recoil glitches.
Here is another video showing the glitching while shooting the Rifle Dynamics full auto Quick Hatch.
When you use the RH25 on a weapon you can use it as a clip-on but I found 8x on a scope is the maximum limit you want to zoom into the screen inside the RH25. 3x-6x is the sweet spot for use as a clip-on. So an LPVO or ACOG is perfectly matched or a red dot with a magnifier. However, I prefer to use the RH25 as a standalone weapon sight to reduce weight.

As I mentioned earlier, the RH25 has two view modes when the unit is upright: Handheld or Clip-On.
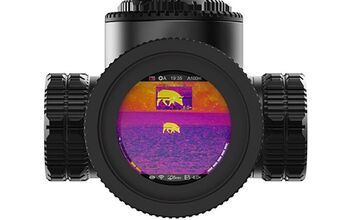
Clip-on mode and helmet-mounted mode are identical. The image is reduced in size to show you a 1x image. This way if you helmet mount it, your unaided eye will fill in the rest while the eye looking through the thermal will see the image but your brain will merge them together. When you have the RH25 set to handheld mode, the image is enlarged to show a 1.3x image. You can see it in the image below. The top is 1x and the bottom is 1.3x. Notice how the 1.3x image is rounded? I guess they programmed this to mimic a scope? I would have preferred the full rectangular image.

When you are in handheld mode, you can enable the on-screen reticle and you can zero it. The screen also has an inclinometer and a digital compass.
Controlling the RH25
The RH25 has three simple buttons. Power, Menu, and Image. These buttons have various functions depending on how long you hold them down. Pressing the power button turns it on. Pressing and holding it down when it is on will bring up a menu to turn the unit off. If you short press the power button, it will recalibrate the NUC. The middle menu button will bring up the menu of options with a short press. The long press will switch from handheld to clip-on mode. Short press the image button and it takes a still capture. Long press will record a video.

The menu is just a series of symbols. I wish the screen would display text when you highlight an option. It does show you numbers like when you change brightness. But for the actual menu options, you have to decipher or remember what they mean. Fortunately the manual explains what each one does.


On the side is a 7-pin Fischer port. Unfortunately, this is not compatible with the iRay CE2 external battery pack. The RH25 does come with a USB/BNC Video out split cable. The USB is used to download any still images and videos you recorded onboard the RH25. The BNC video out is so you can output the thermal image to a mini DVR although I found this to be pointless since the RH25 has an onboard recording. I could see someone mounting this to the outside of a vehicle and plugging it into a monitor inside so you can have your own DVE system.

One major feature that is often overlooked in thermal devices is the objective lens. This has an adjustable objective lens so you can focus on objects close or far. One minor inconvenience is the battery cap. It blocks my left hand from adjusting the objective lens a bit so I end up using my right hand. I would have preferred the battery cap to be positioned in the back so the objective lens is free and clear.

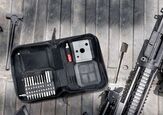
One of the accessories I found well thought out was the battery cap. The Rico Micro is powered by an 18650 however not all 18650s are alike. If you recall, the iRay Clip 1 CE2 uses flat top unprotected 18650s which are shorter than the typical Keeppower 18650s used by Modlite. The length difference is so great that iRay provides you with both battery caps so you are not forced into one type of 18650. I wish the battery cap was adaptable rather than having two separate battery caps. But at least they thought of this and provide both.

RH25 Thermal Imagery
One thing to note is that the FOV on the RH25 is smaller than that of the SKEETIR or Flir Breach. I took the same image with all three devices and superimposed them on top of one another so you can see how much each one shows. The SKEETIR and Flir Breach are similar but the RH25 is noticeably smaller.

Check out the detail on my FJ Cruiser. Amazing!

I brought the Rico Micro with me to a zoo. Here is a giraffe at 1x.

Here is the giraffe under full digital zoom.

And here it is with my Insight MTM afocal 3x thermal magnifier.

Here is a gray wolf eating something in the shade. I could not see the crow with my naked eye.

Gray wolf with 3x thermal magnifier.

My friend J.W. Ramp borrowed an RH25 and took it to Disney World.
Final thoughts on the iRay RH25 Micro
The RH25 Rico Micro retails for $5,999. This is a bit much at first glance but when you compare it to other devices the price is not that bad. A discontinued and used SKEETIRL can fetch a similar price and only has a 320 resolution. While they are great they have their limitations as a clip-on. If you want something in the 640 resolution realm then the SKEEITRX or Voodoo-S retail for $16,000! The Rico Micro seems like a bargain in comparison and it can record video and take still images.
The one thing I dislike about the RH25 is the shakiness of the image. Watch the video above. I was hand holding the RH25 and using a 3x thermal magnifier. I have used that magnifier with other devices like SKEETIR and Trijicon Patrol IR and never noticed shaking in the thermal image like the RH25. However, given the clean thermal image and the fact it is an all-in-on wonder device, I can overlook this minor inconvenience.
Another minor issue I have is that this unit does not seem to keep the color palette I last used. Whenever I turn it on, it always defaults to white hot. I prefer black hot and I have to go into the options menu to change the palette. I wish there was a fourth button to change the color palette. Other than that, the iRay RH25 is an amazing device that has a lot of functionality. The Pictail is a fantastic addition and I find it more useful than the factory mounts. I purchased this from Kosher Surplus who had them in stock at the time I was looking for one. For more information go to IRay USA Website.
More by Nicholas C


![[SHOT 2024] Mantis Laser Training Gets New SKUs – New Blackbeard SKUs!](https://cdn-fastly.thefirearmblog.com/media/2024/05/16/14529205/shot-2024-mantis-laser-training-gets-new-skus-new-blackbeard-skus.jpg?size=350x220)


![[SHOT 2024] New Shotguns From Tristar In 2024](https://cdn-fastly.thefirearmblog.com/media/2024/05/16/14529481/shot-2024-new-shotguns-from-tristar-in-2024.jpg?size=350x220)

Comments
Join the conversation
Just got mine today. My biggest complaint is that it doesn’t support practical external power supply. That 7-pin Fischer doesn’t help much if you want to connect a 5000-10000mAh helmet battery for all night power (or rail mounted battery for rifle-tripod use all night). The 18650 3-4 hour battery is a big step up from 2xCR123 thermals seeming to get 1.5-2 hours... but you’re going to be out for awhile you’re inevitably going to be fumbling around switching batteries in the dark.
If you’re shouting from a bench sighting in for awhile, you can use the cumbersome data/video cable though for extended power.
What's your thoughts on the resolution jump from the FLIR breach for a helmet mounted setup? The breach can be found for ~$2500, so it's quite the price jump up to this.