 Your Privacy Choices
Ballistic App
This past March I bought the Ballistic app for my iPad and played a little with it. A number of you readers jumped in with comments, and the general consensus is that the app was great, but the interface was complicated and documentation was sparse.
My editor contacted me and asked if I would be willing to do a full review on the Advanced Edition version of the app (which is only for the iPhone; I had previously purchased the iPad version). Of course I said yes, and I was sent a code to download the app.
Observations
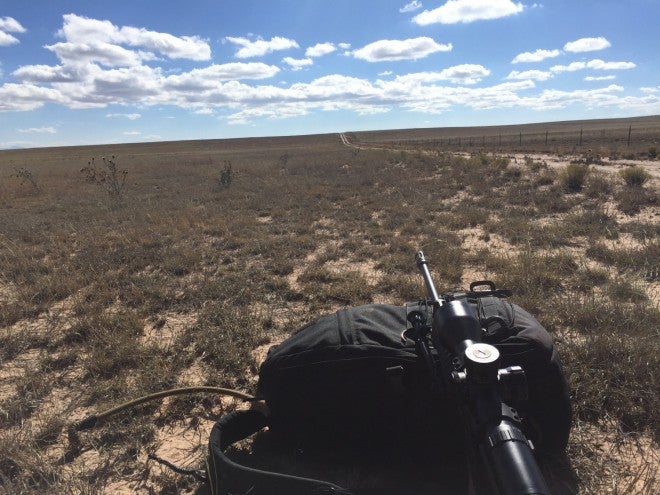
Obviously, to actually go about doing this review, I needed to shoot something at range. It just so happened that I had a pending review on a Bushmaster XM15 (which is pictured in the featured image) which would be a perfect opportunity to do both. The biggest problem was that the rifle shipped with a red dot optic (with a 3.5 MOA dot, no less). Thankfully, Thomas Gomez had a scope (a Bushnell HDMR) that I was able to steal, er, temporarily borrow so that I could get a little further away.
We went out to Tom’s ranch and found a suitable location where we could shoot out as far as we could. Since I was shooting an AR I had no expectations of getting much beyond five hundred yards. At least we could play with the app at one hundred yard increments and see how it worked.

Our target.
We had an eleven mile per hour wind coming from our two o’clock that was measured using our kestrel anemometer. The rest of the data was measured by the app itself using the phone’s GPS and online weather data. Obviously you need to have some internet service for this to work, otherwise you would need to manually input the data.
The app has five main sections: Trajectory, Favorites, Rangefinder, Target, and HUD (which is only available on the iPhone Advanced Edition). Trajectory gives you a range card for your load that you can print, and is useful from that regard (and Favorites is really nothing more than saved “Trajectory” data). The Target section lets you develop DOPE for your system by recording log entries, taking pictures of targets, and recording round strikes. Each section of this app could probably stand to have it’s own full length article. The two remaining ones, Rangefinder and HUD, were the only ones that were useful to me for my shoot and those will be the ones I focus for the rest of this review.

Typical data entry screen allowing you to select the round and other details.
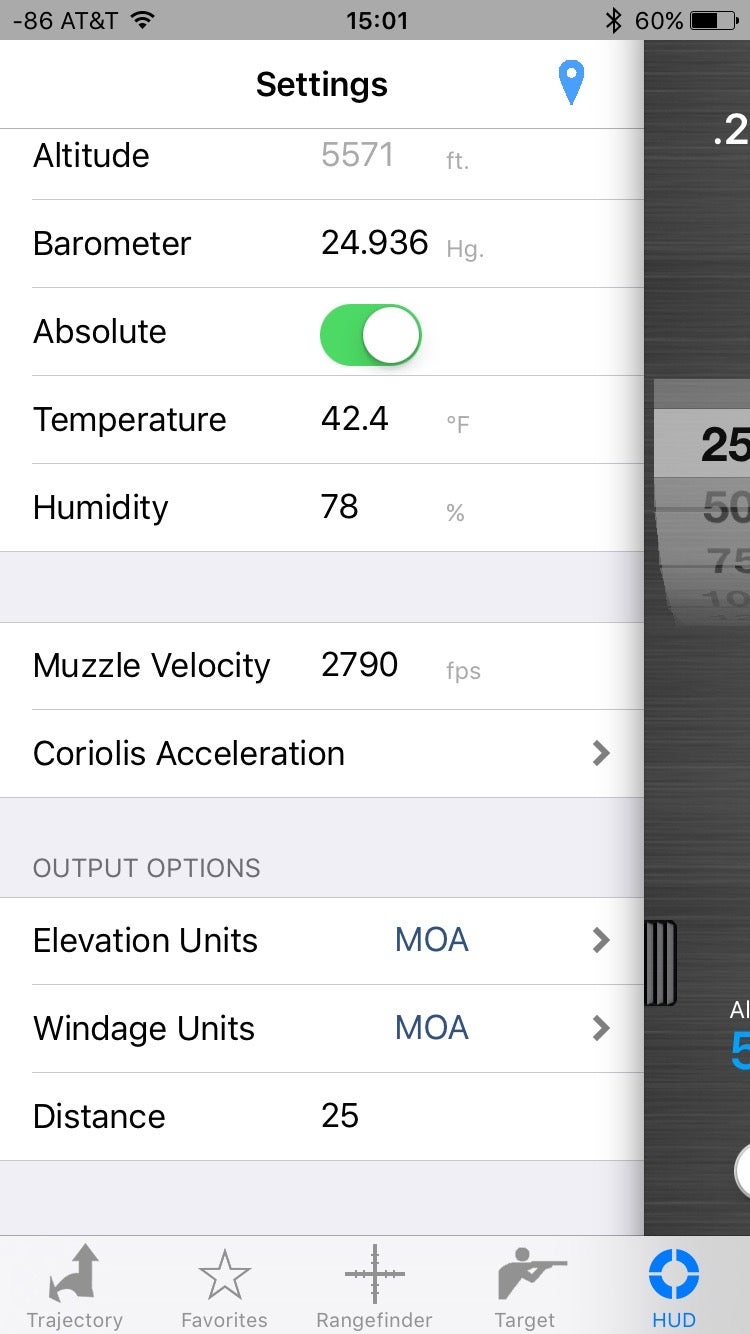
More settings.
The reason I focused on those is that I was using the app for a rifle that I was not planning on owning, so I didn’t have a need to store long term data. That said, I will likely be putting this app to great use on my “precision” rifle.
Each of the main screens (including the Rangefinder, which I will highlight now) allows you to select from a saved favorite (which you create by generating a trajectory card), or by just selecting the profile ad hoc. The app has a huge built in database of bullets and loads, and if that doesn’t meet your needs, you can add your own. Fortunately the rounds that were donated to me for the review were known to the app, and I selected the preset, which in turn, preloaded all of the fields with the data about the round. Next I tapped the map marker icon in the upper right of the screen which retrieved all of the current environmental conditions save for the wind data. We used a traditional anemometer to get this, though I am seriously looking at a smartphone connected one. If you have optics, you can select (or create a new profile) that as well. Once you have put in all of the data you need/want, you swipe the screen over and it gives you a graphic of a reticle loaded with data and adjustment “dials”. Everything from target size, to distance, to target speed (if you have movers). You can even make quick wind adjustments. Overall it gives you a nice visual of what your target field should look like and where you should hold (or if that is not your thing, use the displayed numbers to make your adjustments). While it was nice to be able to see all of the data at first, I ended up thinking it was a bit too cluttered. I think they did as good a job as they could with the available area on the screen, and there is a ton of data to make available.
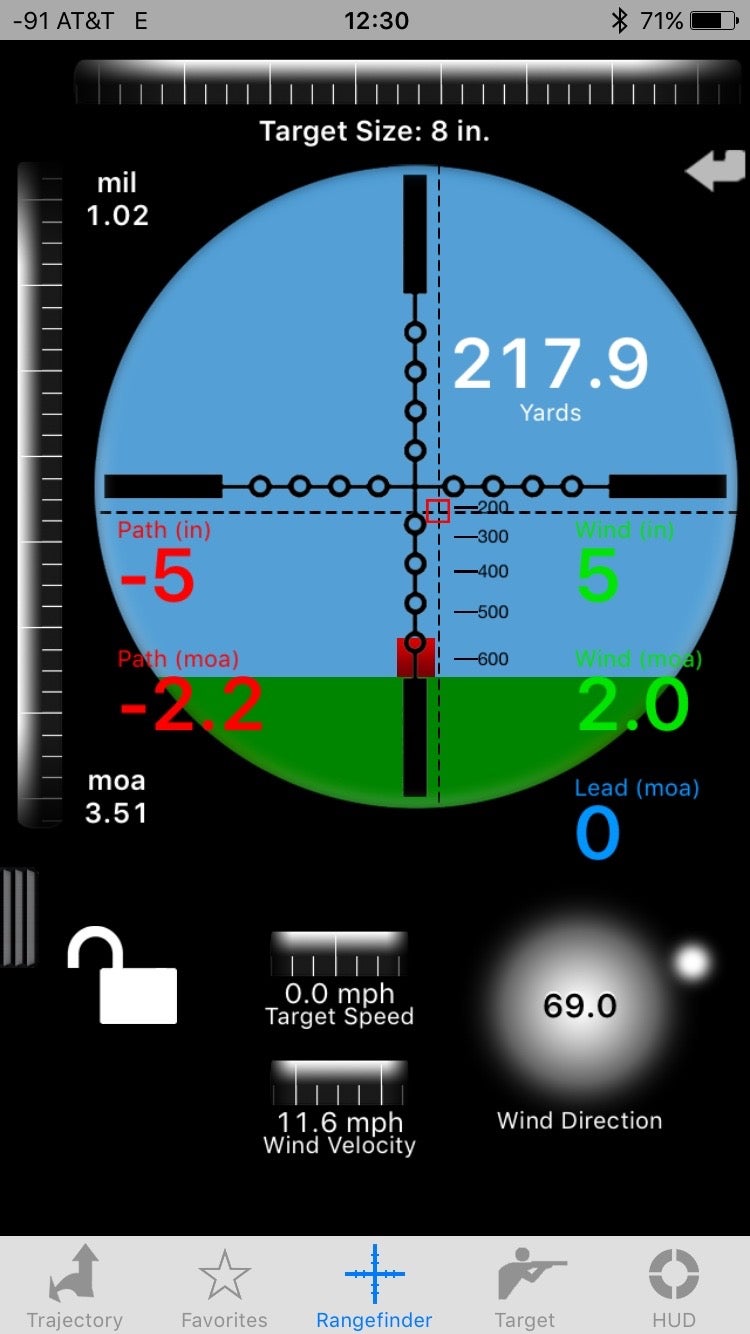
The rangefinder screen showing adjustments based on the environment, round and distance.
This actually led me to what I felt was the most useful part of the app, for some quick ad hoc shooting—the HUD. Like the other parts of the app, you select your round and environmentals. But instead of selecting your optics profile you declare your elevation and windage units. What the app then presents is a greatly simplified interface giving you two simple corrections for your elevation and windage. The screen has some quick dials to give distance (in 25 yard increments), adjust wind parameters, and put in lead. It was this screen I started using from two hundred yards out, and I have included a couple of screen captures from our shots at 425 and 600 yards. As you can see it gave me adjustments for “1” left and “2” and “4” up at the two distances. With the Horus H59 reticle it was a simple matter to adjust my hold over and “ping”. With my Leupold Mark AR I’d just dial the knobs the appropriate amount.
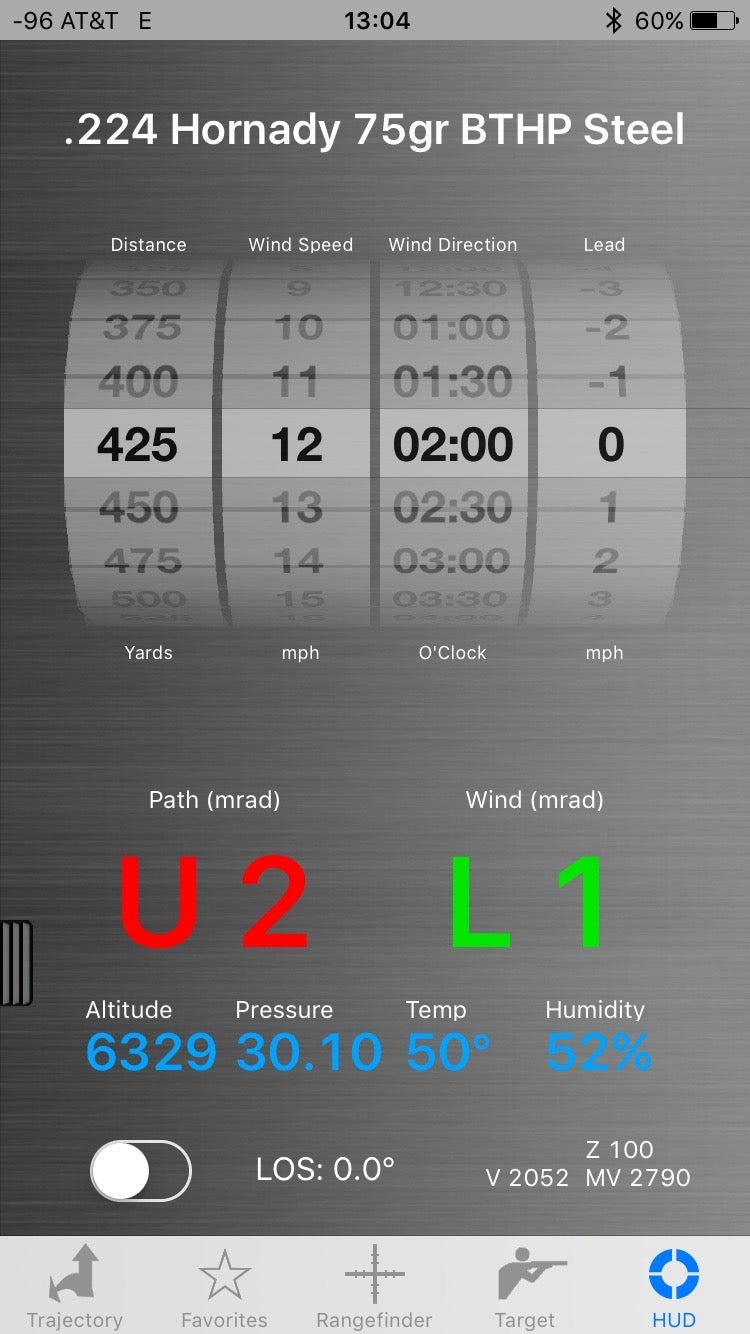
425 yard data and adjustments.

600 yard data and adjustments.
Initially I was skeptical (there was no good reason for my skepticism) that the app would dial me in and give the right adjustments. But it was unfounded—the app did a good job of rapidly giving me the corrections I needed.
Conclusions
Honestly there is more in the app than my skill (and equipment) can utilize at this point. But the features that I used during this review were not only easy to figure out, but pretty accurately helped me make the adjustments I needed to put rounds on steel at six hundred yards.
The iPhone (Advanced Edition) was easier to figure out, in my opinion, than the iPad. Probably because the screens were more tightly focused on the task. In the future maybe I will come back with a comparative review of the iPhone vs iPad versions, and additionally use the app to track long term data on a dedicated precision rifle.
The one downside is that it is only for iOS, and they state they have no intention of making it for any other platform. It is also a little on the pricey side at $19.99 (given the glut of apps under $2.99), but given the amount of data it has on board I think it is worth it (and it is not the most expensive one out there).
You can find out more on their website: http://ballisticapp.com/