 Your Privacy Choices
![By Bain News Service, publisher [Public domain or Public domain], via Wikimedia Commons](https://www.thefirearmblog.com/blog/wp-content/uploads/2018/08/Army_rifle_shooting_Olympic_games_LCCN2014690673-660x484.jpg)
Intro
Throughout my military experience, I have fired the M16 more times than I care to keep in mind. Picture laying outdoors, in the prone position, during rainfall or snowfall, trying to fire; very unpleasant. Amazingly, those factors had no impact on my firing capability. I discovered that while the climate, my mindset, and locality would differ each time I fired, the four rifle marksmanship fundamentals stayed the same. I had set up a stable position, aimed, practiced breath control, and applied trigger squeeze. These techniques appear easy but interestingly many people overlook one or two. Without becoming too technical, I’ll address these four basic skills combining previous experience with textbook responses. I certainly think everybody should comprehend, practice, and utilize these skills on and off the shooting range.
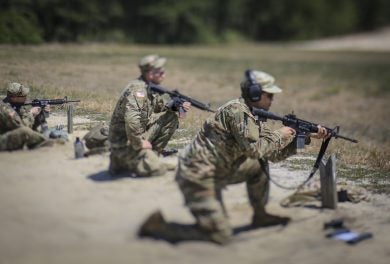
U.S. Army Soldiers fire on targets 100 meters away during Infantry Advanced Leader Course marksmanship training on Joint Base McGuire-Dix-Lakehurst, N.J., May 9, 2018.
Steady Position
The firer must take a steady, relaxed position on the shooting line. Keep in mind that the firer is the greatest judge on his or her placement. It’s what’s most comfortable for them. They must be able to maintain the front sight post steady throughout a shot.
- Firearm Butt Placement – Put in the pocket of shooter’s shoulder. This helps minimize recoil.
- Shooting Elbow – Dependent upon the shooting position. The firer must make sure their elbow positioning allows shoulders to remain level. Regarding an unsupported prone position, the elbow is normally placed close to the body. This assists in sustaining the buttstock in the shoulder pocket.
- Non-Shooting Elbow Position – Securely under the rifle. Should offer a comfy, steady position. If the shooter fires at shifting targets, the elbow position aids those movements.
- Cheek Location – The shooter’s cheek ought to naturally land on the stock with the neck comfortable. This placement reinforces a natural range of sight all the way through the rear sight, front sight, and target. Tip: To attain the same cheek placement each time, the firer can apply two fingers between their charging handle/rear sight and cheek. This makes sure the exact same distance is maintained each time.
![By The U.S. Army (Stress shoot) [CC BY 2.0 (https://creativecommons.org/licenses/by/2.0) or Public domain], via Wikimedia Commons](https://www.thefirearmblog.com/blog/wp-content/uploads/2018/08/Flickr_-_The_U.S._Army_-_Stress_shoot.jpg)
By The U.S. Army (Stress shoot) [CC BY 2.0 (https://creativecommons.org/licenses/by/2.0) or Public domain], via Wikimedia Commons
Aim
The shooter needs to align the rifle and the target the same way each time. To accomplish this, there are a few sight factors that come to play.
- Positioning The Sights – The shooter needs to get the tip of their front sight post centered in the rear sight. It is crucial to know that a small misalignment multiplies the farther the target is. A tenth of an inch misalignment at 25 meters can result in missing a 300m target by about 4 feet!
- Eye Focus/Tiredness – Until you have experience, it is a typical misconception for new shooters to have one eye closed when aiming. One eye closed will result in rapid eye fatigue. Keeping both eyes open minimizes eye fatigue which helps in maintaining the exact same sight picture. In addition, the eye must be concentrated on the tip of the front sight post. This will cause the target to become blurry which is normal. This helps in proper sight alignment.
- Sight Picture – Getting the sights aligned and aiming point down, the shooter can get their sight picture. The target, front sight post, and rear sight post will be lined up.
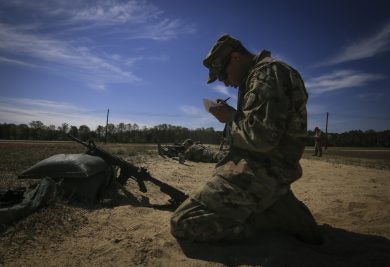
U.S. Army Sgt makes corrections to a range card during Infantry Advanced Leader Course marksmanship training on Joint Base McGuire-Dix-Lakehurst, N.J., May 9, 2018.
Breath Control
The firer needs to manage their breathing throughout firing at a target. Learning on paper targets is a great way of observing if breathing is under control. If a firer’s shot group displays elevation differences (up and down) in between shots, it is probably because they need to train their breathing control.
- Natural Pause – Engaging targets with a great amount of time or weapon zeroing. The firer should pull the trigger during the natural pause of exhaling in a breathing cycle.
- Stop Breathing – If the shooting drill uses very short timed targets, the firer should stop their breath before pinching the trigger. This will ensure adequate time to fire at each target.
Trigger Squeeze
The firer can have all other principles correct but if trigger squeeze is incorrect, the rifle misaligns with the target at the moment of fire. Once again, paper targets are a great way to practice and inspect whether trigger squeeze is being used right. If the shot group displays side to side gaps between shots, it is a great indicator of trigger squeeze.
- Surprise! – Many firers over think this! If the firer realizes that they will pull the trigger, the brain will signal natural reactions like tensing up towards the recoil. This is the easy way to miss a target! Tip: For the beginner, focus on breathing. This will get rid of the anxiety of thinking about pulling the trigger.
- Trigger Finger – The index finger of the firing hand needs to have the trigger placed in between the first joint and tip of the finger. Using the complete end of the finger may cause a minor pull/jerking motion which results in rifle movement.
![By The U.S. Army (Rifle marksmanship) [Public domain], via Wikimedia Commons](https://www.thefirearmblog.com/blog/wp-content/uploads/2018/08/Flickr_-_The_U.S._Army_-_Rifle_marksmanship.jpg)
U.S. Army soldiers look on as Afghan National Army soldiers zero their weapons during basic rifle marksmanship training on Bagram Air Field, Afghanistan, Feb. 11, 2009. The soldiers are assigned to the 1st Infantry Division’s Company D, 2nd Battalion, 2nd Infantry Regiment, 3rd Brigade Combat Team.ÊU.S. Air Force photo by Tech. Sgt. Jill LaVoie
Conclusion
I have coached soldiers who are naturally great shooters fresh out of basic training. Apart from those very select few, many have needed additional paper target training or shadow box training and that’s normal. Many of them even forgot how to “RANGE WALK” down the firing line to get rodded off. Let’s not get started with the ones who couldn’t even point their barrel down range! They were 1 step away from getting tackled! Everything aside, being effective at firing requires practice. These are the basic rifle shooting fundamentals that veteran and professional shooters have perfected. With these marksmanship tools in your toolkit, go get out on that firing line and never forget to practice range safety!
Featured image: By Bain News Service, publisher [Public domain or Public domain], via Wikimedia Commons
Editor’s Note: Welcome to Joshua B, submitting his first article. He has been a long time reader and has an interest in contributing content from a slightly different perspective than we normally have. You can learn more about him from his bio. If you have questions for him, please ask in the comments–and be kind, it’s his first day… 🙂