 Your Privacy Choices
The next evolution for the home machinist is DIY RMR cuts in Glock slides with the Ghost Gunner 3 (GG3). Defense Distributed was kind enough to send in their Optic Cut Kit. I ran the code on two slides and documented the process. Let’s take a look at how you can machine your own RMR cut into slides in the convenience of your own home.
GG3 @ TFB:
- TFB Review: Making A 0% Lower Receiver With A Ghost Gunner 3
- TFB Review: Ghost Gunner 3 – Harder, Better, Faster Gun Making Robot
- [TFB GUNFEST] Ghost Gunner AK-47 Kit – Cut Steel Comrade!
Ghost Gunner Optic Cut Kit
Back at SHOT Show 2020, James interviewed Defense Distributed and they mentioned a Ghost Gunner user had created code to cut Glock RMR optic cut in their Ghost Gunner 2 (GG2). This was amazing for Ghost Gunner users since the GG2 is not designed to cut steel. Last summer Defense Distributed teased a picture of a GG3 cutting an optic cut. Well, DD was kind enough to send in one of their Optic Cut Kit in for review, they even included a stripped P80 slide as well, just in case I didn’t have any Glock slides to work on. I do but this was a nice surprise.
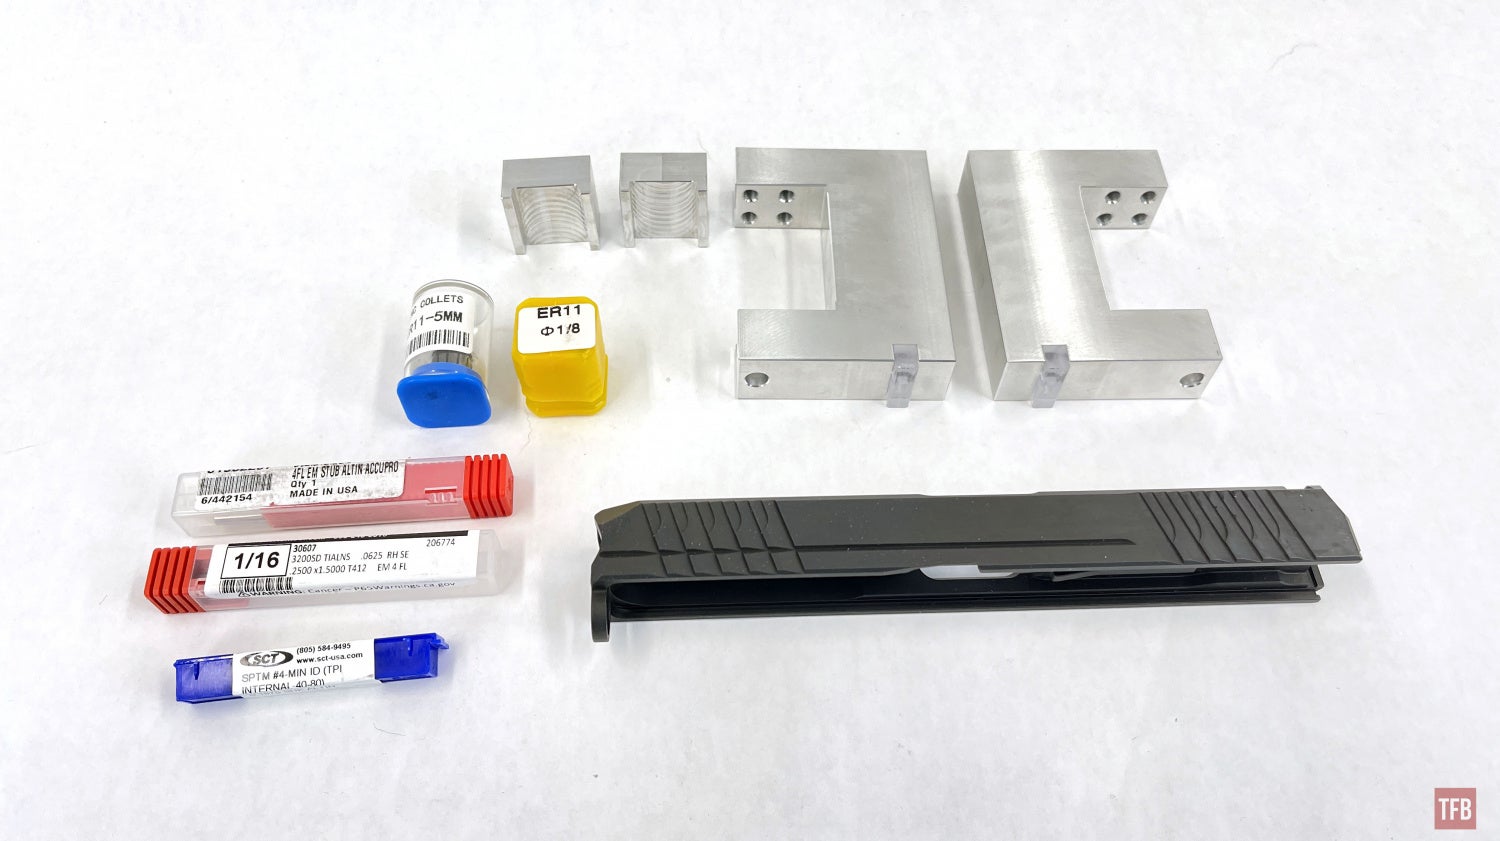
Optic Cut Kit (Slide not included)
Above is the optic cut kit. DD included their newer V2 clamps. Normally there is more hardware with the optic cut kit like the fan, screws and jaws to hold the slide. These are actually the same parts used in the Zero Percent Starter Kit. When they sent their Zero Percent Kit in for review it had a set of their V1 clamps. Below is a photo of the V1 next to the V2 clamps. You need V2 clamps to work with the Optic Cut Kit.

You can see V1 on the left and V2 on the right. The V2 has two more holes which are used specifically for the Optic Cut Kit.

A minor change can be seen in the foot of the clamps. The V1 had a circular cut while the V2 has a square cut.

Starting Up The Optic Cut Kit
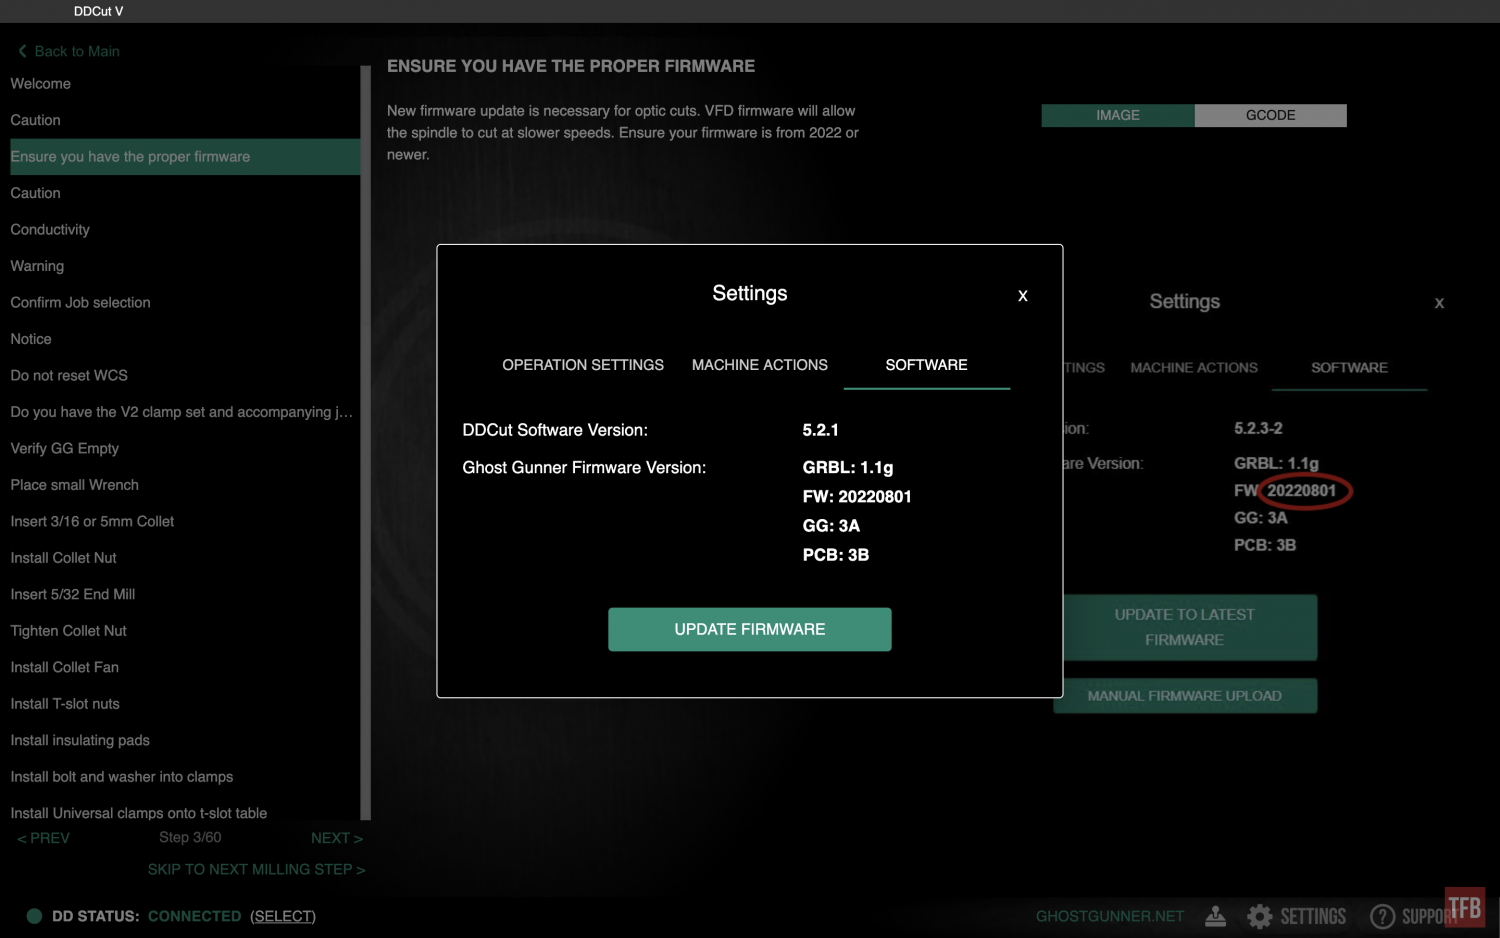
The first thing I had to do was update the firmware. The newer GG3-S does not need to be updated.

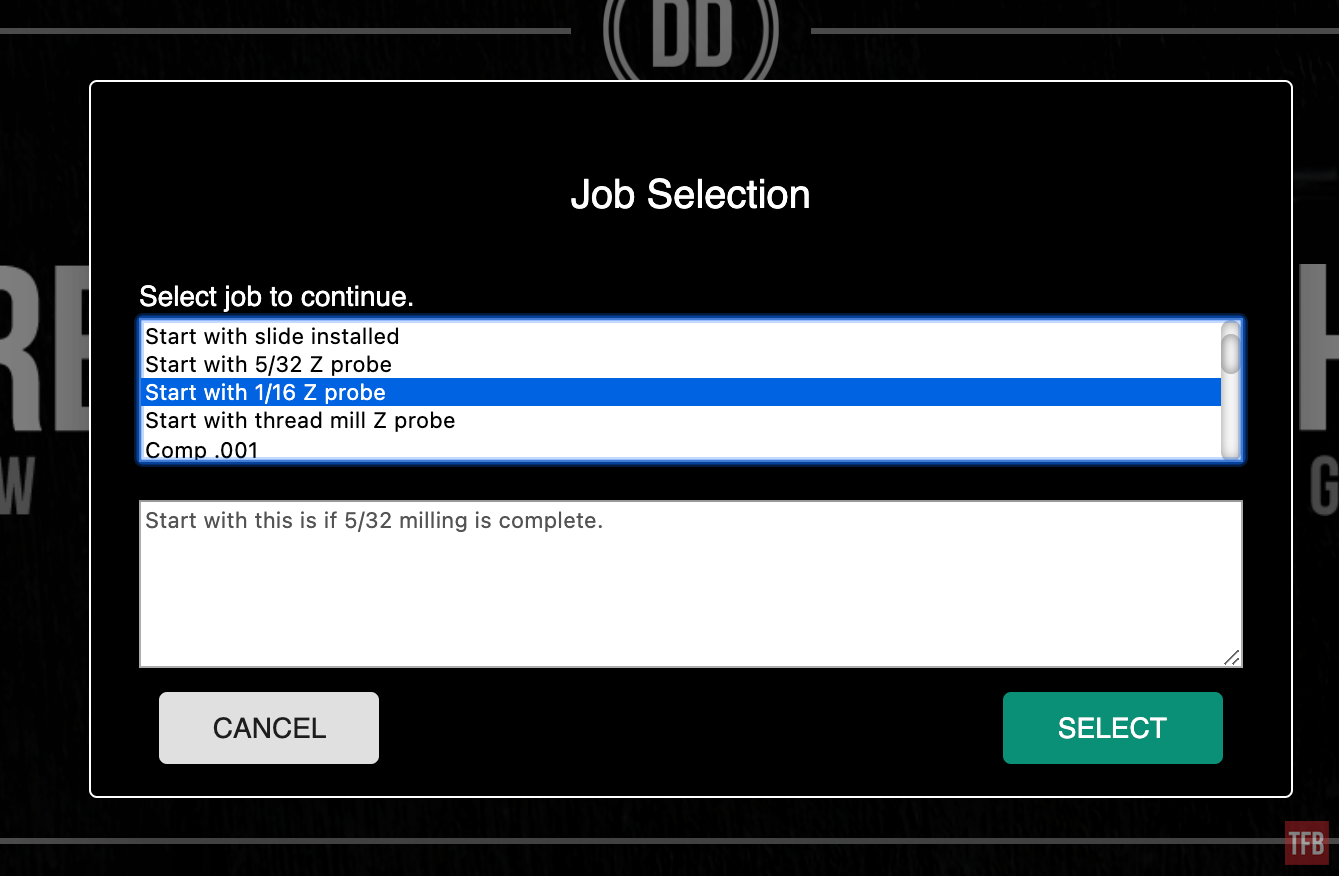
Then I selected the DDCut code.

When you start the DDCut Optic Cut software there are a number of options. Since I am starting fresh, I start with “RMR cut all operations”.
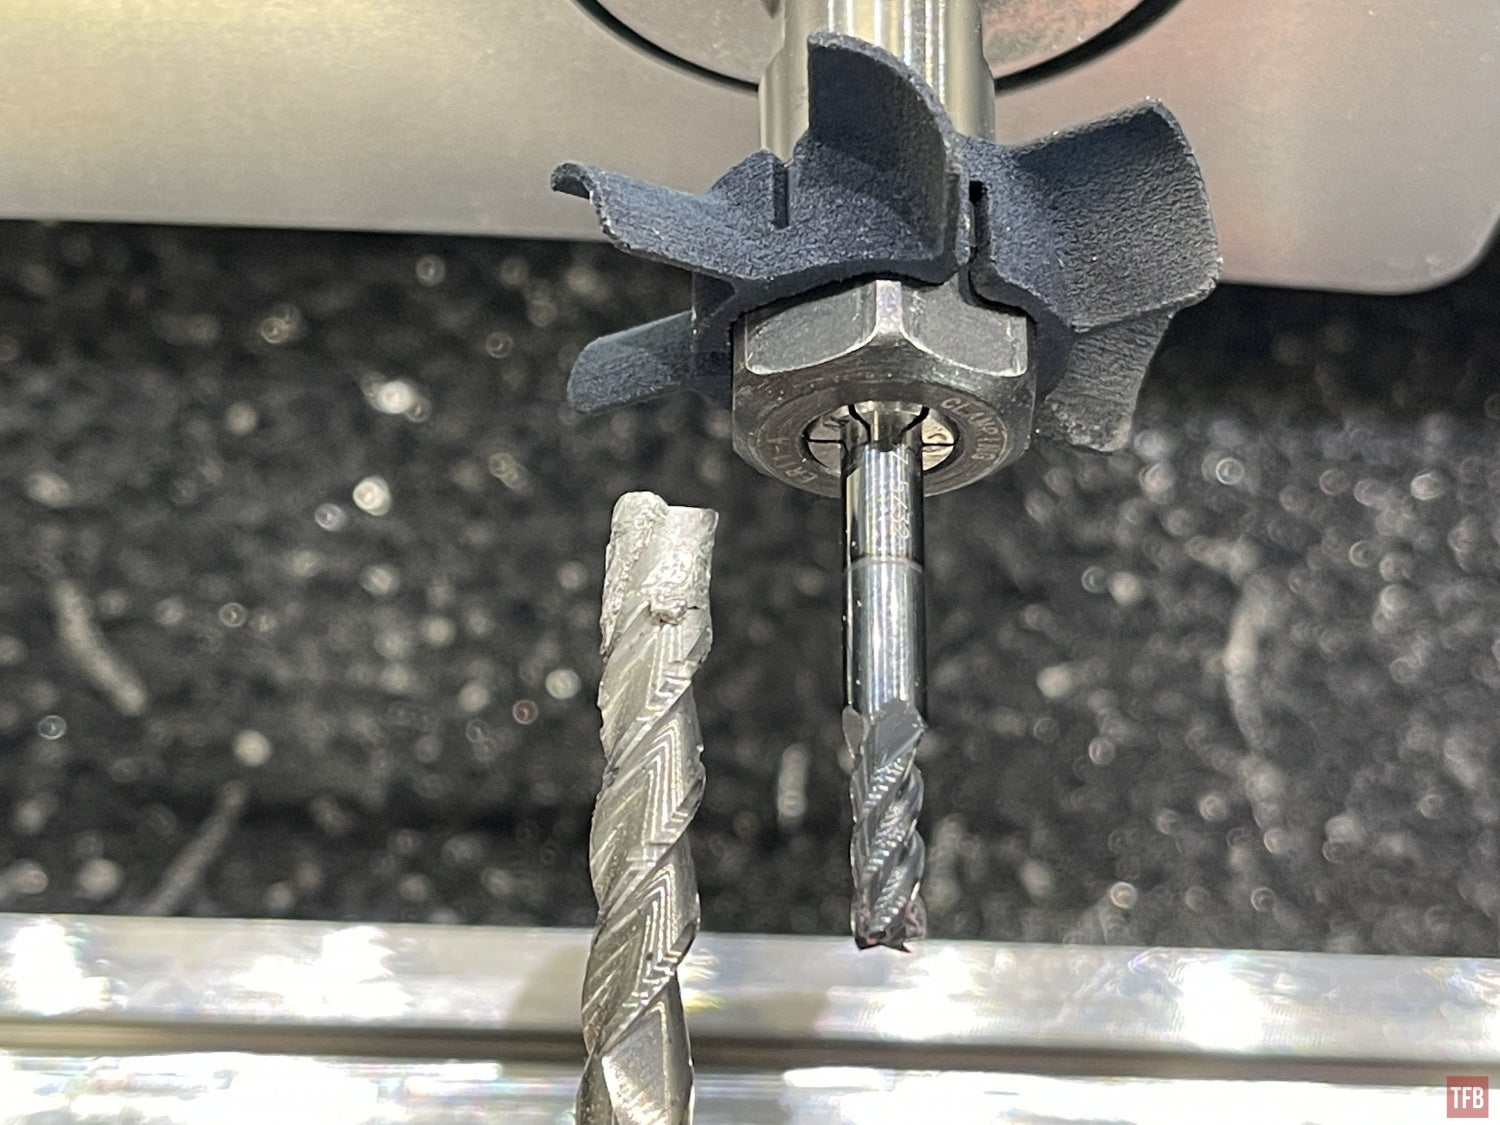
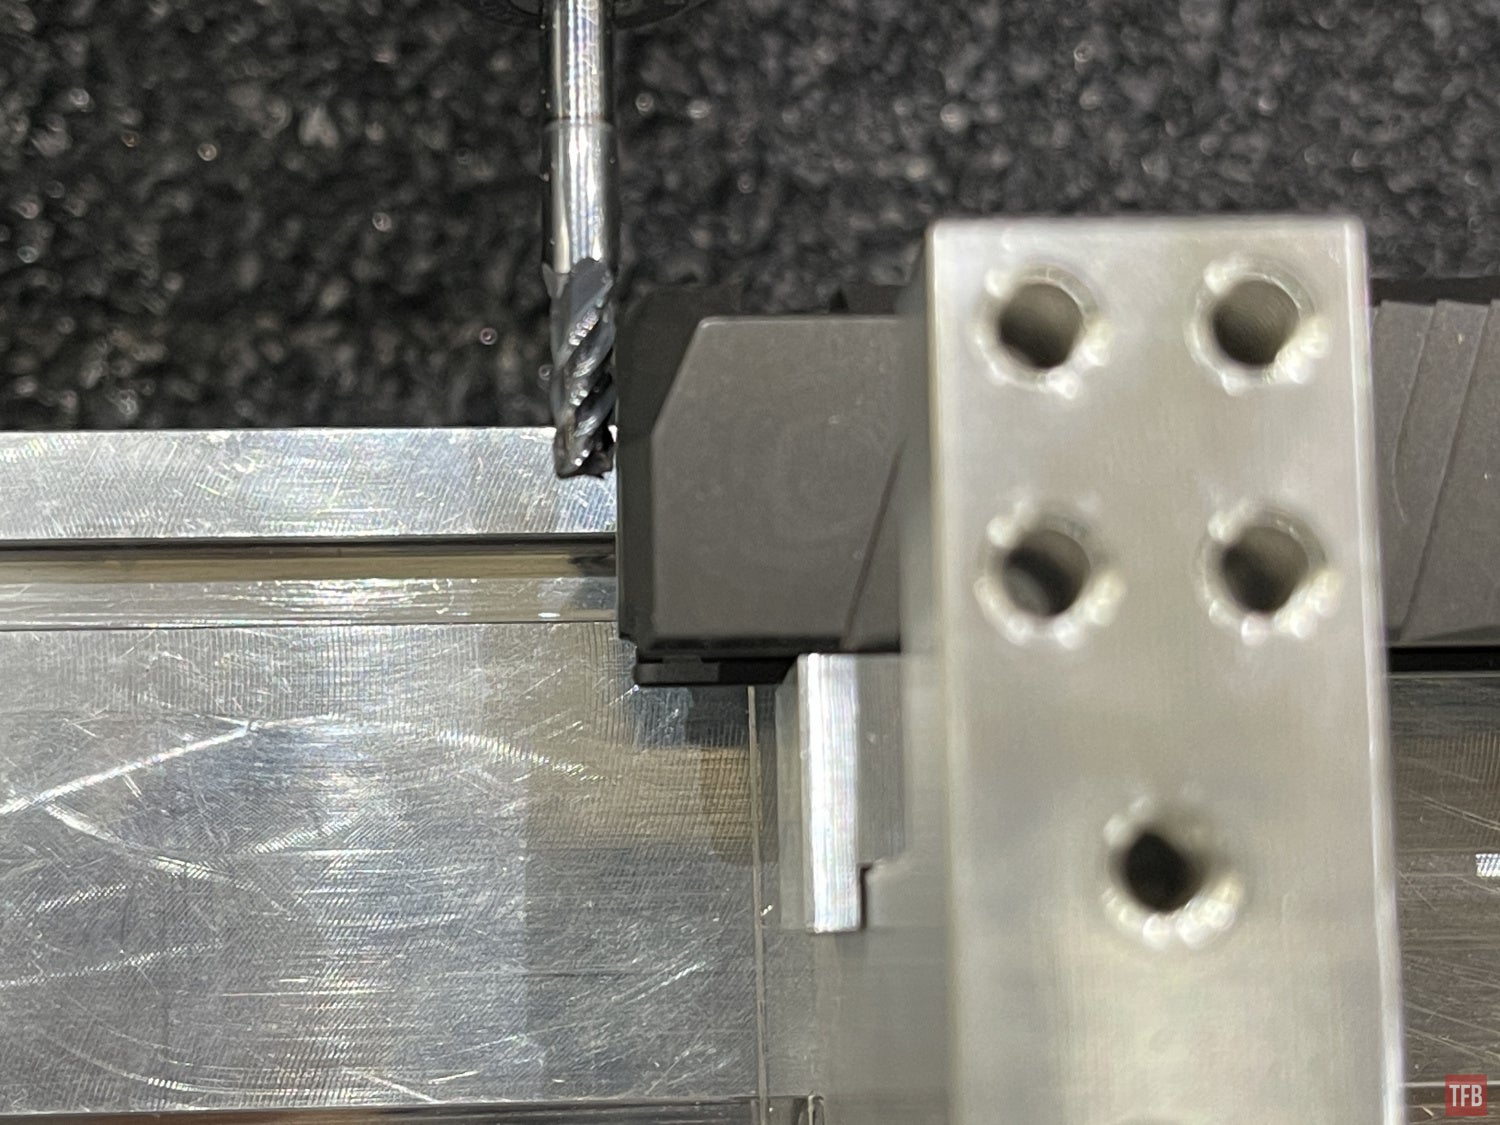
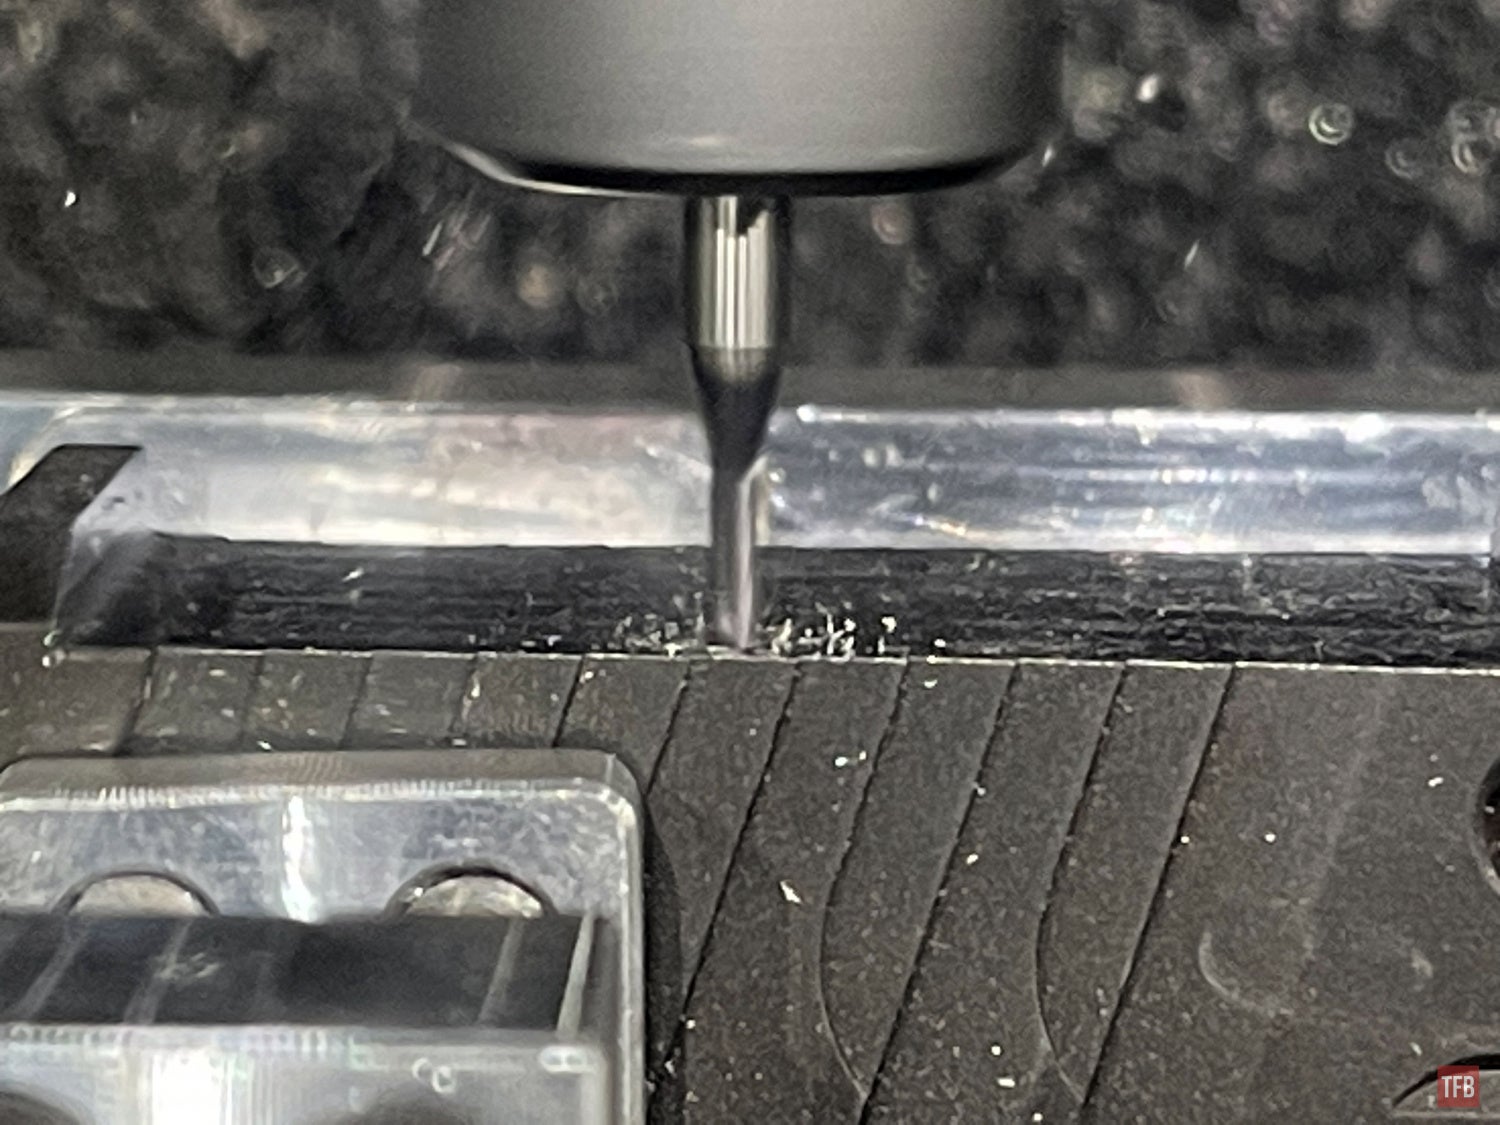
You start by installing the 5mm collet and 5/32 end mill. I placed a used 1/4″ end mill, used for GG3 80% milling, next to the 5/32 for comparison.
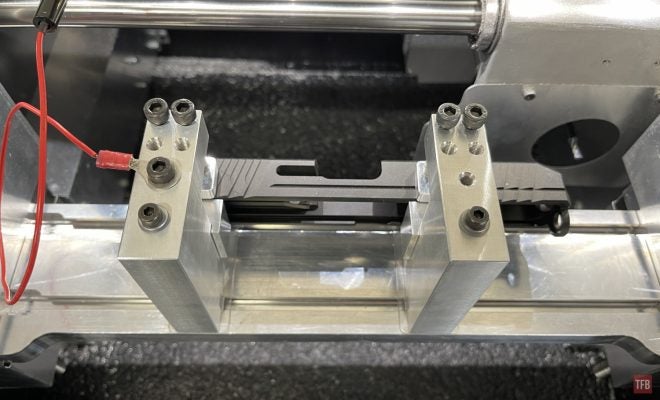
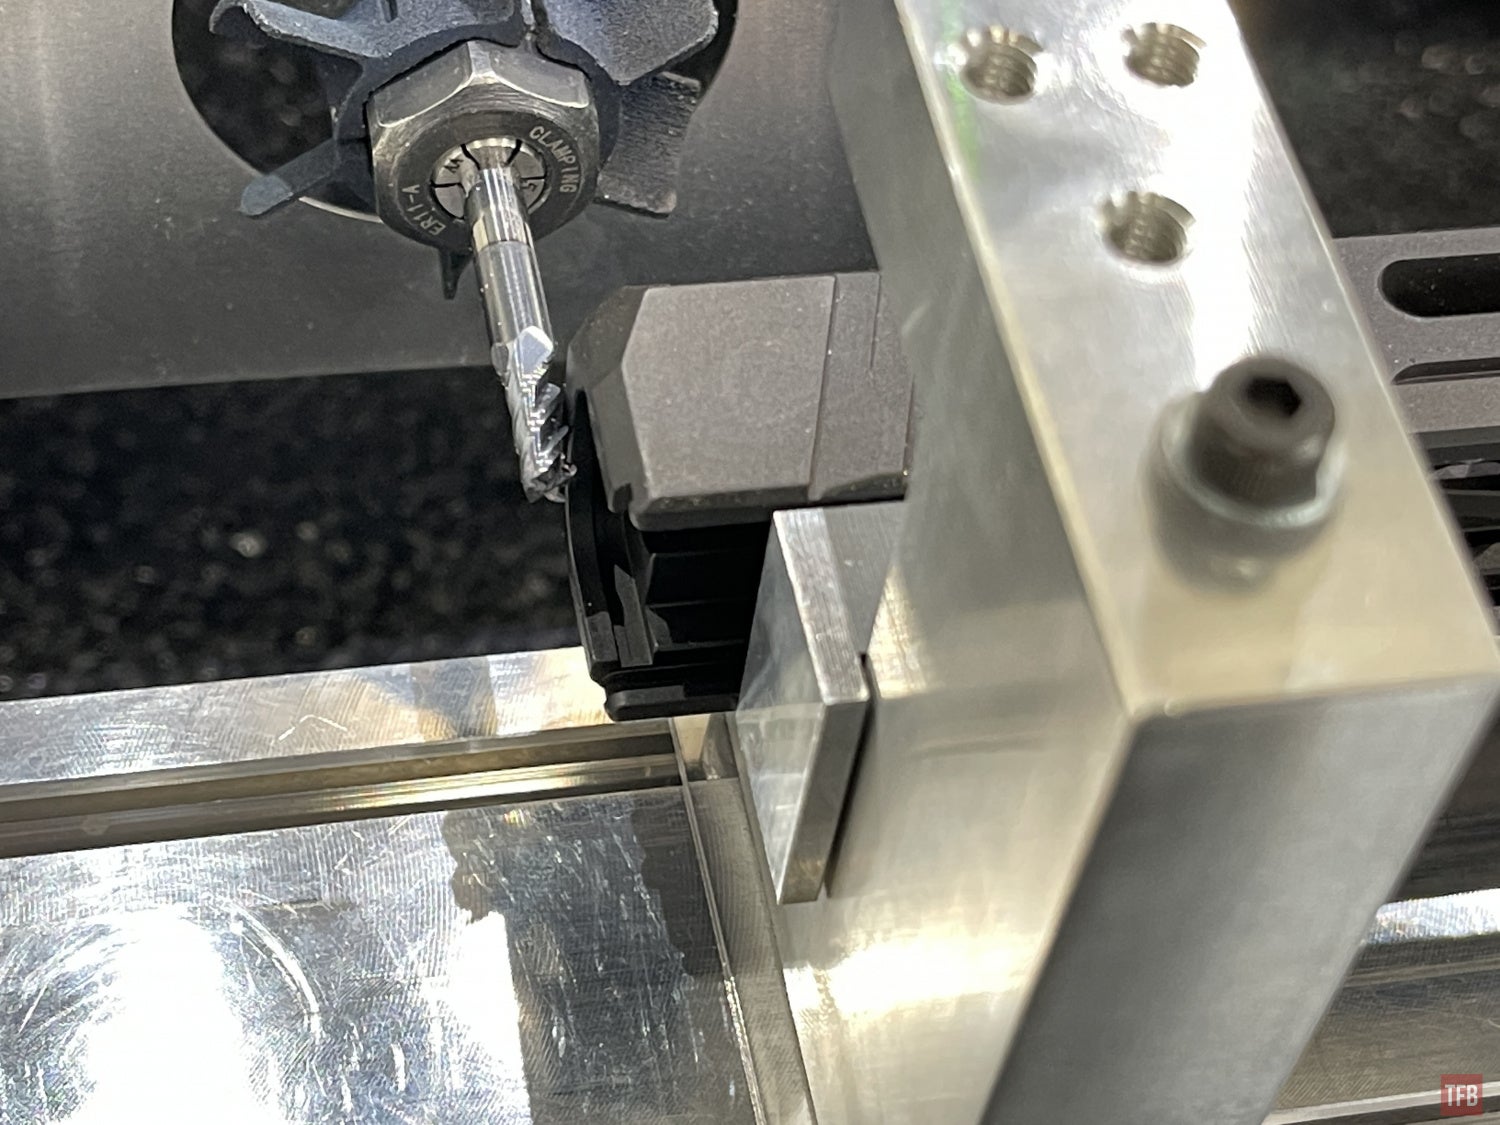
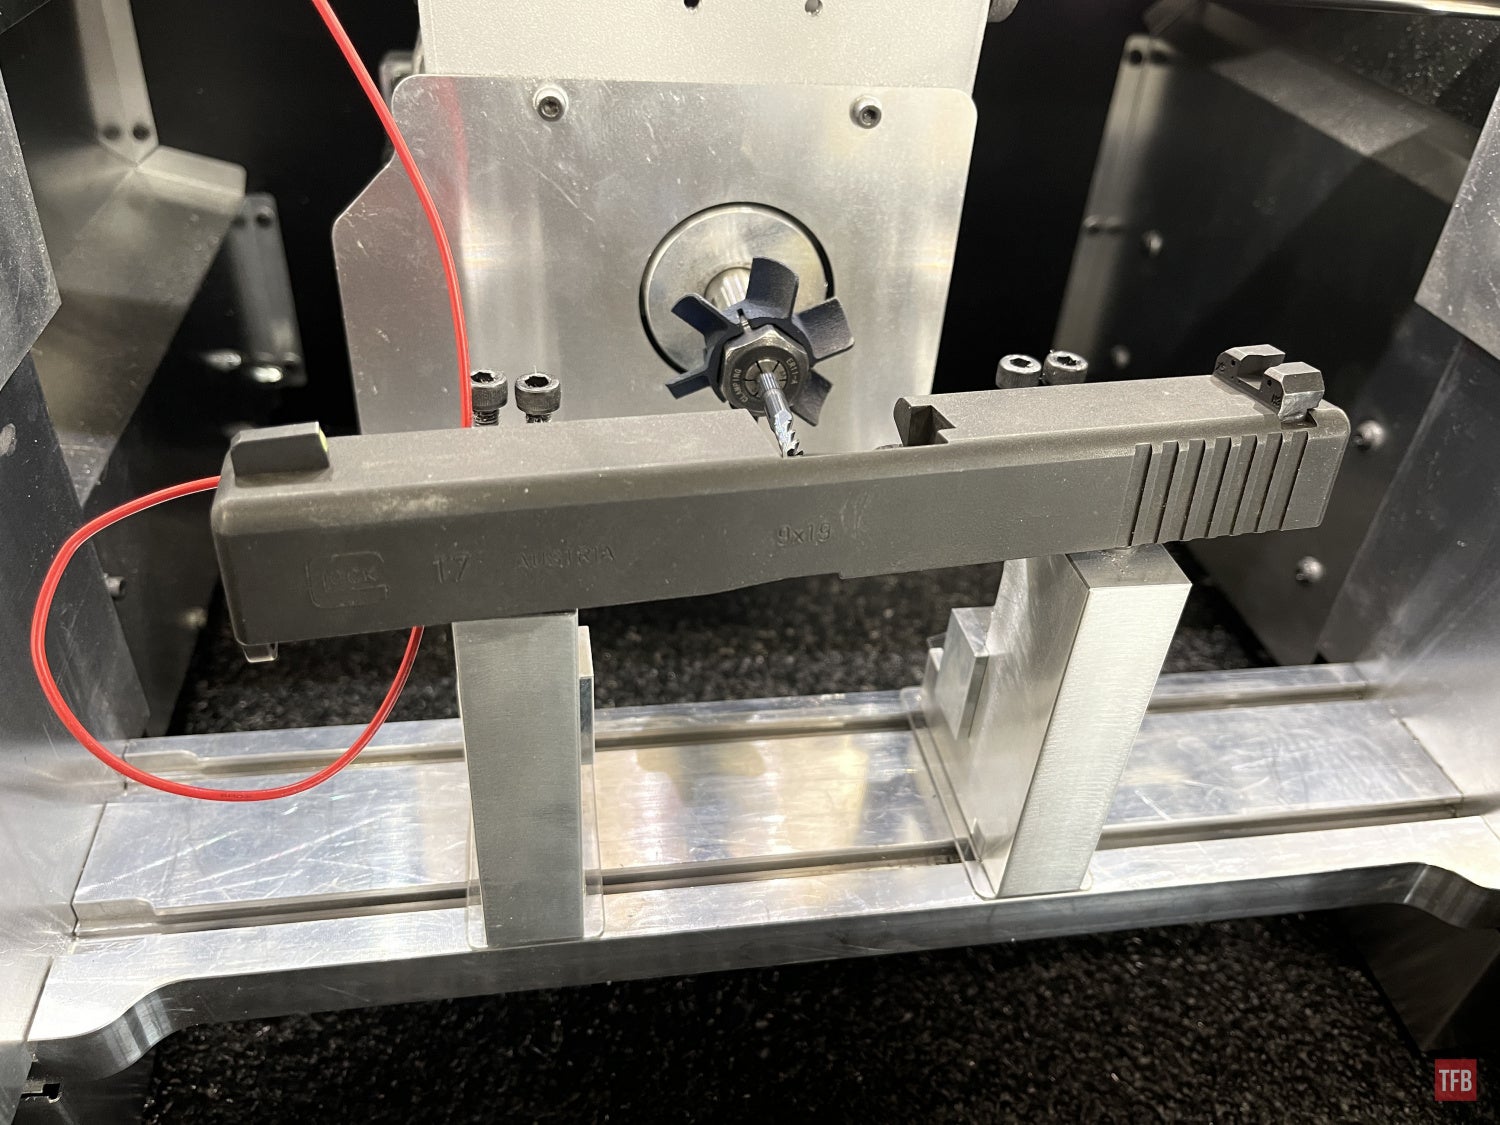
Next up is to install the V2 universal clamps. You slide them all the way to the left and right of the build plate. About 1/2″ away from the side walls. Next, the end mill will move into position. In the photo below it is ready for the left clamp to slide up next to it. You slide the clamp over so it kisses the end mill. Then tighten the bolts. Continue with the software and it will reposition the end mill to position the right clamp. The right clamp position is not nearly as important which I will explain later.

The next step is to install the “parallels” which are two aluminum blocks that act as spacers to push the slide further away and closer to the end mill.
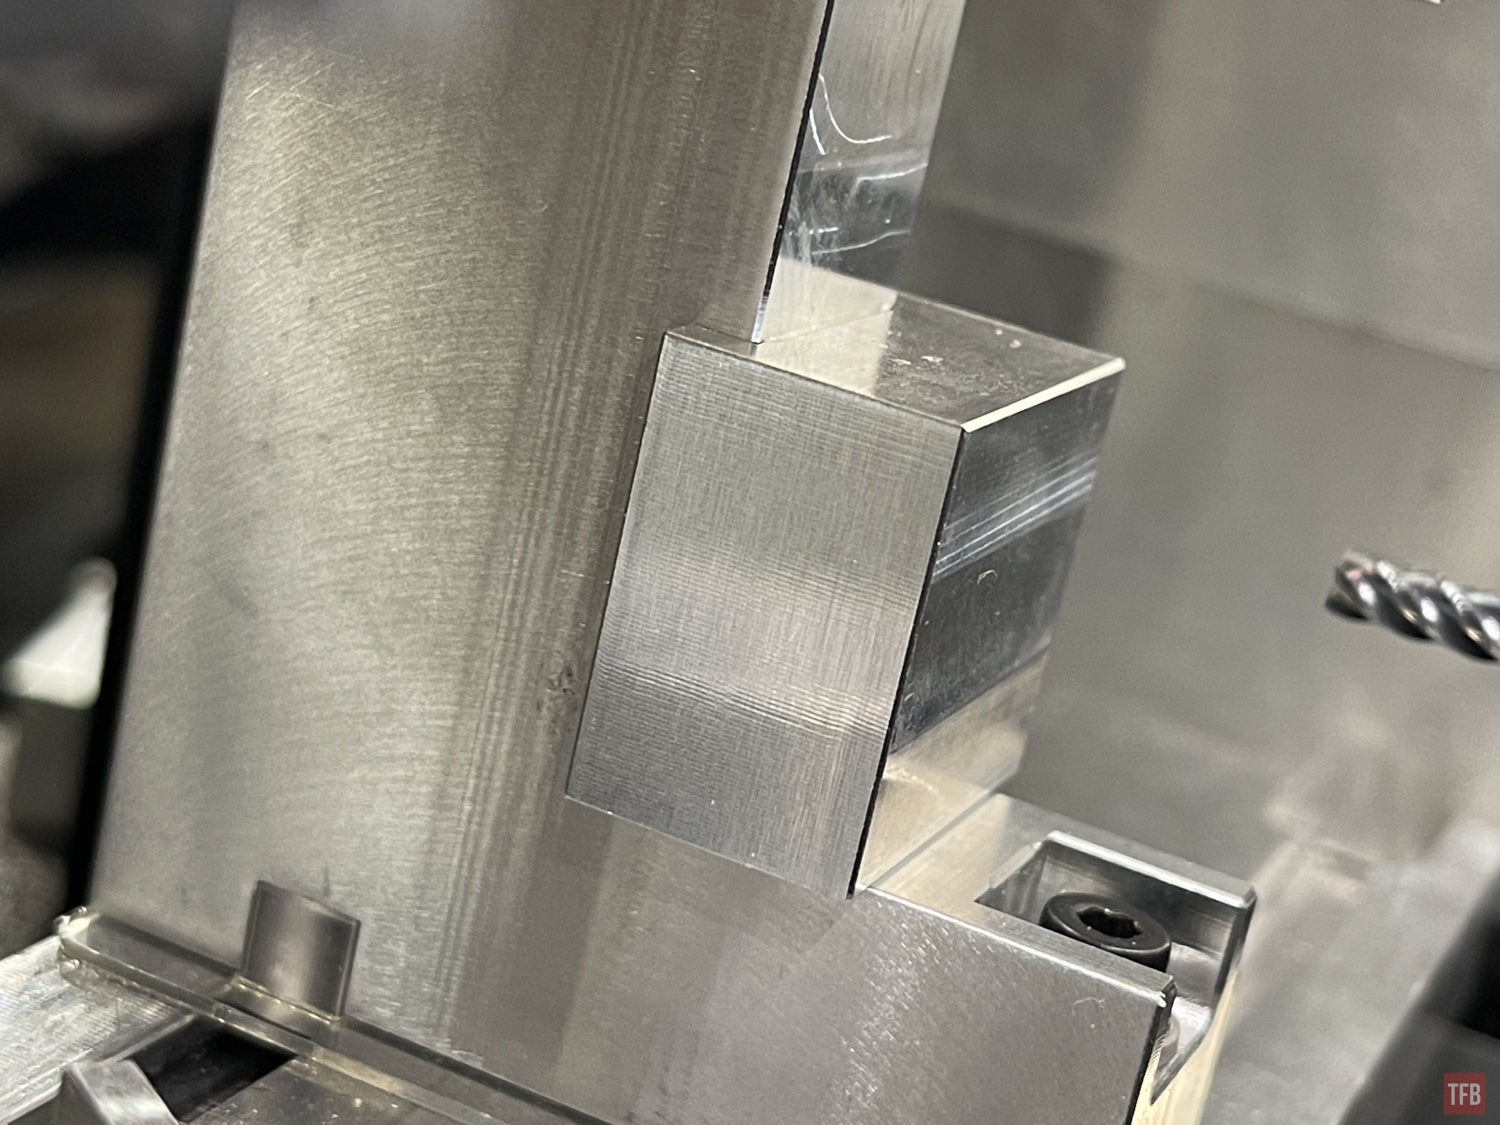
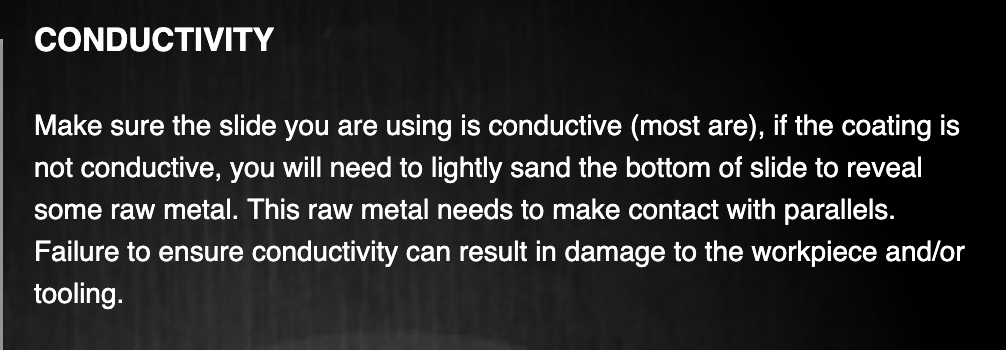
Once you install the parallels, the end mill will move so you can install and position your workpiece. In this case, it is the P80 slide DD sent with this Optic Cut Kit. The software warns you that the slide needs to be conductive. Glock slides with Tenifer coatings are. As well as the P80 slide. I suspect a Cerakote slide would not be but P80 says their slides are Cerakote and I did not experience any issues with connectivity for probing. If your slide is not conductive, the software suggests sanding the bottom of the slide. They say it needs to make contact with the parallels but really it is just the left side that matters since that is where the probe is attached.

You move the slide to the left so it kisses the end mill.
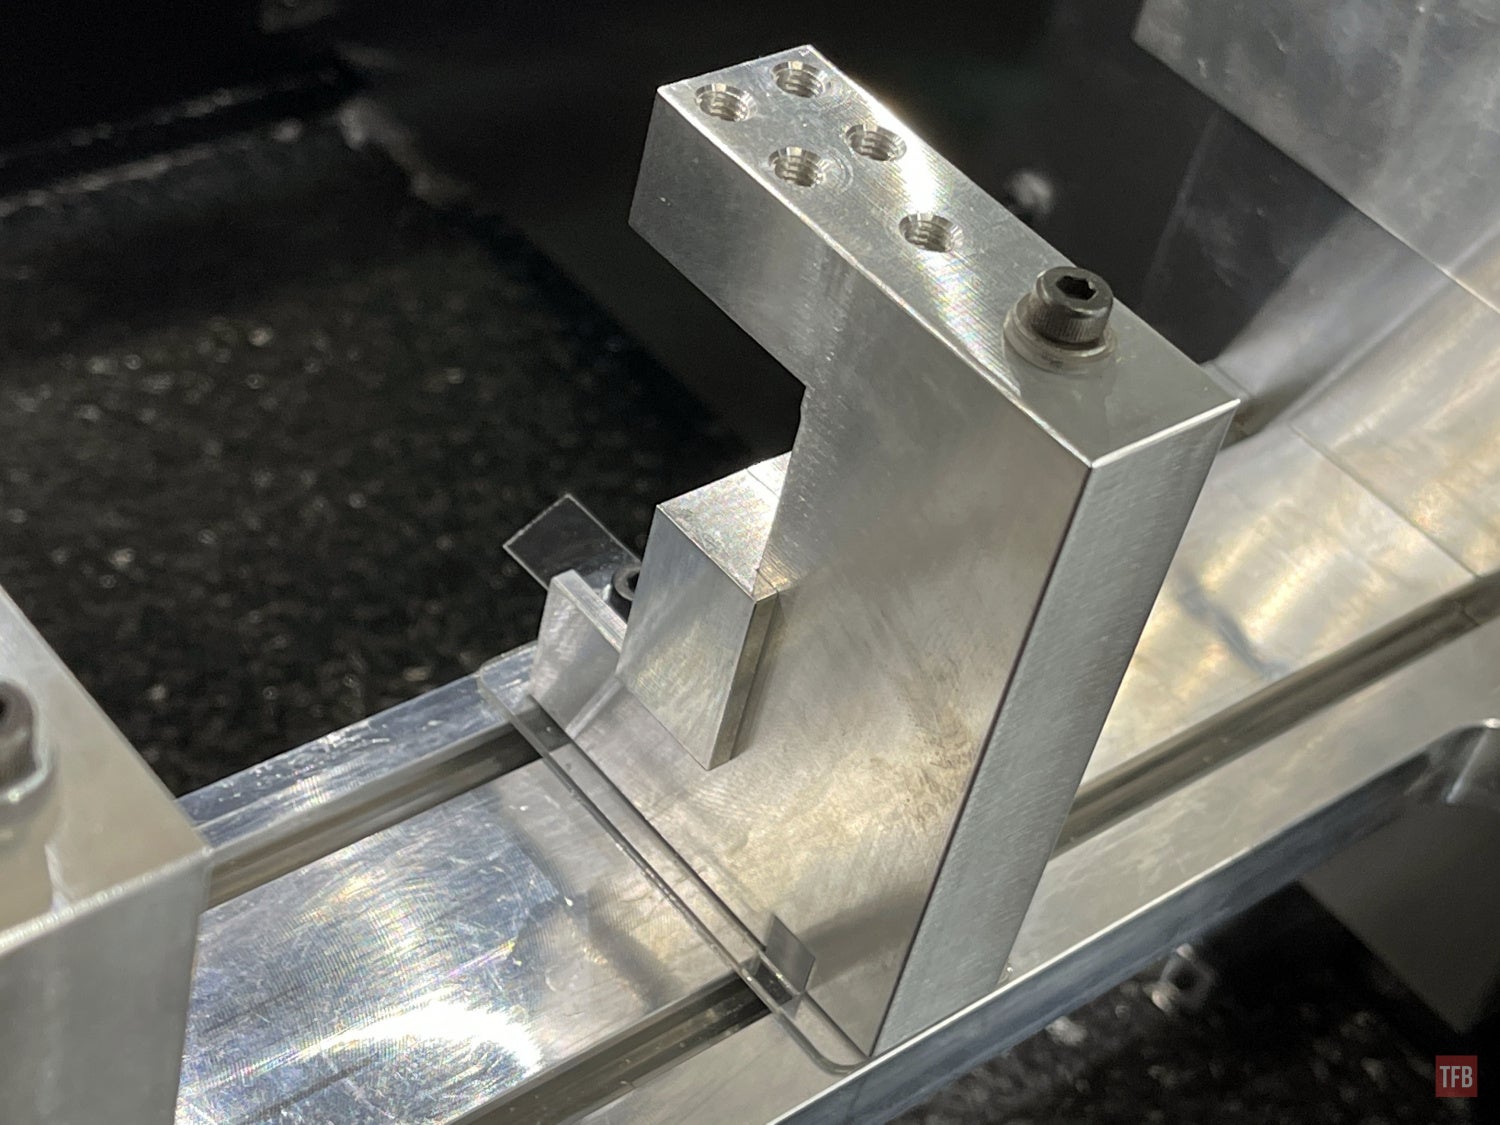
Next, you use the aluminum jaws and tighten the four screws. Make sure you hold the slide and gently pull it back into the parallels as you tighten the jaws.

The DDCut Optic Cut Kit software will now probe with the end mill off these three surfaces of the Glock slide. Remember the software mentions making the slide conductive? I suspect you could use copper tape instead of sanding the bottom of the slide. Similar to an anodized 80% lower, this should work in helping the GG3 probe the workpiece if your slide is not conductive. There is no other need to have conductivity with the slide other than for probing.
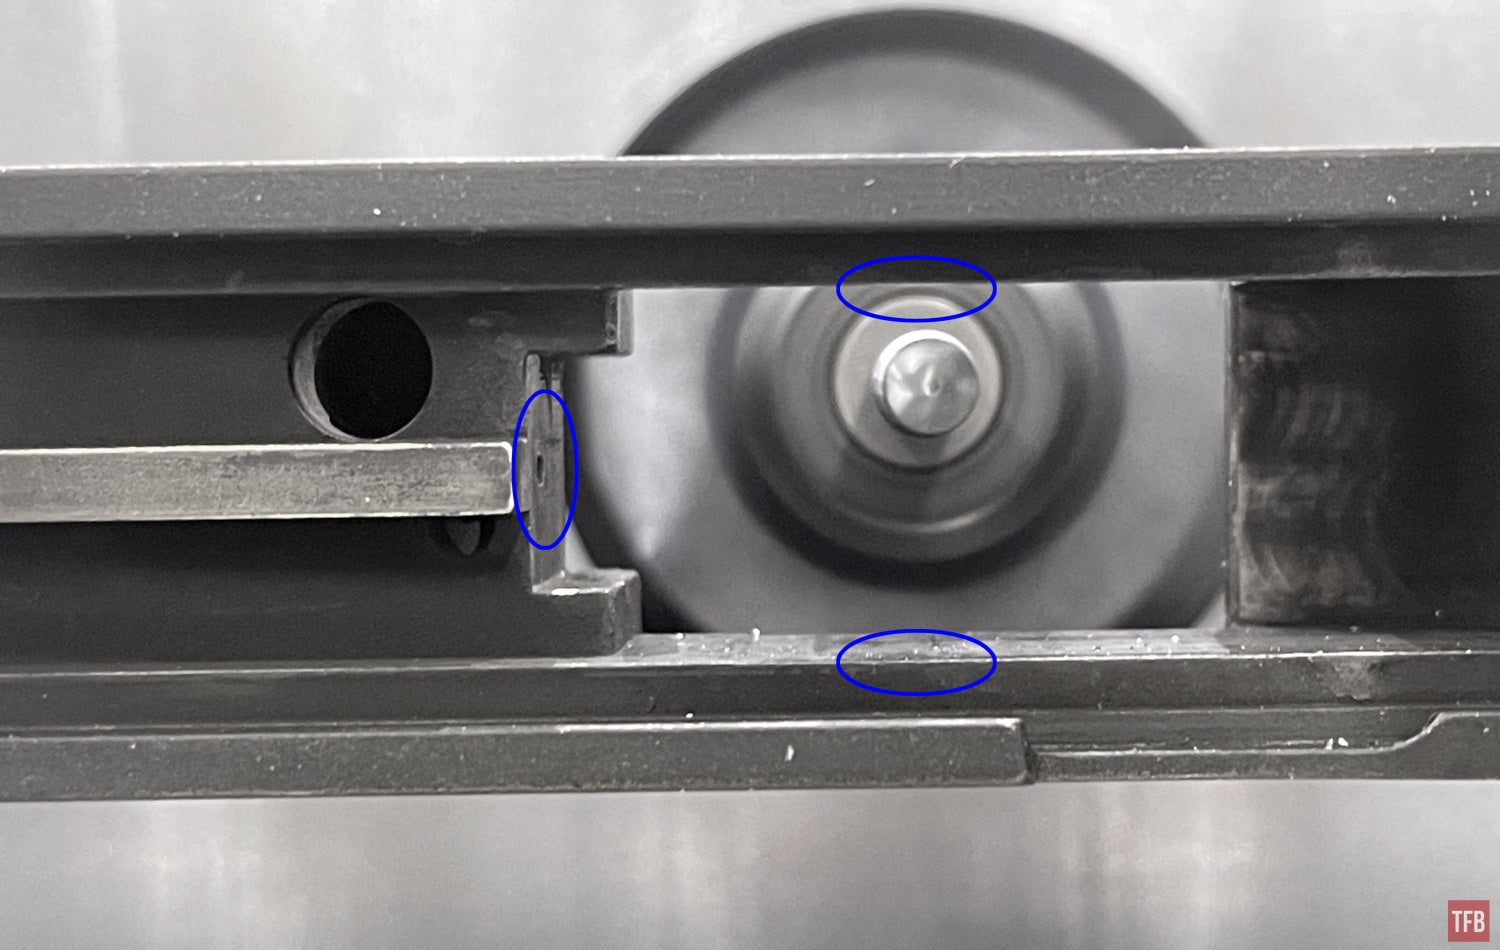
After the end mill probes the inside of the Glock slide, it probes for Z height off the left clamp. This is why I said earlier that the right-side clamp position is not critical. It is only important to be far enough to the right so it clears the end mill when it probes the slide.


The Optic Cut Kit’s first milling job takes one hour. The software then instructs you to test fit your optic.
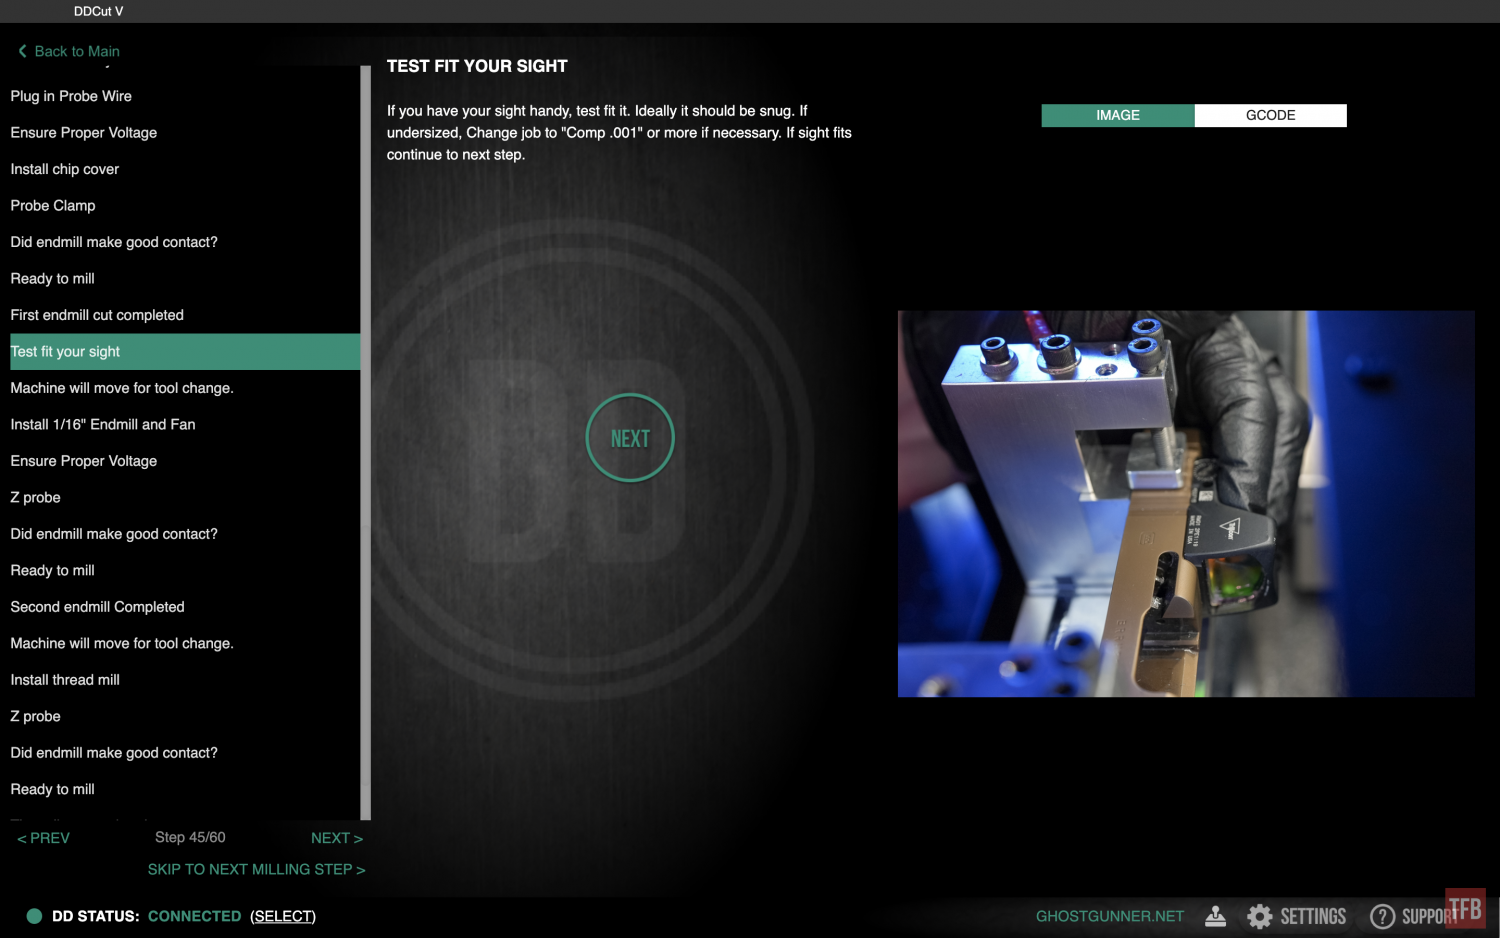
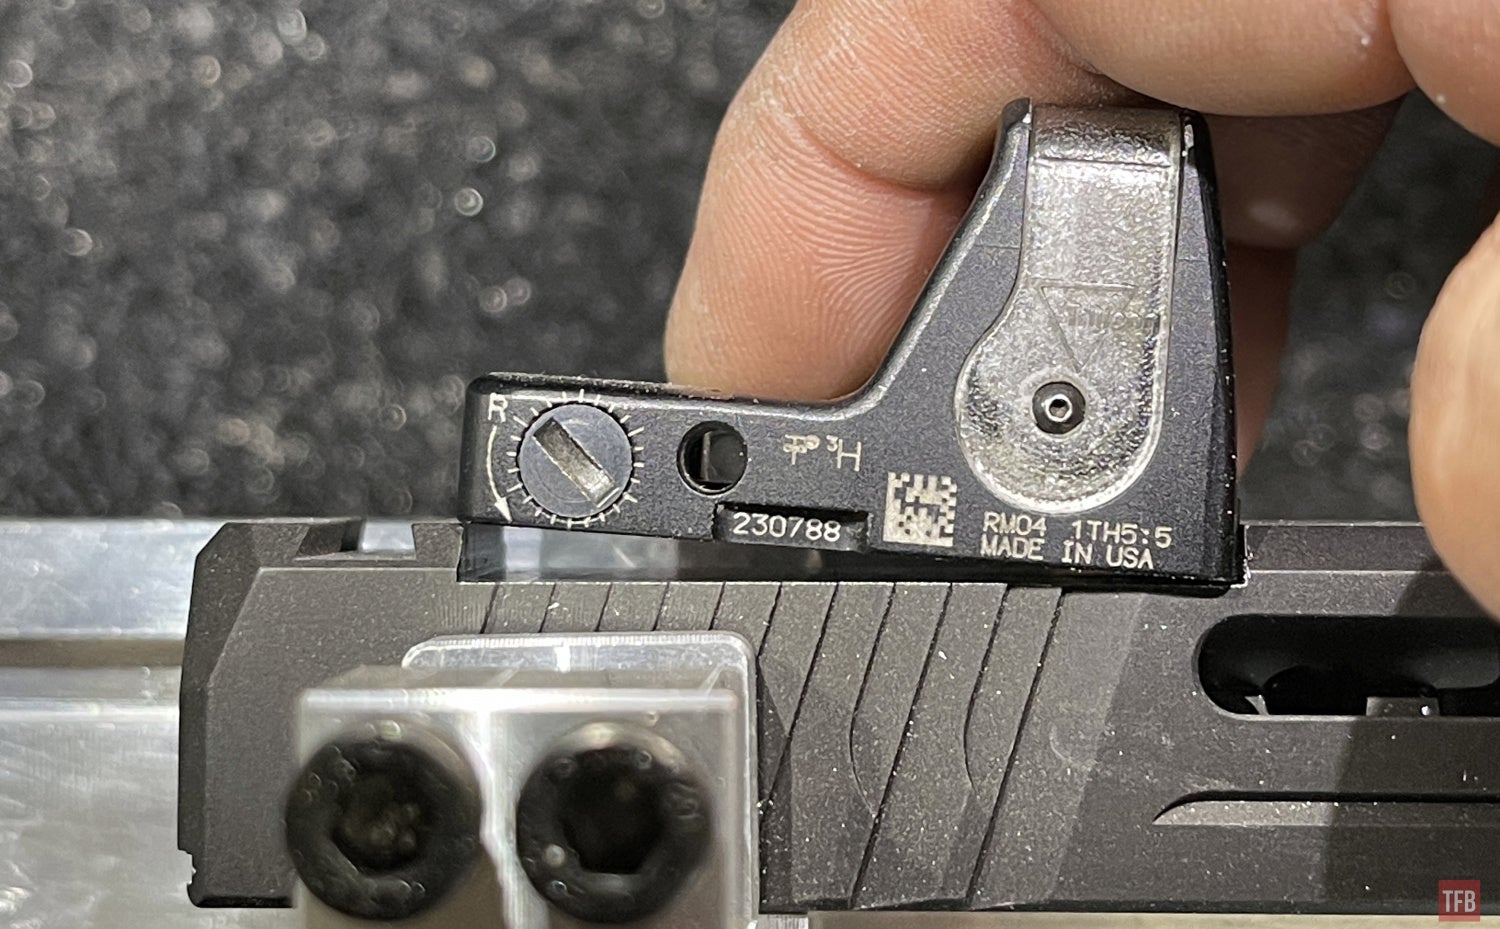
I tested my Trijicon RMR and Holosun 507C. Both did not fit.

So next up is to exit out of the current job and load “Comp .001” job. When you do, the machine will reposition for a tool change, this seems unnecessary since we are using the same 5/32 end mill from the previous job. Click enter and it will machine the front and rear surfaces of the RMR cut to length the cut.

After running “Comp .001” the software will tell you to continue with the next job but if the RMR cut is still undersized go to the next Comp job. I ended up needing to go all the way up to Comp .012.

Now they fit!


The next job for the Optic Cut Kit is to mill the screw holes. Start “1/16 Z probe” job.
When I performed this job for the Optic Cut Kit, the Z-probe failed. It hit a “hard limit”. I was confused. This has happened in the past with the Zero percent kit and it required tweaking the code. But this is different. It hit the clamp too soon. So I pulled the collet and tool out to see if there were any issues. Sure enough, there is a small lip at the back of the collet. Normally I install the collet and then insert the tool by pushing the tool until I feel resistance. That small lip created a false bottom. I thought the tool was inserted far enough. It was not. So now I insert the tool all the way so it pokes out the back of the collet before installing the collet. Now when I install the collet, I just continue pressing the tool in so it touches the back of the CNC head.


1/4″ end mill next to 1/16″ end mill.
Just like the 5/32 probe, the 1/16 end mill probes off the left clamp.

The Optic Cut Kit code only took 3 minutes to mill both holes.

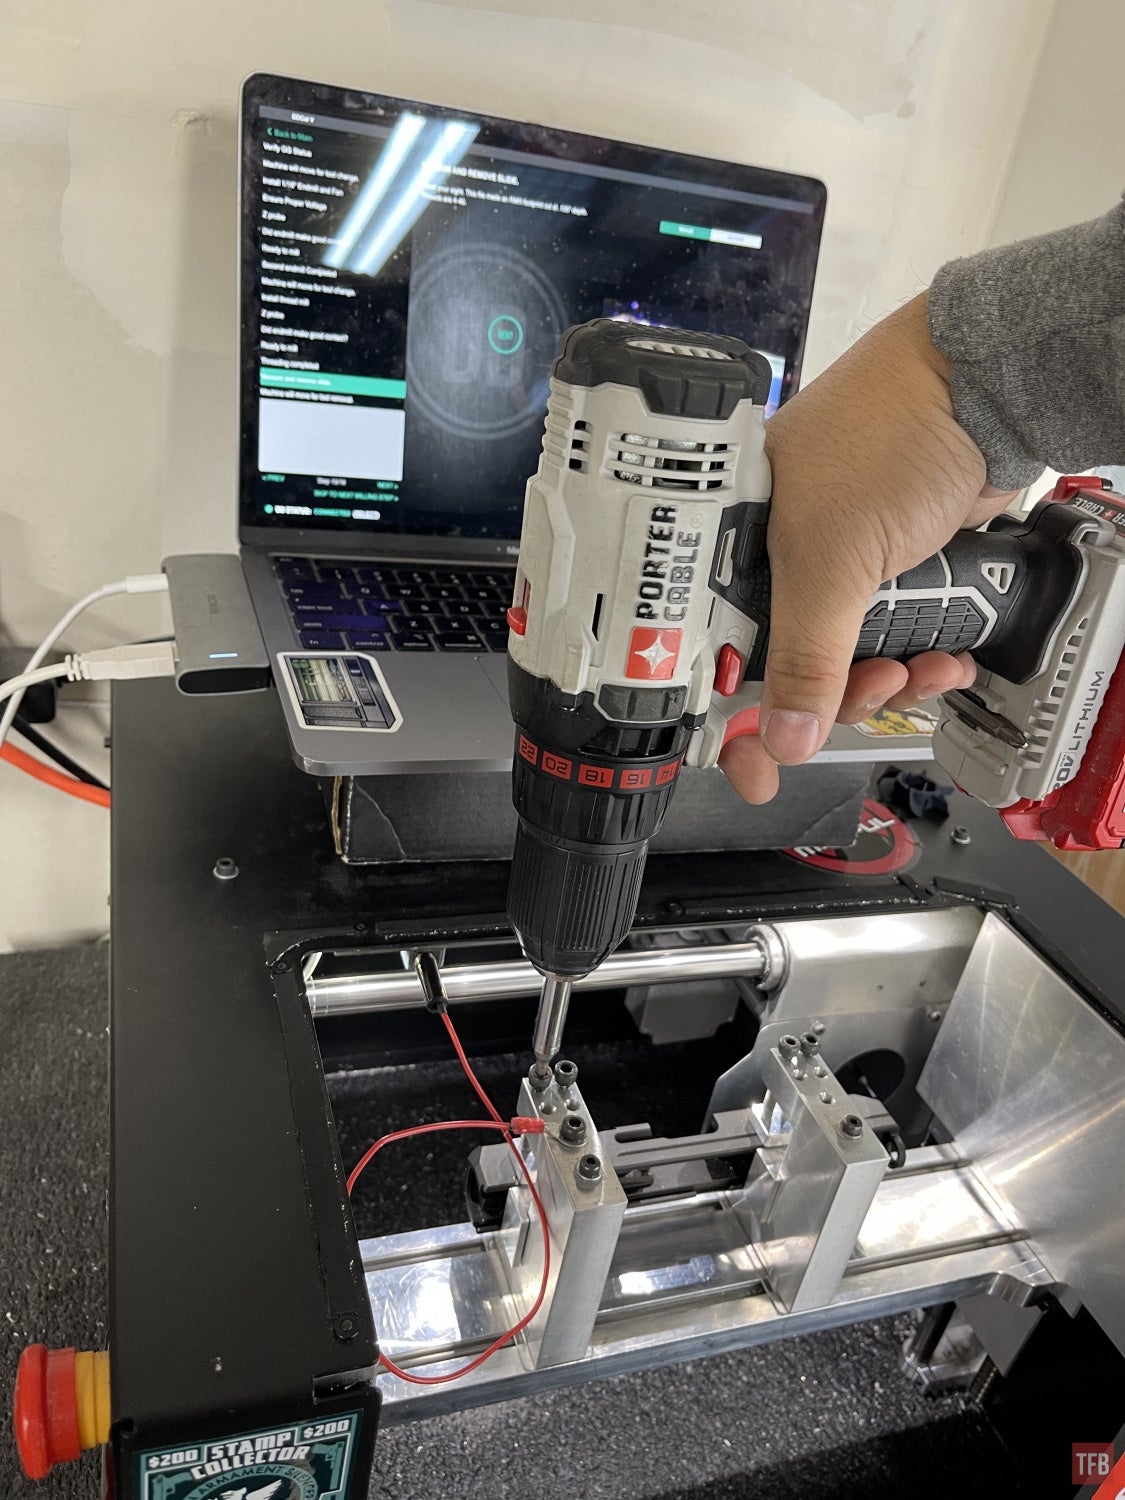
Next up is to thread the holes. Rather than using a simple forming type like a tap, Defense Distributed includes a cutting end mill that will cut the threads.

Like the other two times, the Optic Cut Kit probes off the left clamp.

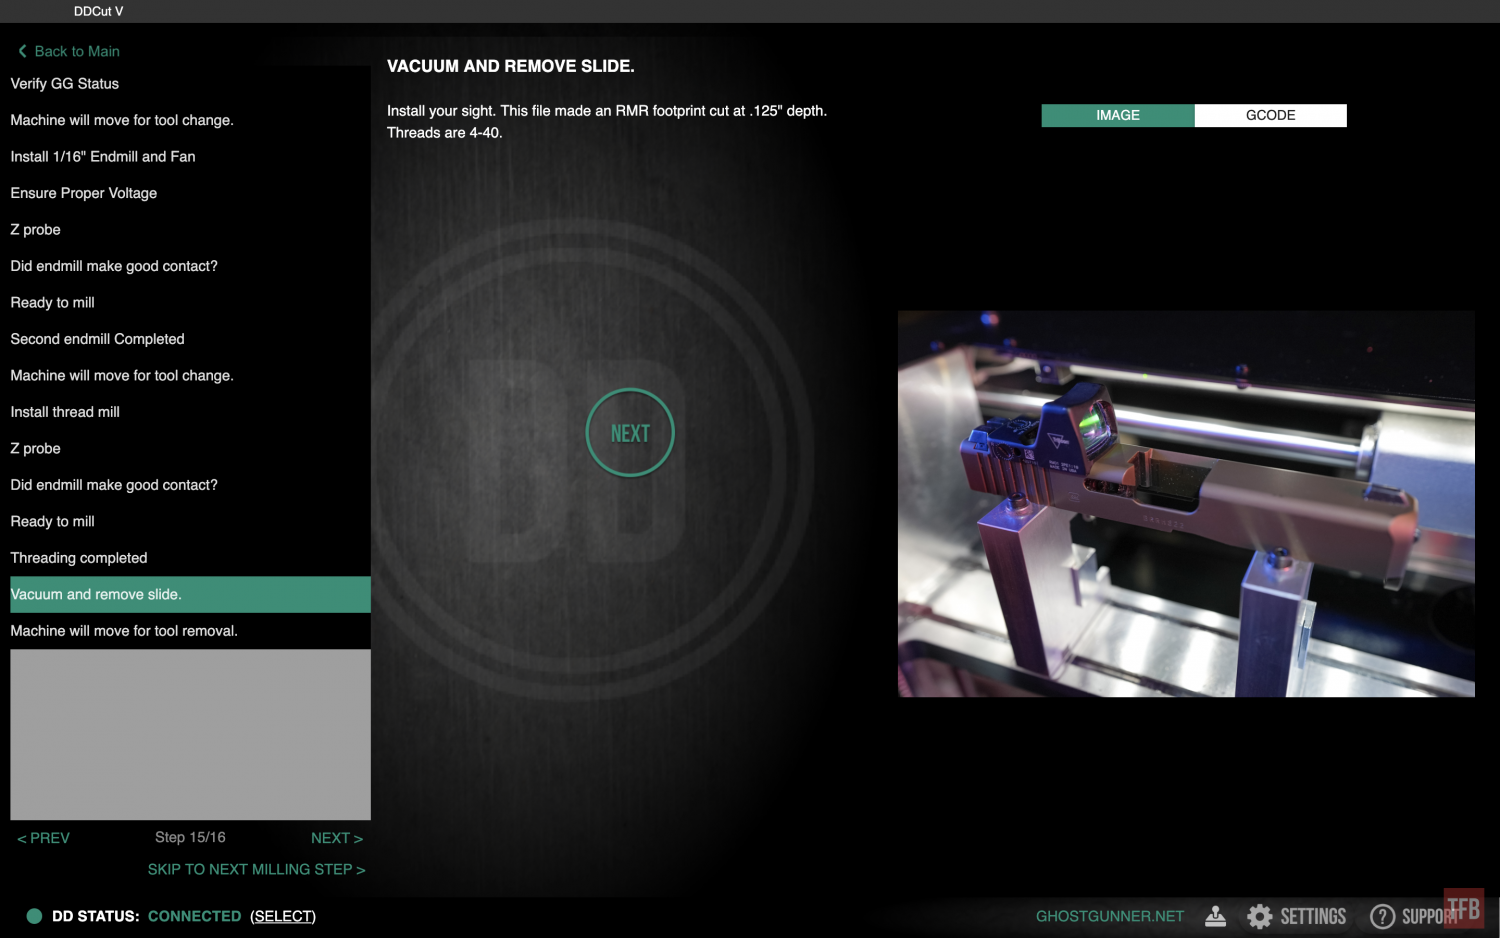
Threading takes a couple minutes. Vacuum the chips and remove the slide.
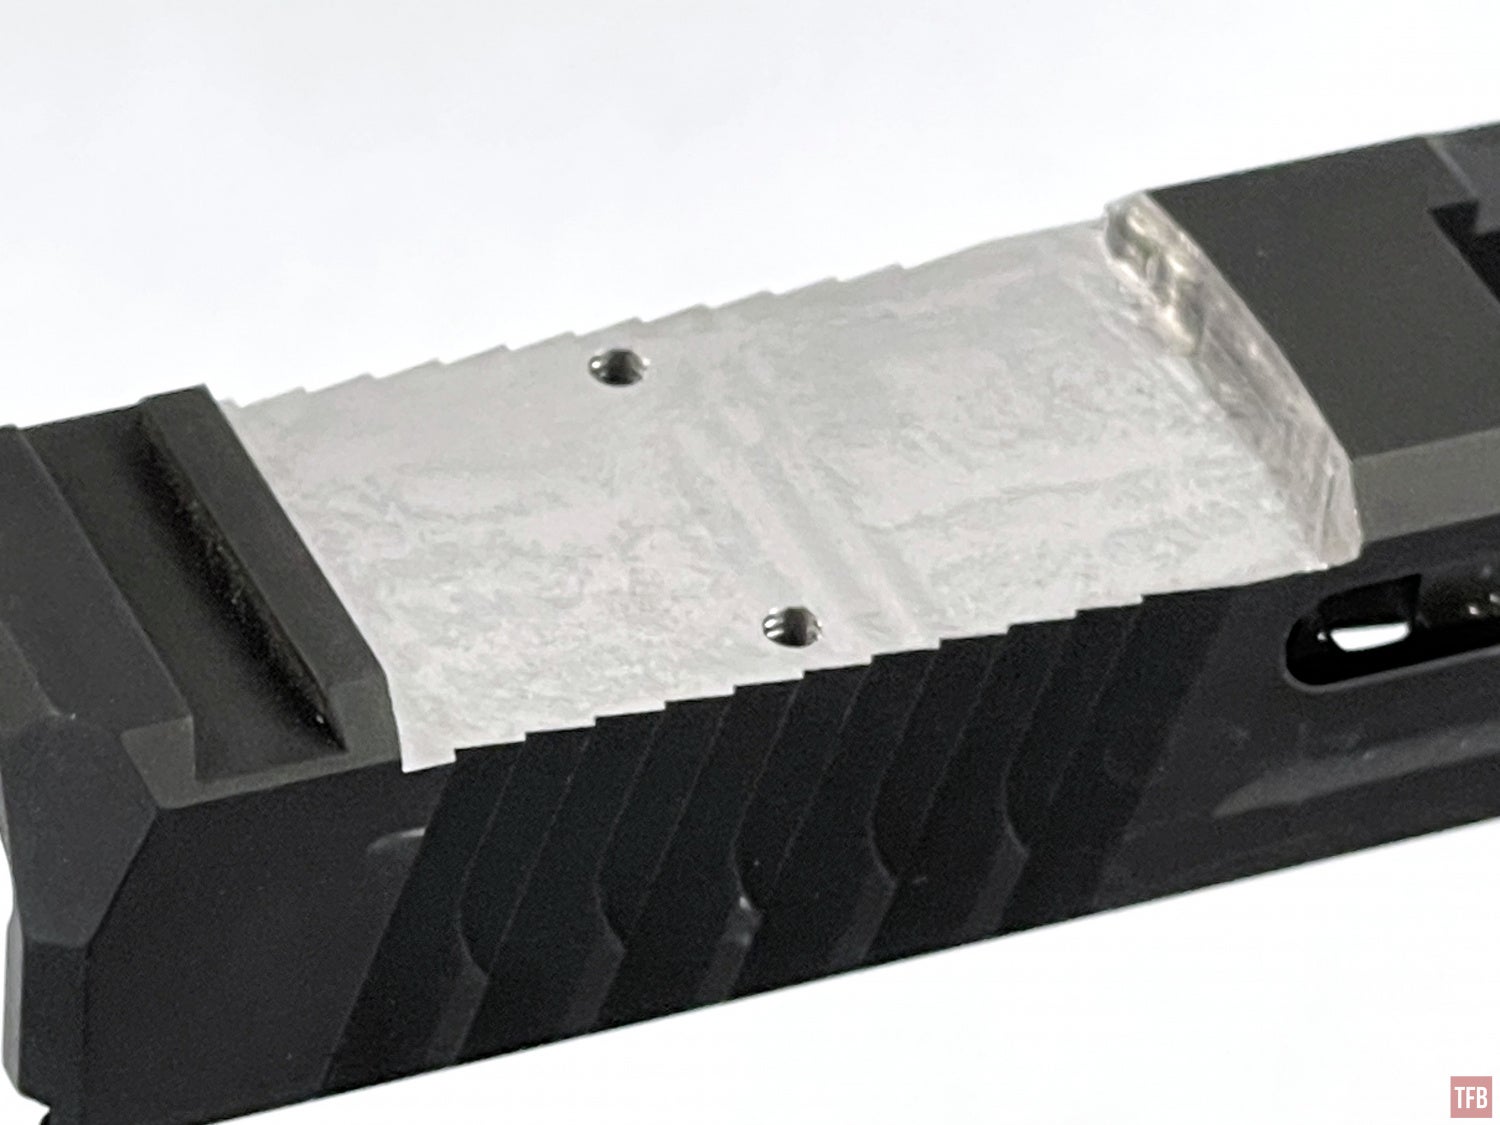
The tooling marks show up in the right lighting.


Next Up, Factory Glock 17 Optic Cut
The P80 slide was great because it allowed me to see and learn the nuances of the Ghost Gunner Optic Cut Kit. I wanted to see if you can cut an optic cut with irons installed on the slide. Also wanted to see how well the Optic Cut Kit cuts through Glock Tenifer coating.

The first job completed but I had to run Comp .0012 like on the P80 slide. The Holosun 507C fits a little better in the P80 slide than the RMR and since I installed the RMR on the P80 slide, I had the Holosun left to test fit on the Glock 17 slide. Even after running Comp .012, the RMR cut was still undersized. The optic cut kit software said to contact tech support so I did.

When I test-fitted the Holosun in the Glock slide, I went straight to Comp .012. I didn’t waste time incrementally going through each Comp program. Since I was waiting for Tech Support, I decided to try and run Comp .012 again and it did cut more metal away. So I ran it a few more times and now the Holosun is a tight fit but it fits.
When it came time to cut the screw holes, the GG3 complained about the Z probe failing. This time it was not a hard limit. Underneath the GG3 opening is a small green LED. This lights up when the probe circuit is completed. This is when the end mill touches the workpiece to complete the circuit. Normally the 80% lowers use a plastic jig so the only way for the circuit to be completed is if something touches the workpiece like the end mill. A small chip of metal could cause the circuit to close prematurely. So I removed the slide and made sure any chips were cleared away. You shouldn’t need to do this and I was worried I would lose the positioning of my slide. But I decided to throw caution to the wind and carry on. Fortune favors the bold and nothing bad happened.
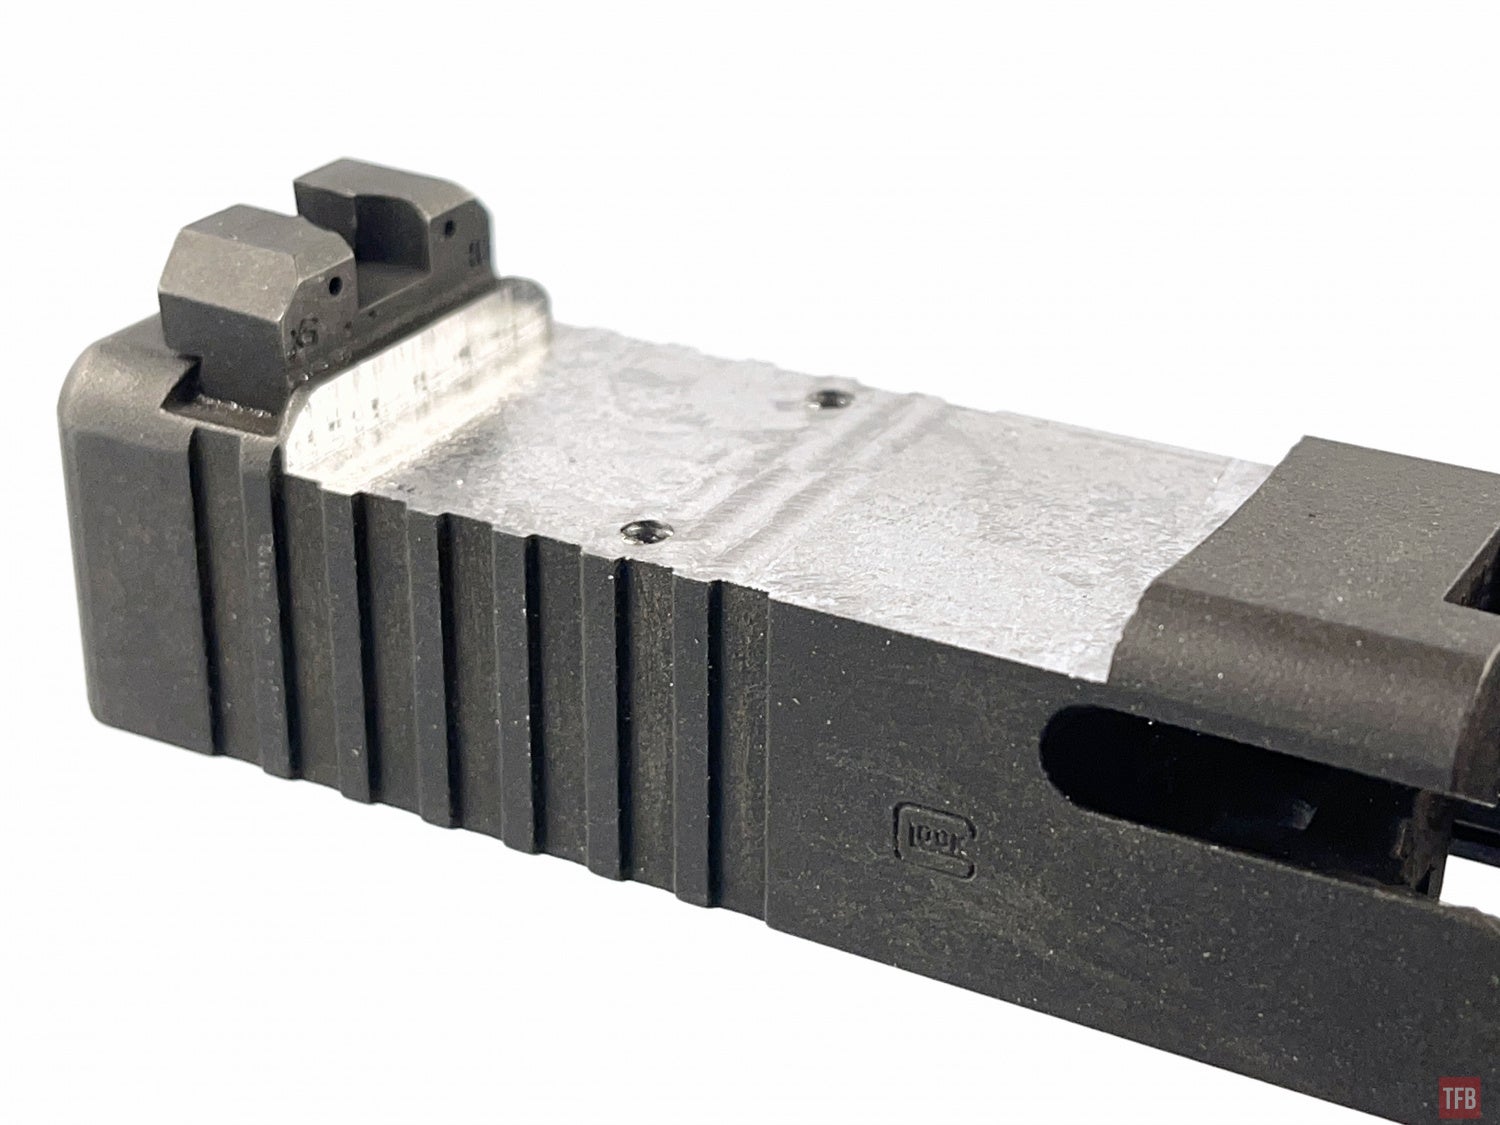
You might notice that this Optic Cut Kit code does not machine the screw hole bosses or the recoil lugs typically used on RMR mounts. That is because your optic is counter-sunk and melted into the slide. There is no need now. The entire slide is the recoil lug.


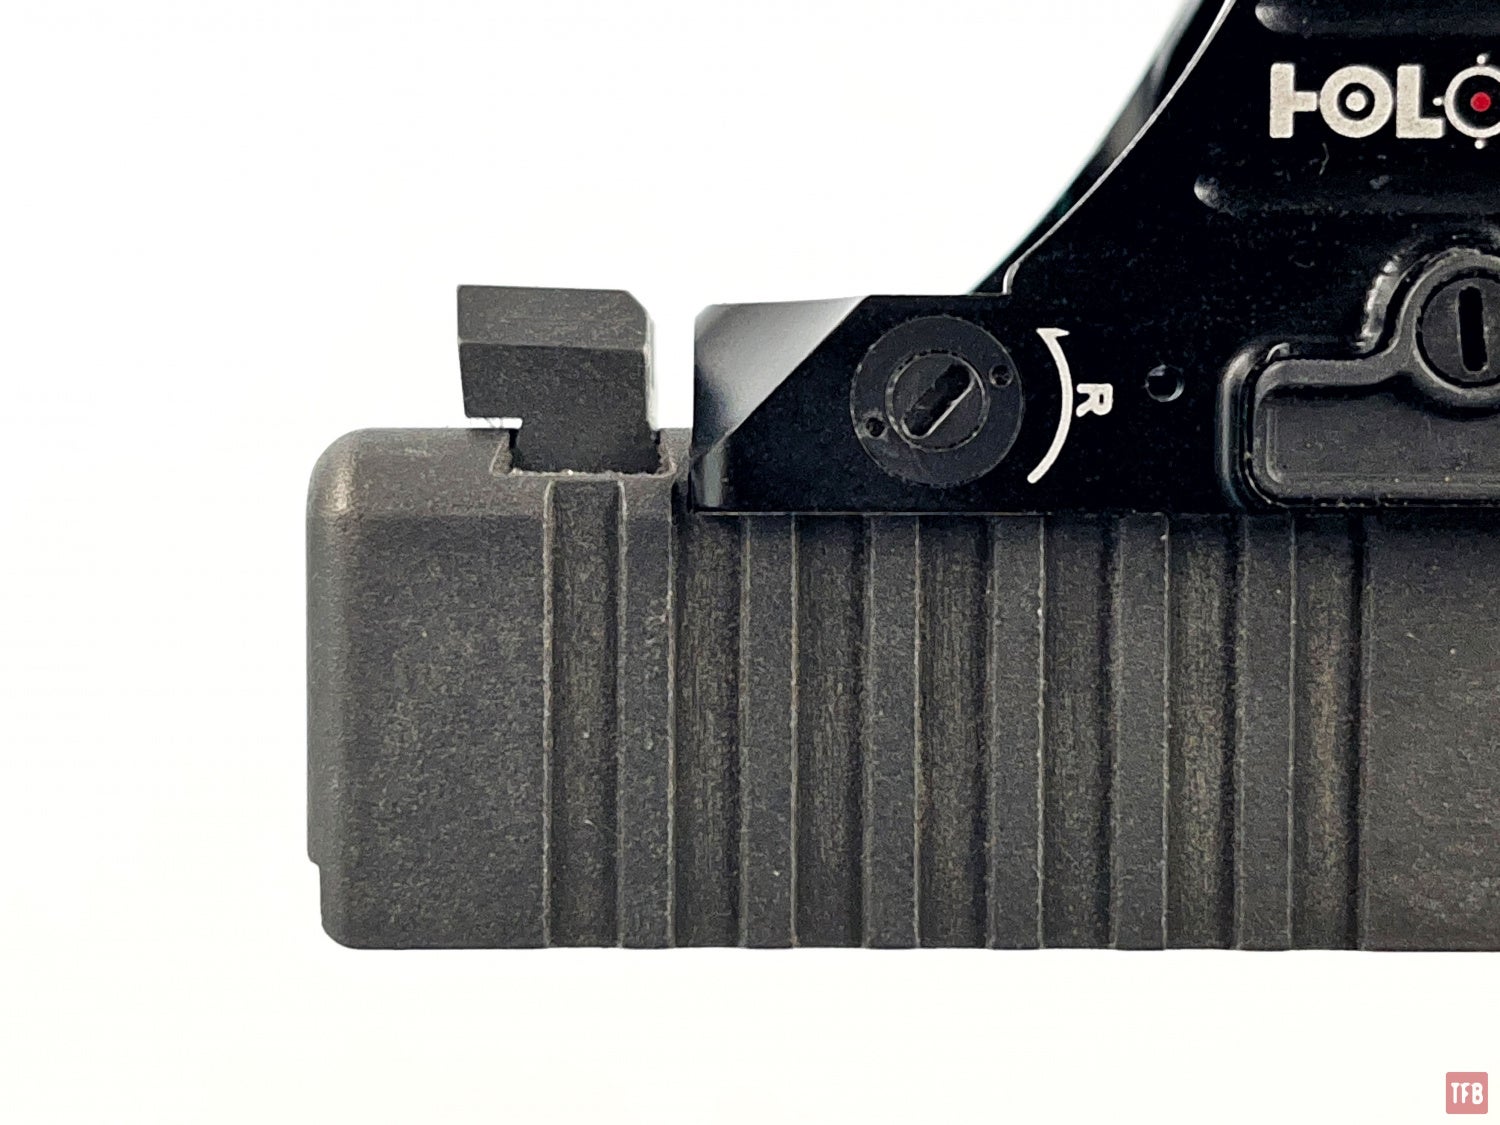
Plenty of material between the rear sight and the optic.
The last thing to do is to install screws. The optic cut kit says to use 4-40 size screws but does not mention what length. I went to my local Ace Hardware and they only had 1/4 inch or 3/8 inch but nothing in-between, so I bought both lengths.
The 3/8″ long 4-40 screws were a hair too long and encroach in the ejector rod channel when I used the Holosun. The Trijicon RMR did not have this problem.


Final Thoughts On The GG3 Optic Cut Kit
Besides exercising the freedom to complete 80% firearms or make 0% lowers out of blocks of billet aluminum, the Ghost Gunner 3 has a lot of potential. The Optic Cut Kit is proof of this potential. Now anyone with a Ghost Gunner 3 or the new Ghost Gunner 3-S can cut RMR footprint cuts in Glock slides. Right now the code only allows for Glock 17, 19, and 26 size slides. Also, Defense Distributed only has a code for cutting an RMR footprint. I would like to see more optic cut codes for the following:
- Docter footprint
- ACRO (this should be easy since it is a dovetail with a slot. Just need the right tools)
- Holosun 509T (similar to ACRO in terms of ease)
- GLOCK MOS in case you want to run a MOS-compatible plate
- RMRCC and all the other small footprints like EPS Carry.
Of course I would also like to see more Glock slide compatibility like the .45ACP Glock 21 slides of various lengths and the single stack Glocks like the 42, 43, 48 etc. Then branch out to other common pistols like the CZ, SIG P320 etc.
I would like to see some more options in this current Optic Cut Kit cutting code. I want more clearance for the red dot if I want to Cerakote the slide. The bare exposed steel is a bit concerning. At the moment, the RMR cut is so tight that I do not think it will fit if I added any kind of paint. Andres, Defense Distributed Customer Service Wizard, replied to my email and sent me a version 2 of their cutting code which now includes more comp codes up to .025 for lengthening the RMR cut to make room for more clearance in case you want to coat the slide. I would like to see a code for cutting the RMR cut further back where the rear sight dovetail is. Then a tool for cutting a new rear iron sight dovetail in front of the optic cut.
For those of you who have a Ghost Gunner 3, the Optic Cut Kit is just $350. That includes the clamps and hardware but if you already have a Zero Percent kit, then you only need the tooling and code. The price drops to $170.
The future looks bright and I hope Defense Distributed continues to update and improve the Ghost Gunner and support the codes. For more information go to the Ghost Gunner’s website.