 Your Privacy Choices

If you have been following along with us here at Friday Night Lights, I have posted about a couple of different panoramic night vision options. Quadtubes are the ultimate way to have panoramic NVGs but they are usually cost-prohibitive. It was Noisefighters who came out with a bridge that made panoramic binos a reality. Well, AB Night Vision (ABNV) has finally come out with their ABNV RPNVG. A ruggedized panning night vision goggle. Today we’ll take an in-depth look at this new offering from ABNV.
Panoramic NVG @ TFB:
- [SHOT 2022] AB Night Vision’s RPNVG – Pano Bino Goggle
- Friday Night Lights: Noisefighters’ Panobridge MK1 – Panoramic Binos
- Friday Night Lights: QTNVG – Panos For The Masses
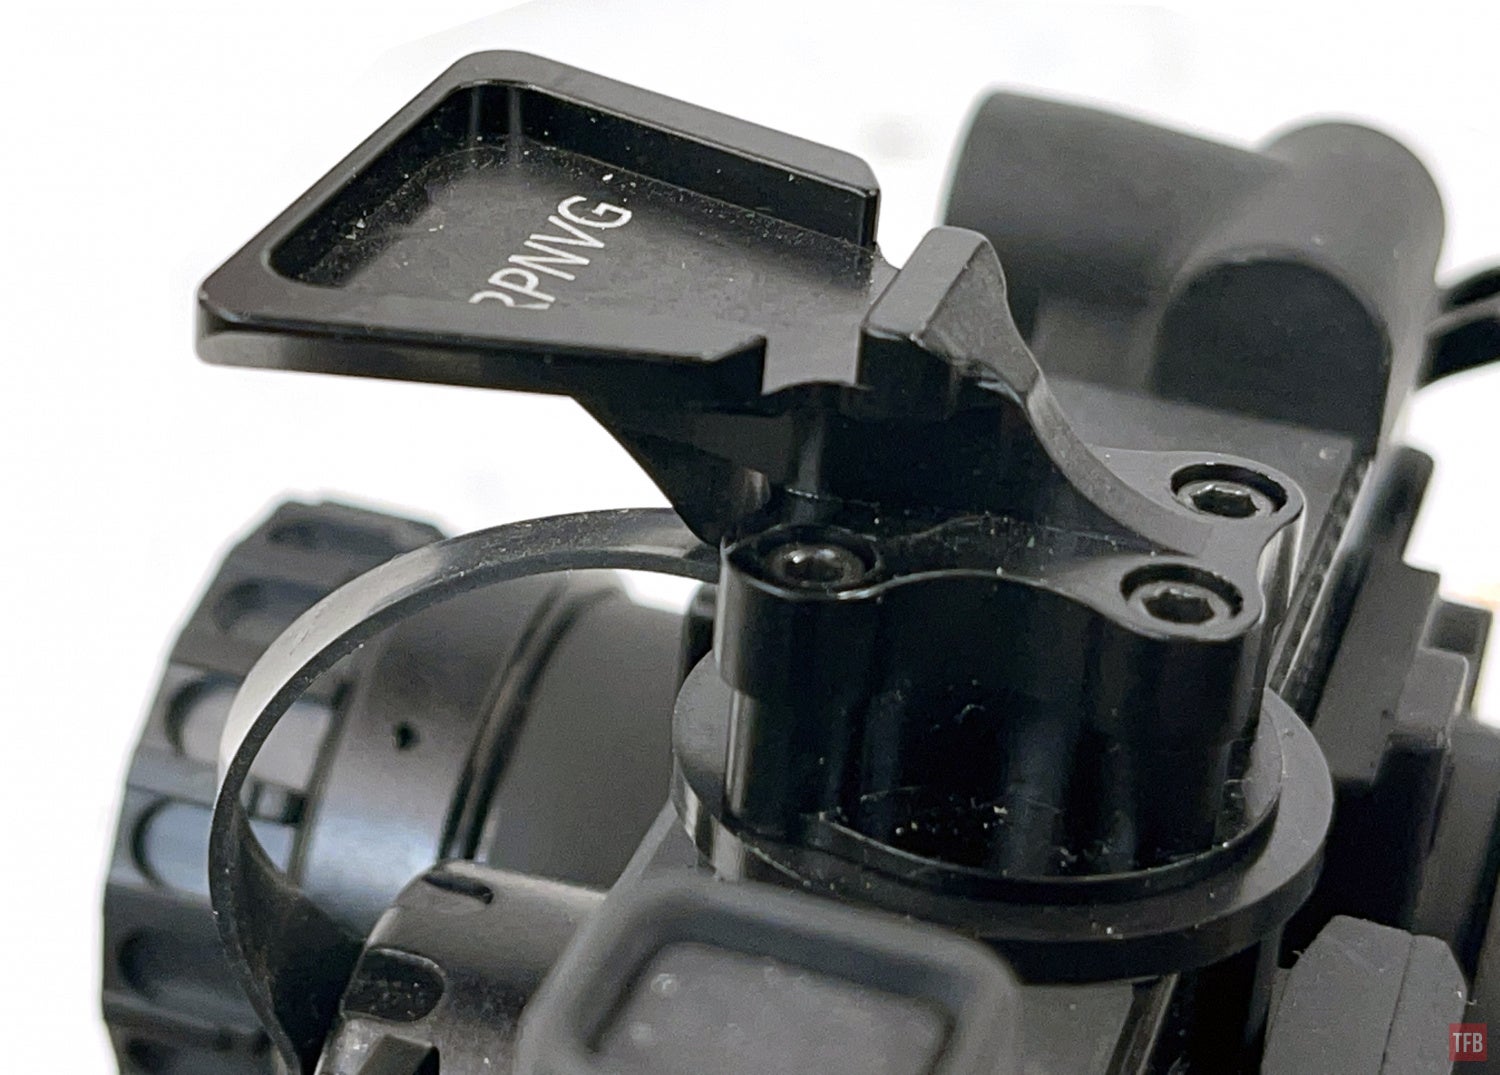
ABNV RPNVG
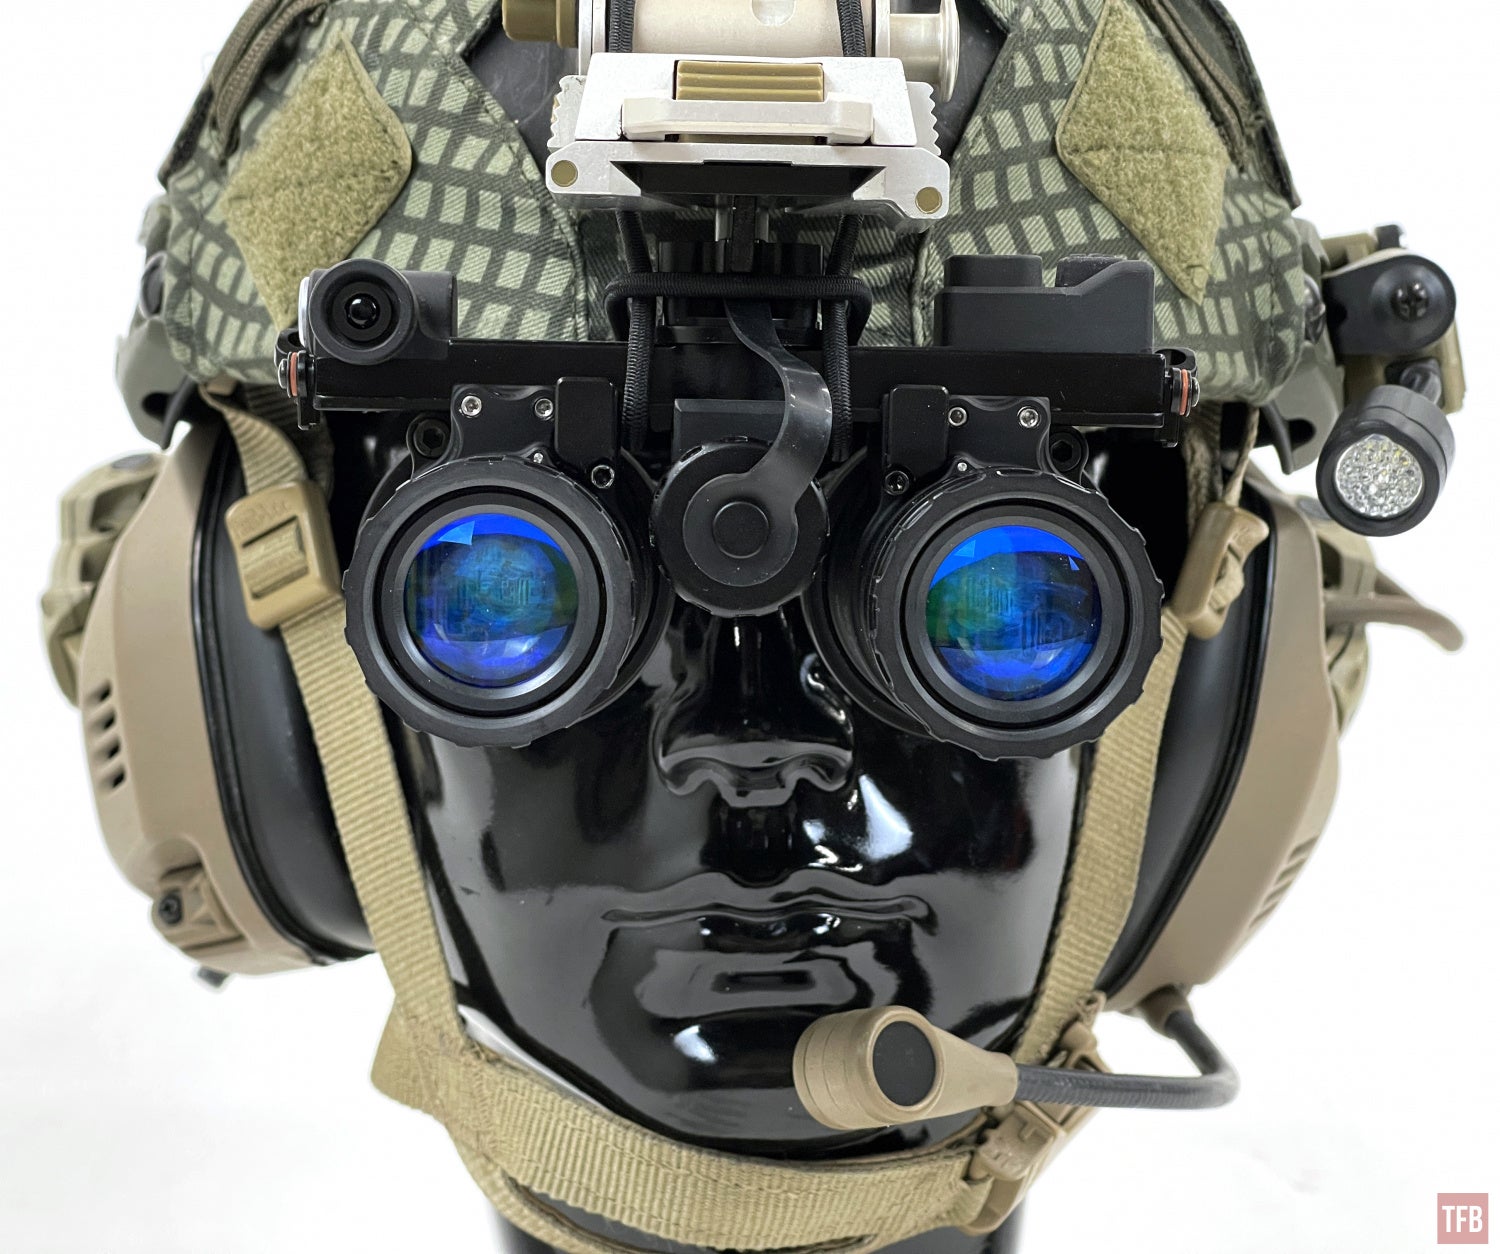
ABNV is known for their RNVG (Ruggedized Night Vision Goggle) If you are not familiar with it, click here. It has become the most popular fixed bridge housing in the commercial night vision market. With the popularity of the Noisefighters Panobridge, it was only a matter of time before panning was implemented in a binocular night vision goggle housing. In fact, in my Panobridge article, I mentioned that the future would involve a panning bino goggle only now it comes from a different place than I had anticipated. ABNV has crossed that finish line first with their RPNVG.
We saw the prototype of the RPNVG at SHOT Show last January. And most of it seems the same but the pods are a little bit different. ABNV sent in their RPNVG housing for us to take a look at.

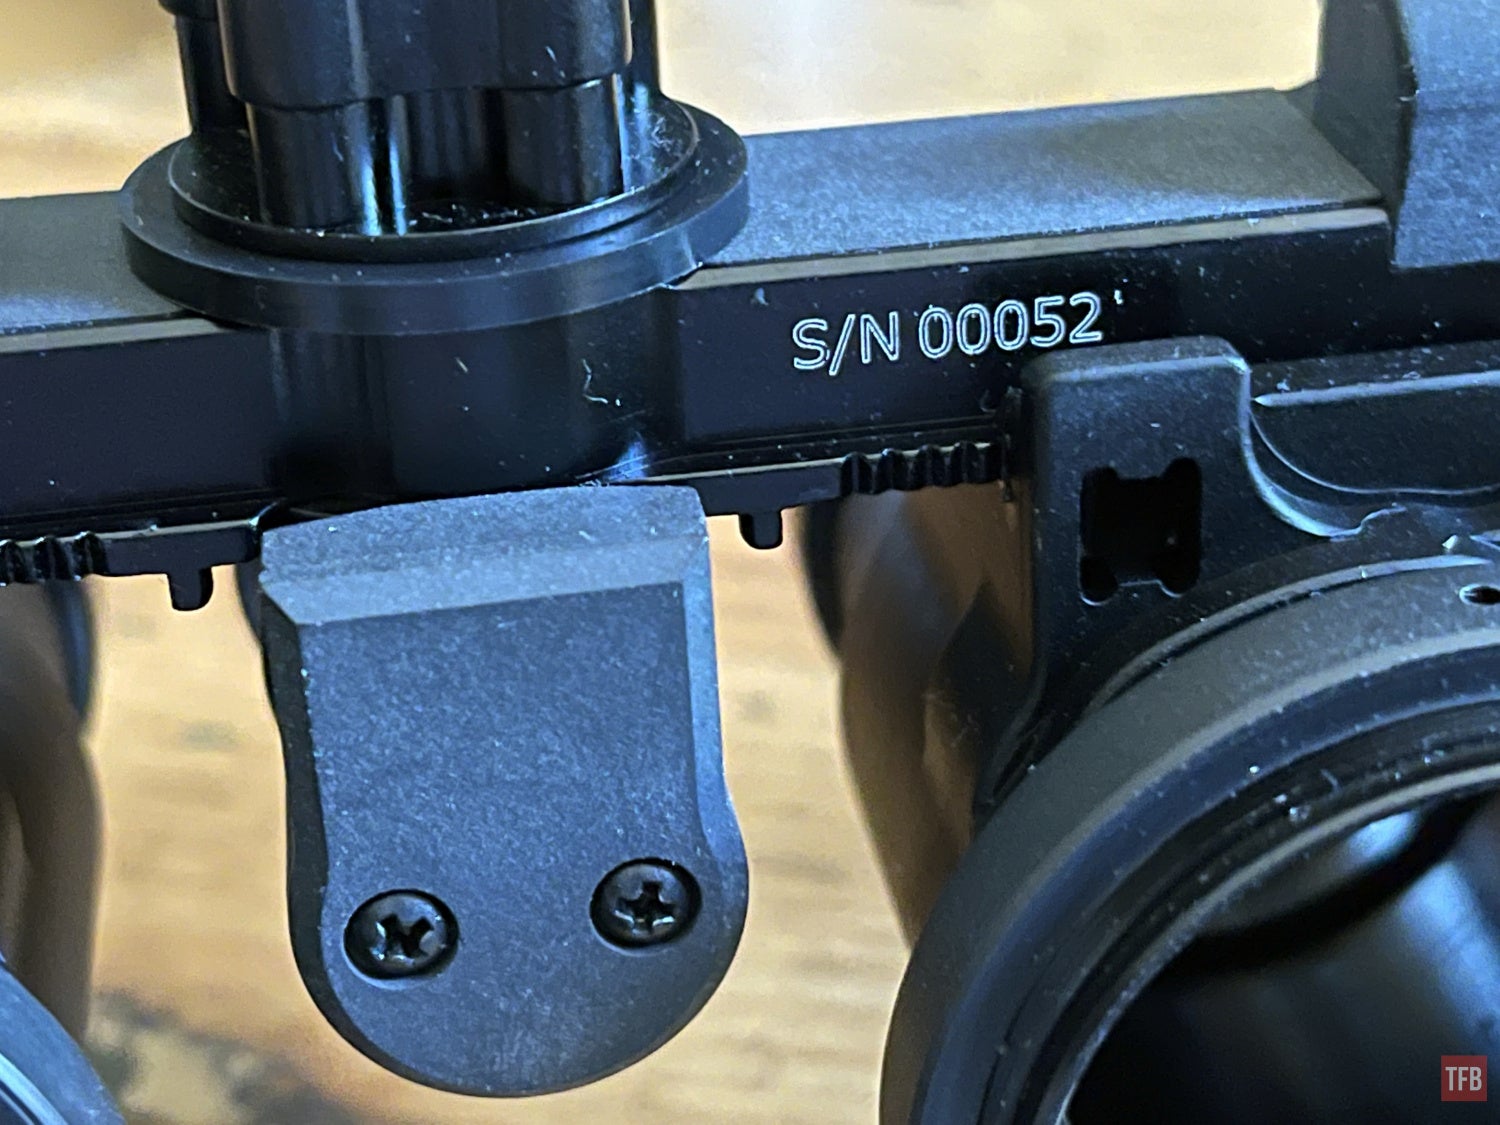
Production RPNVG housing before optics and tube installation.
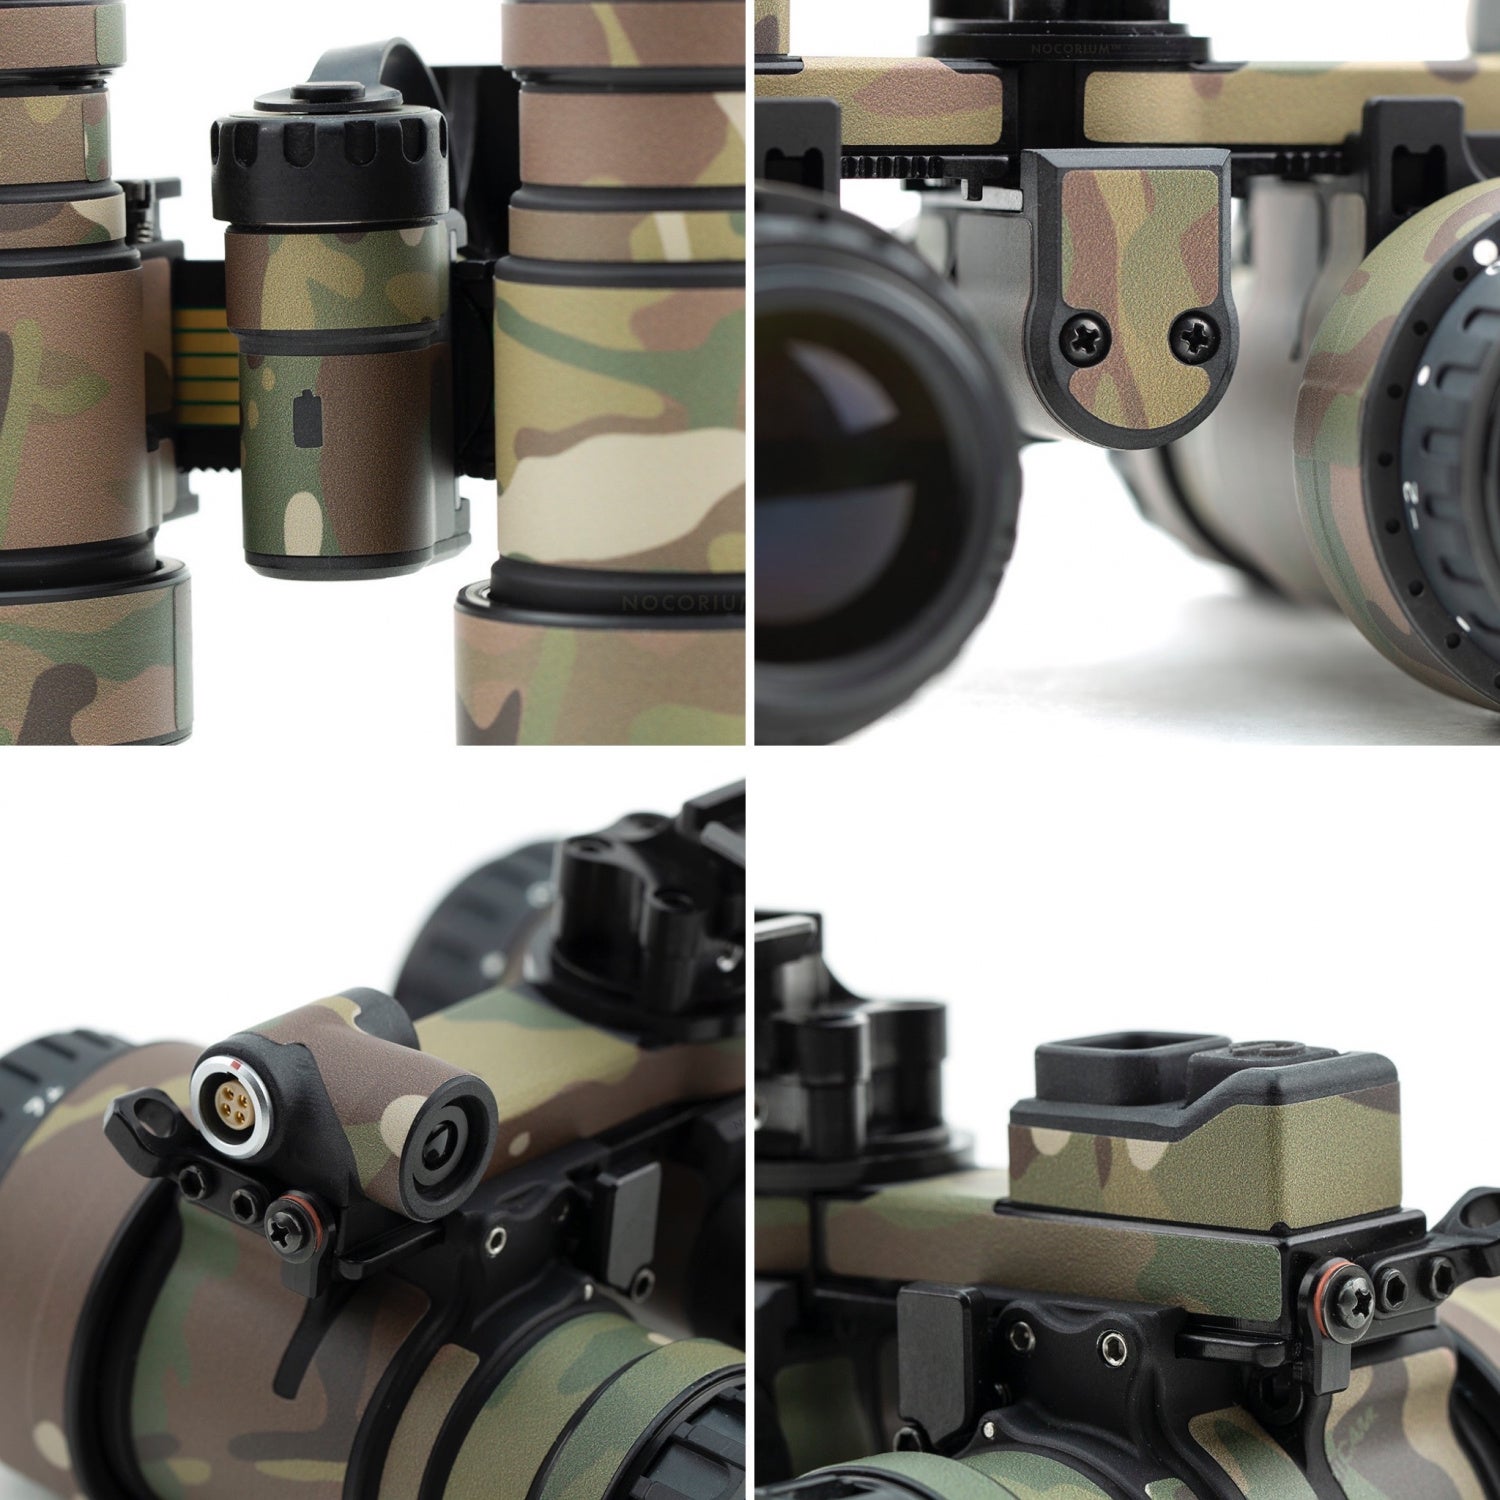
I was surprised to see that the ABNV RPNVG housing comes with D-Collar objective focus stops. These are scalloped, unlike the DEP/RQE D-Rings. What this does is perform double duty. It is both infinite focus stop and close focus stop.
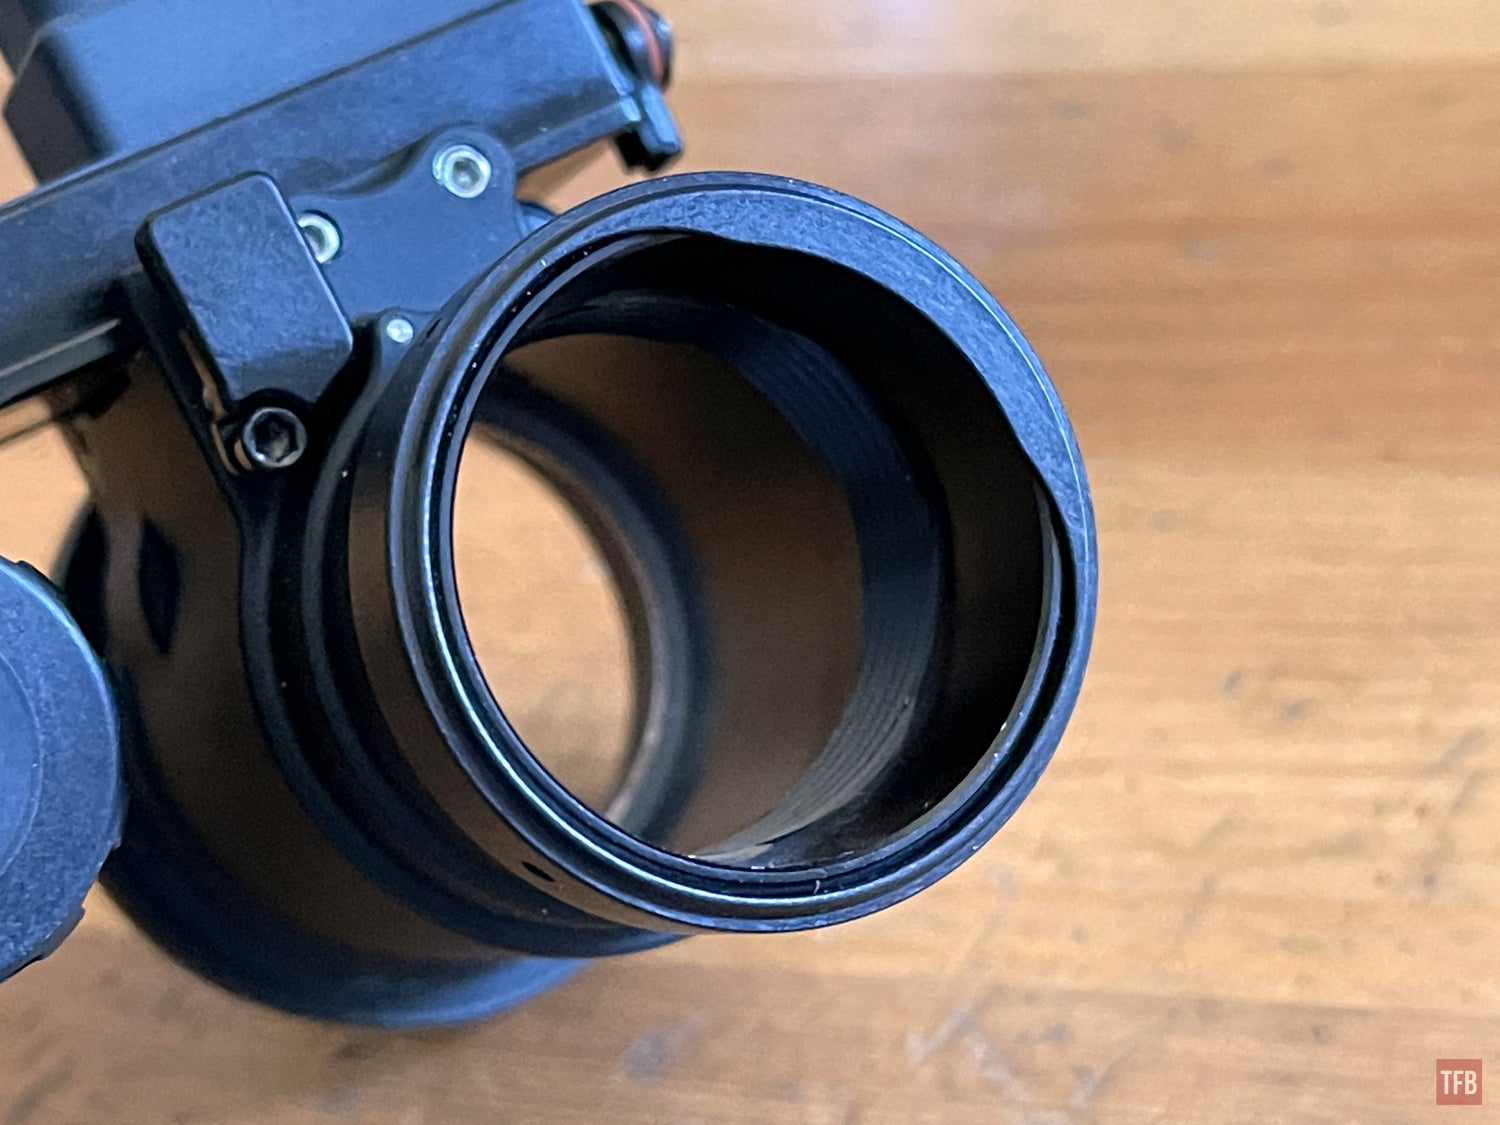
Normally this ring does not have that step that covers a bit of the pod. It simply acts as a stop for your objective lens for when you focus to infinity. Often you can turn the objective past infinity so the infinite focus stop ring is set at the right length to act as a stop for the objective lens. Well, when you focus close, you are unscrewing the objective lens and without a close focus stop, you can unscrew the objective all the way out. The D-ring lip hits a ridge around the shaft of the objective lens so it functions like a close focus stop. Why would you want to do this? The regular close focus stop is a separate ring that is screwed onto the back of your objective lens.
When you fully assemble a night vision goggle, you have to install the objective lens and tighten the close focus stop ring onto it. Then you can install your tubes, light pipe, retaining ring and finally the eyepiece. The problem is if you need to change your objective lens, you have to remove your eyepiece, tube retaining ring, light pipe and image intensifier just to get access to that regular close focus stop. Well, with the D-ring focus stop, you simply loosen the set screws in the ring and unscrew the objective as well as the D-ring. Now you can swap out objective lenses without disturbing the tube or eyepieces. You maintain collimation as well by doing this.

The ABNV RPNVG shares some design elements with the RNVG like the LEMO battery port and IR illuminator.

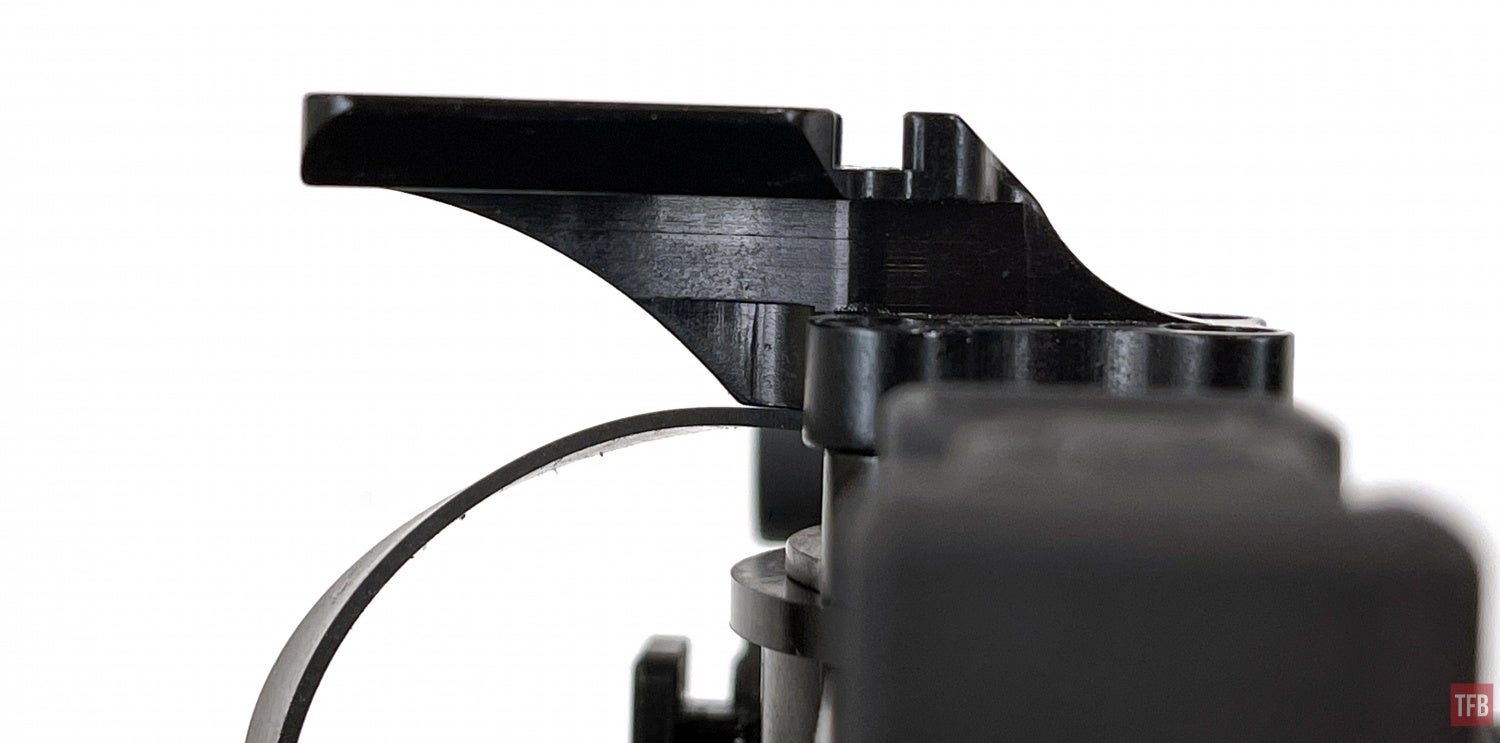
Unlike the RNVG or MOD3, the RPNVG uses a new style of pupillary adjustment. The RNVG and MOD3 are both older ABNV designs loosely based on the ANVS-6/9 goggle. They use screws for each pod to translate the pods left and right. Instead, the ABNV RPNVG uses a spring-loaded toothed catch and matching teeth on the back trailing edge of the RPNVG bridge. See the picture below.
See that square button just above that hex bolt? Push that in and that disengages the teeth so you can slide the pods left or right. Since this catch is spring-loaded, this allows the pods to move in if the pods bump into something with enough force. Rather than breaking something, the teeth will move out of the way and the pods will slide over making a ratcheting sound as the catch drags across the teeth.

ABNV simplified the controls on the RPNVG. Instead of the traditional rotary switch, ABNV switched to a two-button configuration. One button for power and a fenced-in button for IR illumination. You can feel the difference between these buttons even through gloves.

Tube retaining rings and light pipes are typical ABNV designs like in their RNVG and MOD3.


The dovetail is offset a bit. Similar to their recent offset adapter for their RNVGs, however the design is a little different since the RPNVG bridge pivots underneath the dovetail. See the threaded hole under the battery cap tether? That is a set screw for the pivot bolt. You can remove the dovetail above that, loosen the set screw and adjust the tension/friction of the RPNVG pivot.

The slot is just there for production/manufacturing reasons, in order to get clearance for an Allen wrench to unscrew the two forward screws that sit just below that slot. The Dovetail only engages with your mount on the trapezoid cross section and the lip at the rear so the slot will not cause any issue or compromise anything.

If you look at the ends of the bridge, ABNV relocated the bungee anchors to the bridge. Before, on the RNVG, the bungee anchors were machined lobes that protrude from the monocular pods. This can apply a slight torque on the pods and potentially cause some issues with the power connectivity. Well, now the anchors are bolted onto the sides of the bridge. This also makes more sense since you will be sliding the pods left and right to adjust when you go to Pano mode. Just in front of the bungee anchors are these PD stops. It is the round screw with the square block below it.

Pull that PD block out a little bit and rotate up toward the front of the ABNV RPNVG housing. Now you can slide the monocular pods off the bridge.

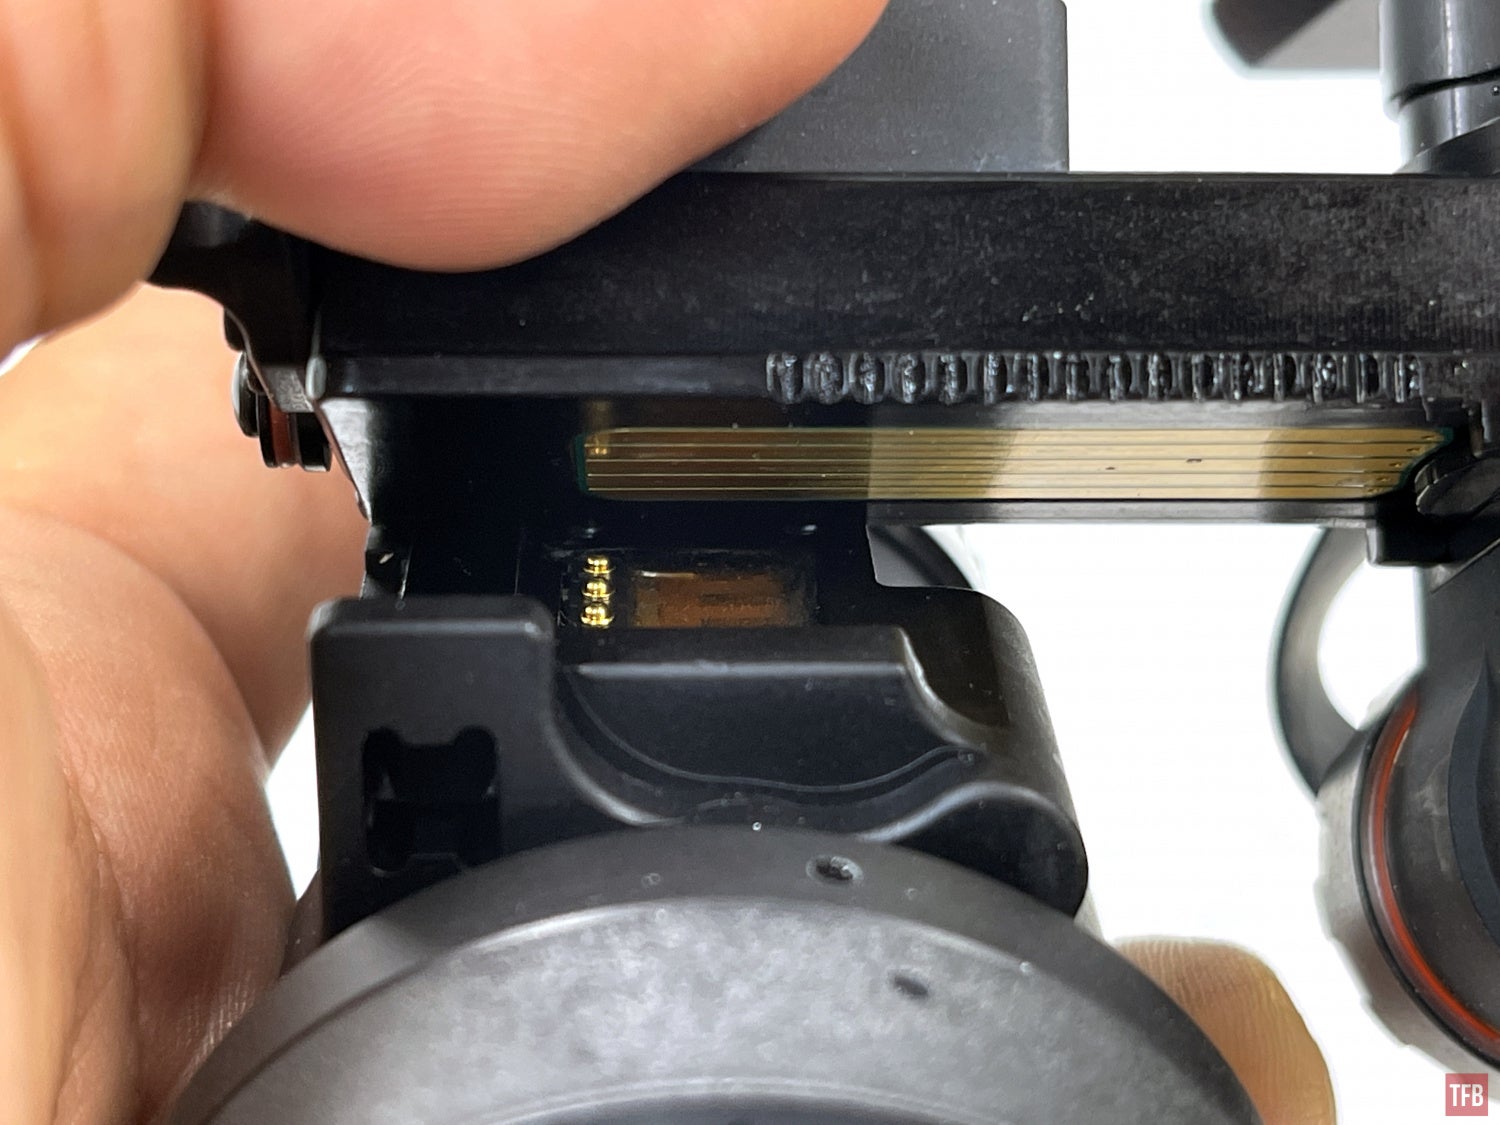
You can see the bridge has four gold-plated rails that line up with the four contact pins on the pod.

I was a little bit concerned about these lines being scratched into the gold contact rails by the pogo pins in the modular pods. You will be sliding the pods left and right on a regular basis if you utilize the panning feature. However talking to the owner of ABNV, Adam Barker, he is confident it will not be an issue. My friend Cajer pointed out an obvious analogy. Think of your phone charger and how many times you plug and unplug that cable into your smartphone? As long as ABNV uses hard gold and a low enough contact force for their pogo pins, this should not be an issue even though you will be sliding the pods a lot.

RPNVG vs RNVG
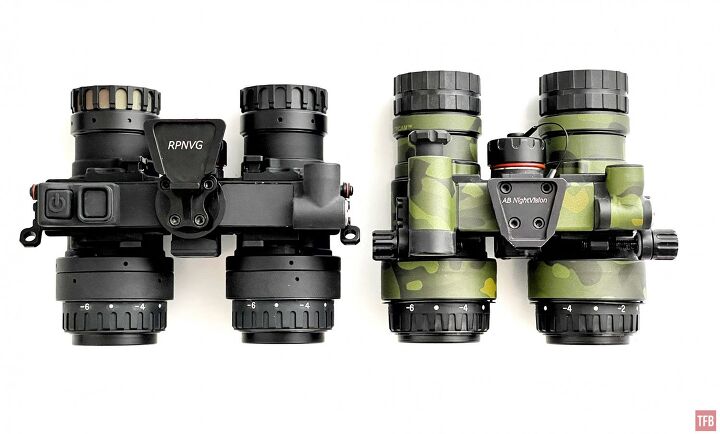
I used RPO lightweight lenses on the RPNVG so they appear shorter in length than the Carson optics on the RNVG to the right.


Panning The RPNVG

Switching from parallel binos to panning binos is easy. You simply move the pods further out and bend the bridge.
Why do you need to move the pods out? It is due to the pupillary distance of your eyes (the distance between pupils). Since the RPNVG bridge folds in the middle, this will cause your eyepieces to move closer together. If you want to go back to parallel pods, you have to bend the bridge straight and slide the pods back inwards. There is no PD stop for this so you have to slide them until you are satisfied. This is why I mentioned earlier that the RPNVG pods will be sliding side to side on the bridge. On RNVGs or MOD-3 you just set the PD to your eyes and you forget it. The only time you need to slide the pods is for a new user with a different PD than you. RNVGs and MOD-3 all use a similar powered rail design as the RPNVG.
While the RPNVG uses a spring-loaded ratcheting mechanism to hold the pods onto the bridge, it is easier to adjust for panning than the Panobridge. The Panobridge relies on two articulating swing arms for PD adjustment. When you spread them out for pano mode, you have to roll the pods up a bit to get the PD set properly. This changes the height of your pods and you need to adjust the height of your mount. If you switch back to parallel binos, then you have to reset the height on a Panobridge again. This is a compromise for the Panobridge but you don’t have to do this with the ABNV RPNVG. Since the bridge is set at a fixed height and the pods are not articulating, you simply slide them out and bend the bridge. No need to adjust the height at all.


You can see the teeth on the back of the bridge. Below you can see the matching dual teeth that engage with the teeth on the bridge.

One minor difference between the Panobridge and RPNVG is the degree of separation. Panobridge can pan to give you up to 70º FOV. The ABNV RPNVG only goes up to 65º. Normal parallel binos and monoculars only show you 40º FOV. I never pan to the max, not the Panobridge nor the RPNVG. I move the pods inward a bit and adjust the angle they are panned to minimize the cat’s eye Venn diagram. When you pan them to the extreme, you can get a sort of shadowing around the middle of the two overlapping image circles.

Modularity Of RPNVG
Since the RPNVG monocular pods can be removed without tools, you can rock one as a monocular.


Another added benefit to the RPNVG design is that you can swap the left and right pods to the other side.

Why would you swap them over? This is a sort of hack to the RPNVG. The spring-loaded catch for the teeth is not centered over the monocular pod. So by moving the pods to the opposite sides, the spring-loaded teeth on the pods do not engage with the teeth on the bridge. Now you can slide the pods left and right with ease. Normally you need to depress the button on the monocular bridge to free it so you can slide it left or right. I found pressing the button inwards a bit awkward, especially when the goggle is mounted on your helmet and in front of your face. I would have to use the sides of my index fingers to push the buttons inwards while my thumbs press up against the bottom edge of my eyepieces. Also with toothless adjustments, I can adjust the pods’ position more minutely rather than rely on the position of the teeth.
See the pins just below the power rails? To the left is the square protrusion that houses the spring-loaded teeth. See how far away it is from the matching teeth on the bridge?
I am not sure if this issue is only on their demo housing or if it is across the board, but if you swap the pods to the other side, the right side will disconnect power if you move it all the way to the end of the bridge. Even with the PD stop. This only seems to affect the right-hand side of the bridge, the left side power rails are long enough that the PD stop will hit the pod before the contacts slide past the edge of the power rails.

See how the contact pins are just past the gold rails?
Nocorium RPNVG Wraps
I brought the ABNV RPNVG to Nocorium to get patterned for his wraps. Here is the install video.
Just like his other NVG wraps, the Nocorium RPNVG wraps are custom designed to fit the housing. Some of the wraps are still the same like the objective lens focus stop ring, eyepiece lock ring and the wrap for the IR illuminator is the same for the RNVG. The IR illuminator wrap has been slightly tweaked to make it easier and less prone to bullying up when applied and Nocorium will be updating his RNVG wraps going forward.

I think Nocorium got a decent amount of coverage and it is aesthetically pleasing.


Final Thoughts On The RPNVG
The RPNVG functions similarly to the Panobridge. You are panning monocular pods to produce a sort of image intensifier Venn diagram. The images overlap and you get a cat’s eye in the middle. You lose a bit of depth perception, especially in the regions that do not overlap.
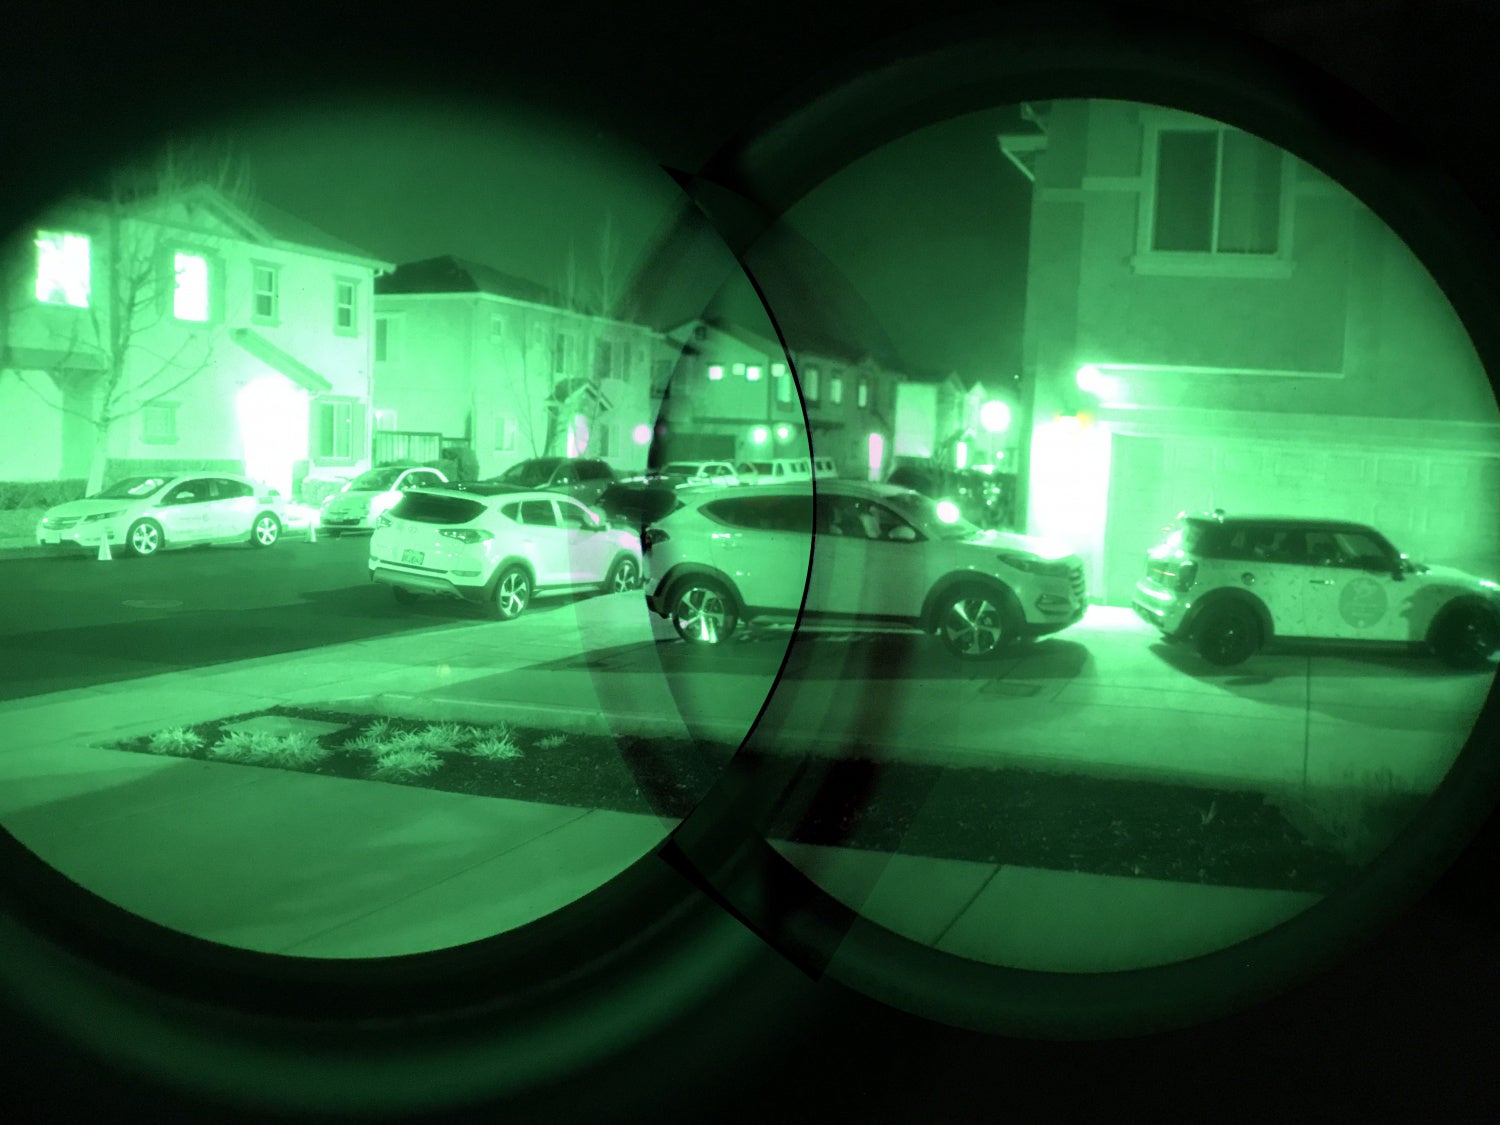
The other compromise is that you are now looking through the edges of your image intensifier and not down the center. Resolution drops down a bit at the edges and your best resolution is in the center of the tubes. You can always push the pods back together for parallel use for better performance.
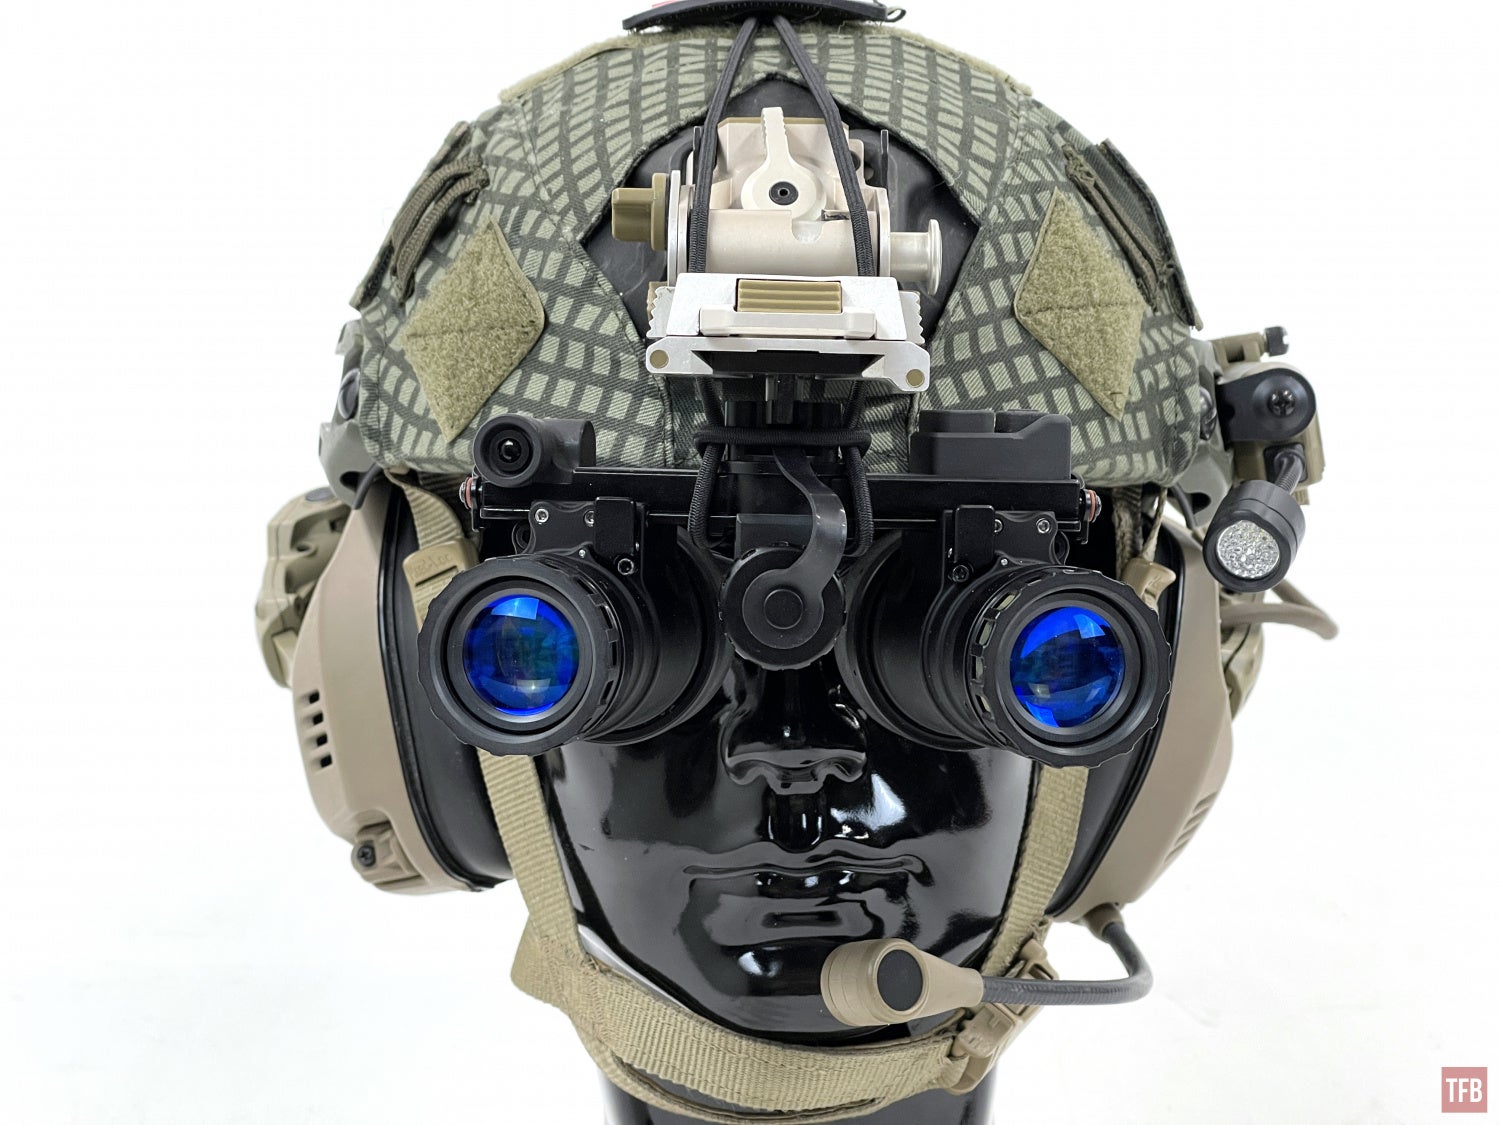
One minor issue I noticed is when I used the RPNVG with my Crye Nightcap. It has a Wilcox G69 so the dovetail shoe extends a bit further than a regular G24 but because of the offset dovetail, the RPNVG eyepieces still sit closer to my face than I would like. It is fine when running parallel pods but if I pan the bridge for pano mode, the eyepieces touch my eye socket. I hope ABNV offers a non-offset dovetail in the future.
At the time of writing this article, ABNV is working on monocular pod adapters to convert the RPNVG pods to single monoculars. Similar to his MOD-3 concept. Adam Barker is not sure if he will continue making the MOD-3. I don’t see any reason to since the RPNVG is now here. If you don’t like the panning feature, you don’t have to use it. The pods will still disconnect without the need for tools and the monocular pod adapters will convert them into PVS-14-like devices.
ABNV will continue to make the RNVG since it is so popular and simple. The RNVG is also a little bit cheaper. The RNVG housing retails for around $1,200 while the RPNVG housing retails for $1,920 and that is without the monocular adapters. A fully built RPNVG will most likely be around $7,000. Depending on the tubes, it could be under or above that price but the average will probably be around $7,000. Compare that to twin PVS-14s. You could be spending anywhere from $4,000 – $8,000 depending on the tubes inside and then you add the $500 Panobridge. The RPNVG is more rugged and lighter. Fully built with RPO lenses my RPNVG weighs 18.8 oz. Dual 14s with a Panobridge are around 25 oz. With lightweight lenses on the 14s, you are still heavier than the RPNVG.
I think the RPNVG will be very popular. It is a little bit more expensive than an RNVG but now you can go pano mode if you want to and you can convert them to be monoculars if that floats your boat. For more information check out @ABnightvision. The RPNVG will be available at all AB Night Vision dealers.
08/02/2022 EDIT: After this article went live, AB Night Vision sent in an alternate dovetail for the RPNVG. This solves the issue I had with the offset dovetail positioning the RPNVG eyepieces too close to my face when I switch to panoramic mode.


