 Your Privacy Choices
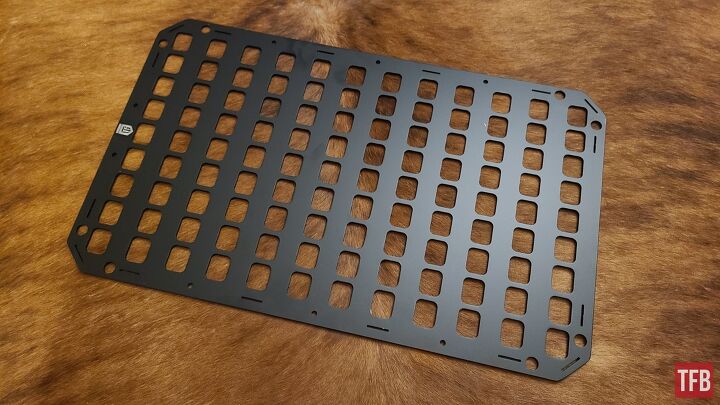
Grey Man Tactical’s Rigid MOLLE Panel (RMPX) is built with end-user customization in mind. Their new billet aluminum RMPX panel gives the end-user all the customization they need as a first responder or just an always-prepared weekend warrior. After giving Grey Man Tactical a list of equipment I liked in my vehicle, they sent over the following setup for me to review.
TFB Review: Grey Man Tactical Rigid MOLLE Panel (RMPX)
TFB Review: Grey Man Tactical Rigid MOLLE Panel (RMPX)
While there are a couple of different options, for this review I’d be using the RMPX Series mount. It’s built from 3/16″ Aluminum and powder-coated for finish and durability.
Outfitting the Rigid MOLLE Panel (RMPX)
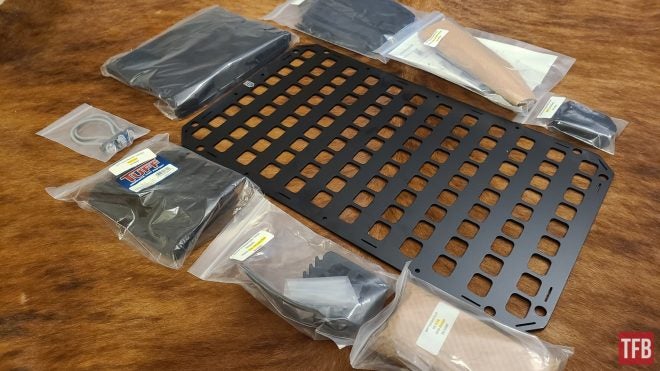
Grey Man Tactical was kind enough to send over a full kit for the Daniel Defense MK18 that’s my go-to truck gun. We’ll walk through this step by step.

RMP Buttstock Cup [XL Cup] Kit Installation
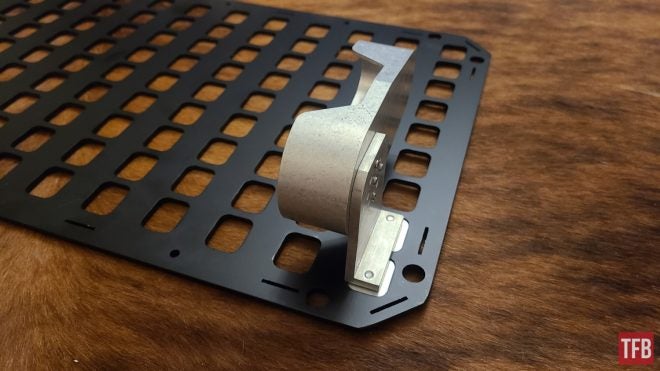
RMP Buttstock Kit [XL Cup] Installed

Rifle Rack Rubber Clamp Install
Next, you’ll need to install the rubber clamp up top to secure the rifle in the rack. You’ll want to test fit a few rifles to make sure this doesn’t interfere with any mounted accessories like lights/lasers.
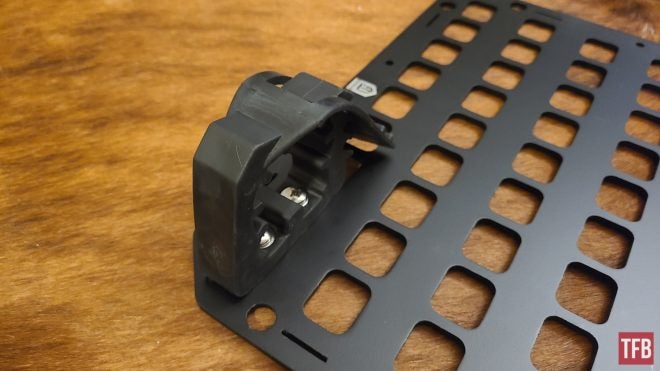
Rifle Rack Rubber Clamp Installed
Install is quick and easy, and you’ll need a standard-size Phillips head screwdriver to get the recessed mounting bolts in place.

Rifle Rack Test Fit
With the rifle rack in, it was time for a quick fit test with the stock both extended and collapsed. All good so far, now let’s mount some accessories.
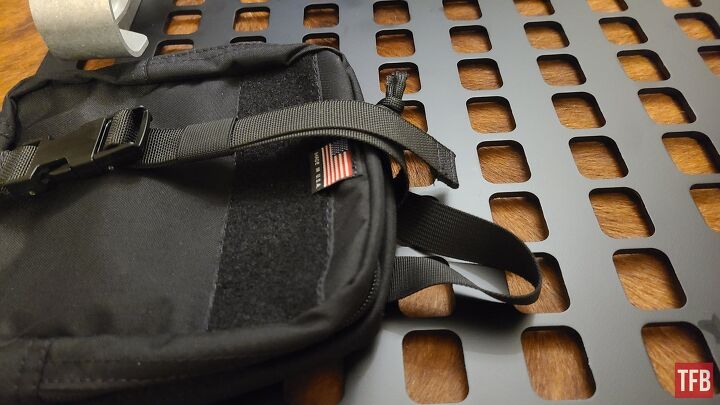
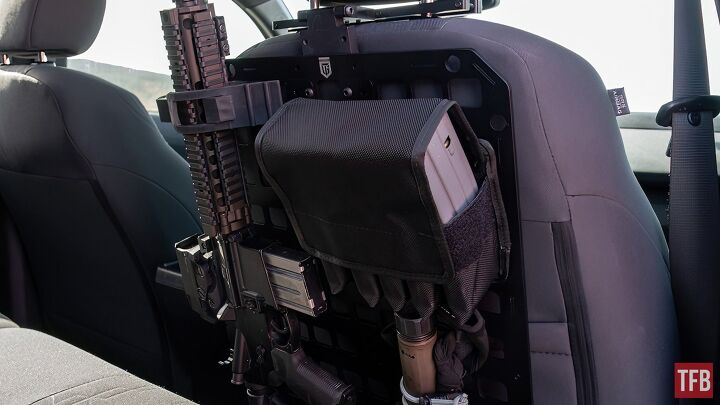
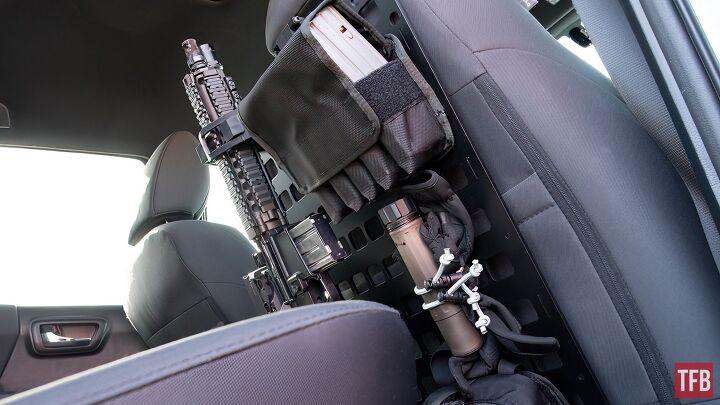
GMT Tear Away General Purpose Pouch Install
Up first would be the GMT Tear Away General Purpose Pouch. This would be my go-to bag for spare eye/ear protection (and maybe a bag of emergency skittles). I opted to mount this down low and out of the way.
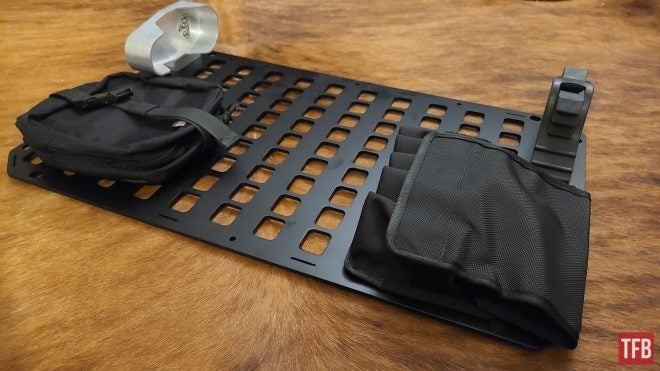
Tuff 5 InLine Mag Pouch Install
Up next was the Tuff 5 InLine Mag Pouch. With the MK18 in the RMPX, the rifle’s magwell was centered in the rack. To avoid clearance problems I installed the InLine Mag Pouch as high as possible for overall clearance and easy access.
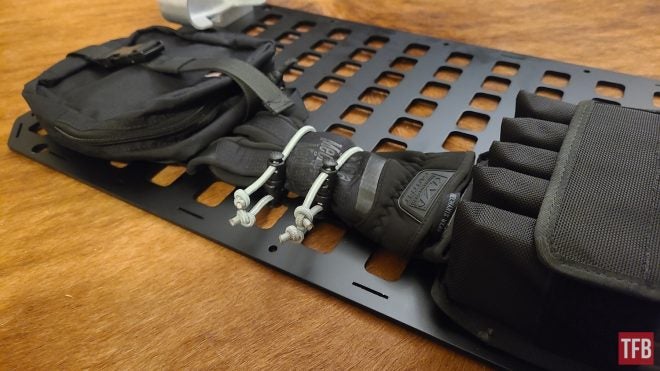
Shockloop Install
Last but not least, was the addition of the Shockloops. These are very handy and allow you to quickly secure gear like gloves or an extra magazine to the rack.
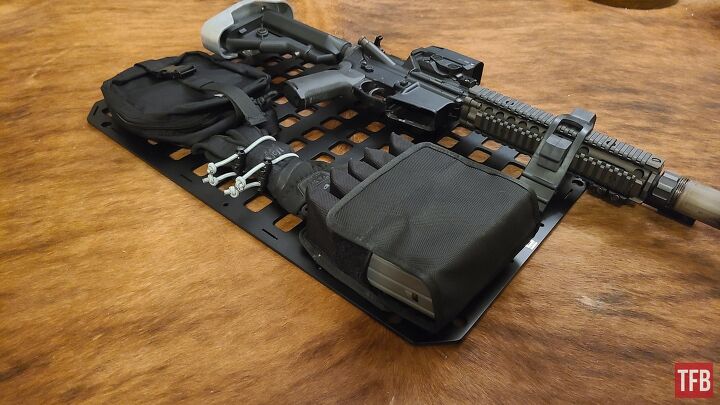
Overall Test Fit
Confident with how the setup looked, it was time to remove the gear and take the rack down to the truck for the final install.
Truck Install and Mounting
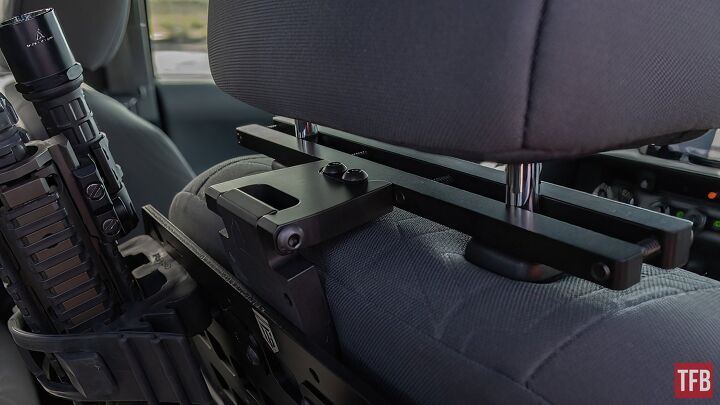
RMP Headrest Mounting Clamp
Before you order an RMP or RMPX, you’ll want to take some quick measurements from your headrests. These Toyota seats weren’t thick enough to warrant the 1.75″ spacer, but many American vehicles with larger seats will need this option. The RMP headrest mounting clamp is easily installed if you first secure the mount to the rack, secure the headrest mount, then mount the rack to the seat using the single cross screw.
GMT Tear Away Pouch with Ear/Eye Pro Inserted
From there you’ll need to feed the Buckle Loop-Around RMP strap around your seat and secure it to the panel. I ended up moving mine farther in after this photo to allow for easier fitment of the cover.
TFB Review: Grey Man Tactical Rigid MOLLE Panel (RMPX)
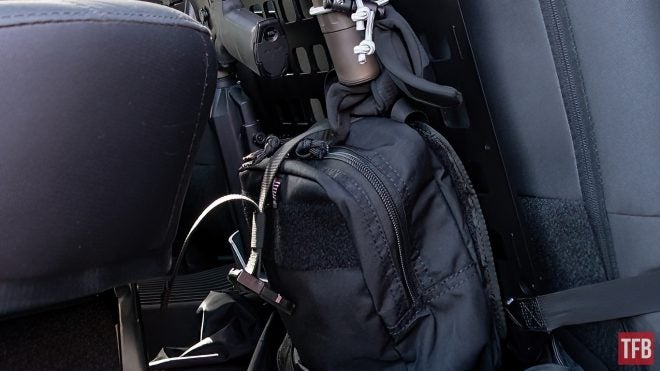
With the rack installed, I decided I’d prefer the suppressor to not stick up above the headrest and instead be stored in the shock loops. Follow along and I’ll show you why.
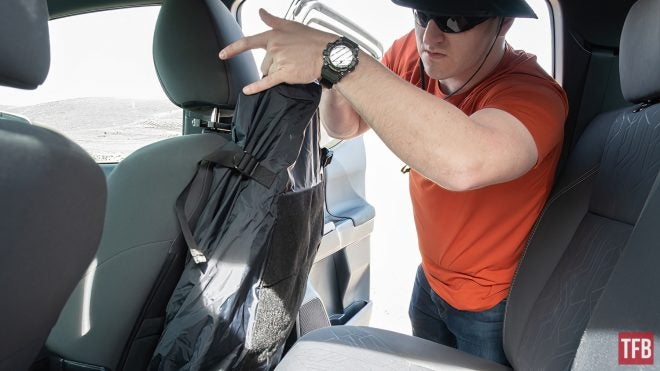
RMP Cover Install from Bottom
The overwhelming reason why I wanted to review this product was because of Grey Man’s RMP cover that stores at the bottom of the seat.
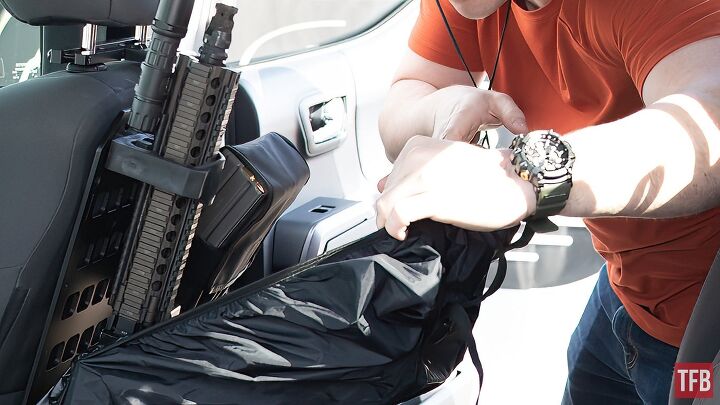
RMP Cover Clearance
The RMP cover looks and behaves like a discreetly fitted sheet for your RMP or RMPX. With two tabs on the top and bottom, you can cover your equipment and keep it away from prying eyes while on the go. Combine this with a heavy tint in your rear windows, and no one will think to look twice.
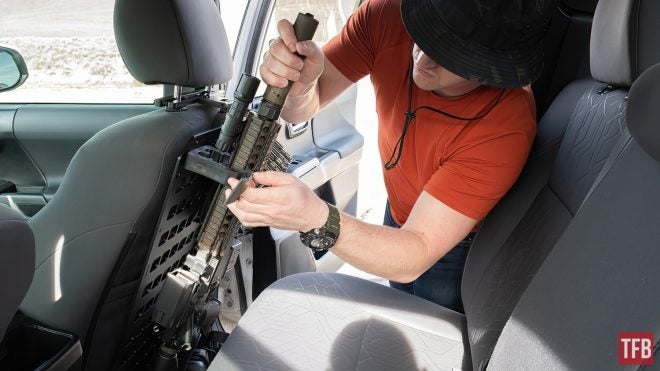
Regular and Rapid Deployment Methods
RMP Cover Removal
With the RMP Cover installed, it would take me less than say 10-15 seconds to have the cover removed, the suppressor installed, and the rifle out and ready.

TFB Review: Grey Man Tactical Rigid MOLLE Panel (RMPX)
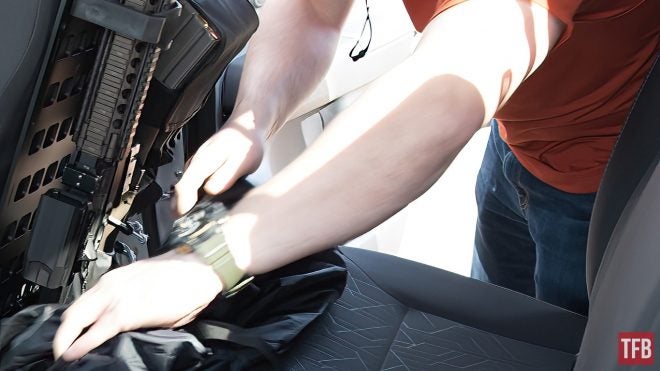
The Rubber Clamp kit at the top of the rifle rack is very secure and will hold the rifle in place even with the tab removed. This makes it easy to do two things, install the suppressor and remove the rifle at the same time.
TFB Review: Grey Man Tactical Rigid MOLLE Panel (RMPX)
With the locking tab removed you can push the tab out of the way, or pull away from the seat hard to release the rifle. After going through this a couple times, I just opted to pull the tab and make things easier.

TFB Review: Grey Man Tactical Rigid MOLLE Panel (RMPX)
In situations where you might not want to exit the vehicle, it’s easy to reach across and break the tab loose. The clamp supports the rifle without the tab, and you can pull the rifle back to free it from the mount with one hand.

TFB Review: Grey Man Tactical Rigid MOLLE Panel (RMPX)
With the rifle free you just need to bring the stock up to clear the rear seat, and then bring the muzzle over between the two seats. It sounds more difficult than it is, and these are just two ideas of how you can set up the RMPX for use with a rifle.
The Verdict
TFB Review: Grey Man Tactical Rigid MOLLE Panel (RMPX)
I’ve had the RMPX in my truck for the past couple of months and it blends in well enough that it’s become more of an afterthought. I haven’t had backseaters complaining about a lack of legroom, but that is something to consider if you have a smaller backseat (you’re going to lose 2-3 inches with gear installed). MSRP on the setup Grey Man sent over to me was $642 (of course without a rifle, magazines, etc). Is this setup for everyone? No. But if you like keeping your vehicle kit organized and having things ready to go, then this is tough to beat. Either way, if you decide to purchase this setup, I strongly recommend getting the RMP cover for that added visual security.
Thank you to Grey Man Tactical for sending this kit over for review, and thanks for reading!
Product Specs and Links
- Simple no drilling / no tools installation and removal that can be completed in under 60 seconds
- Universal fit, check compatibility chart for sizing
- Lockable with the addition of cable lock around seat base
- Heavy Duty Rigid Panel prevents sagging
- Attach MOLLE style pouches to organize your gear
- Customize with Adhesive Backed Loop to accept Velcro Hook Pouches
- Use GMT backer plates to hard mount tool and rifle racks
- 0.25″ holes on edge for mounting with screws
- 1″ slots for attaching 1″ Webbing Mounting Straps and Handles
- 0.563″ holes on corners accept Push Button QD Swivel Mounting Straps
- D-Ring style straps require a removable headrest
- 24in “Top” style strap loops around any headrest
- MSRP: $200
- Conceal and protect RMP™
- Reinforced elastic rim secures around back of RMP™
- Heavy-duty dual pull handles for quick removal
- Deep design to cover all gear attached to RMP™
- Four built-in cinch straps to pull excess cover material snug + out of the way
- 12 X 12 loop panel for attaching name + morale patches
- Durable, weather-resistant polyester fabric construction
- MSRP: $49.99
-
Can be mounted to any RMP™ or RMPX™ with the included RMP Backer Plates and screws
- Spacer: 1.75″ [RMP™ Headrest Mounting Clamp] – This spacer allows more room between the headrest posts and where the RMP™ mounts, necessary for thicker vehicle seats. Use the drop-down menu to select, or sold separately.
- MSRP: $135
- “Bottom” Strap: 48 inches x 1 inch wide (2.8 oz)
- Color: Black
- SKU:000107
- MSRP: $20
- Internal Dimensions: 6.25″ long x 2.6″ wide tapered down to 1.72″ wide x 1.29″ deep
- All Standard size AR-15, M-4, M-16, AK-47 style, an AK-74 style variants (these may fit better in the regular-sized buttstock cup)
- Fits Oversized Buttstocks including extra-wide ones such as Magpul STR
- Fits Most AR Pistol Braces
- MSRP: $150
- Five individual pockets for each magazine
- Attach securely to either your belt or M.O.L.L.E. vest.
- Material: Double layered 1000 denier Cordura
- MSRP: $40
-
Width: 7 1/2″ | 190.5 mm
-
Height: 9″ | 228.6 mm
-
Thickness: 4″ | 101.6 mm
-
Weight: 6.45514 ounces | 183 grams
-
Material: 500 Denier Nylon
-
SKU: 000380
-
UPC: N/A
-
MOLLE Spaces: 5 X 5
- MSRP: $30
-
Specifications: Per one
-
Width: (12″) 1.8″ | 46.43mm (24″) 1.8″ | 46.43mm
-
Height: (12″) 12″ | 304.8mm (24″) 24″ | 609.6mm
-
Thickness: (12″) 0.1″ | 2.54mm (24″) 0.1″ | 2.54mm
-
Weight: (12″) 0.45 ounces | 11 grams (24″) 0.59 ounces | 17 grams
-
Material: Elastic Cord and High Strength Polymer Cinch/Snap
-
SKU: 000465, 000466
-
UPC: N/A
-
MOLLE Spaces: N/A
- MSRP: $17