 Your Privacy Choices
Welcome everyone to the TFB Armorer’s Bench! As mentioned in the little blurb, this series will focus on a lot of home armorer and gunsmith activities. In this article sponsored by Wheeler, Tipton, Caldwell, and Frankford Arsenal, I happened to do a little maintenance on an old Browning Auto-5 that I own and while disassembling and reassembling, I thought to myself that it may be beneficial if I did an Armorer’s Bench on how the friction rings work and the proper way of setting them up in accordance with whatever load you intend to use. When I say “friction rings” I may be referring to the recoil assembly as a whole purely for simplification. All that being said, let’s dive right into proper Auto-5 friction ring orientation!
TFB Armorer’s Bench: Auto-5 Friction Ring Orientation
Welcome to our recurring series of Armorer’s Bench which is made possible and brought to you by Wheeler, Tipton, Caldwell, and Frankford Arsenal who are our sponsors. Here, we at TFB hope to inform, entertain, and even inspire any would-be gunsmith or armorer out there. Ideally, with the information I provide and with the help of our sponsors, you can have some useful knowledge pertaining to the conservation and improvement of firearms technology while at the same time sharing experiences and teaching each other new tips and tricks along the way in the comments. Digging deep into what it is to be an armorer or gunsmith has significance but what is important is what those people do to show they’ve earned that title. I am happy to share my experiences and knowledge and hope it is informative!
Make your personal safety a priority:
- Practice proper gun safety. Always make sure before the firearm hits your bench that it is unloaded and safe to be handled.
- Wear the proper safety equipment. The main one would be safety glasses (decent ones) since parts are often under spring tension and you may work with high RPM tools. Other honorable mentions would be latex gloves or a respirator when working with potentially harmful solvents and oils. Also hearing protection when working with loud machinery or test-firing firearms.
- Modifications, alterations, and customizations will void your firearm’s warranty 9.5 times out of 10. Please take that into consideration before attempting any at-home gunsmithing.
- If you are unsure about proper safety practices, disassembly procedures, or warranty standards, stop, put down the tools, and consult a competent gunsmith.
How Does it Work?: Auto-5 Friction Ring Orientation
The Auto-5 system (different from the modern A5) is a long recoiling action. The Remington Model 11 is a licensed copy of the Auto-5 and this information can be used similarly. With the Auto-5 being a long recoiling system that means that the barrel is made to follow the bolt backward after the cartridge is fired. When the bolt gets to its ideal position it will halt and forward spring tension will unlock the bolt from the barrel and launch the barrel back forward. This ensures that the bolt does not open before the pressures in the barrel become safe.
The Auto-5 friction rings and recoil system (located under the handguard) are basically a linear brake system. As the barrel travels backward it fights a series of rings and a large spring. This effectively slows the barrel and bolt down enough to clear pressure from the barrel and also maintain a cycling operation. This operation can be impacted by a change in shotshell loads (like going from light to heavy) which is why changing the orientation of the recoil system is necessary.
Why Does it Matter?: Auto-5 Friction Ring Orientation
Besides potential cycling issues, the Auto-5 can BEAT ITSELF TO DEATH if the correct orientation is not selected for the correct load. What I mean by this is if your shotgun is set for light loads or set up incorrectly altogether and a heavy or magnum load is introduced once or several times, the bolt and barrel’s mass will be smacking into the rear of the receiver (and inducing some harsh recoil). This pounding of the back of the receiver is why you may come across an Auto-5 with the “humpback” receiver cracked or even broke/burst open. Be careful!!!
Note: Before moving on to field stripping, I wanted to mention that there is no need to lube up any part of the recoil system. You may clean and protect it from rust if need be but make sure it is not lubed up at all. This includes the magazine tube itself. The recoil system requires friction to function properly. Introducing a substance (lube) that gets rid of friction or eases the movement of metal parts will result in constant issues and malfunctions and may even harm your receiver with excess movement. There are a few uncommon reasons to lube the magazine tube in order to aid in cycling but this is typically when a gun is dirty enough to slow down.
Field Stripping: Auto-5 Friction Ring Orientation
Field stripping an Auto-5 is pretty simple. Obviously, make sure everything is safe and unloaded and you are wearing proper PPE if you choose to attempt this. Start by locking the charging handle to the rear. Then begin by putting the butt pad on the floor with the muzzle pointed to the ceiling.
Once this is done you should be able to push or slide the barrel slightly into the receiver. You do not need to go far but by all means, feel out how the system works manually. Continue to hold the barrel in this position until the magazine tube cap is off.
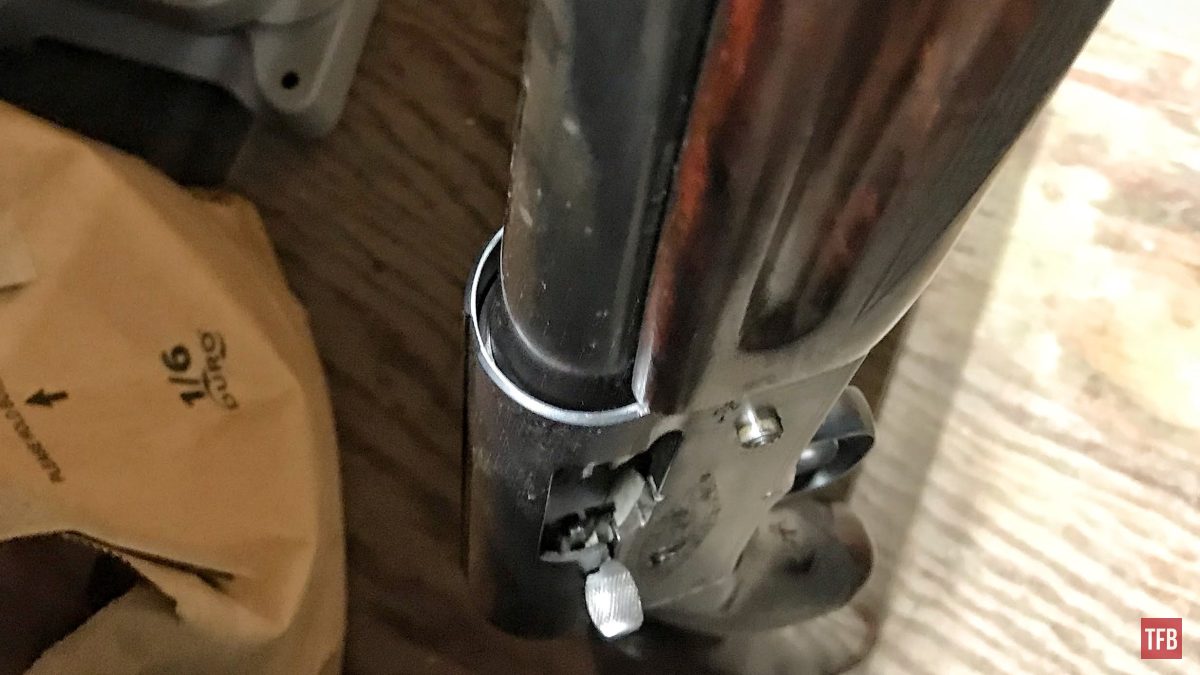
With the barrel pushed into the receiver about half an inch, the magazine tube cap should be able to be screwed off. If you do not push the barrel into the receiver while doing this the cap will be extremely hard to unscrew since you are fighting spring pressure.

Removal of the magazine tube cap will allow the barrel and forend to come off.
Note: Be extremely gentle with the forend since they are thin and fragile and prone to cracks and splits.
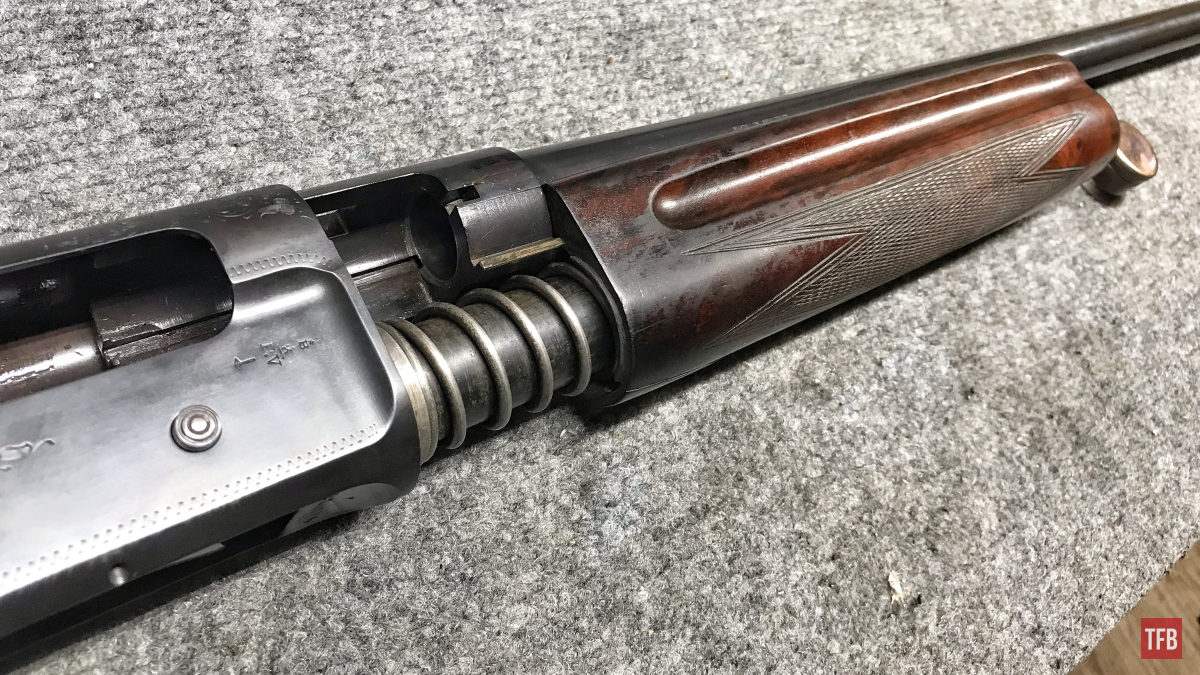
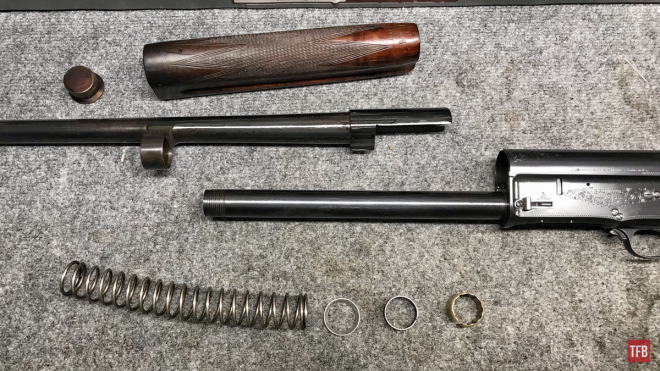
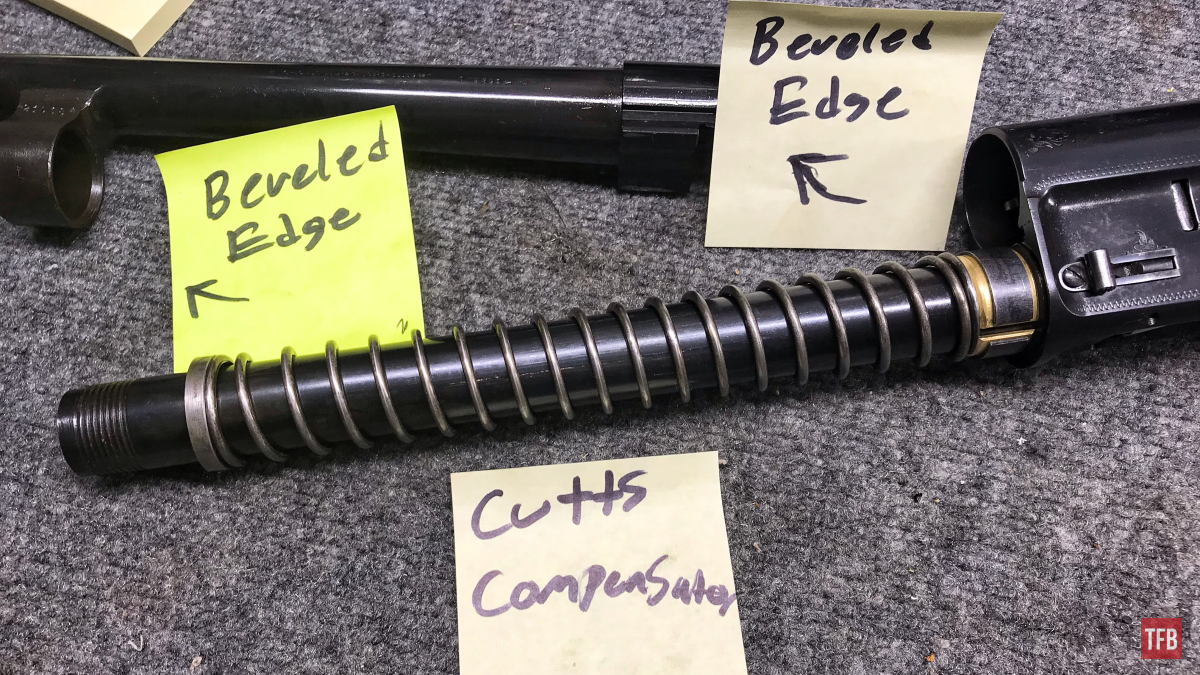
With the magazine tube cap, barrel, and forend of the magazine tube take note of how the rings and spring sit on the tube. This is changeable and the whole basis of the article…welcome to the show.
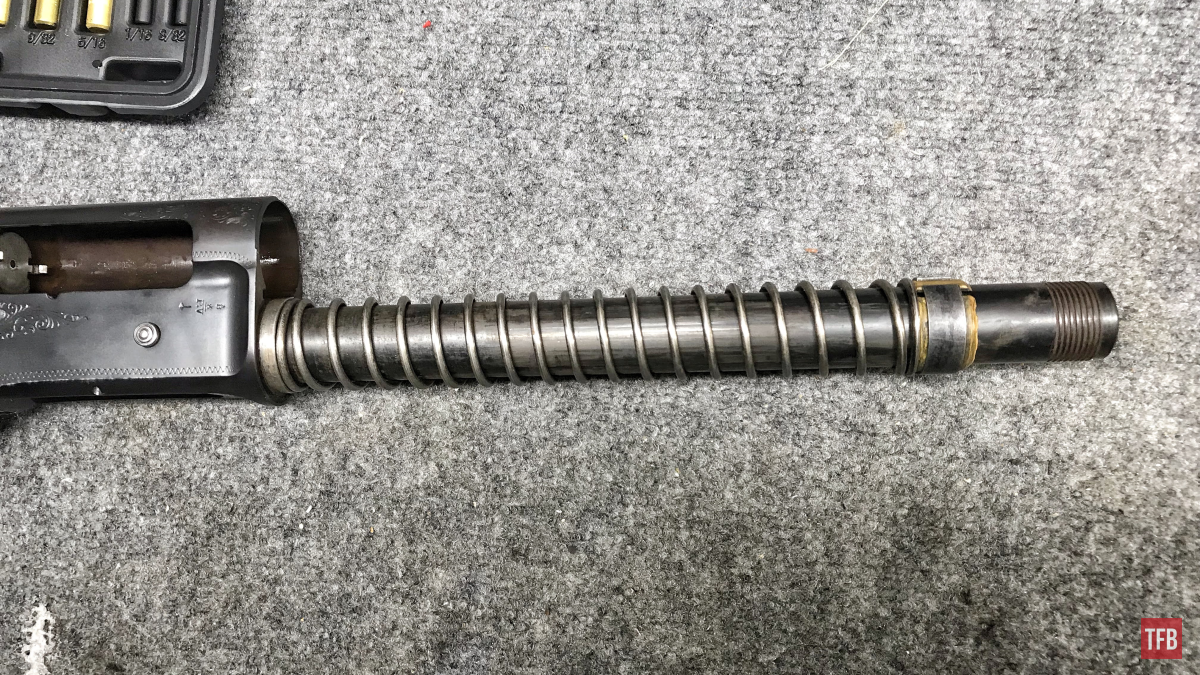
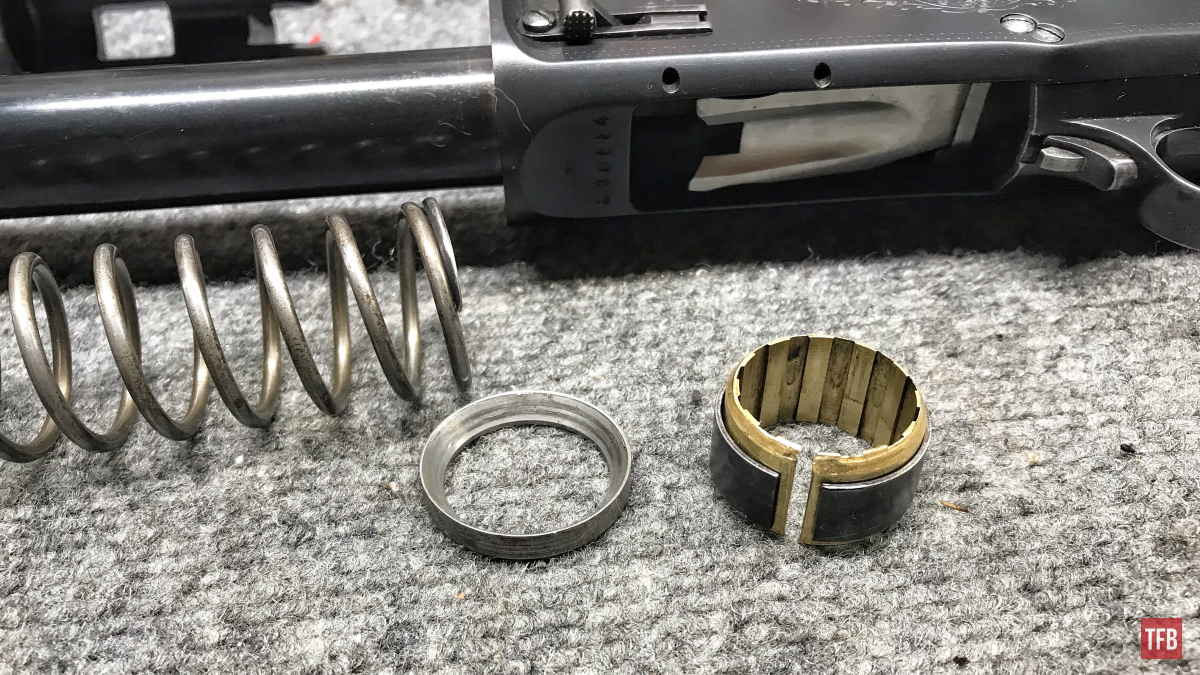
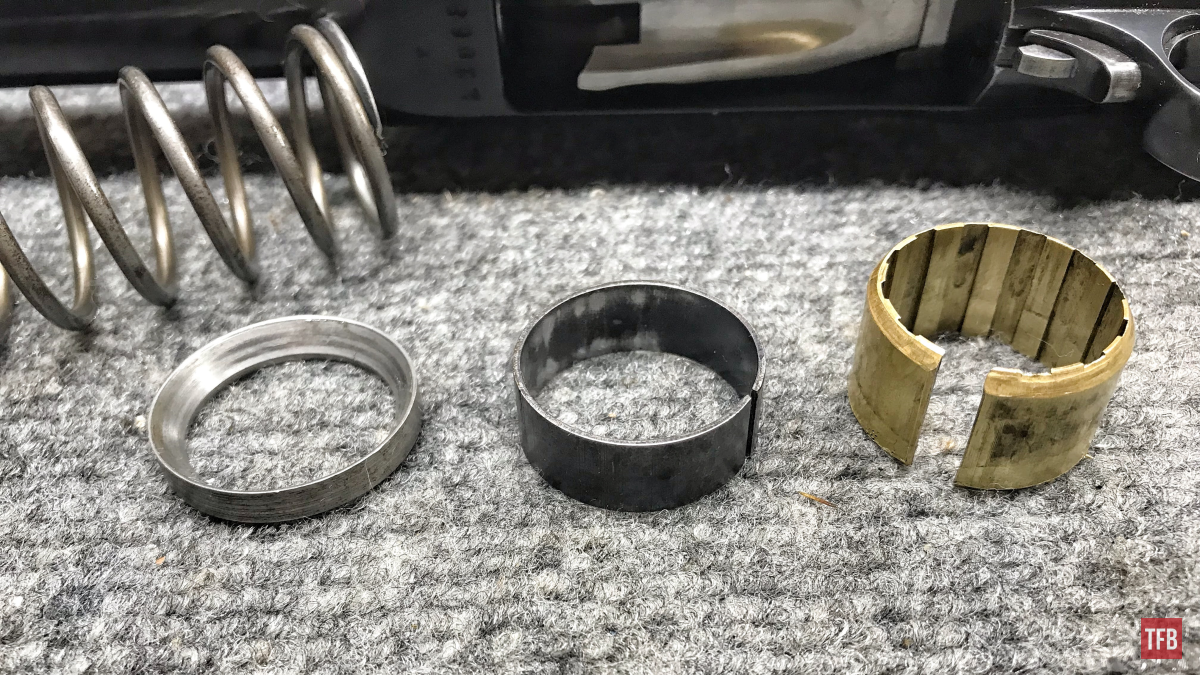
Here we have a Recoil Spring (giant spring), a Friction Ring (a thin steel ring with a beveled inner face), a Friction Piece (bronze c-shaped cylinder), and a Friction Spring (c-shaped spring steel that is around the Friction Piece when assembled – no need to take it apart).
Quick Disclaimer: Auto-5 Friction Ring Orientation
The following recoil system setups are ones that I pulled straight from a Browning armorer’s manual when I worked as a gunsmith at FN America (Browning, Winchester, and FN are sister companies). That being said, these are what I have known, witnessed, and believe to be correct. I double-checked my notes and everything seems to be as it was in the manual but I am only human and the manual was quite old…It had a Cutts Compensator recoil setup for goodness sake.
Side Note: I apologize for the sticky notes and my poor handwriting. My sleep-deprived brain forgot that I could insert information into the pictures in post. Bear with me!
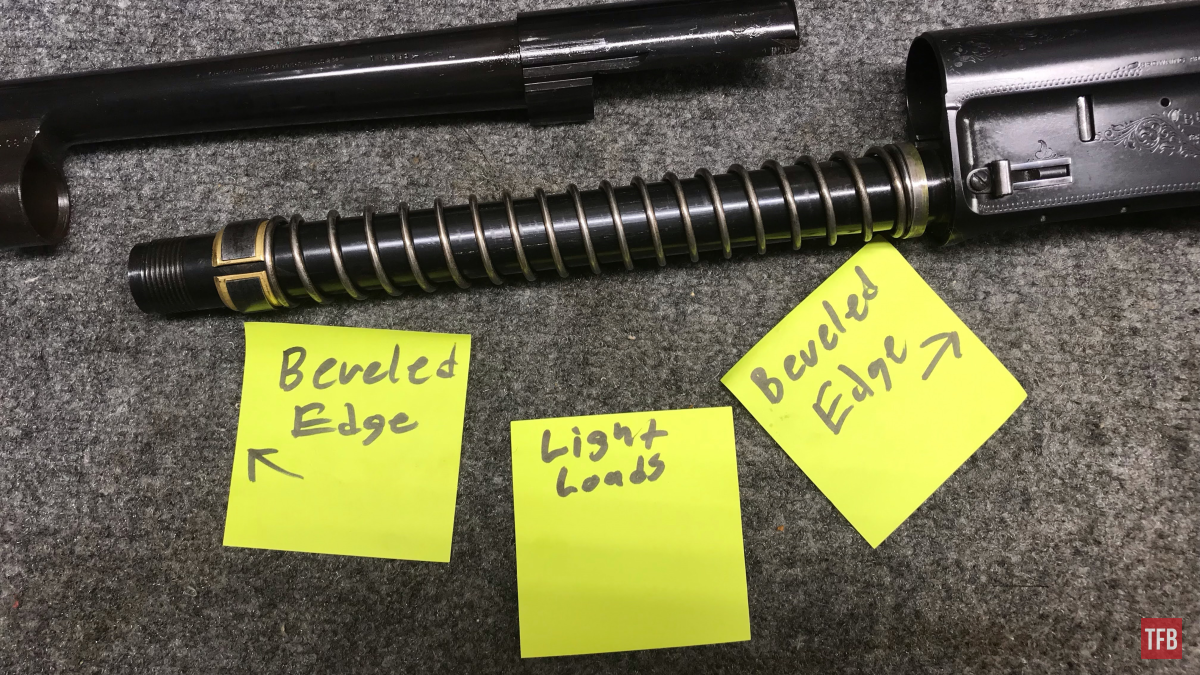
Light Load Orientation: Auto-5 Friction Ring Orientation
The light load orientation is where you should be at with most generic target loads and trap loads. Some Auto-5 shotguns literally were called a “light twelve” and would come with this set up from the factory. The friction ring is all the way back against the receiver and the beveled edge is facing the receiver. The bronze friction piece also has a beveled edge and that one faces toward the barrel (the barrel itself has a corresponding beveled face built-in. The spring is separating the friction piece and friction ring.
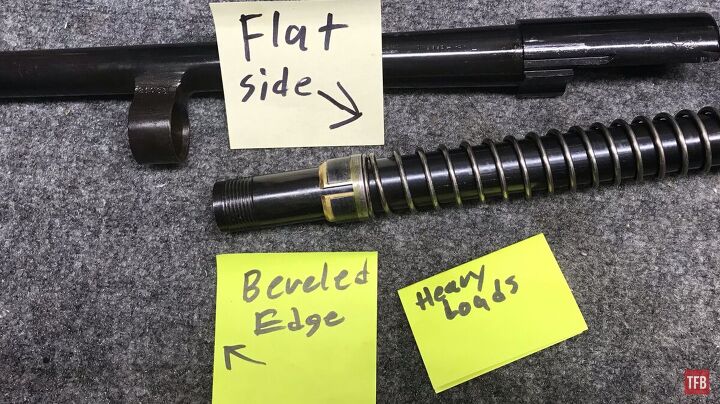
Heavy Load Orientation: Auto-5 Friction Ring Orientation
For heavy loads, the friction ring gets moved up to the end of the magazine tube with the friction piece. The friction spring’s flat face is facing the spring which is in turn against the receiver. The friction piece remains where it was in the Light Loads position, beveled side facing the barrel.
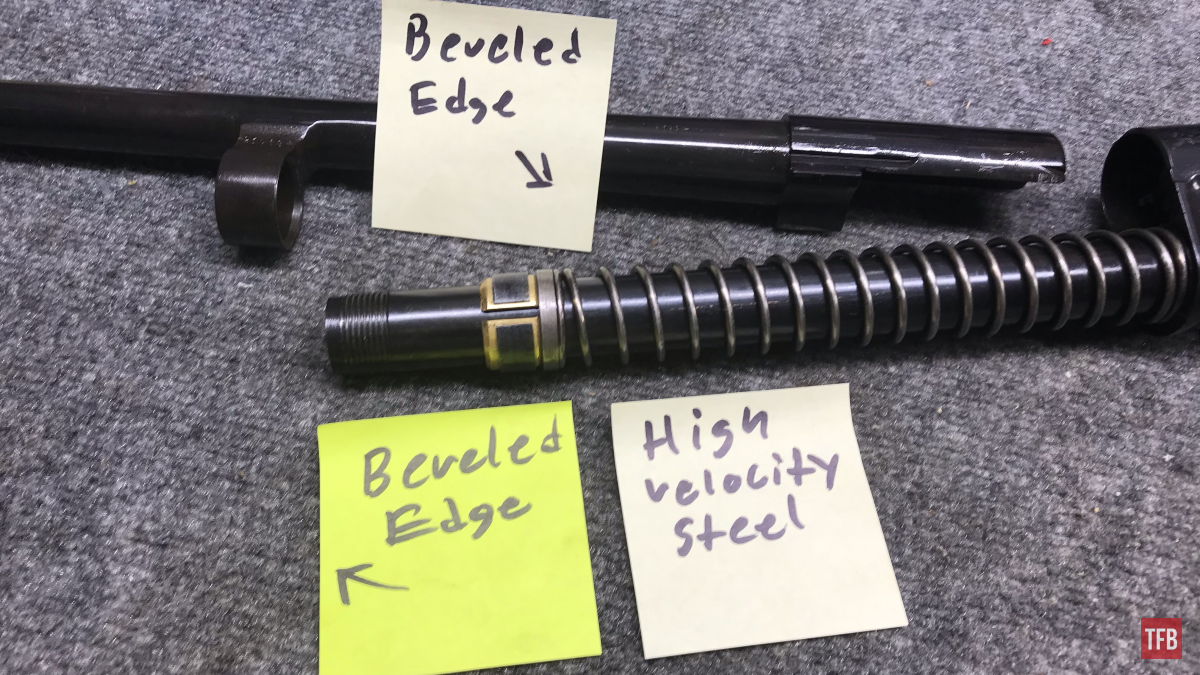
High-Velocity Steel Load Orientation: Auto-5 Friction Ring Orientation
For higher velocity “steel” loads it is extremely similar to heavy loads but the friction ring’s beveled edge is facing the recoil spring instead of the friction piece.
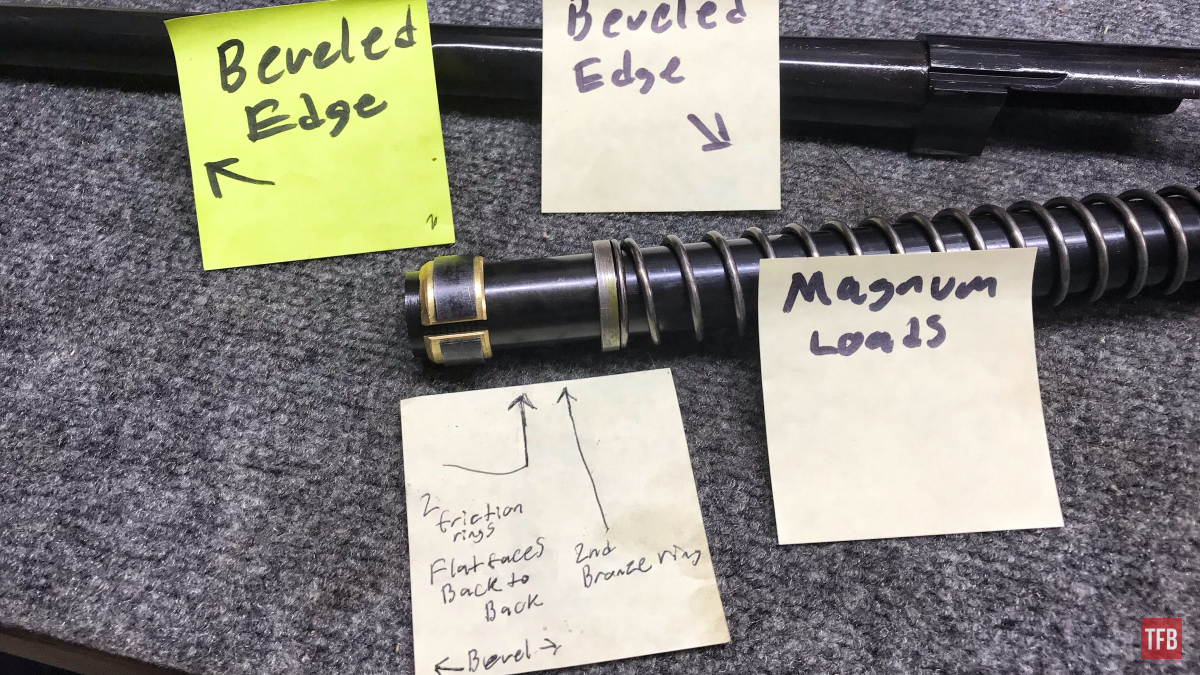
Magnum Load Orientation: Auto-5 Friction Ring Orientation
This one is tough without the extra pieces needed but I will try my best to thoroughly explain. For magnum loads two additional friction rings and one magnum bronze friction piece (with friction spring on it) are necessary. All five pieces are toward the front by the barrel and the recoil spring still contacting the receiver. In order from muzzle to receiver, it goes friction piece, friction ring, friction ring, friction piece, friction ring. The first friction piece is the same as all so far where the beveled edge is facing the barrel. The next two friction rings work in tandem. Each of their beveled faces is facing outward. One toward the muzzle and one toward the receiver. Their flat sides are facing each other. The second friction piece is actually skinnier than the other one pictured. This friction piece‘s beveled side faces the muzzle in order to fit into the friction ring next to it. The last friction ring’s beveled side faces the recoil spring.
Cutts Compensator Orientation: Auto-5 Friction Ring Orientation
This one probably is not applicable to most Auto-5 shotguns out there but I bet someone has a Cutts on theirs and is in need of a quick tip. Here we go! As shown below, the bronze friction piece has moved to the receiver with its beveled side facing the recoil spring. The friction ring itself is in front of the recoil spring with its beveled side facing the muzzle of the gun.
Final Thoughts: Auto-5 Friction Ring Orientation
Well, there you have it! The full list of potential recoil system setups for the Auto-5 and applicable variations. I enjoy working with these old gats and their quirks and shortfalls are part of what makes them unique and beautiful. Take care of the history you have, treat it well, and enjoy it. Be safe out there and I will see you next week!
As always, thank you for reading TFB! Be safe out there, have fun while shooting, and we will see you next time for the TFB Armorer’s Bench brought to you by Wheeler, Tipton, Caldwell, and Frankford Arsenal! Also, let us know what you think in the comments below! We always appreciate your feedback.

Pro Range Glasses, Clear

The Caldwell® Pro Range Glasses feature a stylish wrap-around design and are a great choice for all shooters. They feature an adjustable nose piece and temples for all day comfort. The scratch resistant lens meets ANSI Z87.1 standards and offers 99.9% UV protection.
AR Maintenance Mat
 The Wheeler Delta Series AR-15 Maintenance Mat is perfect for any AR-15 owner. It features a screen printed expanded view of an AR-15 Carbine to easily identify the parts of your rifle. The Mat is made of a dark gray non-marring padded neoprene material with a durable non-skid rubber backing to protect firearm finishes while helping to keep track of small parts. Excess oils and solvents are absorbed into the mat, keeping the surface clean and dry. Each mat is machine or hand washable with mild detergent and water, and can be rolled up to easily fit in your range bag.
Universal Bench Block
Made of non-marring urethane, the Universal Pistol Bench Block is perfect for use on M1911 pistols as well as other firearms such as 10/22s.
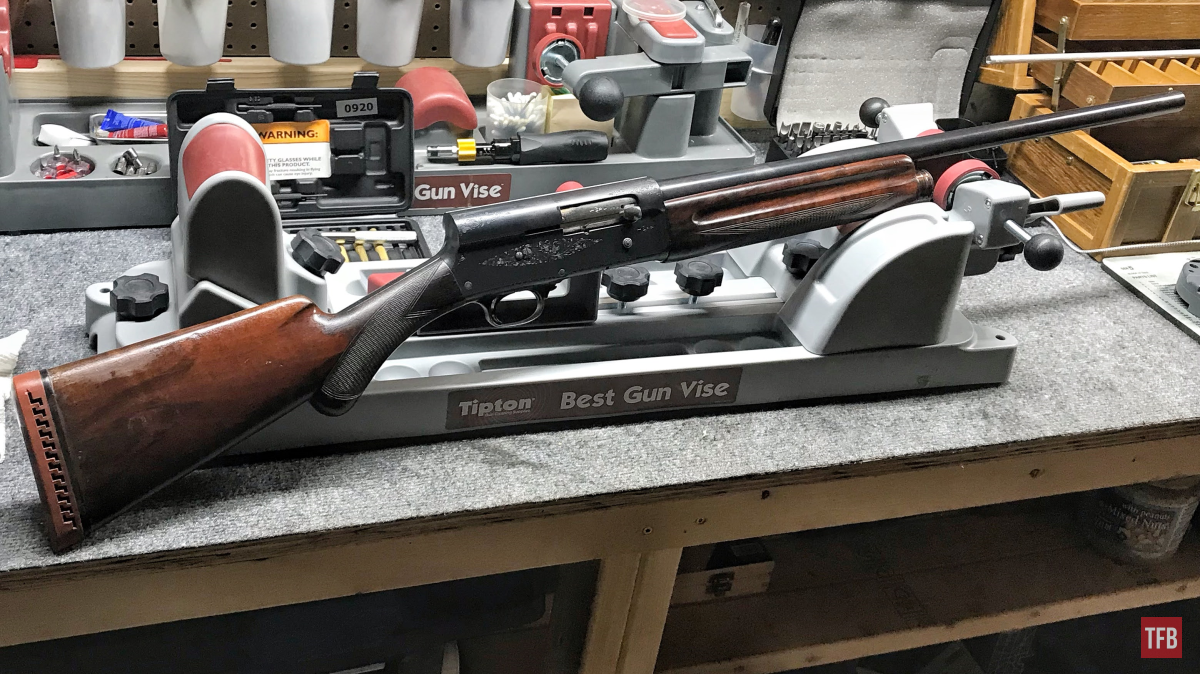
Tipton’s Best Gun Vise
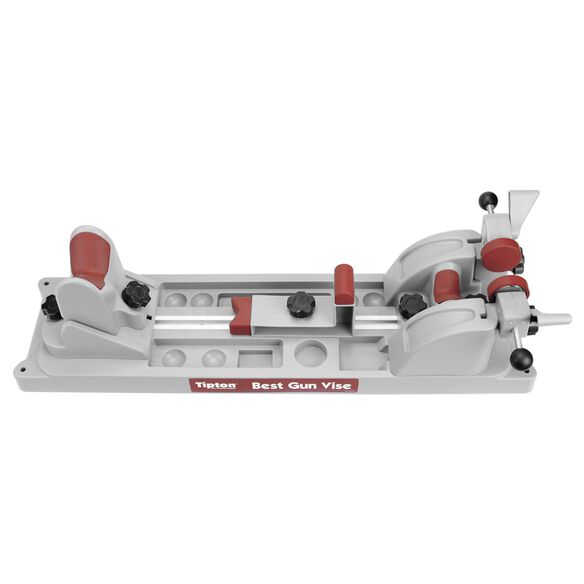
Tipton’s® Best Gun Vise™ is the best tool you can own for working on your firearms. The vise was designed to accommodate the widest possible array of firearms for cleaning, maintenance, or gunsmithing, and is easily configurable to handle bolt-action rifles, break-open shotguns, AR-15’s, and handguns. A central aluminum channel lets the user move individual components to the ideal position for their firearm. Each individual component then adjusts to the perfect position for secure support. The rear base features two adjustable offset clamps for a tight grip on a wide range of buttstock configurations. The Best Gun Vise™ is extremely stiff and is made from high-quality, solvent-resistant material that will stand up to years of hard use.
72 Piece Professional Gunsmithing Screwdriver Set

The Wheeler 72 Piece screwdriver set features 54 hollow-ground flat bits, 4 phillips, 3 torx, and 8 specialty bits all made from durable S2 tool steel with a 56-58 Rockwell “C” hardness rating. The precision-engineered bits have a concave shape that allows for insertion all the way into the screw slot of rmaximum contact to prevent burred, buggered, busted up screw slots. The kit also includes 2 non-slip, overmolded plastic handles that come in a convenient hinged storage case whcih includes a bit location guide.