 Your Privacy Choices
So things have escalated quickly the last time I wrote about the Steiner PVS-21 monocular and mentioned two accessories for the PVS-21. The Steiner CEHUD and COTM add a whole other layer of capability that you do not have with traditional night vision systems. Friday Night Lights is brought to you by ATN Corp, manufacturers of night vision and thermal optics like the THOR LT. As with all of our sponsored series, Friday Night Lights will continue to bring you unbiased news and reviews from a variety of companies.
Steiner @TFB:
- Friday Night Lights: LPNVM PVS-21 A Steiner Tactical Monocle
- TFB Behind The Gun Podcast Episode #23: Chris Gaddy from Steiner Optics
- Friday Night Lights: Steiner CQT – Thermal Fusion Red Dot
- Friday Night Lights: Steiner DBAL-A4 All-In-One MFAL
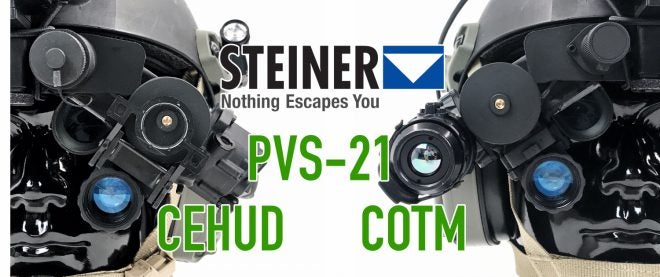
PVS-21 CEHUD & COTM
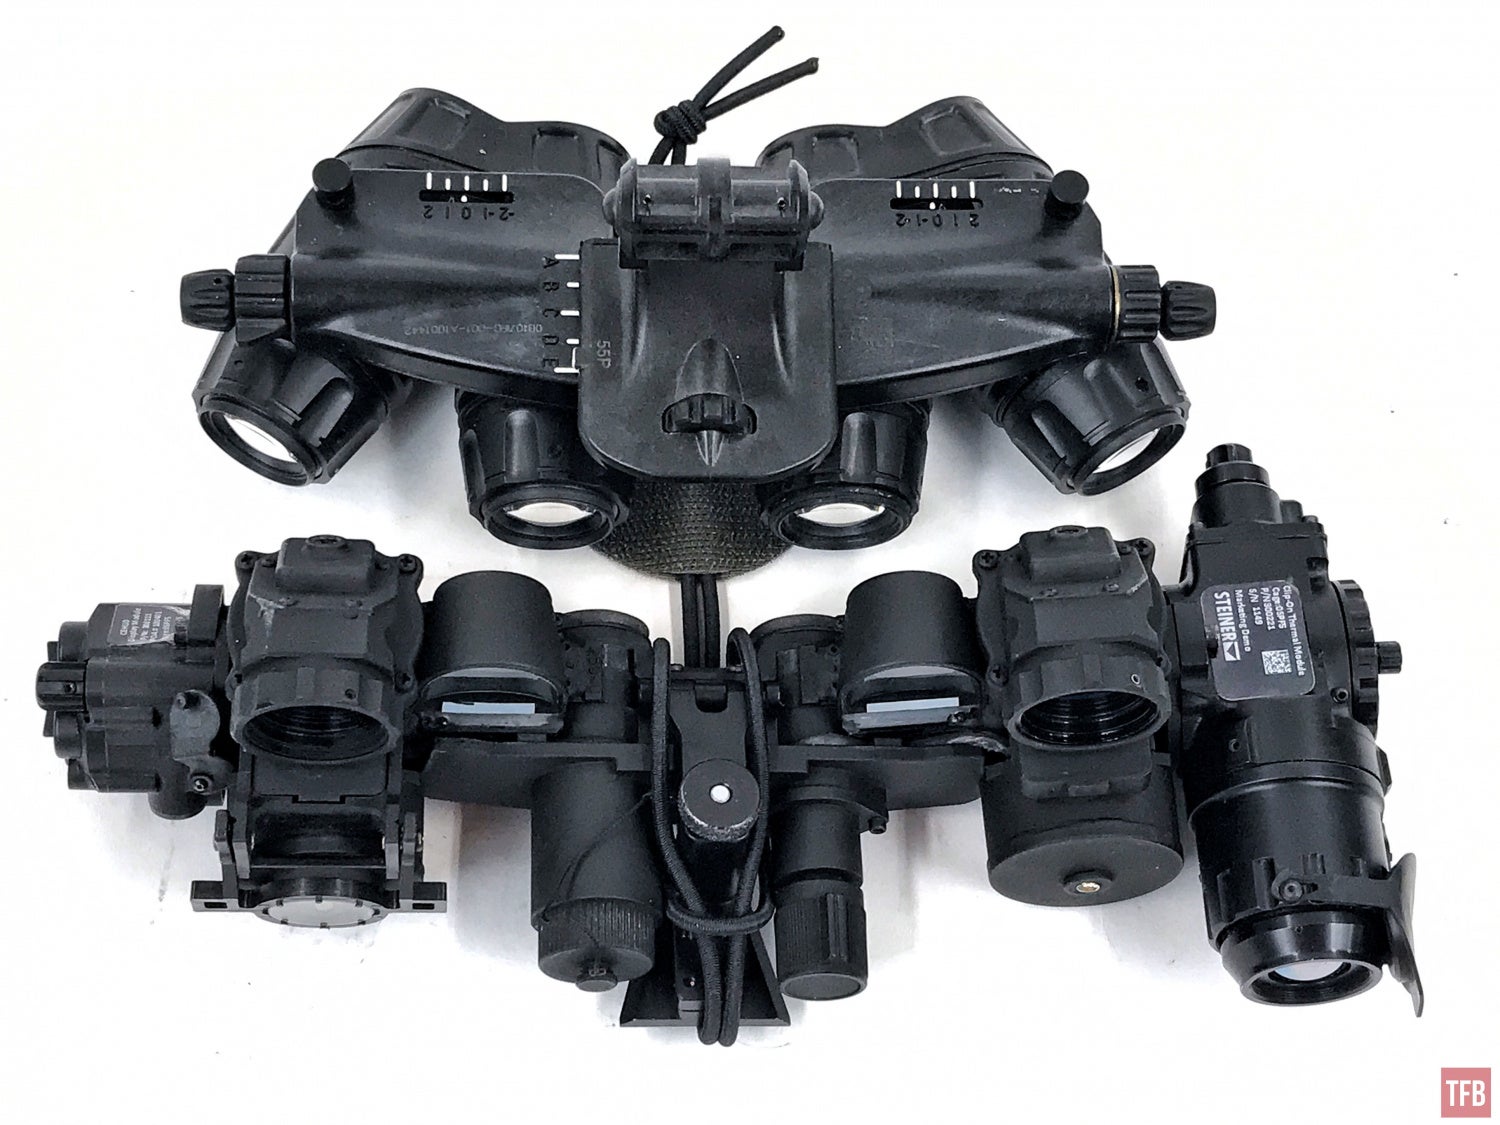
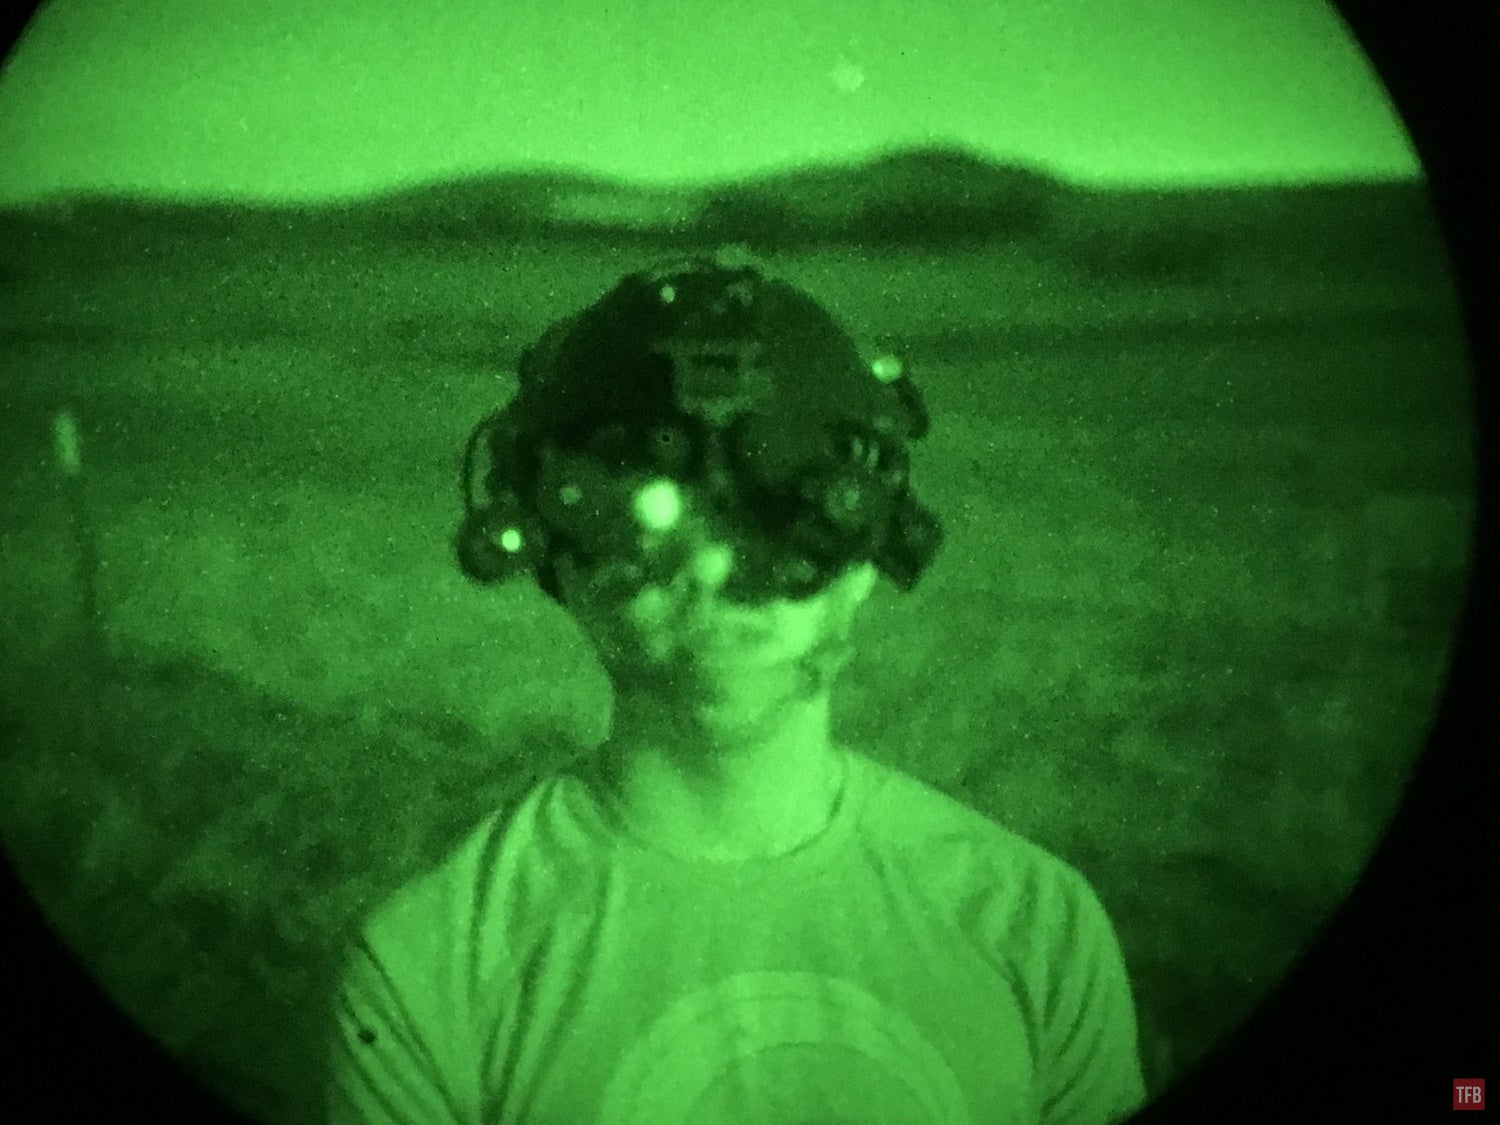
COTM on the left. CEHUD on the right.
So as I said, things have escalated quickly. When I borrowed Jake’s PVS-21 monocular, I reached out to Steiner Marketing and asked if they have a CEHUD and COTM lying around that I could borrow. To my surprise, they did and they arrived last week. I have heard of the CEHUD and COTM but other than a couple of stock photos on Steiner’s website, there is not a whole lot of content regarding them.
The CEHUD and COTM are different and yet similar at the same time. The CEHUD (Conformal Enhanced Heads Up Display) is the smaller module you see in the photo above. It allows you to insert/project images into the PVS-21 like a heads up display. While the COTM (Clip-On Thermal Module) is a thermal clip-on but unlike a COTI, or similar device, the COTM projects the thermal image behind the night vision image so you end up with a fused thermal image similar to an ENVG PSQ-20 or ENVG-B (bino). What I did not realize is that the COTM functions just like the CEHUD and can also insert/project images into the PVS-21.
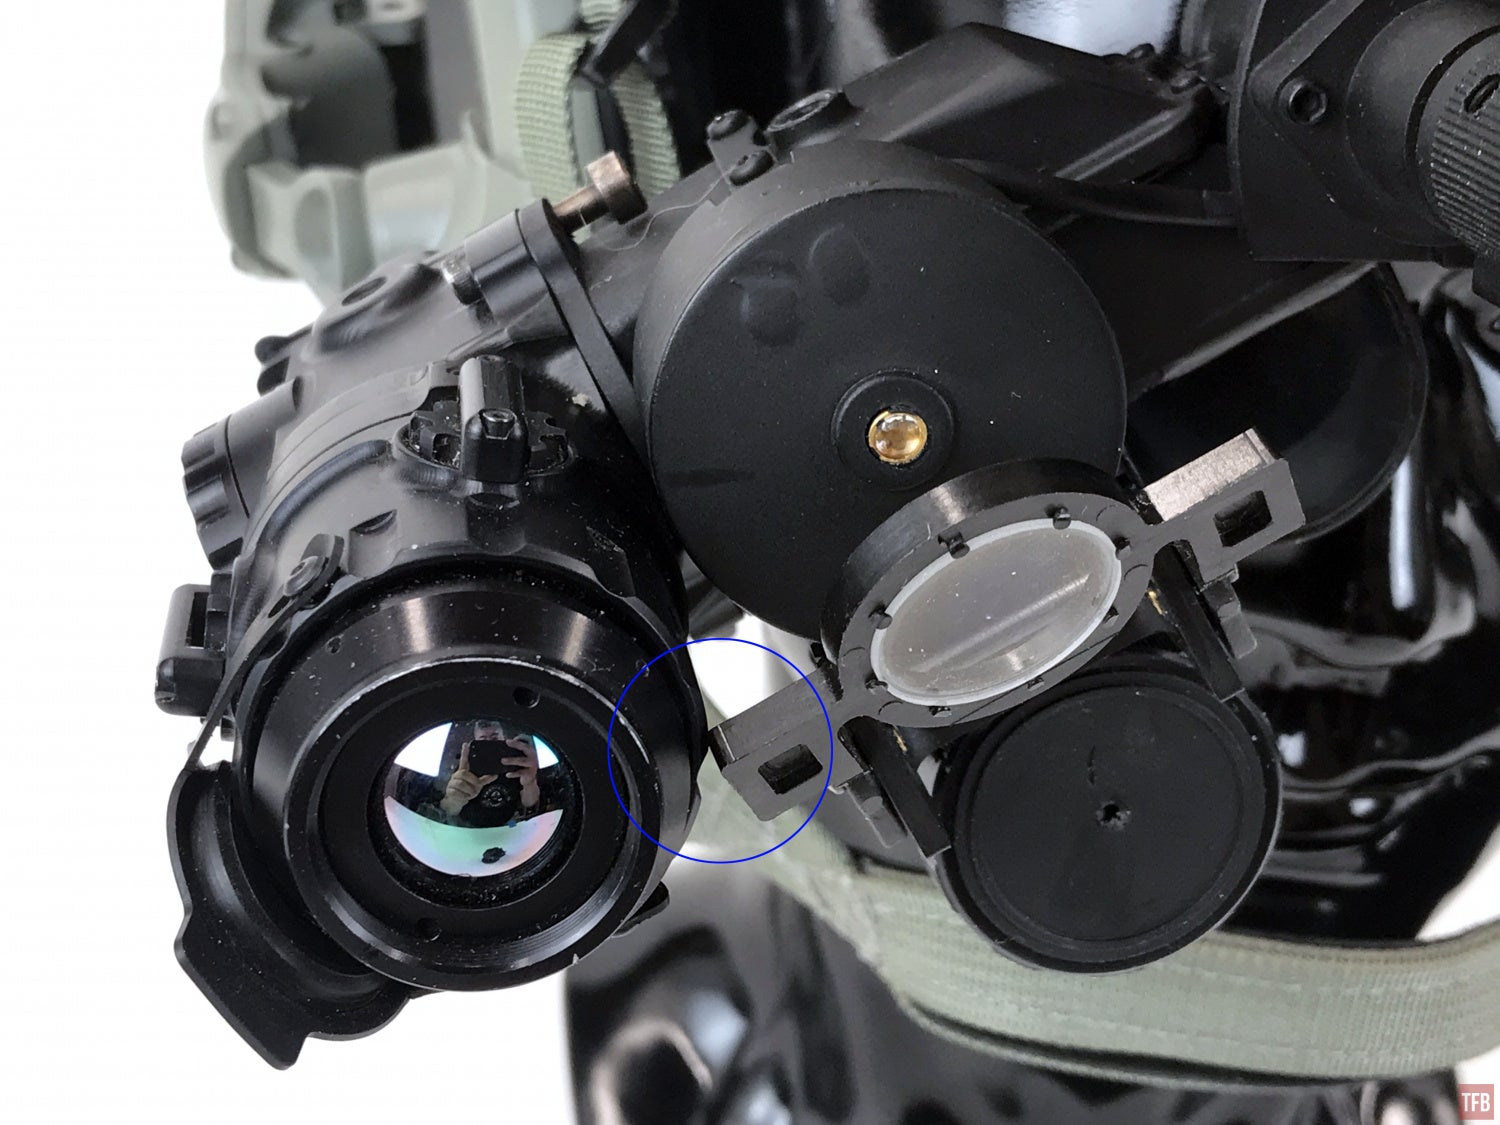
So what am I talking about when I say insert/project images? Somewhat like an ENVG-B, the PVS-21 has rear projection due to its design. Since the night vision image is bounced through a series of mirrors and beam splitters, you can add a port to inject images into the same light path as the night vision image.
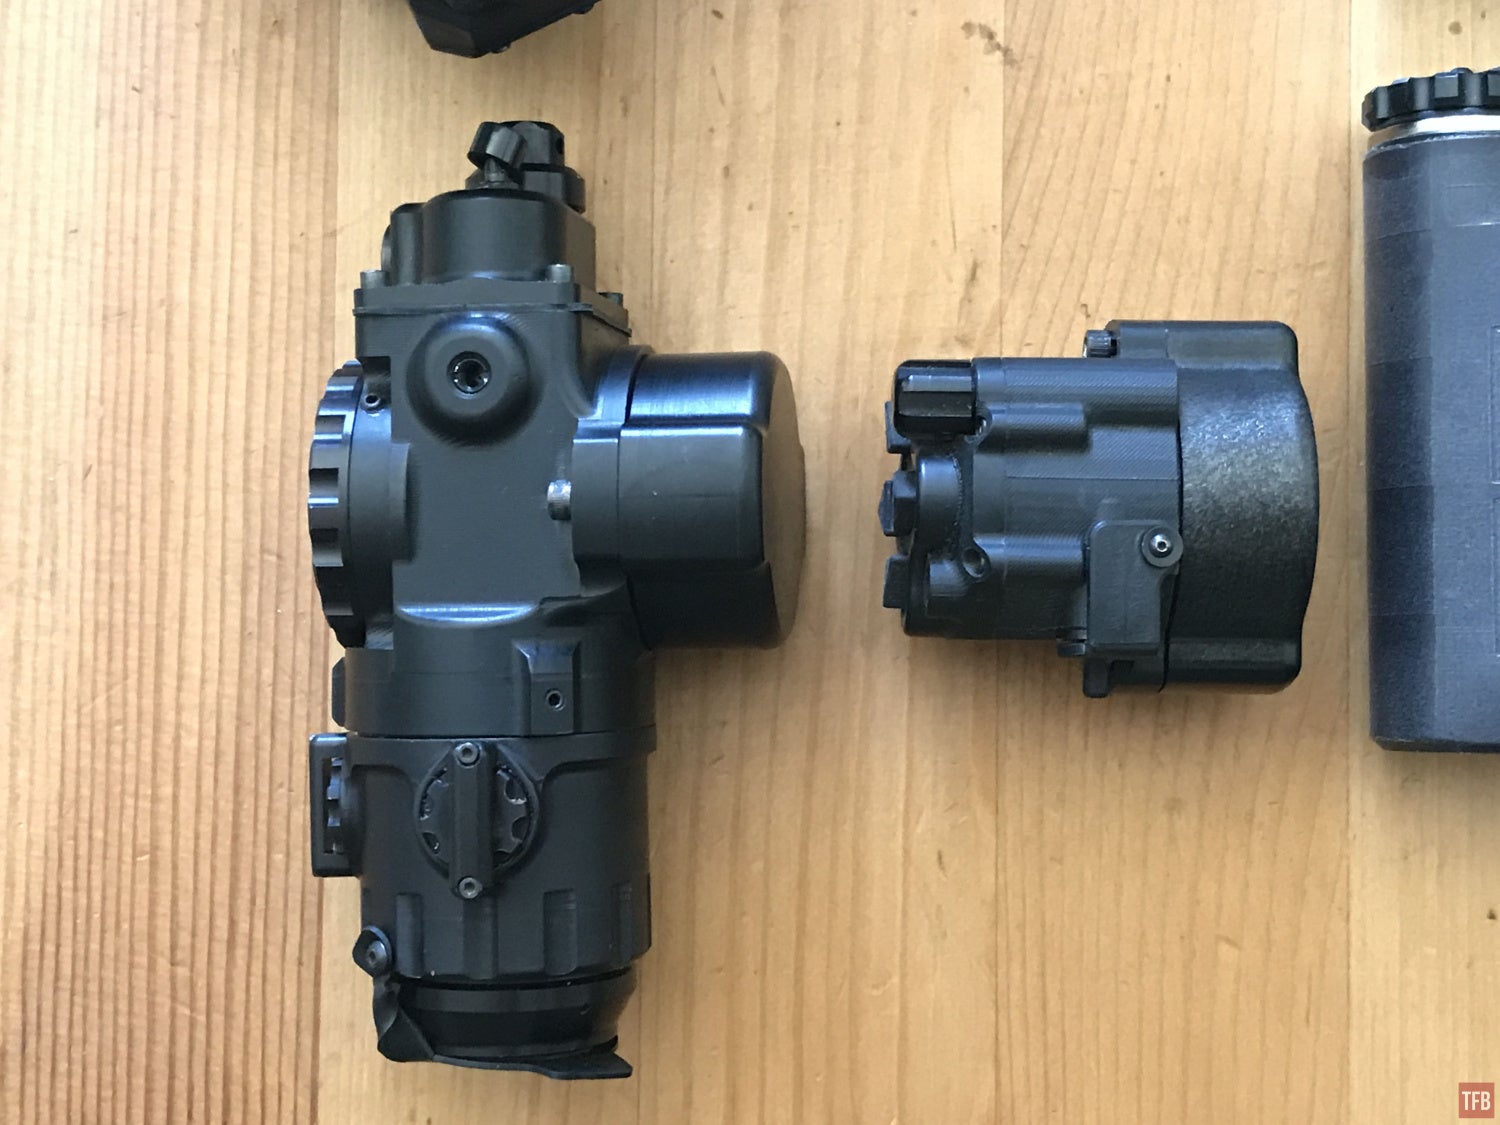
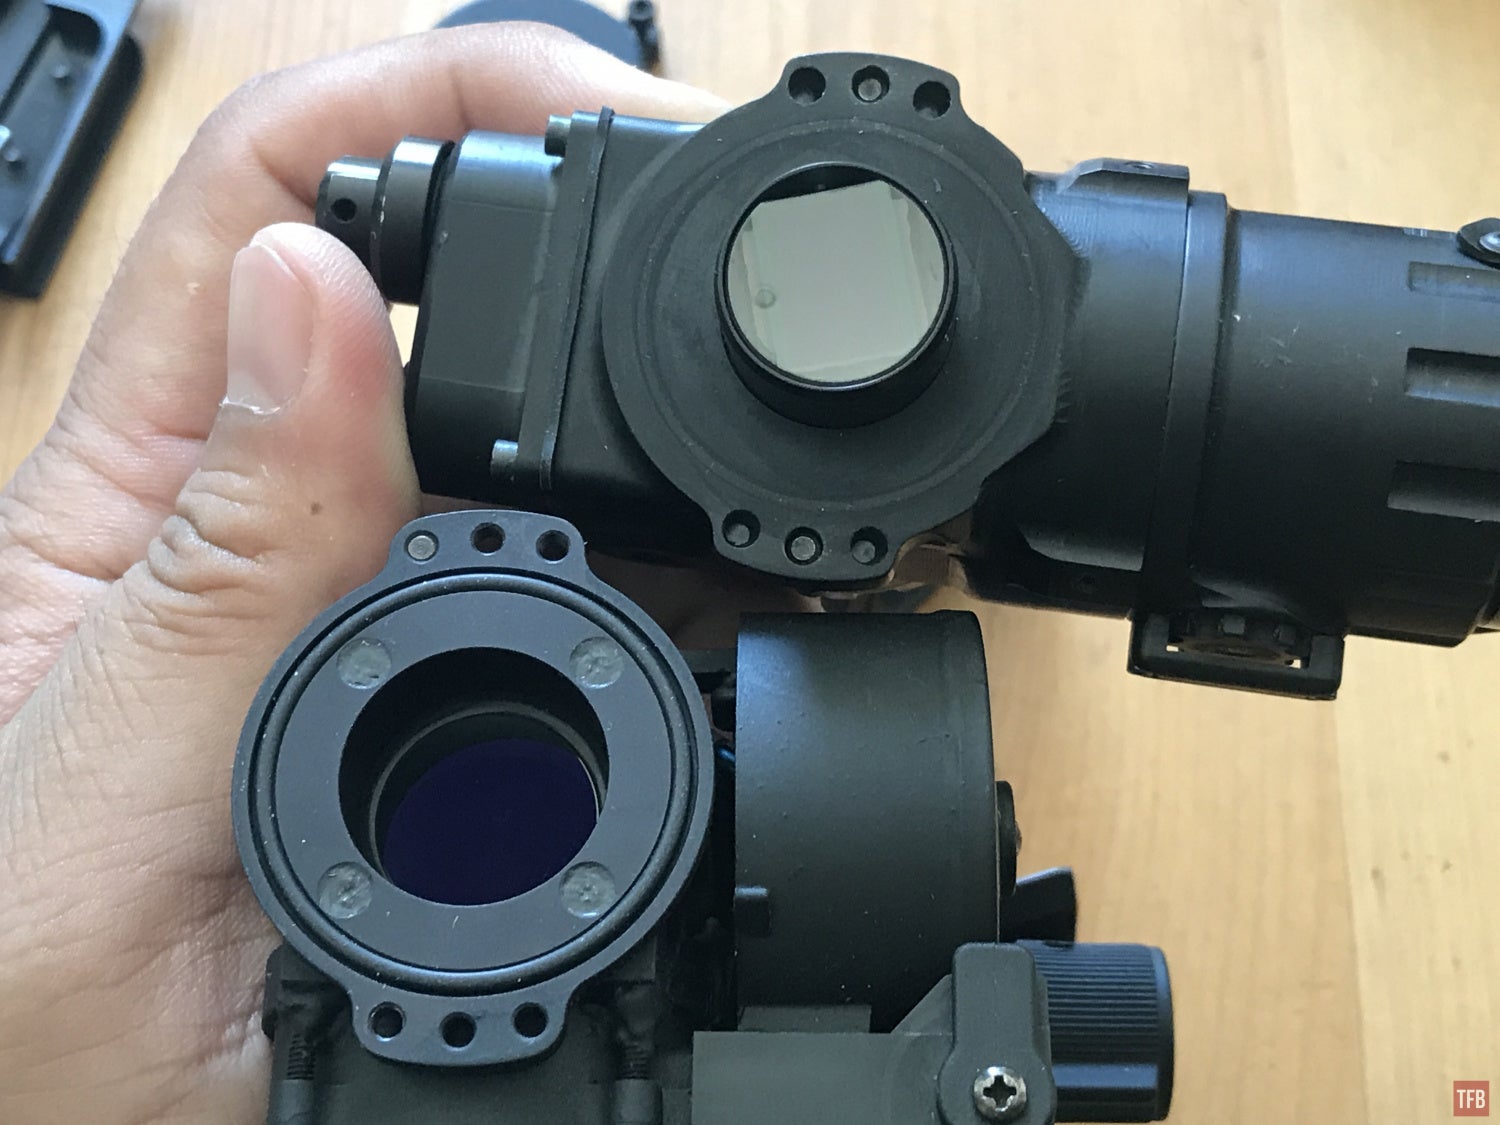
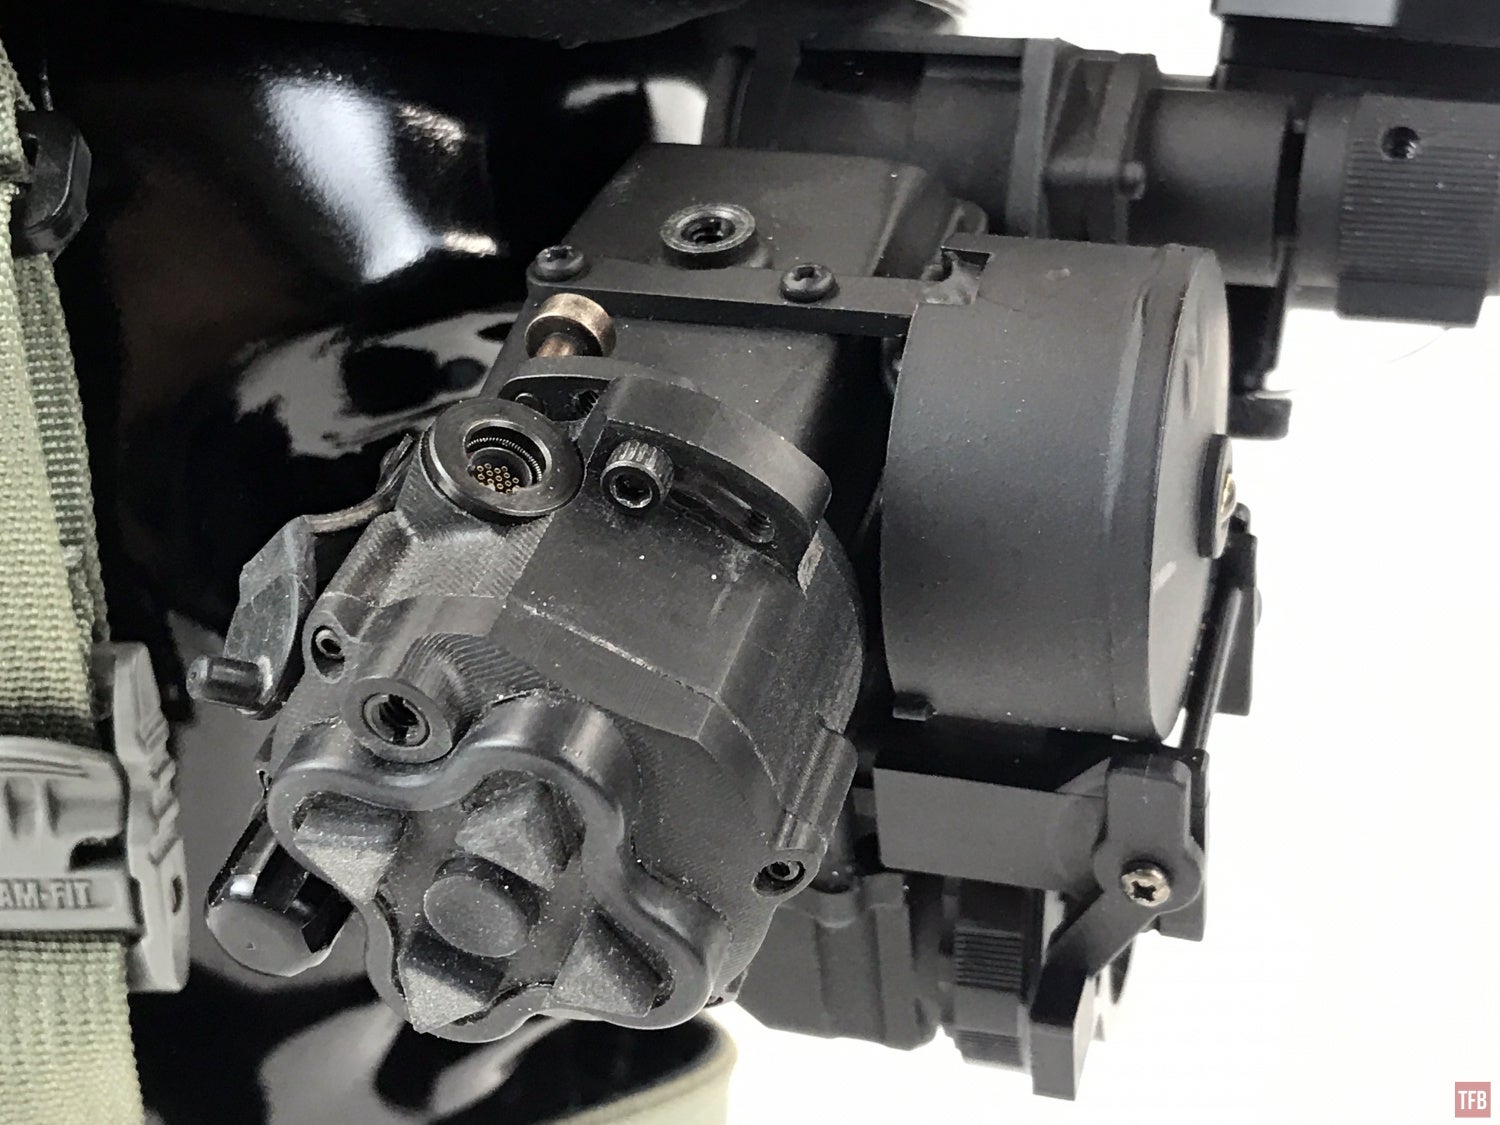
Both the CEHUD and COTM come with screw-on covers to protect the microdisplays. Unscrew the two small screws and remove the polymer covers. Those two small screws are how you attach and mount the COTM or CEHUD to the PVS-21.

As mentioned in my PVS-21 monocular article, there is a port cover on the side of the PVS-21 that once removed, allows you to install the COTM or CEHUD.
One aspect to the CEHUD and COTM that I was unaware of is that they use a remote battery pack to deliver power. Both the COTM and CEHUD do not have onboard power. Instead, you connect them to their respective battery packs via a proprietary cable.
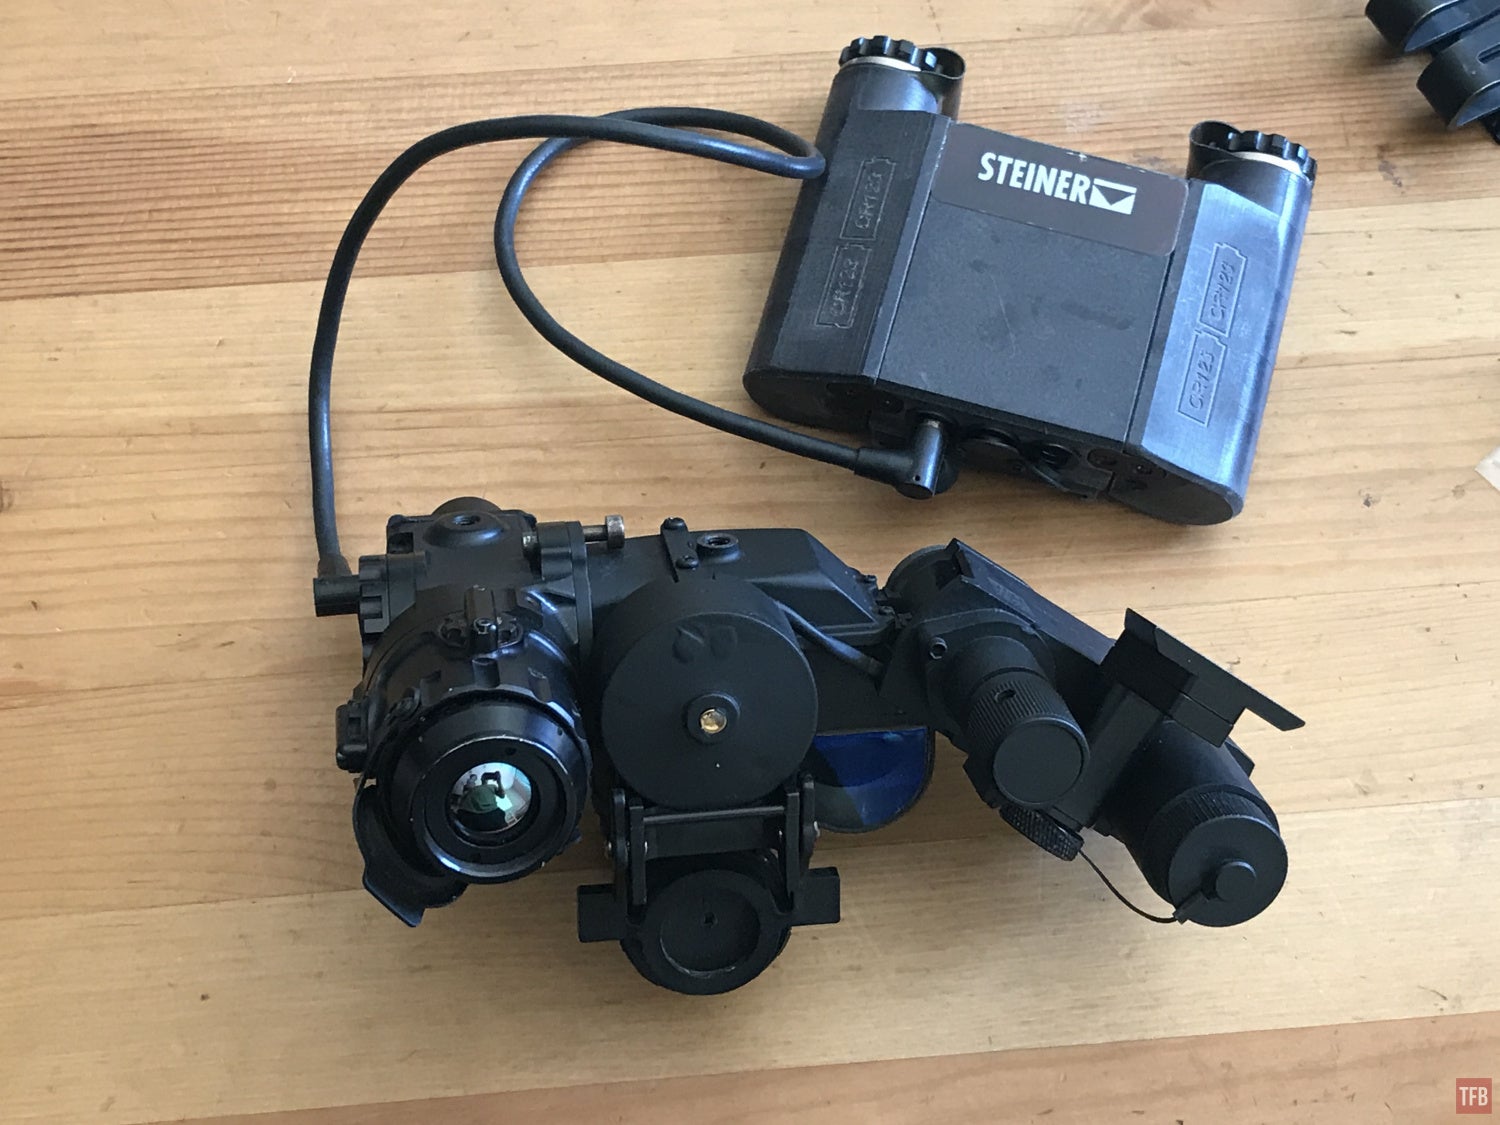
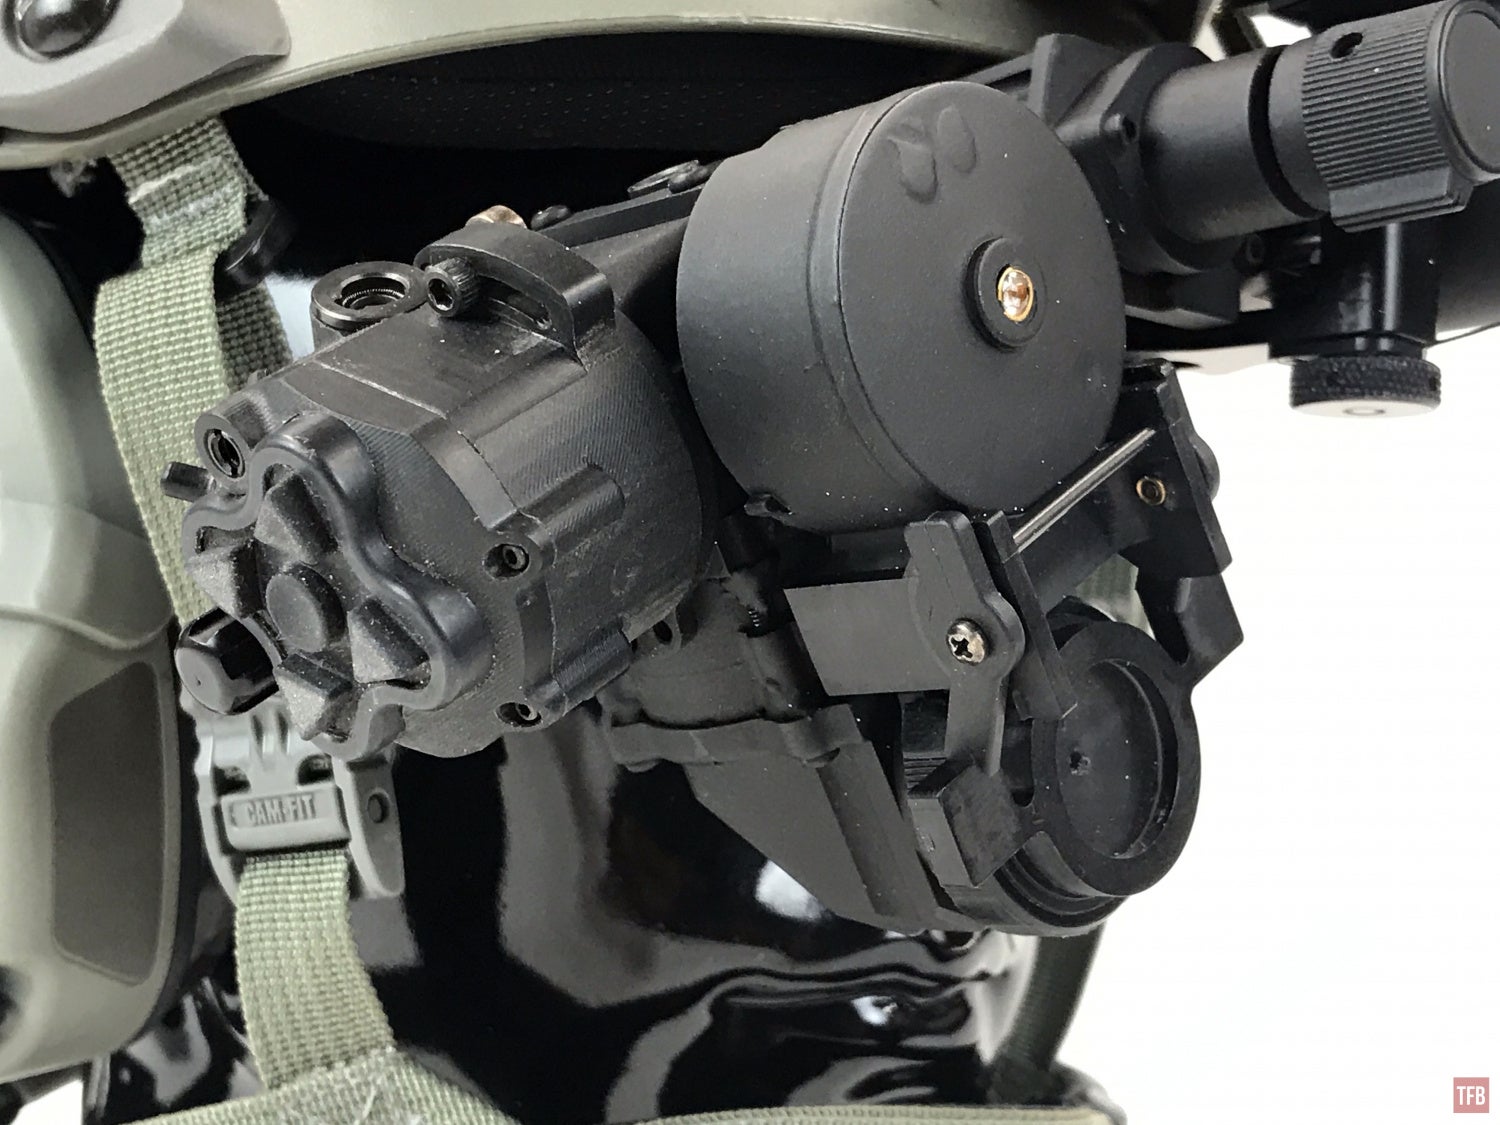
COTM mounted on the PVS-21 and wired to the battery box.
The CEHUD and COTM have their own battery packs. However, I am not sure if they are interchangeable. The COTM battery pack uses 4x CR123, two CR123s on either side. The CEHUD battery pack uses 4x AA batteries, two on either side. It appears that the central parts of the battery packs are identical.

Both battery packs have three ports at the bottom.

I will explain what these ports do later. But first, let’s focus on the clip-on thermal module.
Clip-On Thermal Module (COTM)

Those of you who have been following along my other articles know that I am a fan of the COTI system. You add a thermal imager and it projects the thermal image into your objective lens. Due to the Steiner PVS-21 design, you can project images behind the image intensifier. One major benefit to this is having the color difference of the thermal image and night vision image. Your standard COTI system inputs the thermal image through the image intensifier and so the thermal image is the same color as your image intensifier, Green or White Phosphor. Another added bonus is that the COTM cannot burn images into the tube since it is projected behind the image intensifier.
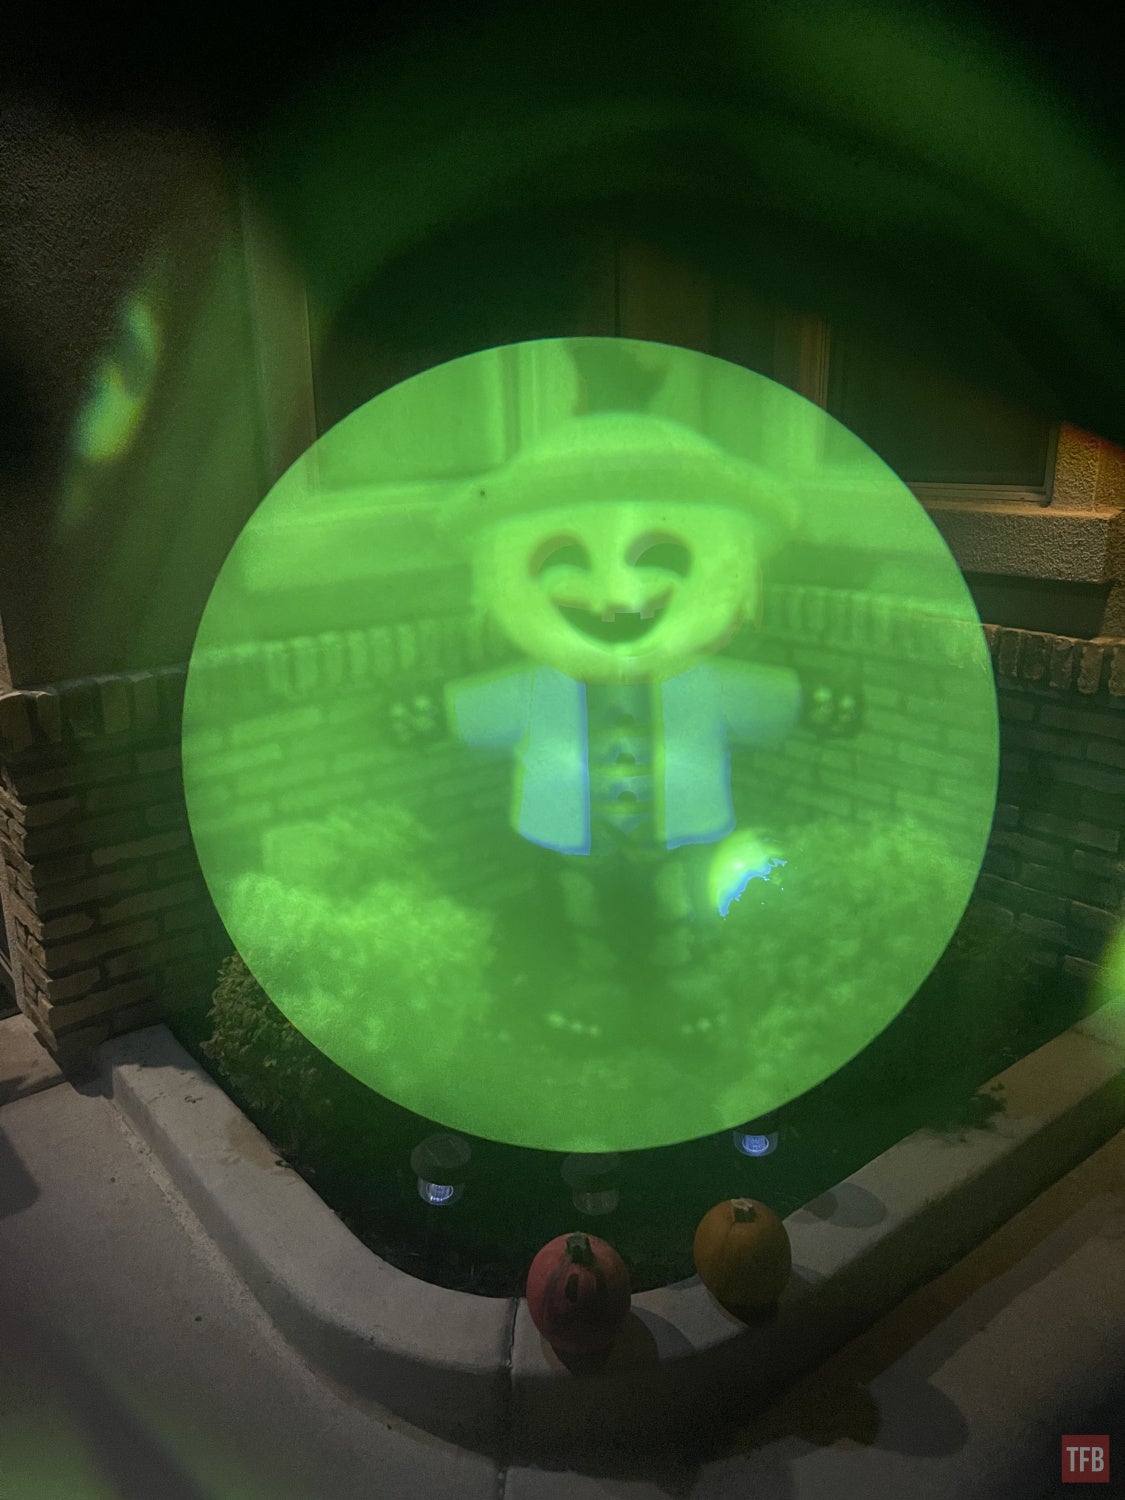
See the photo below. This is the actual image produced by the COTM when set up on a PVS-21. I photographed this through the HUD window using my iPhone.
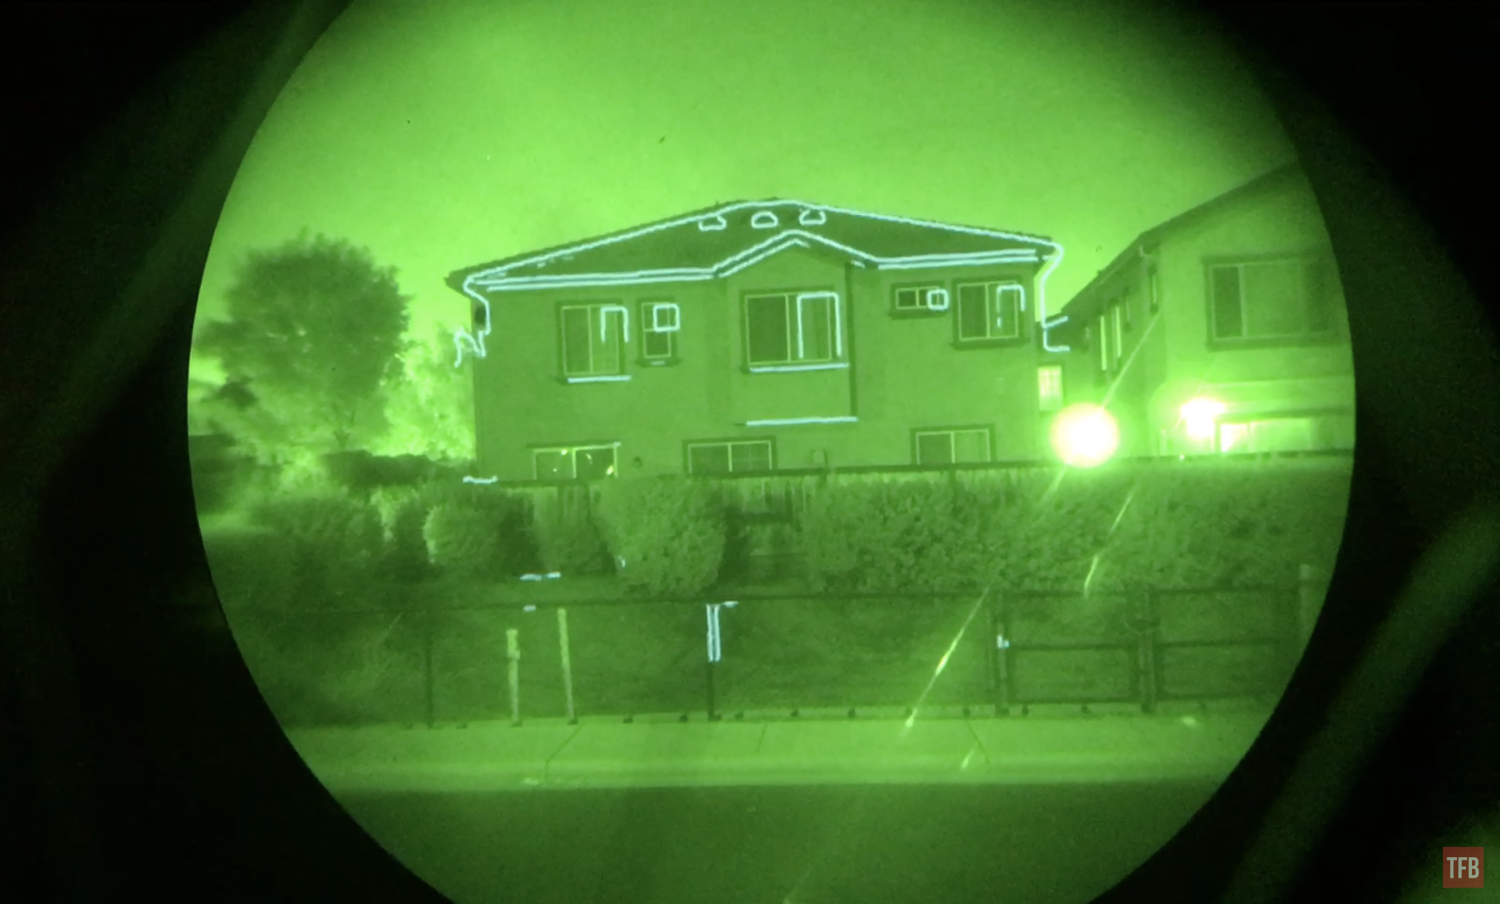
COTM in Edge Detect mode

The COTM has a lot of adjustments due to its unconventional position. The head has elevation and windage adjustments for aligning the thermal image to zero/overlap the night vision image. Obviously the closer the object the greater the offset. If you collimate the thermal image to something up close, then further objects will be offset.
There are also two rotational adjustments for the COTM. The entire head can spin to rotate the thermal image in relation to the projected image.

See the wheel with directional pad (D-Pad) and small dial in the photo below? That wheel can spin. This rotates the projected image in relation to the HUD window. The small dial is a diopter adjustment to focus the projected image for your eye. The D-Pad is for navigating the onscreen menu and adjusting brightness and adjusting contrast. If you push both contrast up and contrast down buttons simultaneously for 5 seconds, the projected image will be rotated 180º. This is for mounting the COTM on the other side of a PVS-21 binocular.

At the back of the COTM are a rotary mode switch and a small push button. The push button is for switching polarity from white hot to black hot. If you hold that button down for a couple of seconds, it will perform a Flat Field Correction calibration. Around the side is the multi-pin port for delivering power as well as a hidden feature. You can input videos into the COTM.
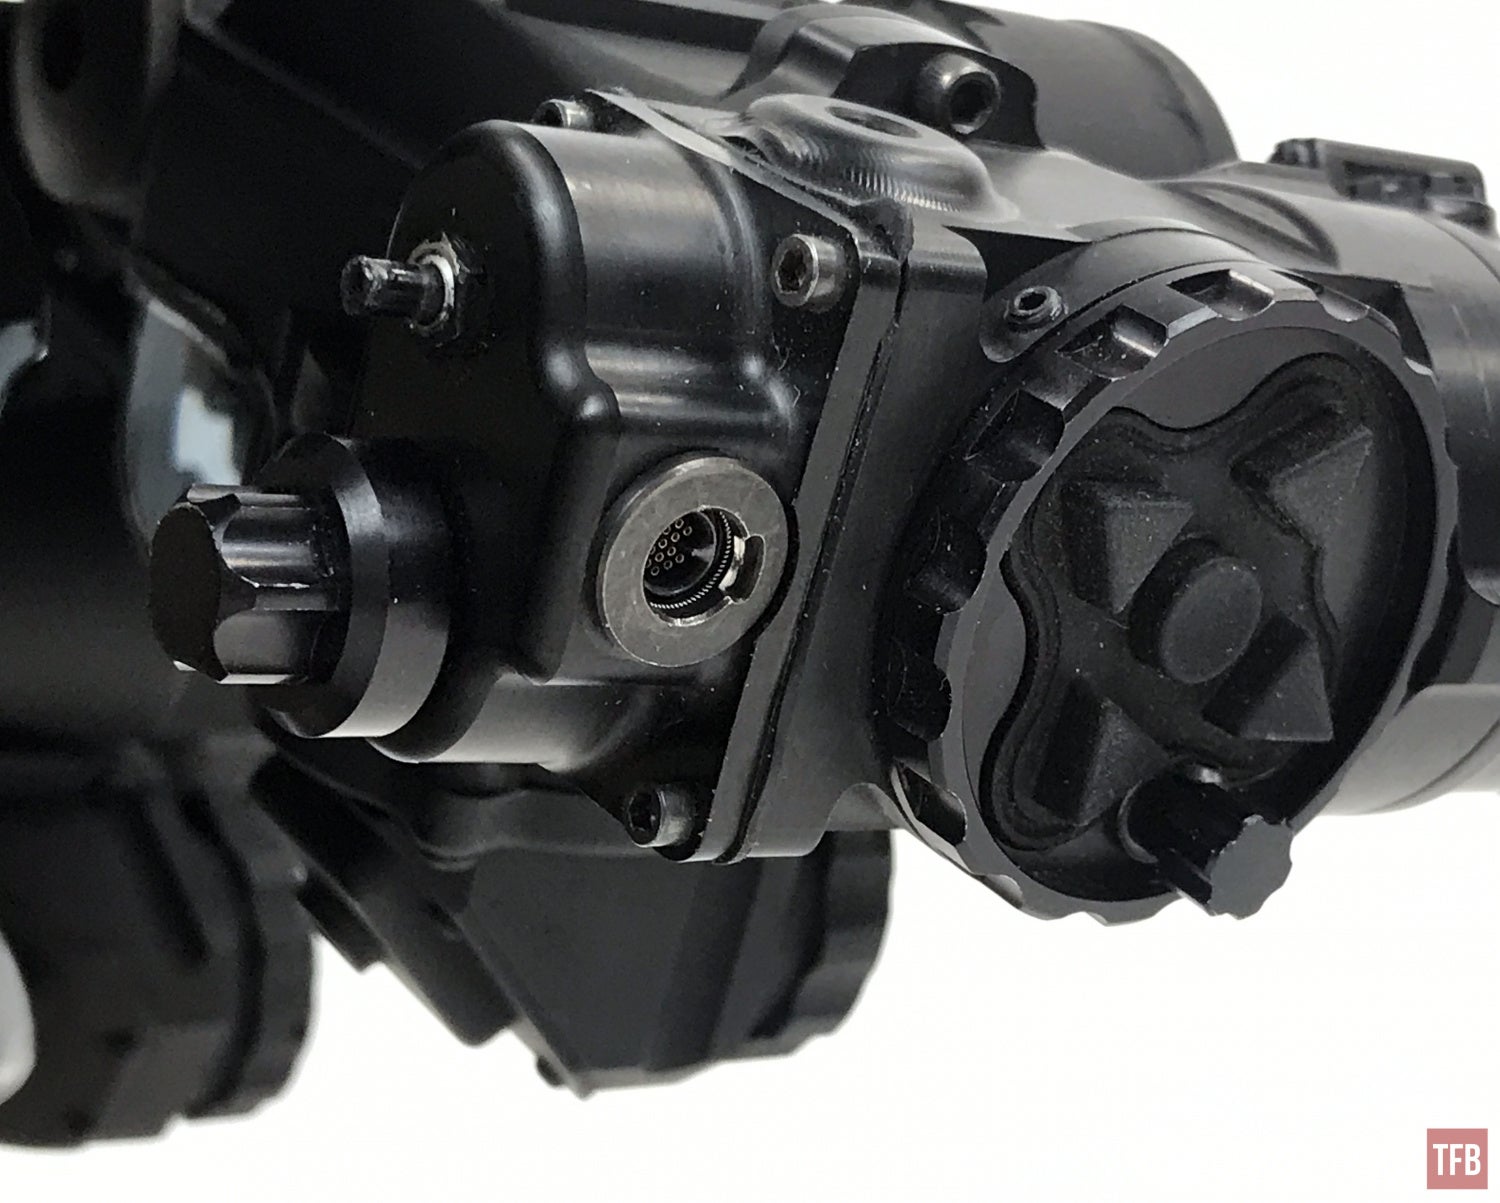
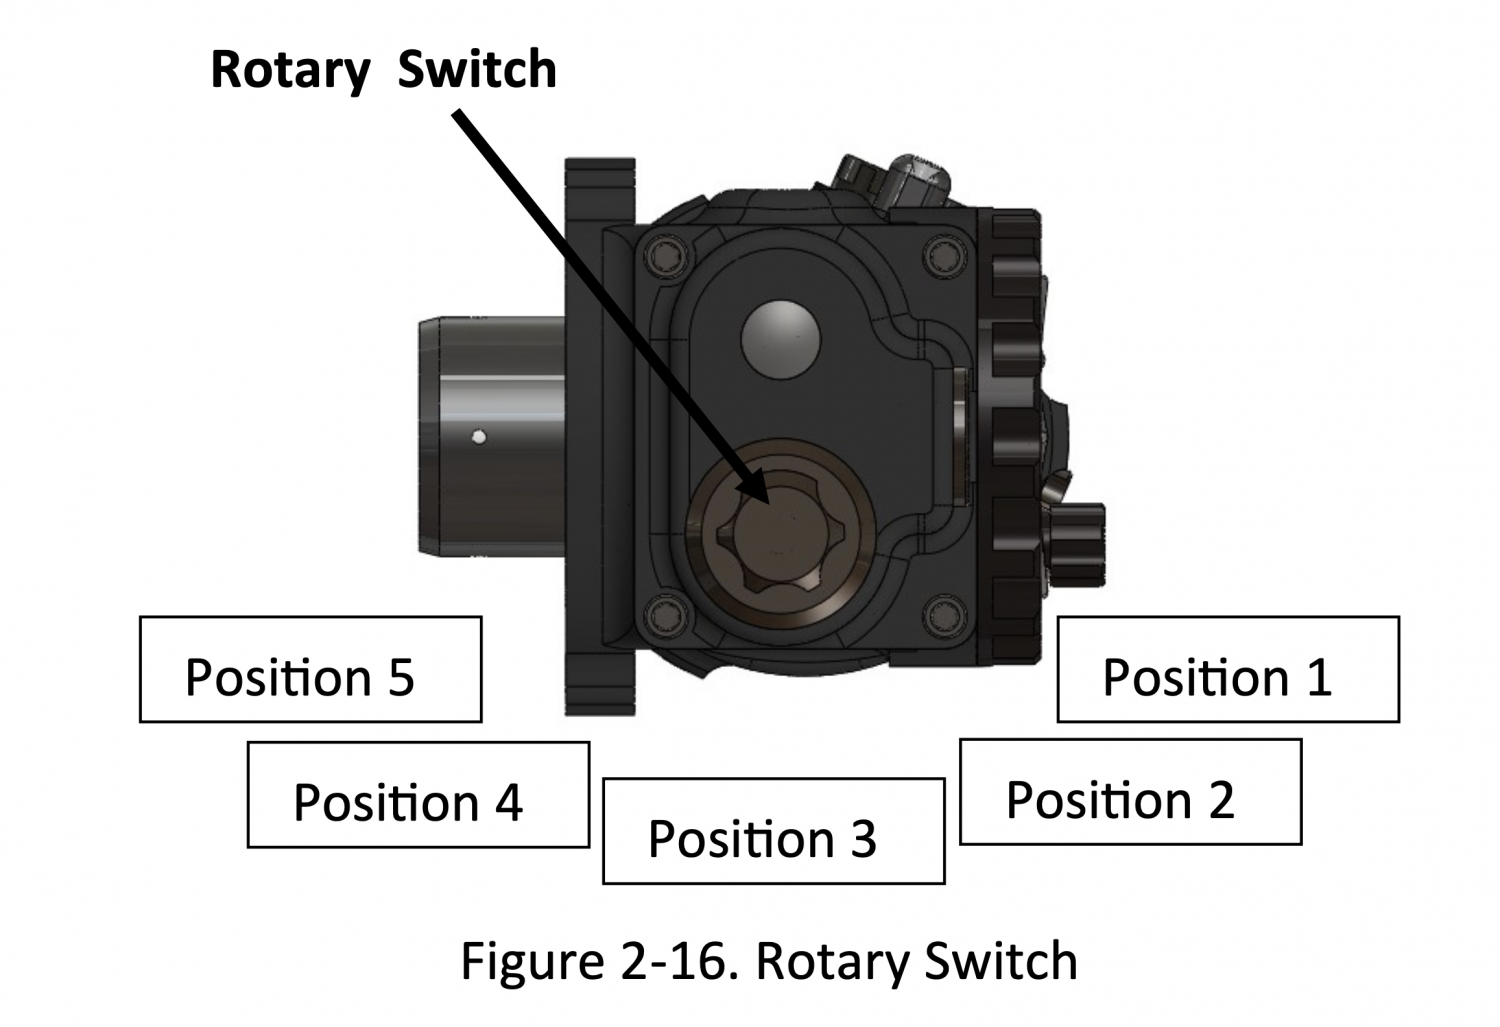
Photo by Steiner, from the manual.
The rotary switch has 5 positions.
- OFF
- Thermal Imaging
- BNC Video Input (B/W Images)
- VGA Video Input (Color Images)
- Unused for future development.
We will talk about the image/video input in a little bit. But first, we will talk about the CEHUD.
Conformal Enhanced Heads Up Display
The CEHUD is a simpler version of the COTM. It does not have a thermal imager and is solely for inputting video into the PVS-21.
Adjusting the image is a little bit different. You do not have to worry about aligning the thermal image since there is none. So you have to rotate the CEHUD itself. It bolts into one of three positions on the side of the PVS-21. The mounting flange is a slot so you can rotate the CEHUD to finely adjust the angle. Once the image is square in the HUD window, tighten the two screws. The CEHUD has a similar D-Pad as the COTM, it also has the diopter adjustment dial and the port for the power video cable is on top of the unit.
Inputting Video Into Your Nods
Both the CEHUD and COTM come with a bunch of cables. In order to have image projection while using the battery pack, you need two cables: one to power the CEHUD or COTM and a cable for the video source. Remember the three ports at the bottom of the battery packs? Those are for delivering power to the CEHUD or COTM as well as delivering video. You plug the video cables into any of the ports in the battery pack.
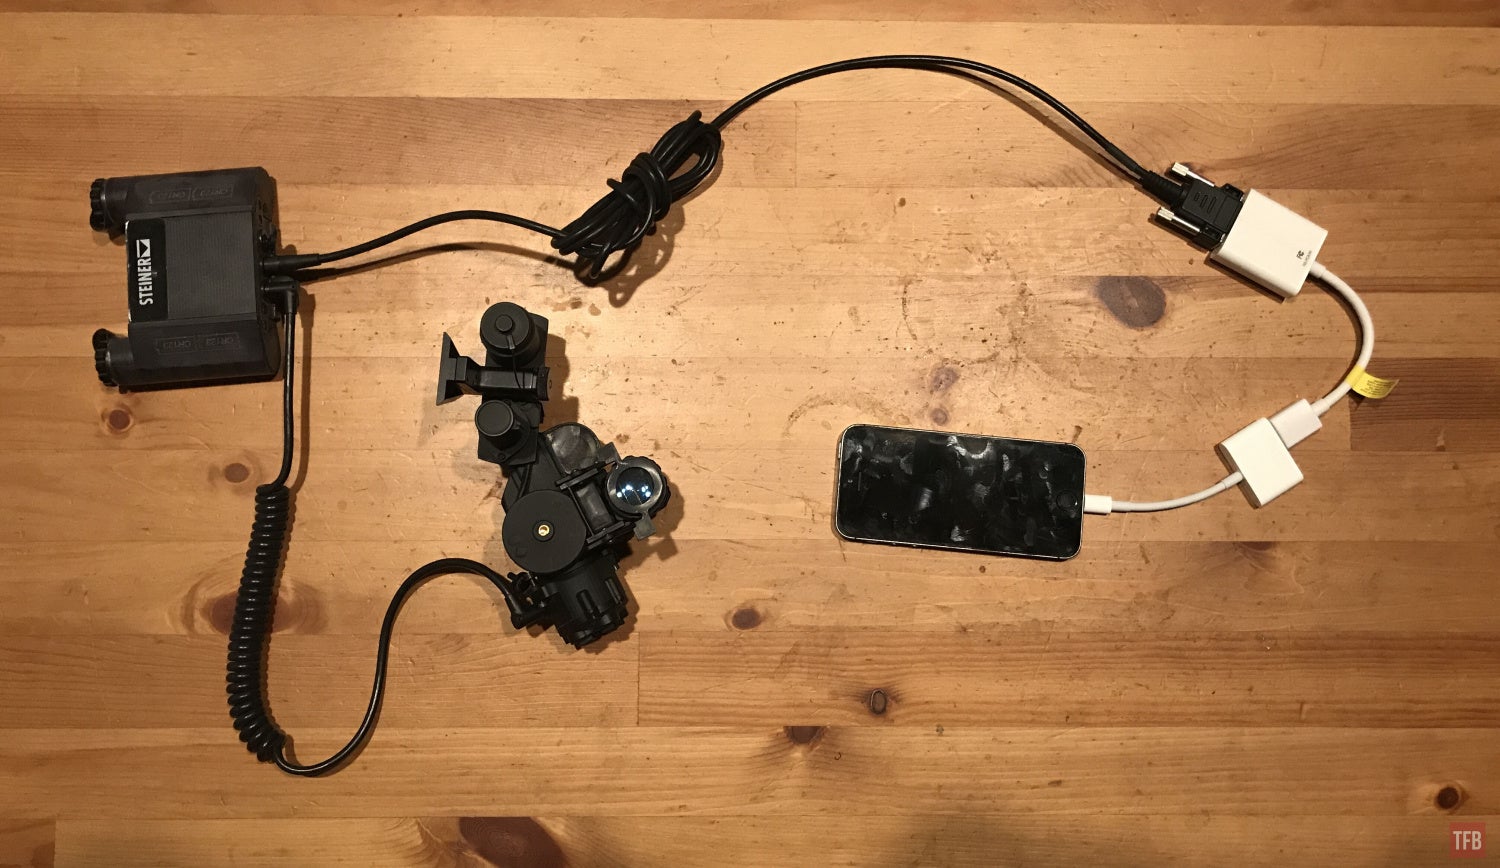
The COTM needs the battery pack to power the thermal imager. The CEHUD, on the other hand, has an alternate method to insert video. There is a VGA cable split with a USB cable. It is used for hooking up a computer to the PVS-21 CEHUD. You are supposed to plug the USB plug into the computer to power the CEHUD. Since that USB plug is what powers the CEHUD, I plugged it into a USB power bank and it works!

See the battery pack and two cables. Below that is a simplified setup without the battery pack.
Did I just say “VGA cable”? Yes, I did. Unfortunately, the CEHUD and COTM are only compatible with analog video signals. You have two options: you can use a VGA cable or a BNC cable. If you use the BNC cable, the images and video will be black and white regardless of the source. VGA on the other hand will be in full color. See the video below.
The video starts off by showing the COTM. As briefly explained earlier, the COTM projects the thermal image behind the night vision image. The COTM produces a white thermal image so you see white thermal overlaying green phosphor night vision. This thermal fusion image is very similar to the older generation PSQ-20. Click here to check what that looks like then watch the video below.
So while the CEHUD can run off the PC VGA/USB cable, it does not work with the COTM. You have to use the 4xCR123 battery pack.
One very cool feature about this style of image/video projection is that it is independent of the PVS-21 image intensifier. A normal COTI projects a thermal image through the objective lens. The ECOTI has the potential to input images and video as well but it is not as easy and requires some rather proprietary and expensive equipment. However, you still have the same problem. It requires the use of a night vision device to be turned on to see the projected images. Not the case with the PVS-21 and COTM or CEHUD. Even with the PVS-21 turned off, you can still see the COTM thermal image and any images/video projected by the CEHUD.
In the video below, I attached the CEHUD to the left side of a PVS-21 binocular and the COTM to the right side. I have the COTM set to thermal and the CEHUD is projecting Super Mario Bros 3 in the left side.
There is a downside to this technological terror, the size and weight.

34.3 ounces is pretty hefty.
The fully assembled PVS-21 setup is wider than ANVIS-10 panos.


While 34.2 ounces is more weight than a set of panos, the weight is closer to the helmet CG than traditional nods. Surprisingly, I did not need much in counterweight. The battery pack for the COTM was plenty and I did not feel the weight of the fully built PVS-21 that much. I am used to the weight of panos so maybe I am just used to this weight?

Downsides To The COTM/CEHUD System
Due to the size and position of the COTM, the Steiner refocus lens for the PVS-21 hits the side of the COTM and prevents it from folding all the way up. This is not an issue for the CEHUD.
Another problem is the low resolution of the COTM and CEHUD. When I project the screen of my iPhone into the PVS-21, it crops off a lot. The problem is you need a video signal that is the right size for the COTM or CEHUD. According to the manual, VGA is only 640×480 while SVGA video signal is 800×600. These are still a lot smaller than your high-definition smartphone displays. The video game consoles I projected are all using HDMI output so they are higher resolution than the PVS-21 can see.
Final Thoughts On The COTM & CEHUD

My friend Cajer trying the COTM and PVS-21s.
The CEHUD and COTM were way ahead of their time. You can hook up a thermal weapon sight, that has analog video output, into the CEHUD and project the thermal image into your PVS-21. You can aim around corners or in other positions that do not allow you to get behind the optic for a normal sight picture.
I played with a 980nM out of band laser and SiOnyx Aurora. The out of band laser cannot be easily seen with the PVS-21 unless it was point-blank range. But the SiOnyx Aurora can see it clearly. I set up the Aurora with the app on my iPhone and set the app to live view. This shows me what the Aurora sees through my iPhone. I then project that screen image into the CEHUD and PVS-21. I can aim the invisible laser using the projected Aurora image. This is a similar setup to a SWIR system just not at 1500 nM. The only problem is that I am using off-the-shelf technology and there are compromises. By projecting the Aurora image into my phone and then into the PVS-21, the lag is tremendous. Also, the image the Aurora produces is not perfectly aligned with the night vision image.
Another idea I had but was unable to execute was to project the screen from my DJI Mavic Mini into the PVS-21. This is due to the fact that you cannot plug in the HDMI cable since the DJI Mavic remote control has to be plugged into the phone. I tried screen mirroring using a Chromecast dongle but I was unable to get it to work. In theory, it should work. As long as you can output the live video, it can be projected into the PVS-21. I think controlling a thermal drone would be great in low-light outdoor areas. Using a normal drone in the dark is not that practical since most off-the-shelf drones are not set up to see in low light.
There is another elephant in the room and that is the price. As mentioned earlier, the CEHUD and COTM are rather obscure and until now, there has been hardly any content created about them. I have no idea how much they cost. Given that Steiner charges $11k for the monocular and $21k for the binos, sort of sets the pricing structure. Benny Harrens of Kosher Surplus said he heard the COTM costs $15k!!. While that is rather expensive for the rather pedestrian performance, it is a unique system. I wish the COTM had onboard power so you could use it stand-alone as a COTI. I would like to ditch the large battery pack especially if I am not projecting images into the PVS-21.
With the PVS-21 turned off, the COTM still displays thermal in the right HUD window and gives off a faint glow.
According to the Steiner rep who lent these to me, Steiner is playing with the idea of modernizing the CEHUD and COTM however it is low priority. They will wait for a large government contract before upgrading them to work with modern digital video signal input.
After thought Edit:
I had not really used the PVS-21 that much but during Halloween I wore them as part of my costume. During the constant use I finally noticed a way to peer around the PVS-21. I was able to peer between the HUD windows with my inner peripheral vision. See the diagram I whipped up below.

Due to the COTM and CEHUD mounted onto the PVS-21 they block a bit of my outer peripheral vision as you can see illustrated in the diagram above. However see how my left eye (indicated in blue) peripheral vision overlaps the right eye FOV? This little sliver of vision allows me to see through the COTM on the right and the opposite is true for my right eye seeing through the CEHUD on the left. It is something you need to experience in person but I was pleasantly surprised how well I could see around the goggle housing. In mixed lighting I could see quite a bit since the HUD windows have very thin walls. Not much blocks my view so I can see outside the 40º FOV that the night vision provides.
Here is a photo I took with my phone. It shows the color leaking through the HUD window through the night vision image. Also you can see around the night vision image as mentioned above.
TFB’s Friday Night Lights series is brought to you by ATN

Big shoutout to Steiner for lending me these rather rare and obscure accessories for the PVS-21. Thanks to Jake Grubski for lending me his PVS-21 monocular.