 Your Privacy Choices
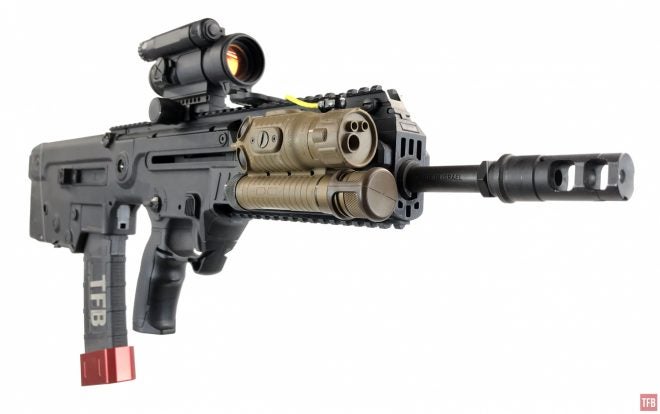
Rheinmetall is a German defense contractor. They make various military products like electro-optics, night vision and aiming systems. Earlier we saw the GN1 from SIMRAD which is now owned by Rheinmetall. Today we will take a look at their Vario-Ray LLM (Laser Light Module).
Vario-Ray LLM In-depth Look
We have posted about the LLM before. Eric B. posted about the Swiss Army adopting it. Miles posted about the British Paras using the Vario-Ray as well. Well, I got my hands on one and it is probably the most complicated laser aiming module I have seen. First of all, it is a complete MFAL. It has both visible and IR lasers and illuminators. We saw an all-in-one laser system before with the DBAL-A4 and the Wilcox Raptar Lite ES.
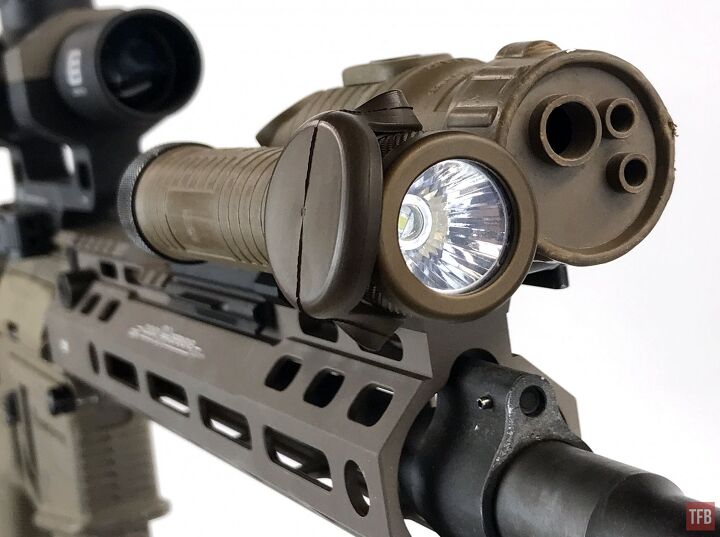
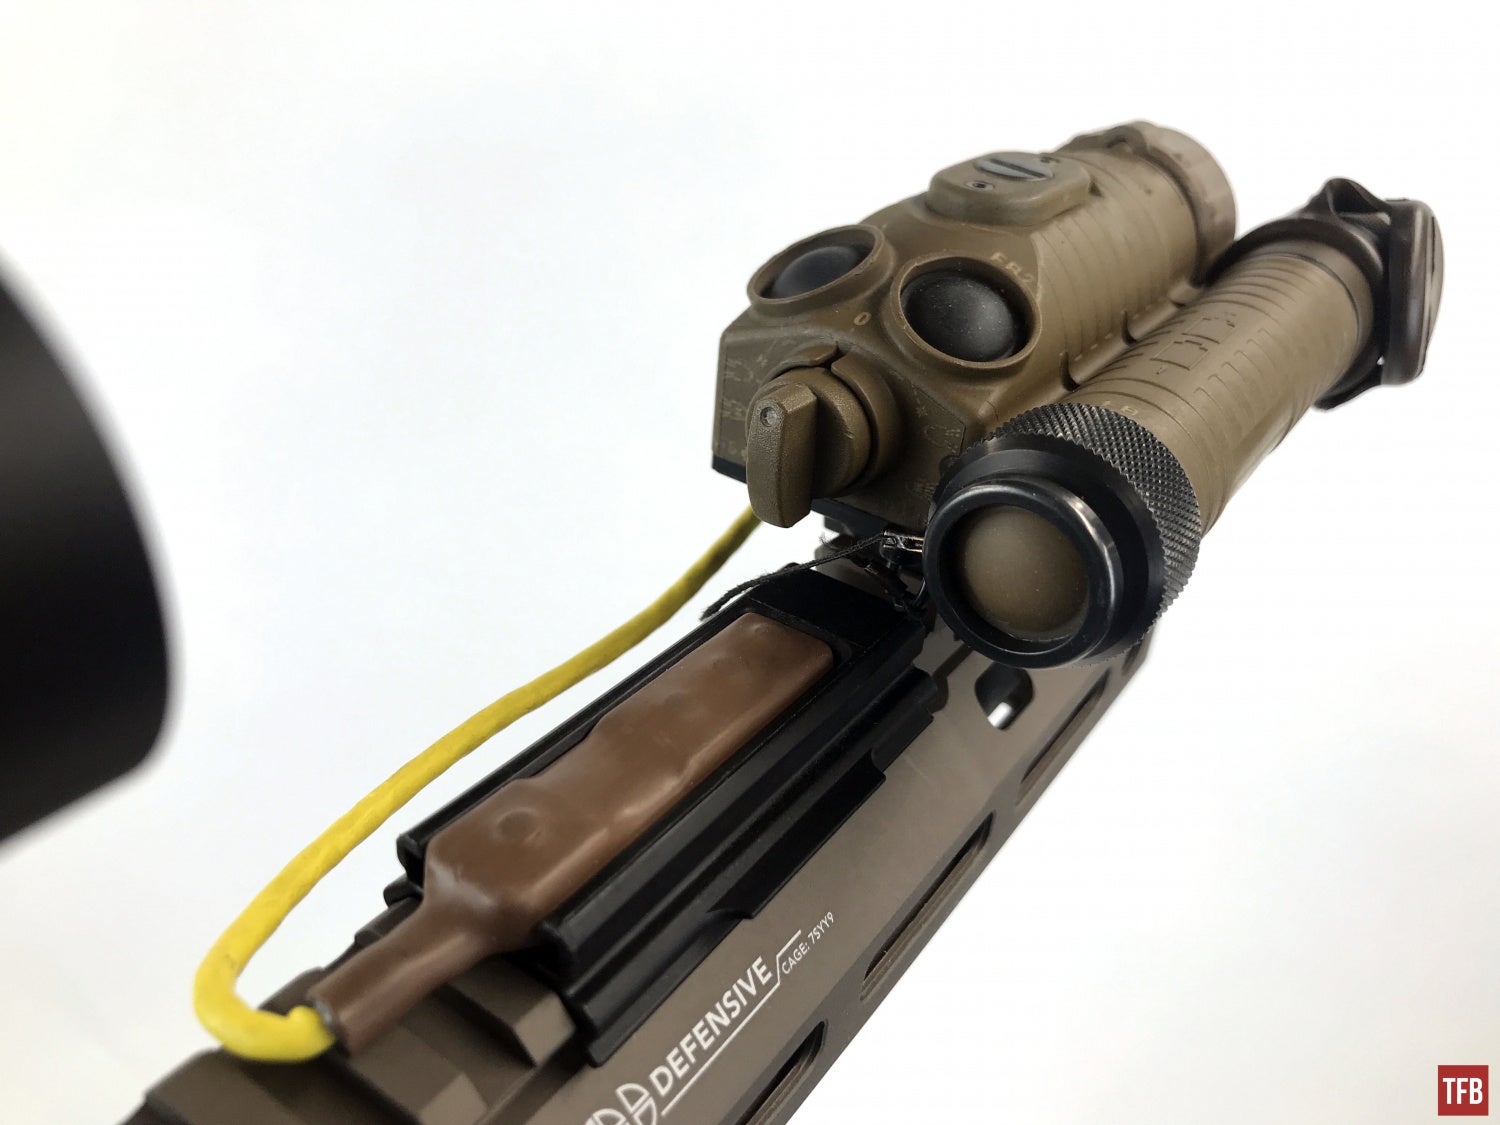
The Vario-Ray LLM is basically a laser unit with an integrated flashlight merged off to the side. The front of the laser has a hole for the IR illuminator, IR marker and visible marker.

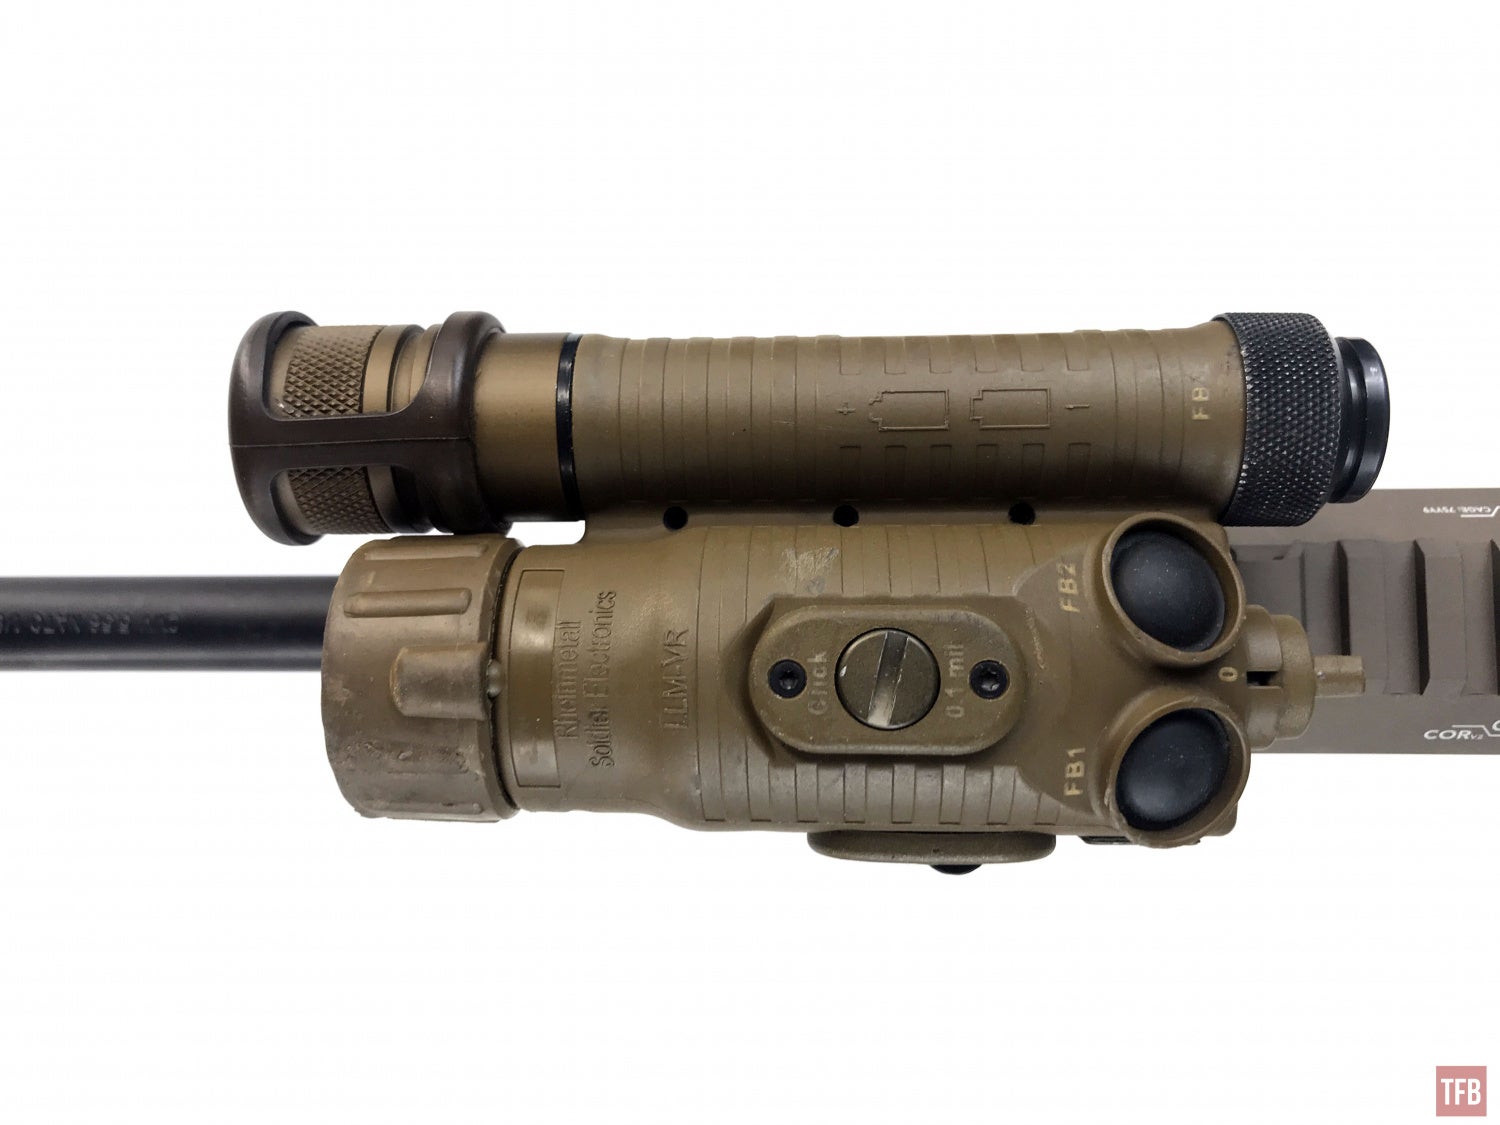
The flashlight has a tail cap switch. Unscrew this to change out the two CR123 batteries that power the Vario-Ray LLM. No matter what mode you are in, pressing that tail cap switch will activate the white light as a visible override.
The Vario-Ray is a full power laser however you can only access its full capabilities with a specific remote tape switch. I only have the yellow training cable so it is set to eye-safe mode. If the cable is removed the unit reverts to eye-safe mode as well. I need the brown cable as it has a special chip in the tape switch that unlocks the higher power for the laser.
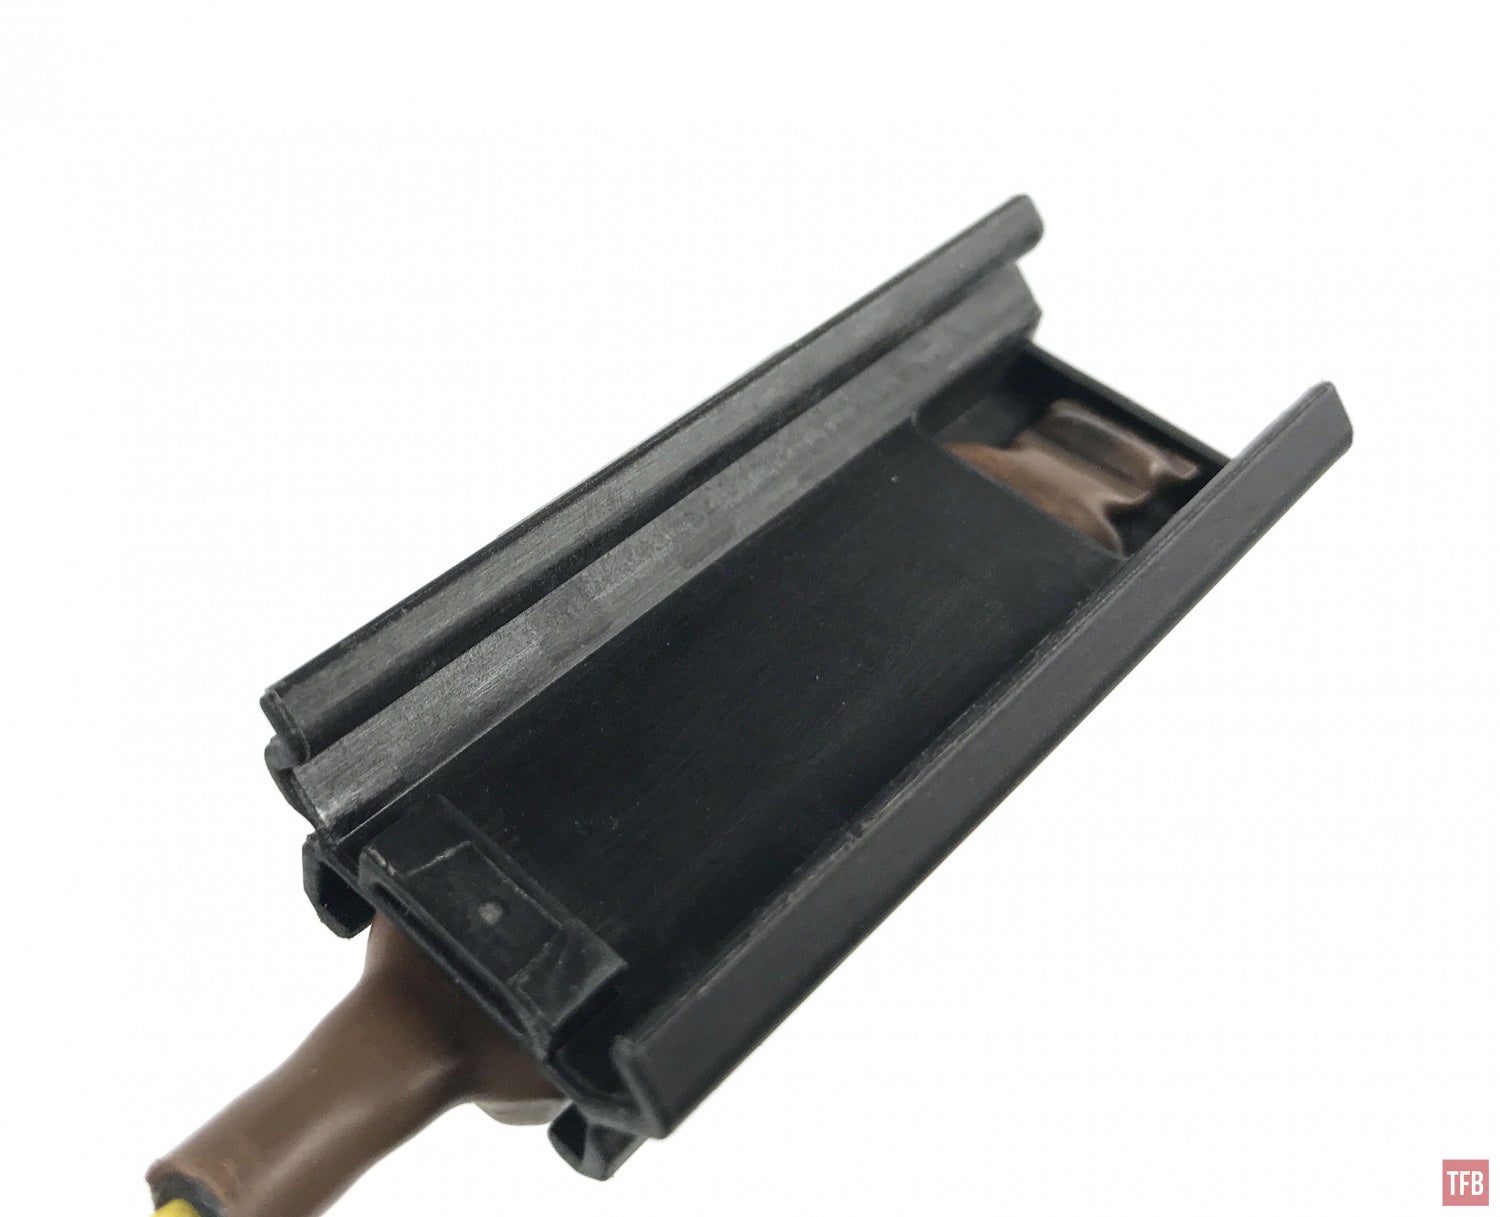
The tape switch has 4 buttons. You can see them in the image below.
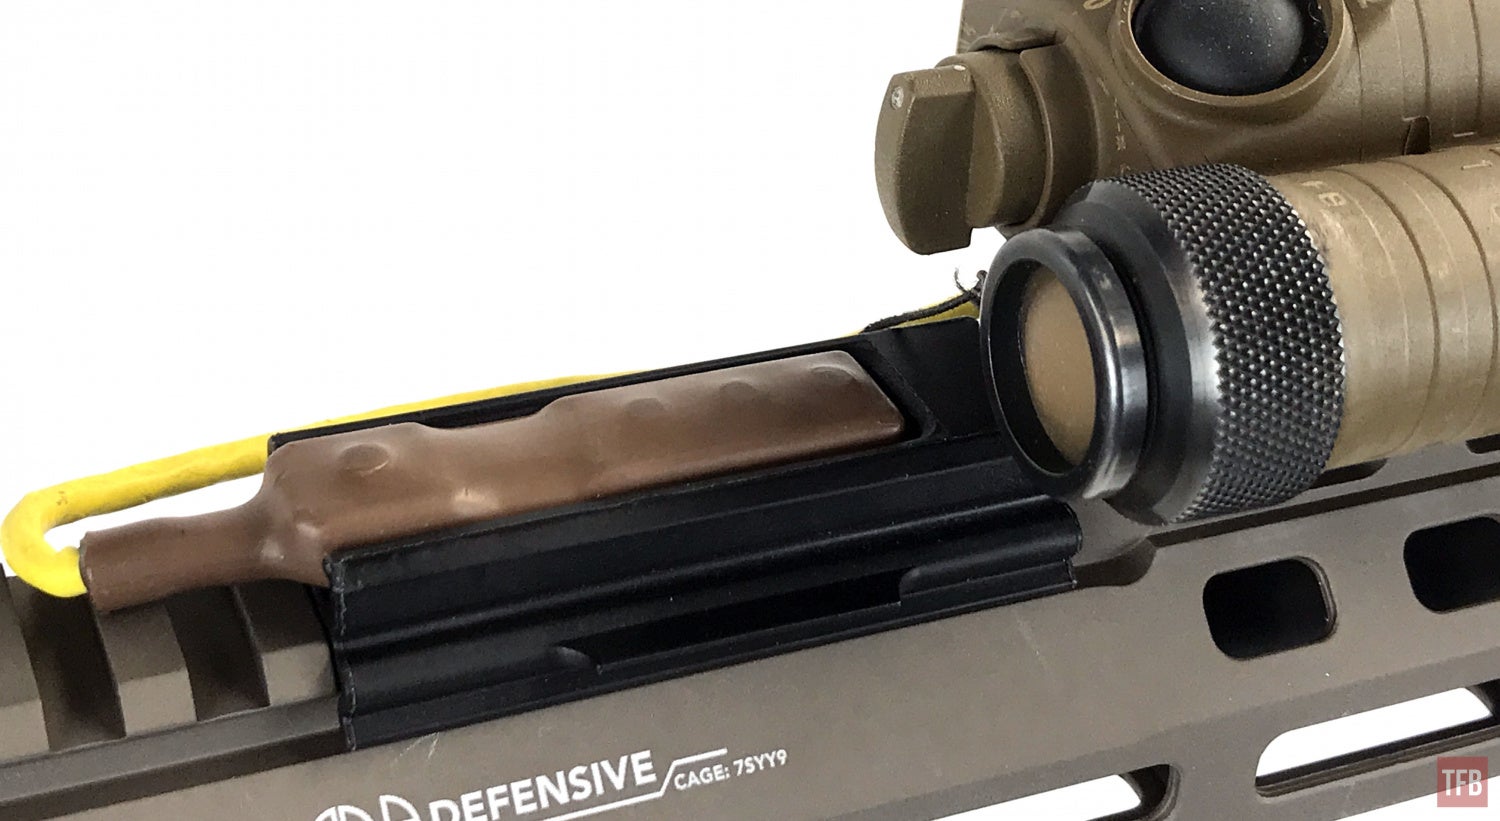
The Vario-Ray LLM comes with a Picatinny mount for the tape switch,


Vario-Ray Activation
As I mentioned earlier, the Rheinmetall Vario-Ray LLM is the most complicated laser I have seen. There are three buttons, not including the four buttons in the remote tape switch. The flashlight has a switch in the tail cap but the two round buttons on top of the laser housing also activate the target marker and illuminator. FB1 activates the laser target marker and FB2 activates the illuminator. If you are in VIS mode, then the red laser and flashlight will activate with those buttons. If you are in IR mode then only the IR laser target marker and IR illuminator will turn on.
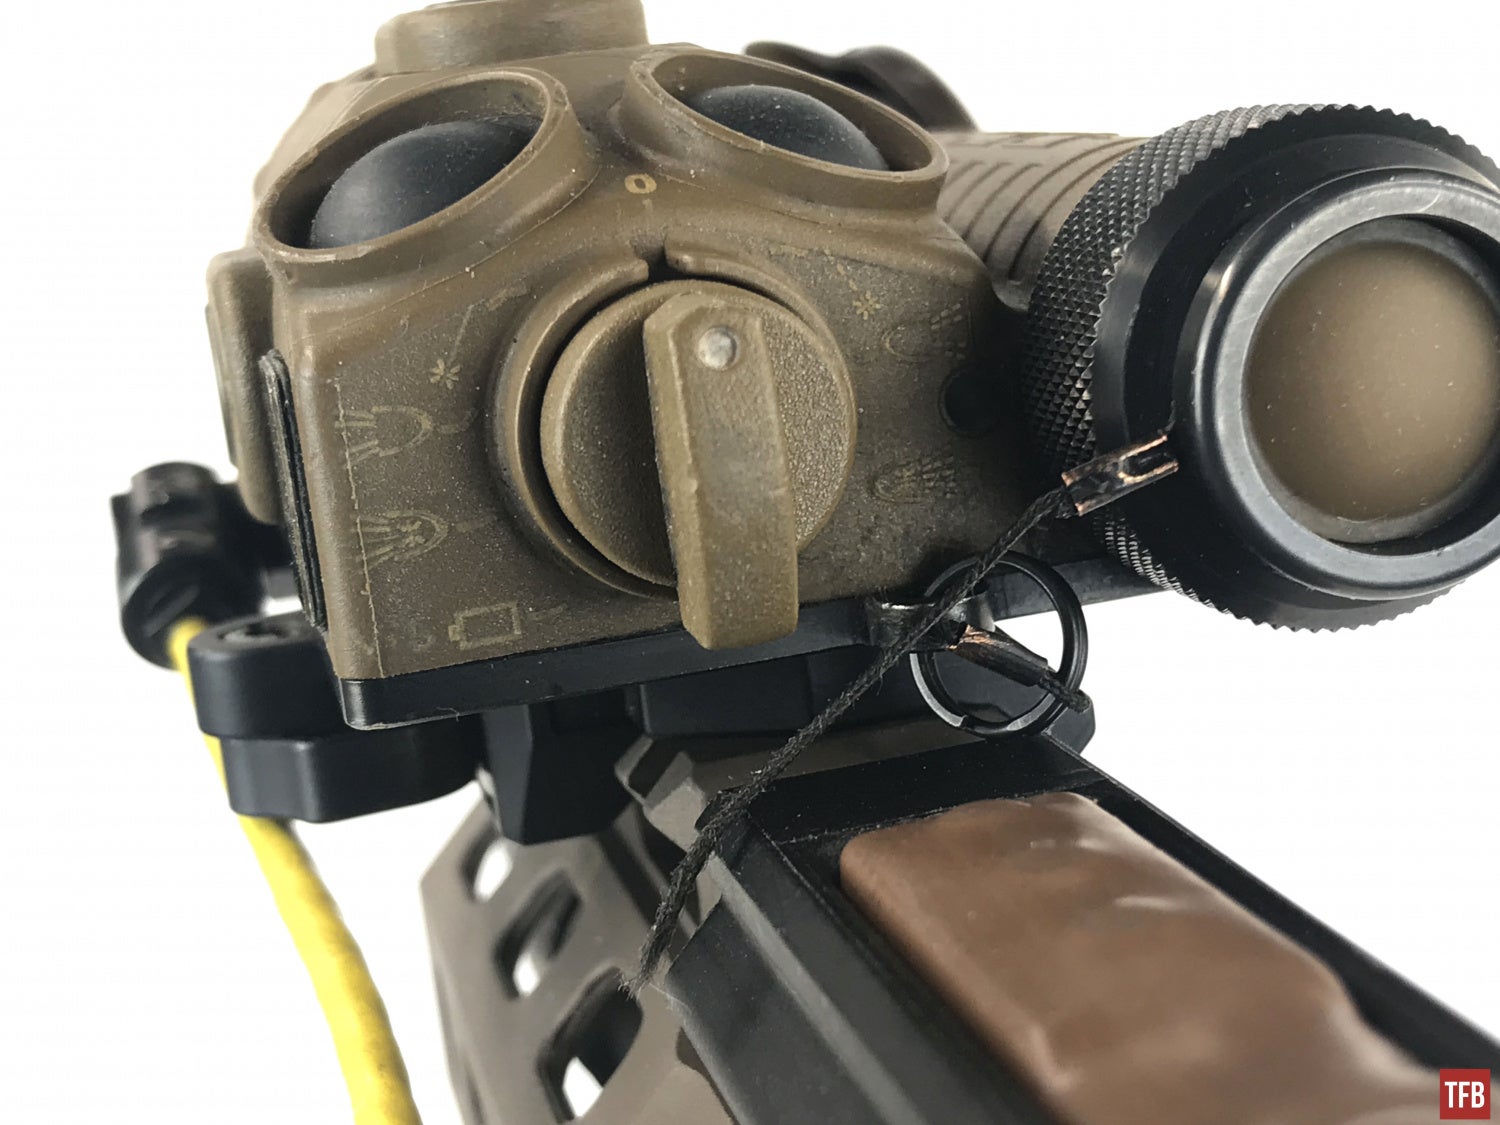
The mode switch has a safety detent. You have to push the switch inwards and then you can rotate it right or left of 0. Once you are in VIS or IR mode, you can change between laser pointer or illuminator priority whenever you want. If you want to switch spectrums or turn the switch to 0 you then have to push the switch in to set it to 0 or go past 0 into the other spectrum.
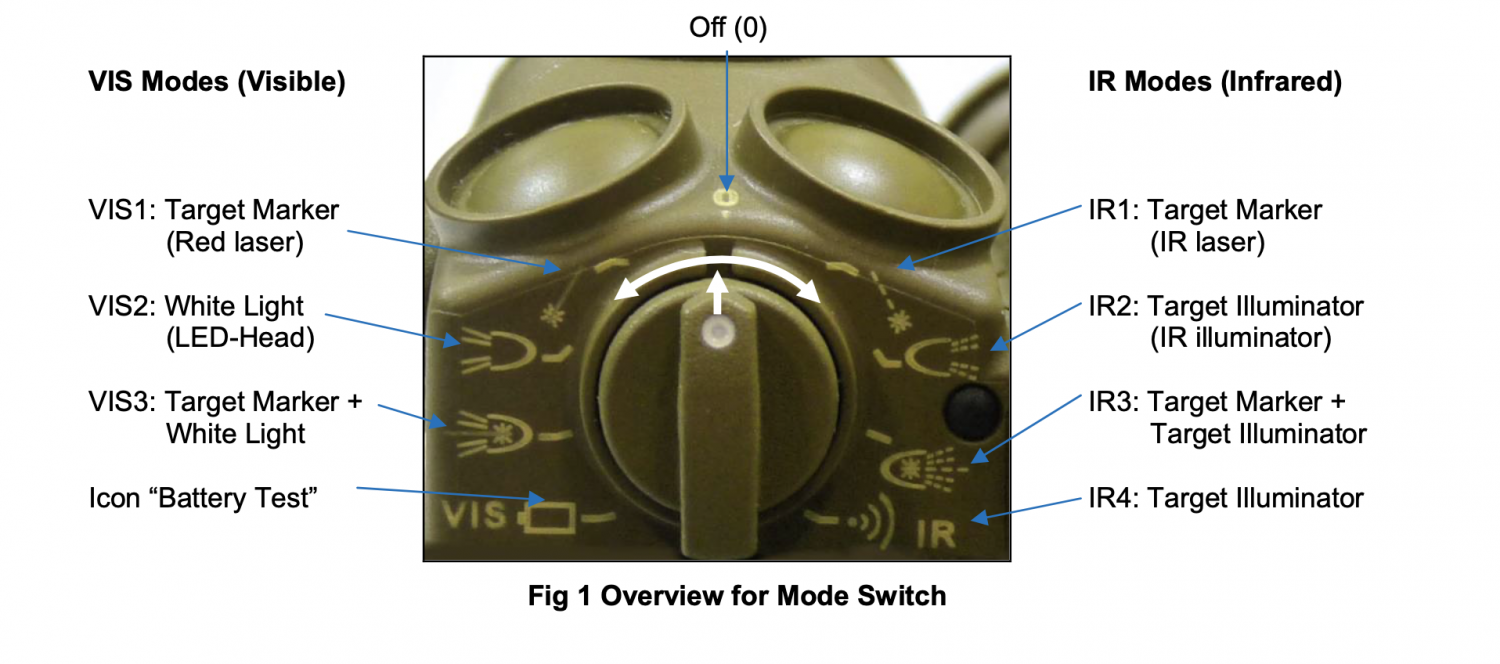
At the 7 o’clock position of the mode switch, just below the VIS3 mode, is the battery test mode. If the multi-color LED indicator is green then the batteries are 50%-100% full. If the light is yellow then the batteries are 25%-49% full. And if the light is red, then the battery is less than 25% full.
That seems straight forward right? Well, it goes off the deep end from here. The FB buttons are constant on only. No momentary activation unless you use the remote tape switch. Here is the chart from the instruction manual. Depending on which mode you are in, the buttons have different functions. You can adjust the laser marker brightness as well as the brightness of the illuminator. According to this chart, you can adjust the size of the IR illuminator, however, this unit is either defective or that only works in full power mode as I cannot get the Vario-Ray LLM to change beam pattern size.
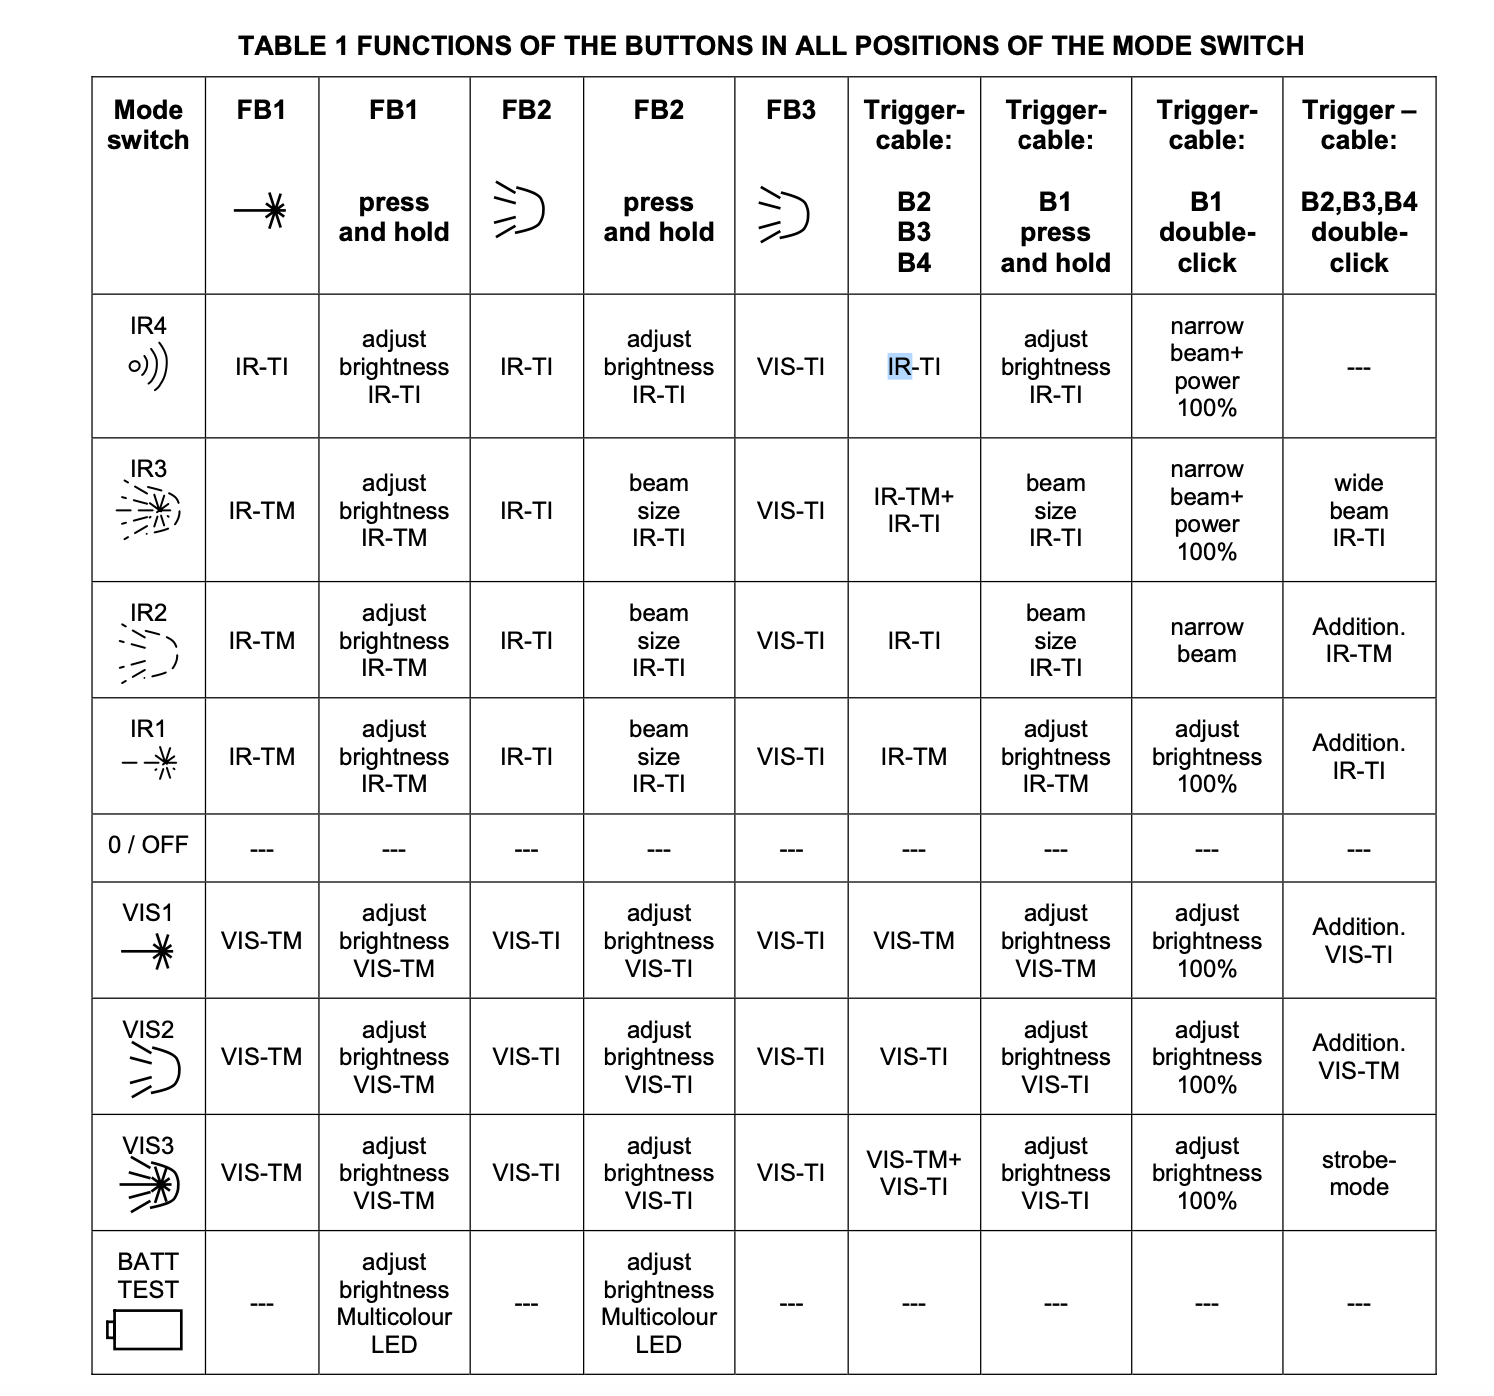
One handy feature is that with the tape switch you can activate the laser or illuminator for simultaneous activation at any time depending on the mode you are in. Take a look at the mode select dial below. Push the dial in and turn one click to the left. That is VIS1 mode.
In VIS1 mode, pressing the tape switch will activate the red laser. If you double tap the tape switch, the red laser and white light will turn on simultaneously. If you are in VIS2 mode, then the tape switch will activate the flashlight and double clicking the tape switch will activate the red laser as well as the white light.

Final Thoughts On The Vario-Ray LLM
The Rheinmetall Vario-Ray LLM is an interesting all-in-one laser system. Just like the Wilcox Raptar Lite ES, the Vario-Ray flashlight head is replaceable. Unlike the DBAL-A4 where, if something happened to the light, you would have to send the entire unit back to Steiner to get repaired.
The tape switch is held in place with a threaded nut but it is a bit of a pain to tighten as the housing gets in the way. But there is less chance of the tape switch being ripped out of the housing.
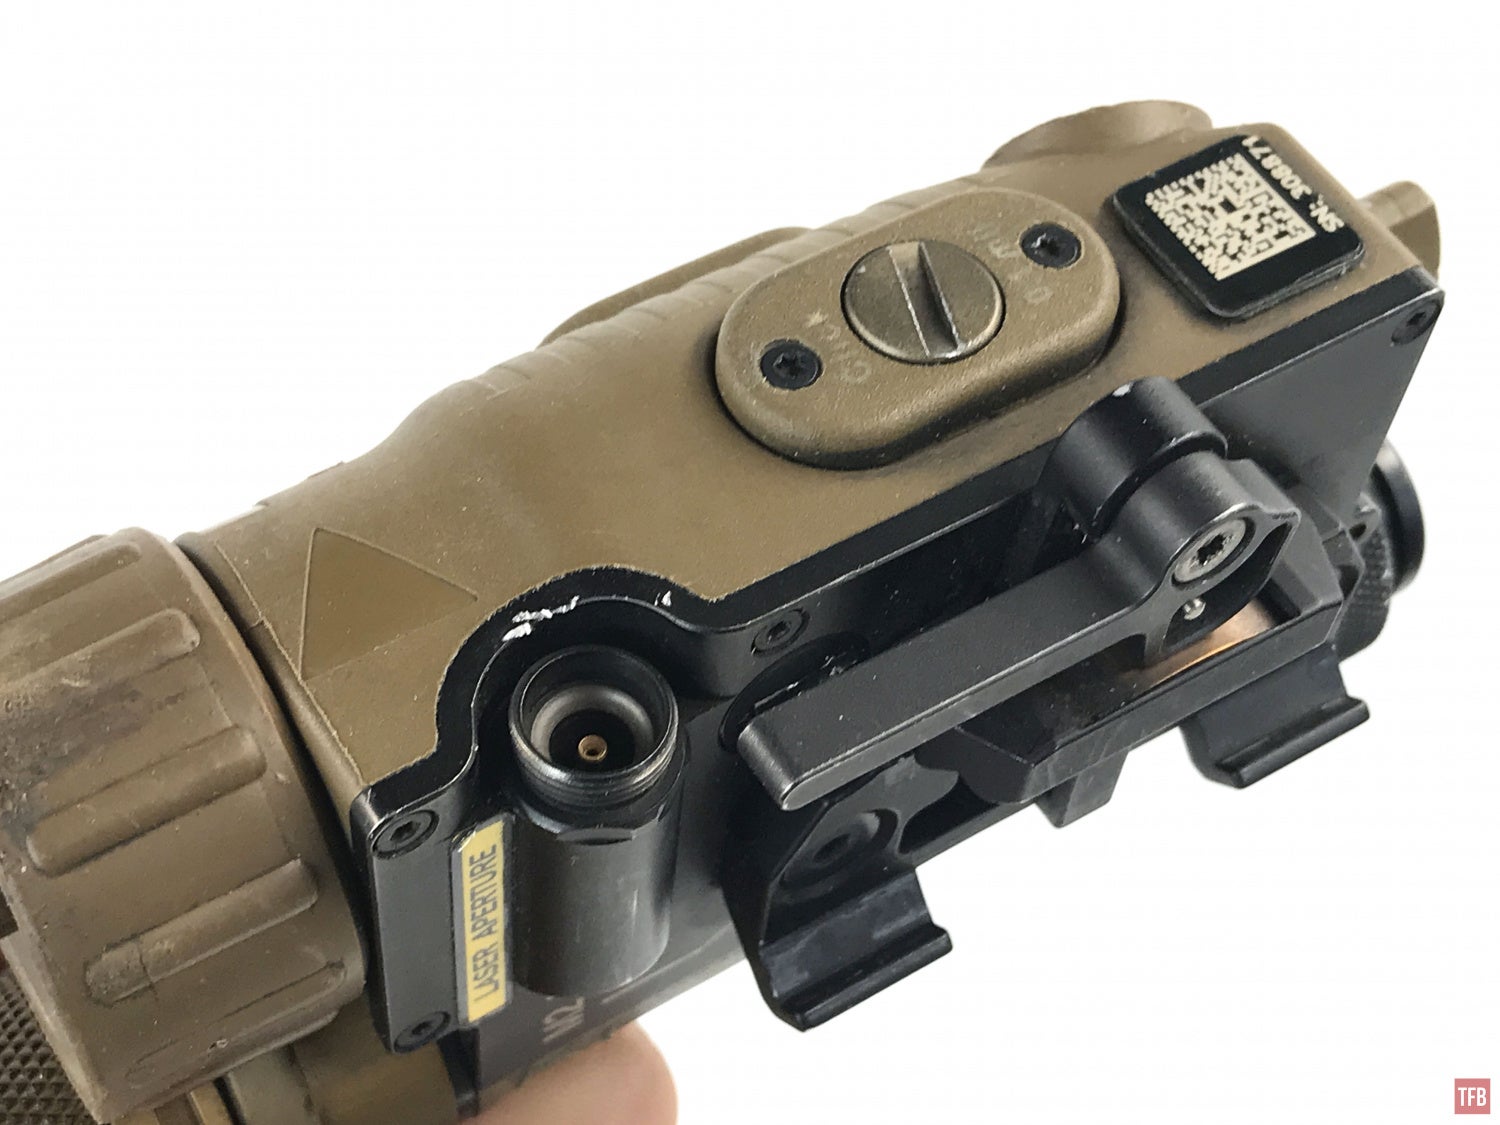
The QD mount has two mounting positions: M1 and M2. This shifts the mount over by about 1/4 inch. It does not seem like much but it could mean the difference between mounting or not mounting the Vario-Ray LLM.

While the main functions of the laser are straight forward like activating the laser marker, illuminator or flashlight, you have to remember what mode you are in. This makes it too complicated but the simplest solution is to just run the laser at full power all the time and don’t worry about adjusting brightness. If you are on target marker then you can double click the tape switch to bring up the vis flashlight or IR illuminator depending if you are in VIS or IR mode. But if you need to, you can just press the back of the flashlight and hit FB3 to have visible override.
The only annoying aspect is the dependency of the trigger cable to switch between eye-safe mode into full power. If the full power cable is damaged or removed the unit reverts to eye-safe levels. I don’t need my laser to act as a nanny.