 Your Privacy Choices
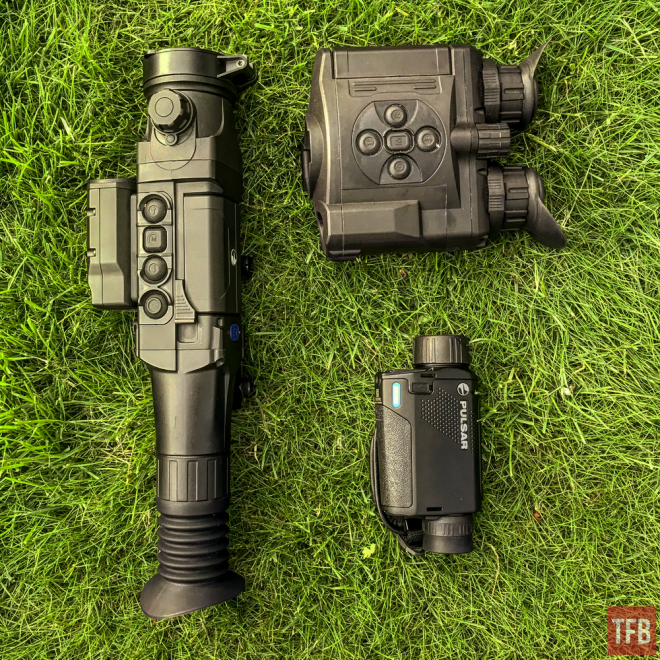
Earlier this year we gave you a head’s up about the new upcoming products from Pulsar Thermal Imaging. Time flies and I’ve had the opportunity to examine and use both the Pulsar Accolade 2 LRF XP50 thermal binoculars and the Pulsar Trail 2 LRF XP50 thermal riflescope for a few months.
This review will cover the European version of the Pulsar Trail 2 LRF XP50. The U.S. version will have a shorter eye piece, which won’t have the wide angle.

The Thermion XP50 and the Trail 2 have the same <40mk sensor, magnification and displays. The image quality should be similar, but the Trail 2 has a built-in Laser Range Finder and comes with a mount.
Below: A rare sight together – Pulsar Trail 2 LRF XP50, Accolade 2 LRF XP50 and Axion XM30S. All with their purpose.
Below: One optic to rule them all? Pulsar on top, with Leica Geovid HD LRF and Zeiss (1960s) binoculars and a Zeiss Laser Range Finder.

Ergonomics
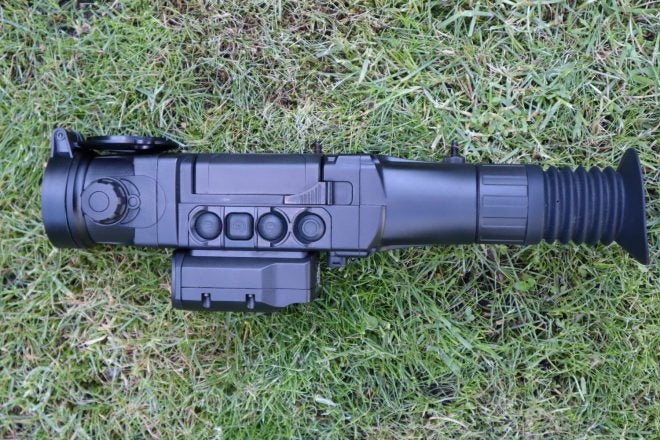
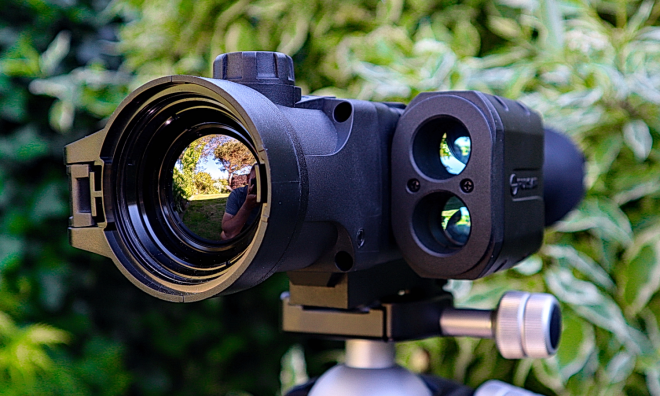
Last year, in TFB’s Friday Night Lights series, we had a look at the Pulsar Thermion XP50 Thermal Scope. The new Pulsar Trail 2 LRF XP50 looks a lot more tactical than the Pulsar Thermion. It’s made out of black polymer with a long rubber eyepiece to black out any incoming light as you’re looking at a screen. All the buttons are covered by black rubber, apart from the start/shut off button which is Pulsar blue. There is a lens cap on a hinge, which is great as you always have it.
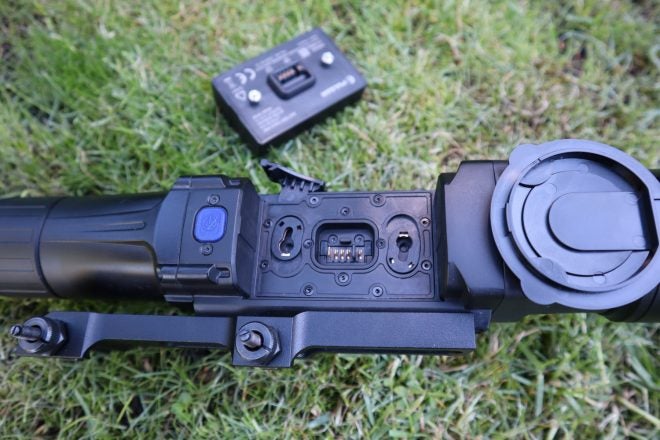
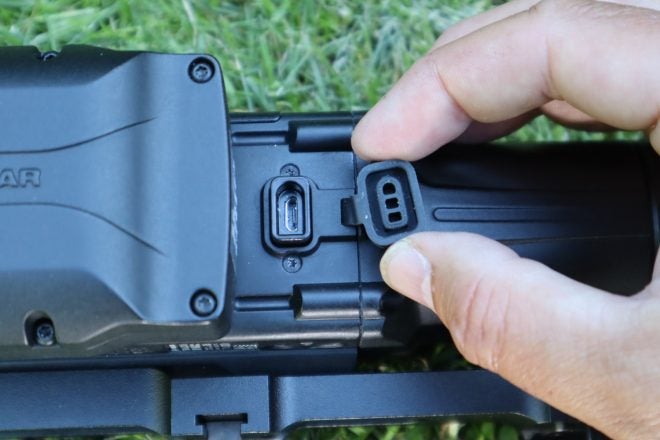
Below: Switching the battery is easy. This is one of the few contacts the electronics have to the outside world.
One the left side (looking downrange) there is a Laser Range Finder (LRF) module. This is easy to use, and quite convenient as it’s more difficult to estimate the distance to your target with a thermal sight. When you use the LRF the image zooms out to 2.5x automatically for an overview.

There’s a focus ring at the front for adjusting the focus when looking at different distances. As there is no auto focus, you will be using this ring quite often.

Trail 2 comes with an IPX7 waterproof rating, to protect the unit from water and other foreign particles. According to Pulsar, the unit is designed to run flawlessly, even after submersion in up to 3 feet of water for up to 30 minutes. While the temptation to test this is strong, we haven’t.
Image Quality
Image quality, perhaps the most important feature of any optic and certainly a thermal imaging device like this. The two main components that deliver the image is of course the sensor itself and the small screen that delivers what the sensor sees.
The sensor is an uncooled 640×480 @ 17 µm, NETD <40 mK sensor. NETD (Noise Equivalent of Temperature Difference) is one of the most important parameters for any thermal detector, and describes their sensitivity. NETD is typically being expressed in millikelvins (mK). The value is measured in a laboratory with ideal conditions. The lower the NETD value, the higher the sensor sensitivity.
The microdisplay is an HD AMOLED in resolution 1024×768, and it’s great. To compare, the Accolade 2 binoculars have a 640×480 display and the difference is noticeable for sure. Don’t get me wrong, the Accolade 2 is great, but the Trail 2 is better.
The refresh rate is 50 Hz, which is important when shooting at moving targets. Low refresh rates are the main reason why I haven’t bought my own thermal device, but Trail 2 is excellent and delivers a fluid motion that doesn’t lag. Even if you do a quick scan over a large sector, you will discover areas of interest (heat), so you can stop and look closer. Is it a hot rock or an animal?
The magnification is from 2 up to 16 (x8 zoom), but I used only 2-3 magnification most of the time.

Picture from a cold, foggy night. Hard work for any thermal device. (White hot)
On a perfect sunny day you may not be able to see the difference between an old device and a brand new one so easily, but in the morning after the rainy night when everything has more or less the same temperature, there will be a noticeable difference.

Roe deer from a cold, foggy night. The Trail 2 still delivers, especially against less powerful devices like the Axion model. Pitch black, lots of humidity. (Red hot)
Before I mounted the Trail 2 to a firearm, I used it as a monocular just to be able to walk around and evaluate the performance without having my suburban neighbors calling the police. There is quite a lot of wildlife going on in suburban parks and small forests as the sun goes down!
Below: I feel blessed to have witnessed and recorded this. Standing by a roe deer at 14 meters, then another one appears. Unfortunately, there’s no sound, in the end they get scared and start barking.
Still image. Don’t say that thermal imaging can’t display depth. Most of the time I used the Observation Mode, but there are other settings for wood, rocks or your custom setting.
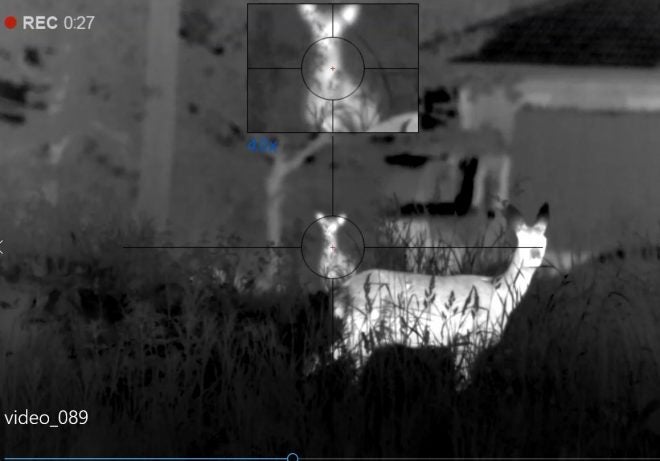
I was able to stand from between 8-40 meters from a roe deer. When I returned the night after, I spotted two kids with it, an unforgettable experience only available through night vision.
Below: This is what they look like when you accidentally use the flash on your iPhone.

If your target is relatively close, say 50 meters, and you adjust the focus so you get it just right, it feels like there’s a depth in the picture. The resolution, both in terms of the minimal temperature changes it can detect and the screen quality, is really good. If you like this effect, I think it was enhanced when using red hot but it could be subjective.

Once you get used to this kind of image quality, it’s hard to go back. As technology develops, I know I will regret typing this, but I don’t see a huge need for anything better. Then again, I bought Blu-Ray after DVD and enjoyed it.
My understanding is that the Trail 2 LRF XP50 I evaluated will be more or less similar to the one soon to be released in the USA. I heard that the eyepiece is going to have another design.
Picture-in-Picture
The Picture-in-picture is a setting in the software, and displays a magnified image at the top-center 10% of the overall field of view for a closer view of the target or a more precise shot placement.
The testing platform
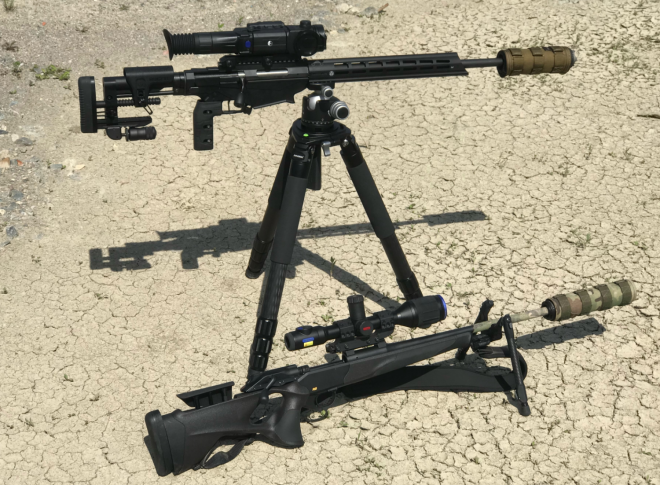
I used my bolt-action Ruger Precision Rifle Gen 1, in caliber .308 Win. The ammunition is GGG loaded with 168 gr Sierra Match King bullets. With a traditional 12x optic, this firearm is tried out from 300 meters (5 shots within 8 cm) to 45×45 cm steel at 900 meters. The handguard has been upgraded to one from Catalyst Arms and the Trigger was changed to a flat one from Timney, both an improvement over the original parts.

I used a bipod from B&T Atlas and a support bag at the rear, all shots fired sitting from a concrete bench. I would certainly have shot more stable and better from prone as I’m used to.

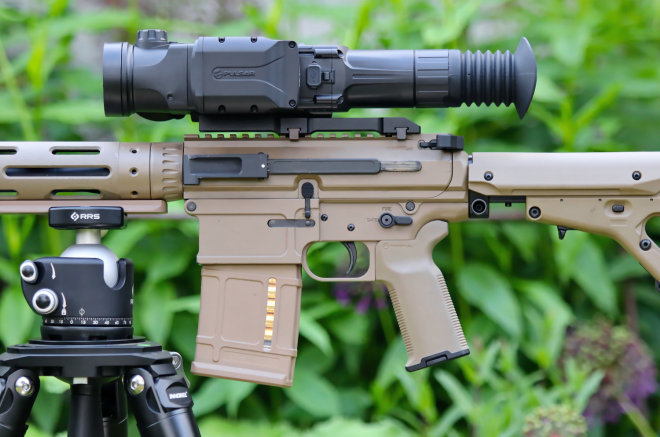
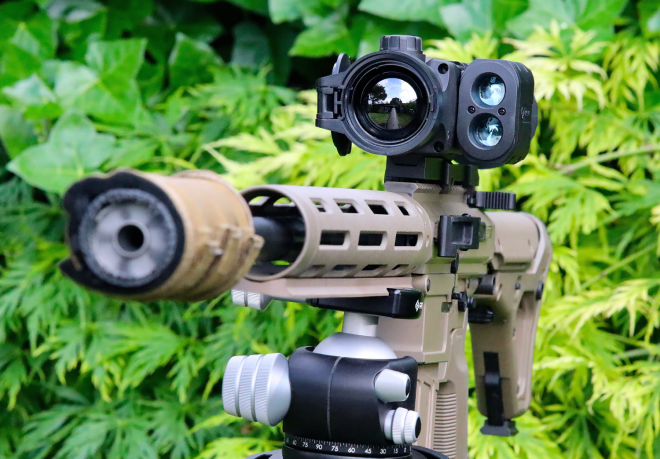
Pulsar Trail 2 LRF XP50 on a B&T suppressed JP Rifles PCS-12.
As you have noticed in the pictures, the Trail 2 has also been fitted to a JP Enterprises PCS-12 semi-automatic AR10 clone, in 6.5 Creedmoor. I never shot with this setup, but it should work just fine.
For a short while, it was also mounted to a Stormtrooper CTR-02 AR15.
Range Time! Zeroing and grouping at 100 and 300 meters.
I have never zeroed a Pulsar or any other digital scope before. I am the type of person that doesn’t read the manual until I really have to (and then it’s usually to no help anyway).
I stapled a hand warmer onto an IPSC paper target at 100 meters and sent one round, aiming at the hot spot. My spotter said it was high, so I aimed for the bottom of the paper and got a hit on the paper. Based on this hit, I froze the picture and told the sight where I aimed versus where I hit.
The Trail 2 then recalibrated and I shot again, this time with a hit on the hand warmer. I considered this my first hit in a 5-shot group. The group was approximately 3.5 cm (1,4″) which I consider good enough for hunting, but we all have our own standards.

Below: Handwarmer made a very small signature on a hot summer day, but I was still able to zero and shot a nice 5-shot group (red hot).

I could have been done and gone home for the day, but there were some targets at 300 meters, with electronic marking. I don’t want to destroy any sensors or cables on those targets, so after some calculations, I decided to find an aiming spot that hopefully would get me hits around the center of the target.
Below: Through the reticle picture, and not recorded with the internal device.

I went for 12 power magnification on the Pulsar Trail 2. Remember that these paper targets are far from ideal for a thermal sight, so it’s not easy to find a steady spot or reference to aim for. You’re looking at a digital display, and if you increase the magnification it feels that you just increase the pixelization and haze.
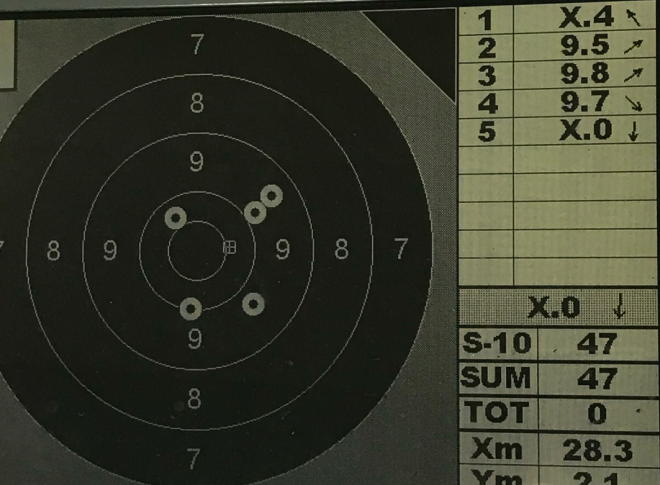
My first round was sent at the 300-meter target, and was amazed when I noticed that I hit the center 10 (10.4)! The purpose of this exercise was not really to hit the center, but rather to see what kind of groups I could shoot. I shot another 4 rounds without looking at the result. In the end, the result was a 5 shot group within 117 mm or 4.6″ (<12 cm)!
You can see the video of the 300-meter shooting here, as well as some Laser Range Finding at the end.
I know that the rifle and ammunition are fairly accurate together, and my best group with a normal optic (Schmidt & Bender 3-12×50 PMII) is around 8 cm. Not much different from the group I just shot with the Pulsar.
The Space Force reports: Life is good on Mars. No unusual thermal activity.
I still find it hard to digest and comprehend that I managed to shoot and hit at this level, having spent just a total of 12 rounds! I was expecting to spend a lot more effort and ammunition. I guess that is proof that the Pulsar sight is accurate and easy to use.
Customizable Reticle Options
Inside the menus, there’s a wide array of color-customizable reticles, including scalable ballistic styles. There’s a video that shows all the reticles here.

Video Time
Below you can see a variety of videos recorded with the Pulsar Trail 2. These are recorded with the built-in photo and video recorder, which is extremely easy to use. There’s 16 Gb of internal memory for you, which means a huge amount of hours of recorded video.
Pulsar Trail 2 LRF XP50 (2020 model) and roe deer with fawn. 38 meters.
Pulsar TRAIL 2 LRF (2020) and Roe Deer 40 meters.
Pulsar Trail 2 LRF XP50 – Wild Swedish Moose, close. Here you can also see some of the menus and other color palettes.
For more Pulsar videos please check out the Night Vision Viking channel.
How much better is the new Trail 2 vs the old one? Watch this video (external test).
The Technical Details – Pulsar Trail 2 LRF XP50
- <40 mK NETD sensor
- 640x480px 17µm
- Magnesium alloy housing.
- Instant start-up in under 3 seconds
- Full colour HD display with 8 colour pallets.
- Recording in HD .mp4
- 16 GB of memory
- Wide-angle eyepiece
- Blue power ON button
The Trail 2 is rated up to 6,000 joules for larger calibers up to .375 H&H, 12-gauge and 9.3×64.
If you want another mount than the standard one (pictured), here’s one option from InnoMount.

Pulsar’s StreamVision
When it comes to the software, it works fine but I did have some problems connecting the device to my iPad. I think the main problem was not related to the app, but that the iPad had a preference to switch over to my much stronger WiFi network at home. I did not use Pulsar’s StreamVision a lot, mainly because I downloaded all my recorded videos and pictures at home via cable.
PRICING
Unfortunately, I do not have access to an official price list. In Europe pricing seems to be around €5,000 and in the USA around $6,000. Just note that there is a difference between the XQ50 (cheaper) and the XP50 models. Below: Pulsars – Trail 2 LRF XP50 vs. Thermion XP50.

Conclusion:
The Pulsar Trail 2 LRF XP50 is a high-end thermal sight, there’s no doubt about it. At no instance during my review did I think that the system’s performance was too low. I didn’t experience any lag or similar issues, and I didn’t discover any bugs in the software. If you have an animal (or heat source) within 40-50 meters the image quality and resolution are amazing, but the scope can detect up to 1800 meters (1.1 miles).
For years I have been looking to get into night vision, but the devices I looked at were either too bad or too expensive. The Trail 2 isn’t cheap, but for what you get I wouldn’t call it expensive. It cost a lot of money, yes, but if you’re an avid hunter, it’s still affordable and the resale values seem to hold well.
This device has really made me appreciate Mother Nature more and got me closer to wild animals than ever before. It’s hard to explain in text, but if you use it right, you can really discover things that you would never ever experience without it. It’s obviously a sight, to be used for hunting, but you don’t have to shoot anything to have a use for it.
I wish for a more tactile feel in the buttons. Now it can be a little difficult to know if you pressed the button or not.
Any battery-powered device is going to need a recharge sooner or later, but in none of my excursions did I have any problems with the battery life. If you’re going away for a few days, on a long hunt, then you need to start planning ahead and conserve the energy.

Upgraded Ruger Precision Rifle in .308 Win, with a B&T suppressor and Cole-Tac thermal cover, standing on an Innorel RT90C tripod and BH-55 head from Really Right Stuff.
Switching and charging batteries is really easy, just make sure you store the charger and the cable where you can find them.
The Picatinny mount seems like it could be of better quality, but I couldn’t really find any errors with it and there are up to 4 screws that hold it together.
An auto-focus would have been nice, but I think that would make the unit much more expensive and fragile with moving parts in the lens.
Below: 12 meters or 13 yards. How close can you get? Note the picture-in-picture. Cold summer, around midnight. (Black hot)

Unfortunately, I had to return the Trail 2 to Pulsar, but I can highly recommend it if you’re looking for a high-end thermal riflescope.
You can find the product link to Pulsar here. You can compare it to the Pulsar Trail XP50 here.
UPDATE: Pulsar USA have now released pictures of the Pulsar Trail 2 LRF XP50 USA Version. It’s funny they chose a very similar rifle to the one used in TFB’s review.

Pulsar Trail 2 LRF XP50 USA Version.
You may also be interested in the Pulsar KRYPTON FXG50, which is a Thermal Vision Front Attachment for your riflescope.
As usual, we welcome your feedback and comments.
We are committed to finding, researching, and recommending the best products. We earn commissions from purchases you make using the retail links in our product reviews. Learn more about how this works.