 Your Privacy Choices

It has been a personal goal of mine to get my hands on a Thales LUCIE NVGs. However they are not that common and not normally sold to civilians. Just a couple weeks ago my friend Warren came across someone selling a SIMRAD GN1. While it is not a LUCIE, it functions the same and it looks really cool. So I bought it. Get ready for a visual feast of images.
Retrofuturistic SIMRAD GN1

Waiting for COVID-19 to die off.
There is not a lot of information that I could find about the SIMRAD GN1 online. A lot of my information came from the help of a fellow night vision enthusiast in Norway, B. Pedersen on Instagram. Thanks to B. Pedersen I was able to confirm that the GN1 was released in 1990! I could not believe that these predate the Gulf War. They were designed by the Norwegian company SIMRAD. SIMRAD merged with a company called Vinghøg in 2005-2006. Later in 2009-2010 Vinghøg was bought by Rheinmetall AG and is now Rheinmetall Norway. In fact Rheinmetall still has the GN1 on their website.


Compare that to the Thales LUCIE below.


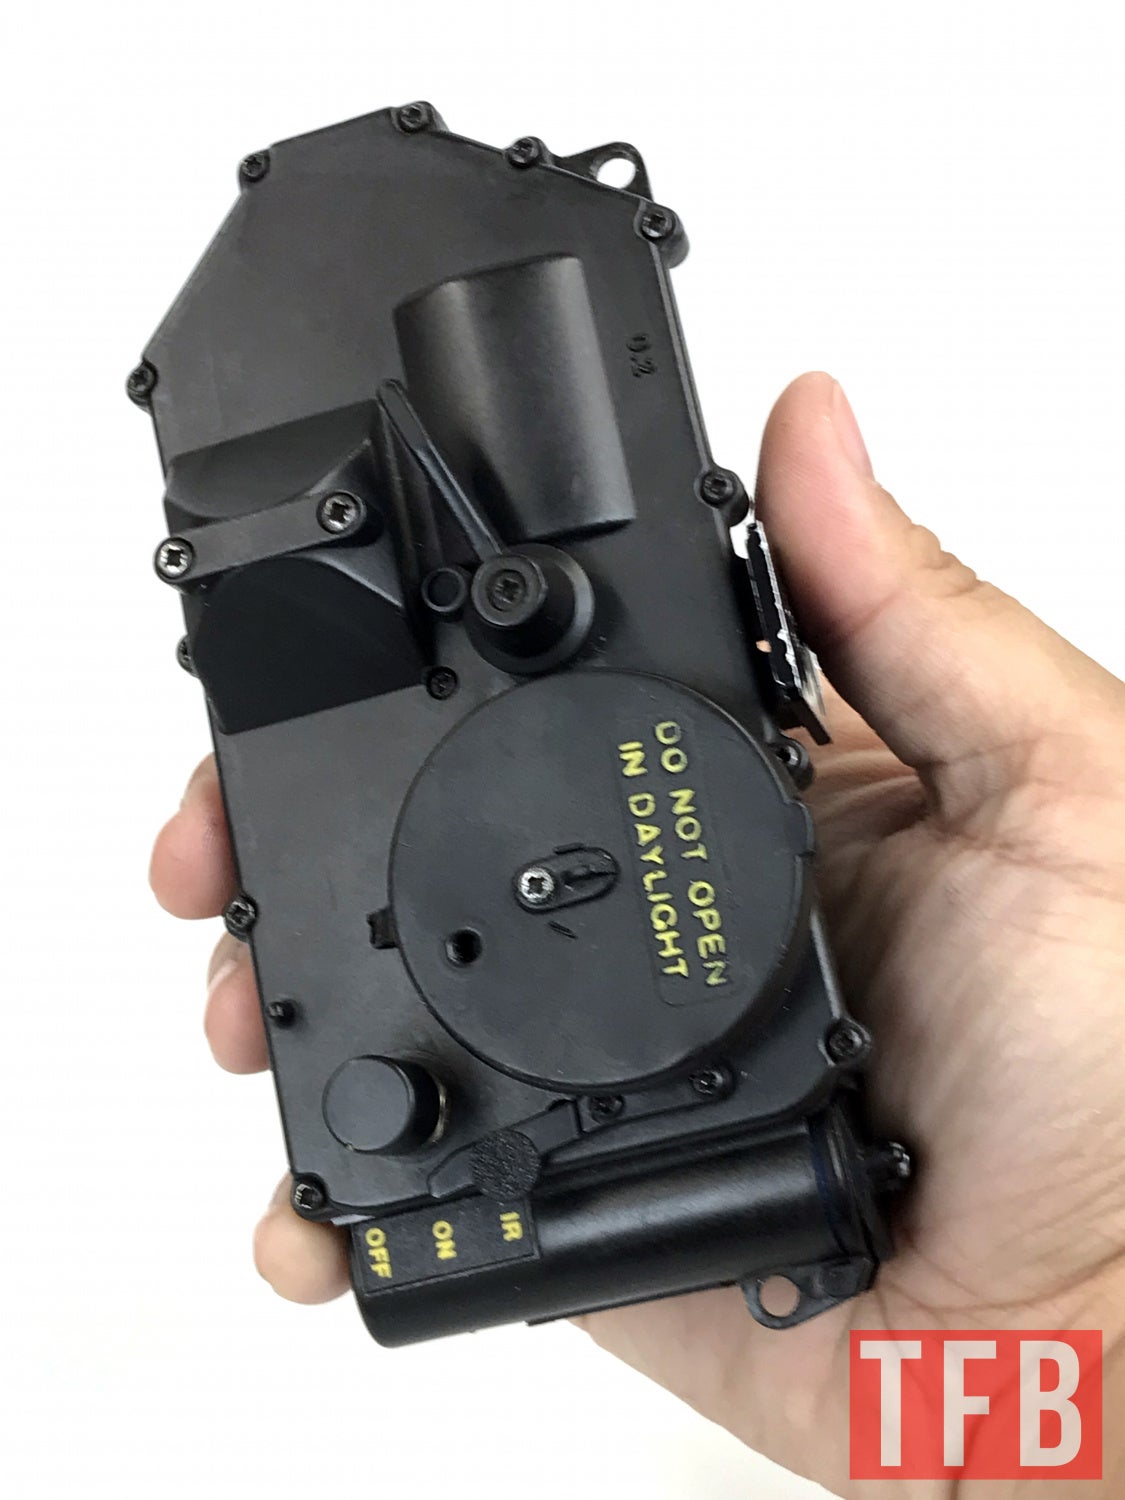
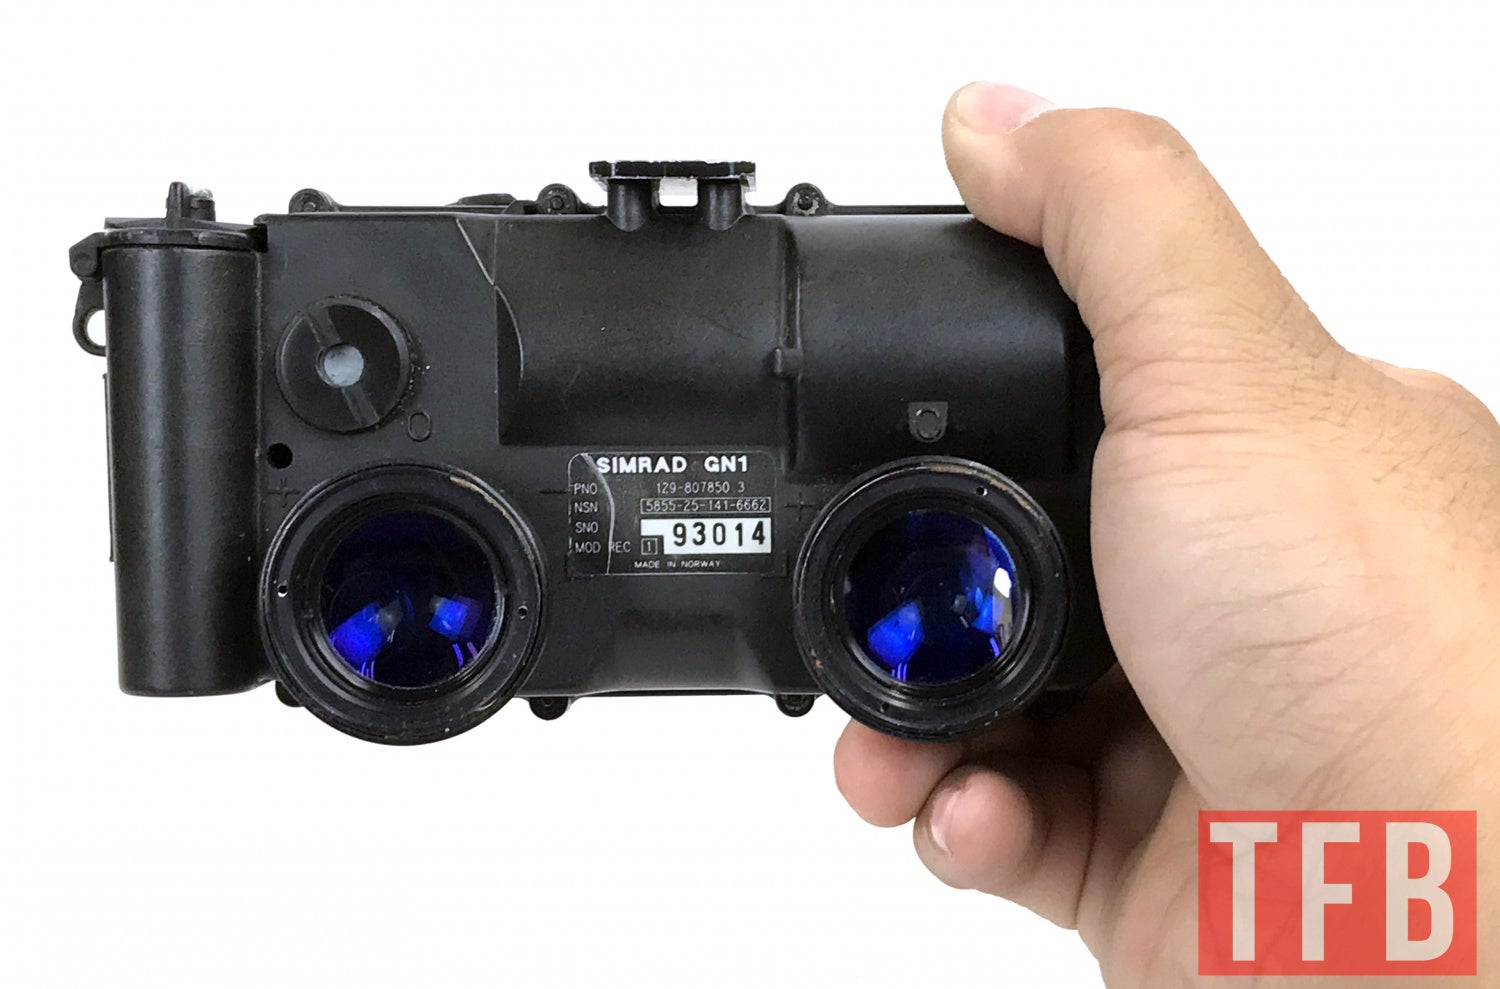
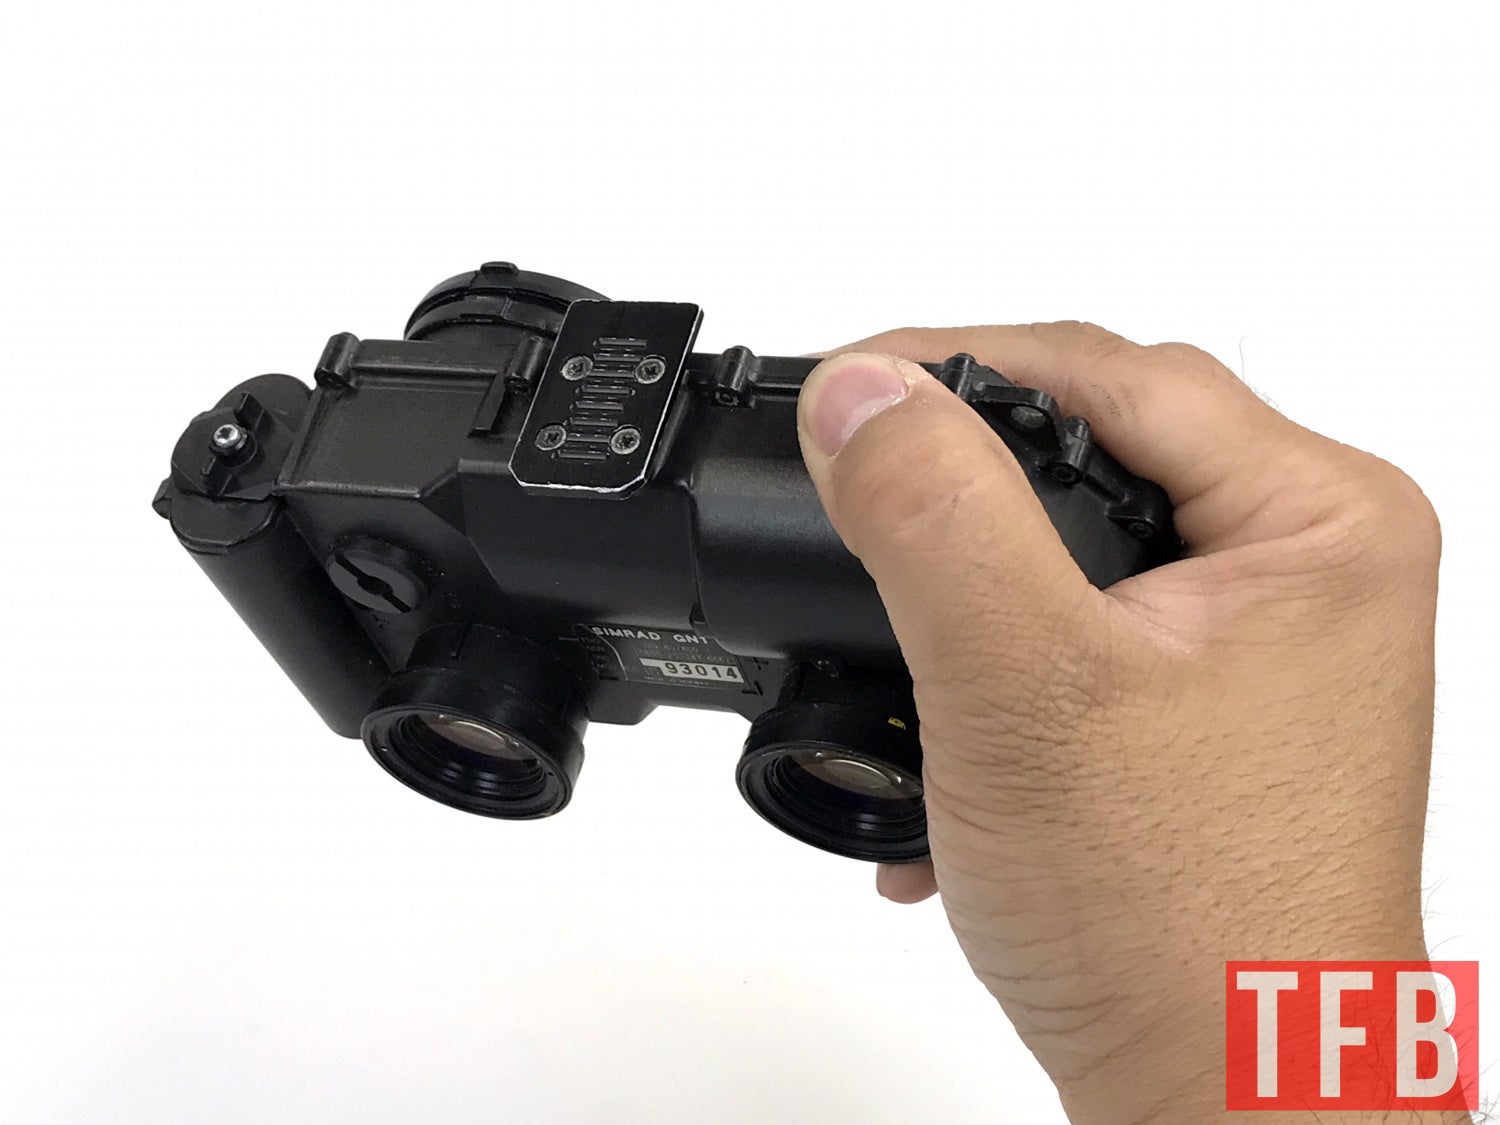
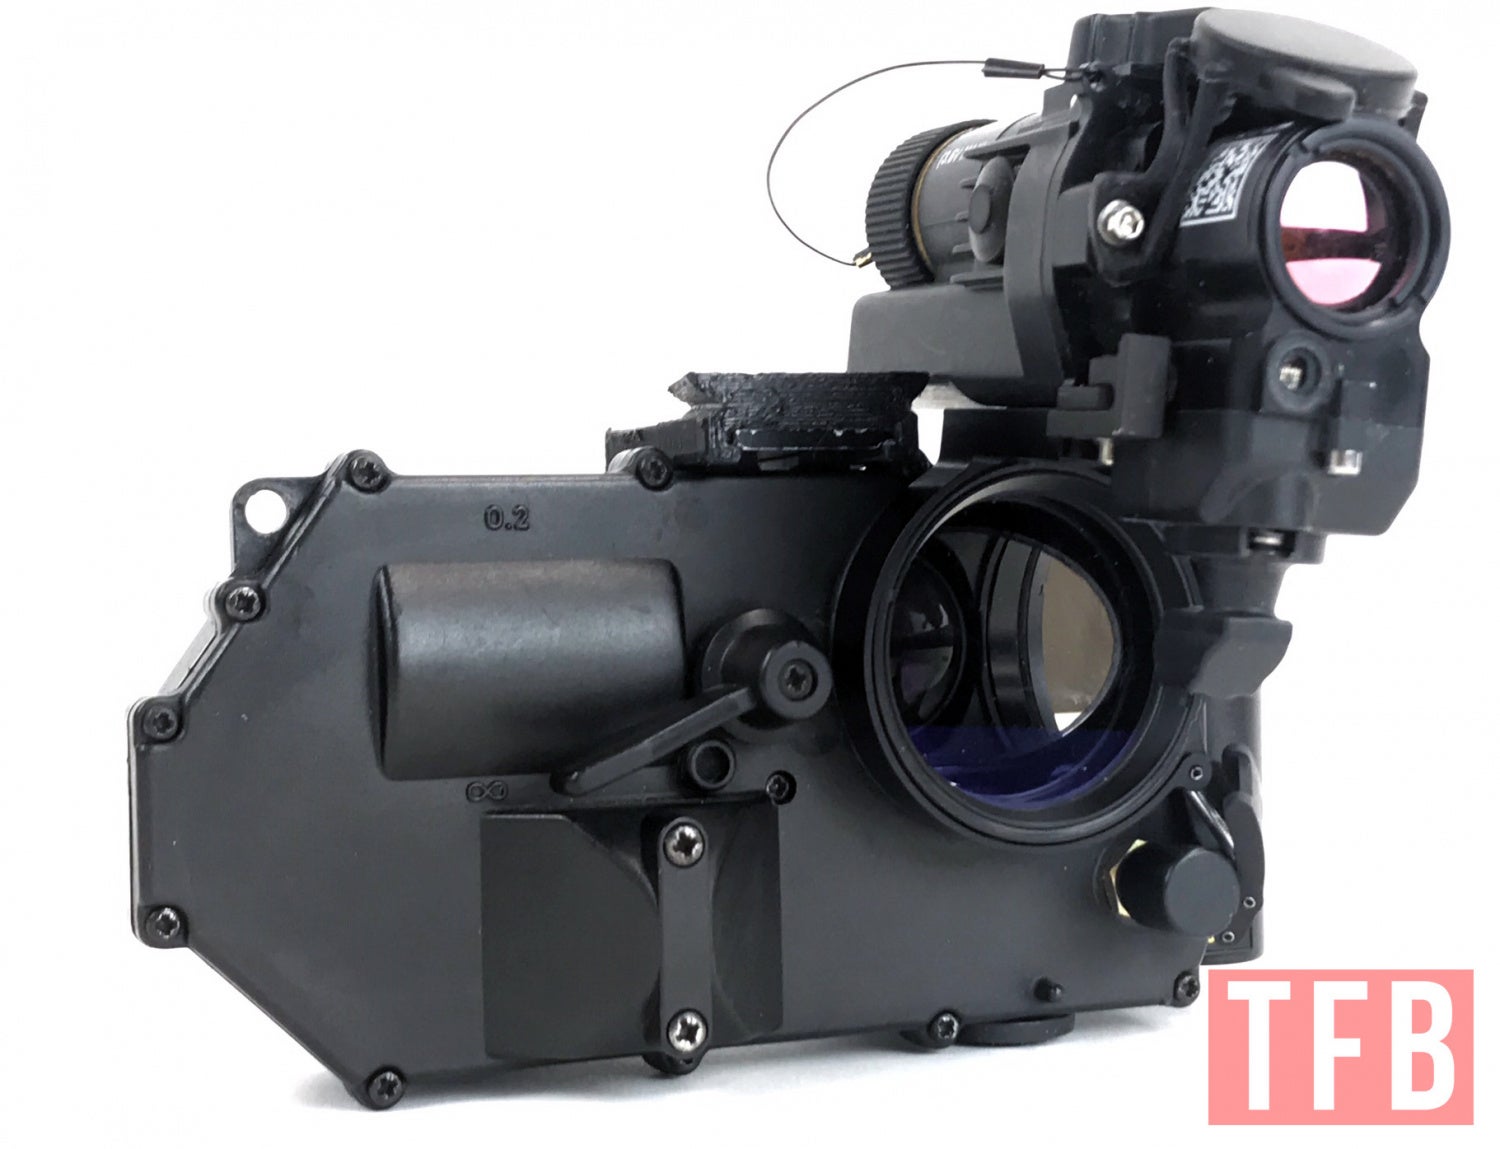
The GN1 is very small compared the PVS-7. In my hand it has a similar size to a camera.


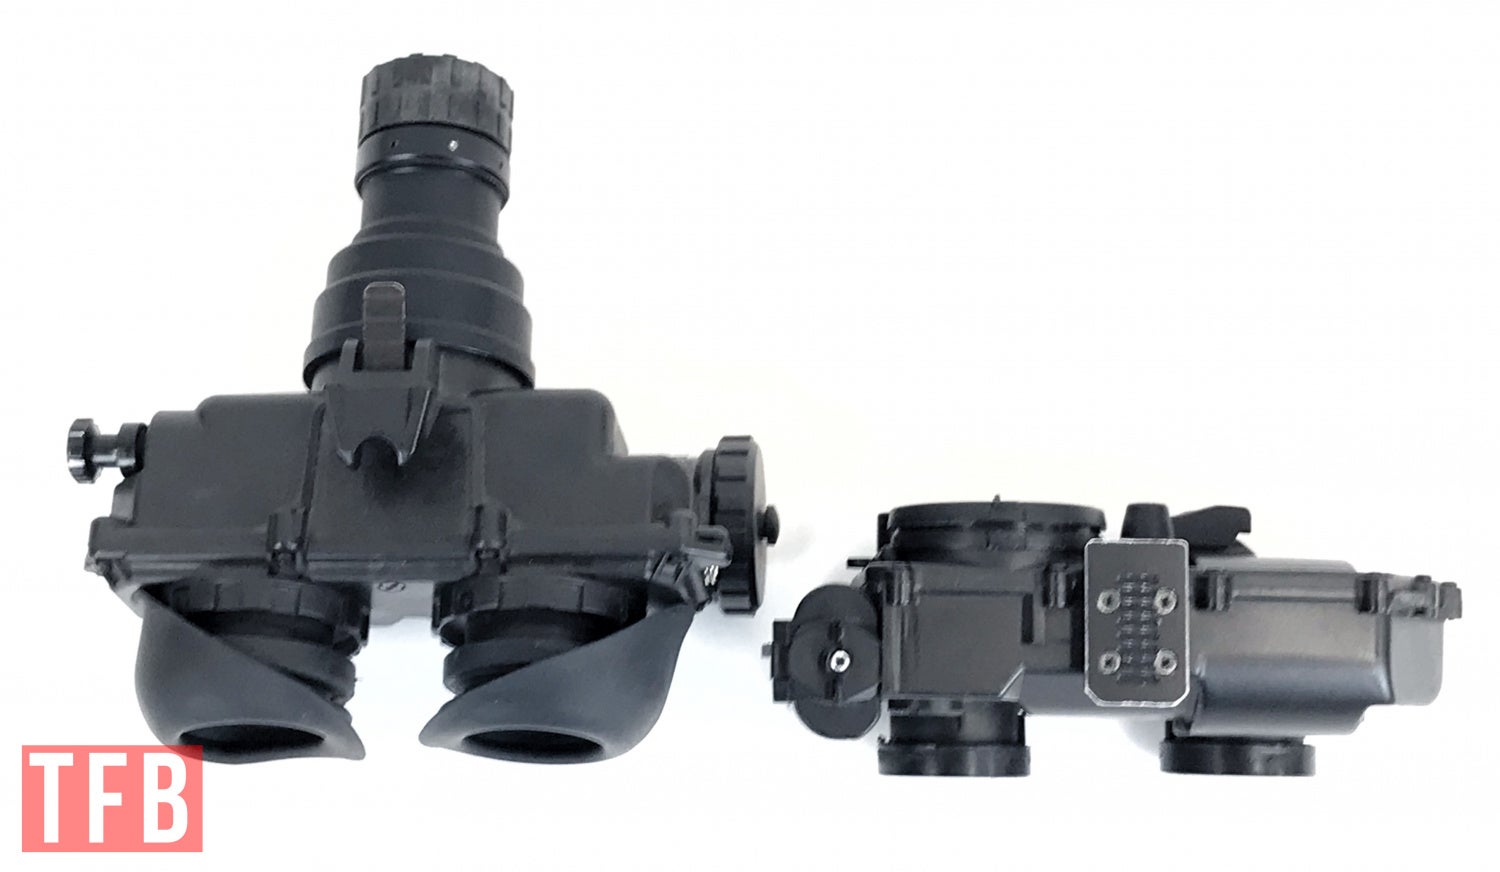
Below are some comparisons of the GN1 size next to some popular night vision goggle designs.

Sentinels compared to GN1. The Sentinels weighs 585g
PVS-7 next to the GN1. PVS-7 weighs 538g

PVS-18 next to the GN1. PVS-18 weighs 377g
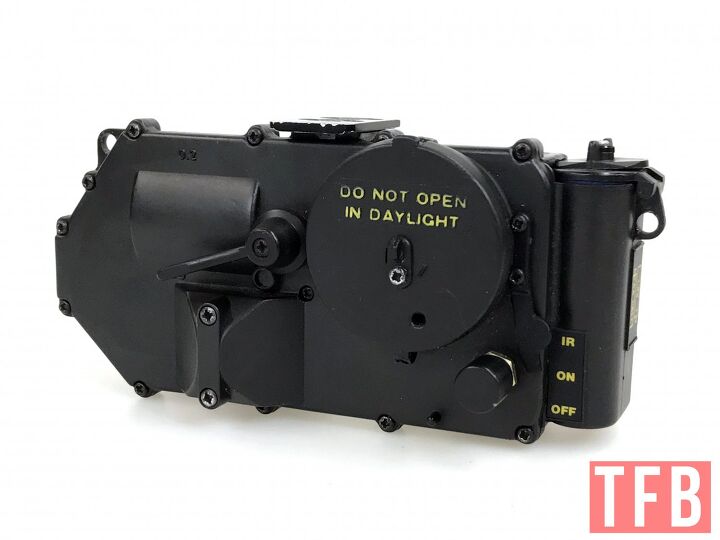
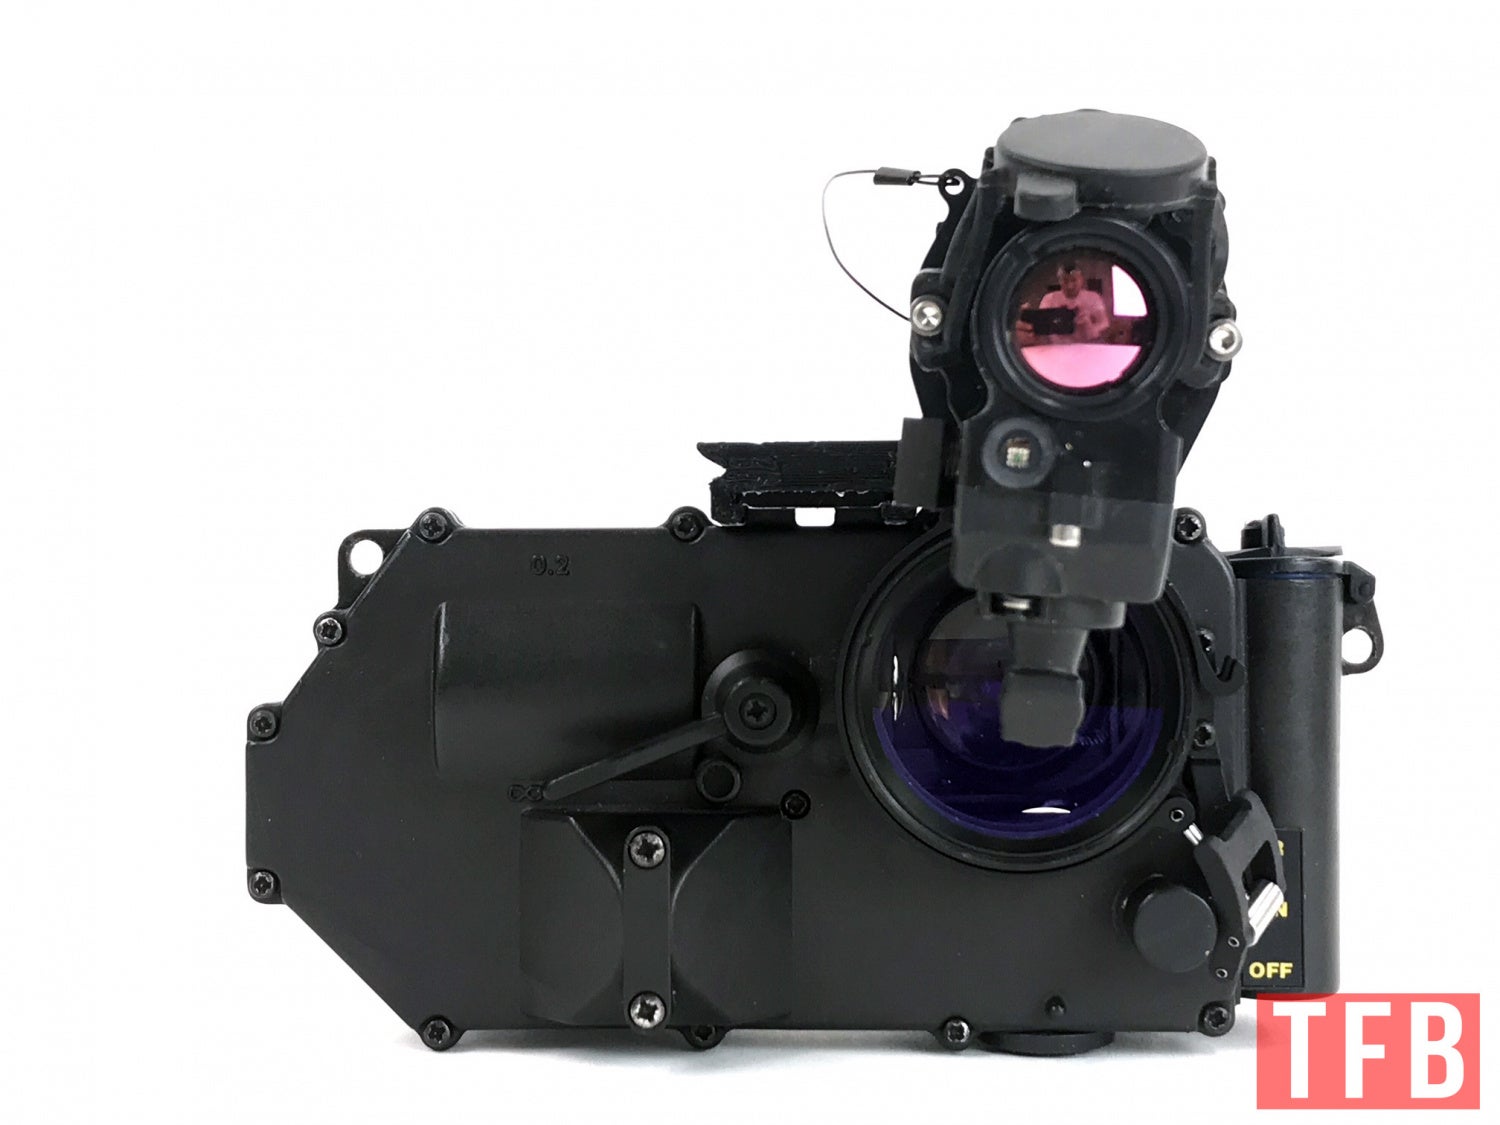
The GN1 has a daylight cover similar to a scope cap. It is tethered to the objective lens but has a unique feature to its design. It has a pin hole cover that can be closed to eliminate all light entering the objective lens.

Pinhole daylight cover opened.

Pinhole daylight cover closed.
Do you see that hole just below the pin hole cover? At first I did not know what that was for. The back side of the lens cover did not yield much insight other than the fact that the hole does not go through the cap.

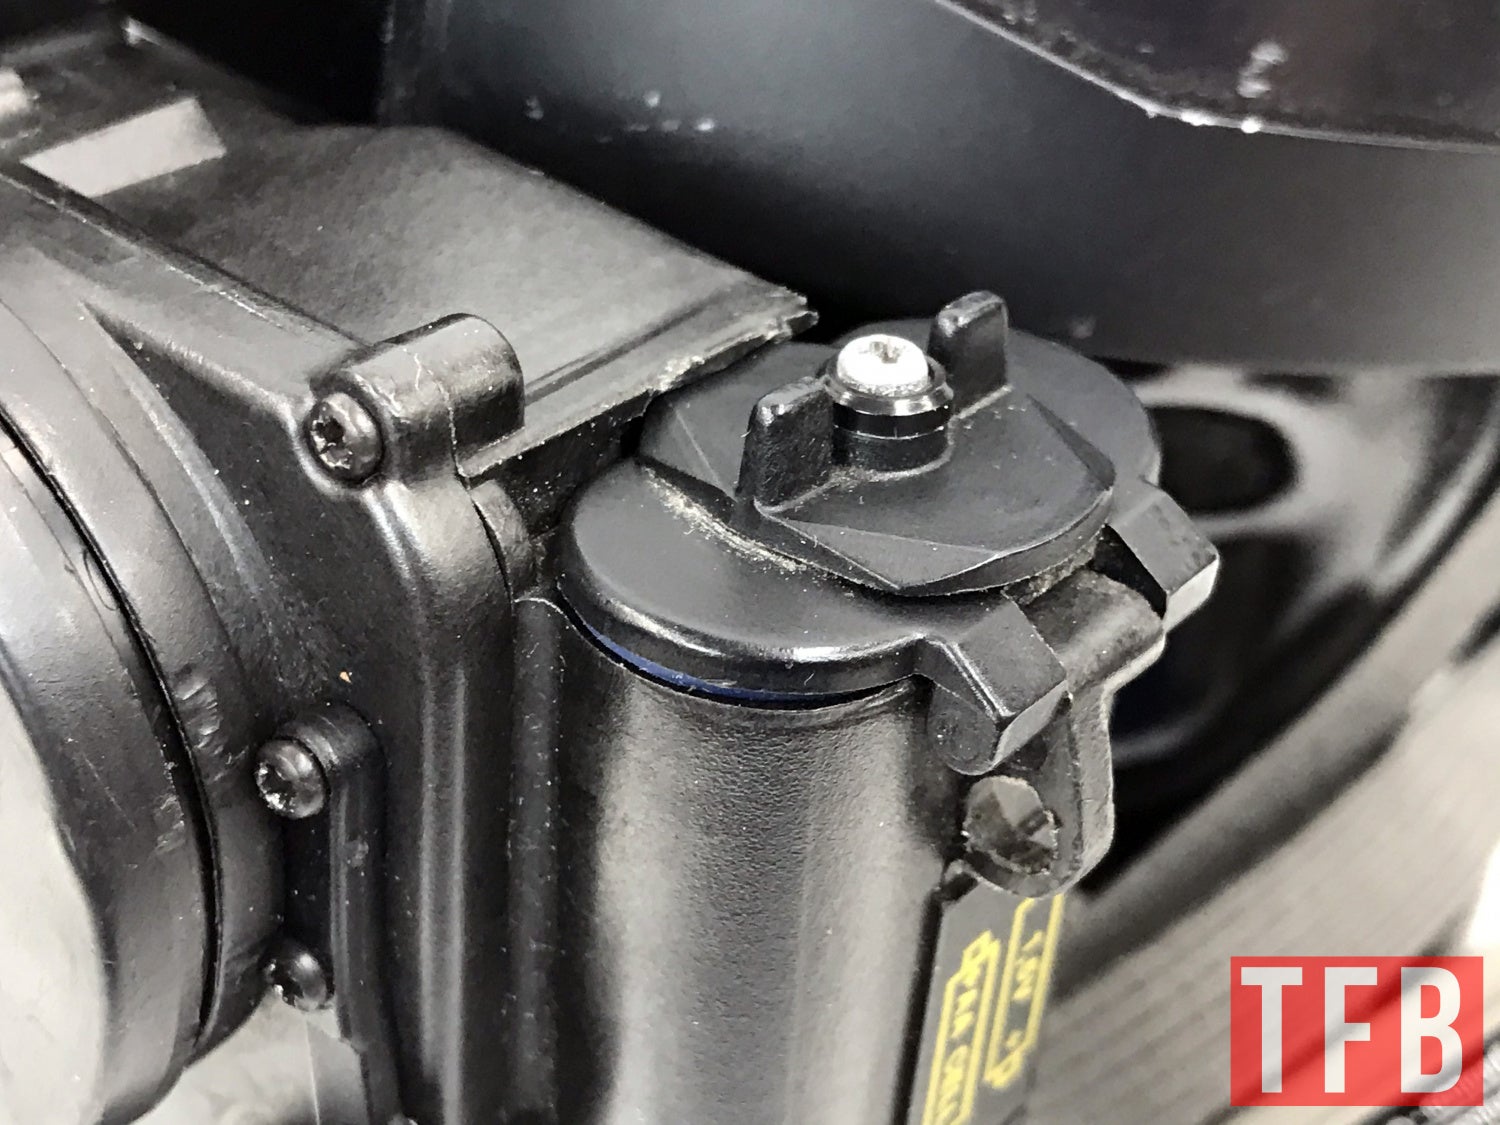
Take a look at the housing in the photo below. You can see a small protrusion near the bottom edge of the housing and below the daylight cover.
That protrusion plugs into the hole in the daylight cover and keeps the cover out of the way when you use the GN1.

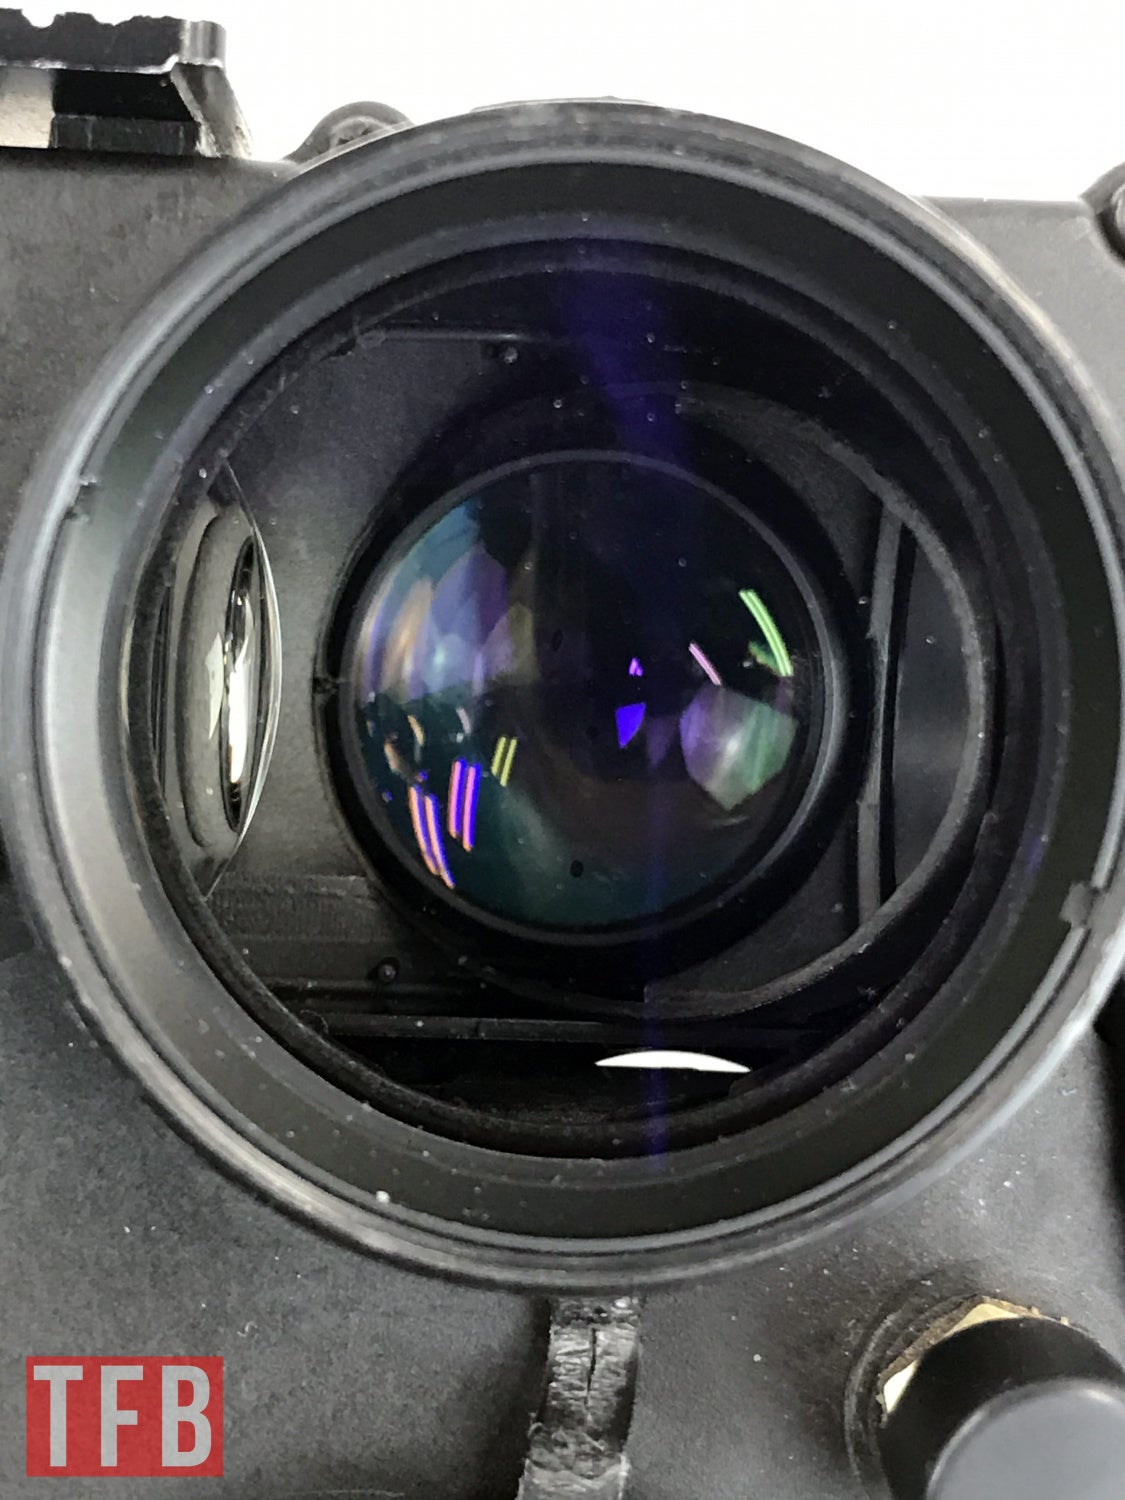
Just to the left of the objective lens is a lever. This is how you adjust focus. In fact the lens that the cap covers is not really a lens. It is just a window. Behind it is a mirror that bounces the light 90 degrees to the left and into the actual objective lens,
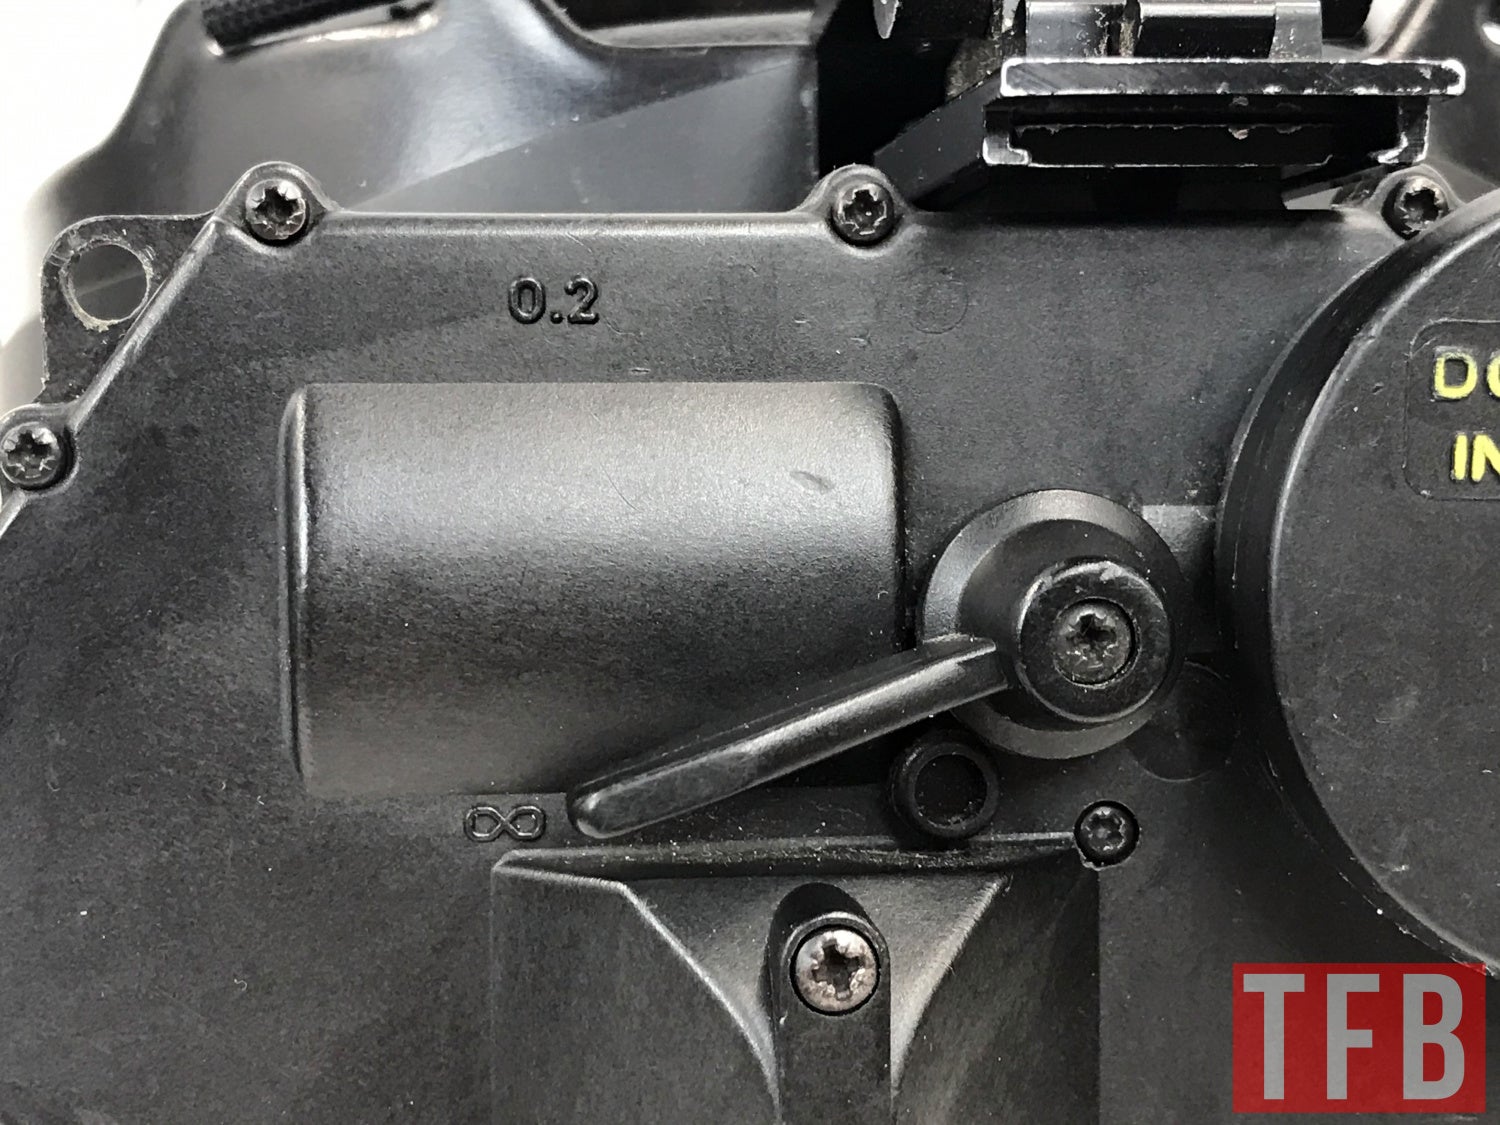
Lower the lever for infinite focus, raise it for close focus.
Looking straight into the GN1 port/window you can see the 45-degree mirror reflecting the objective lens which sits just 90° to the window and mirror.

Moving the focus lever pulls and pushes this objective lens left and right.
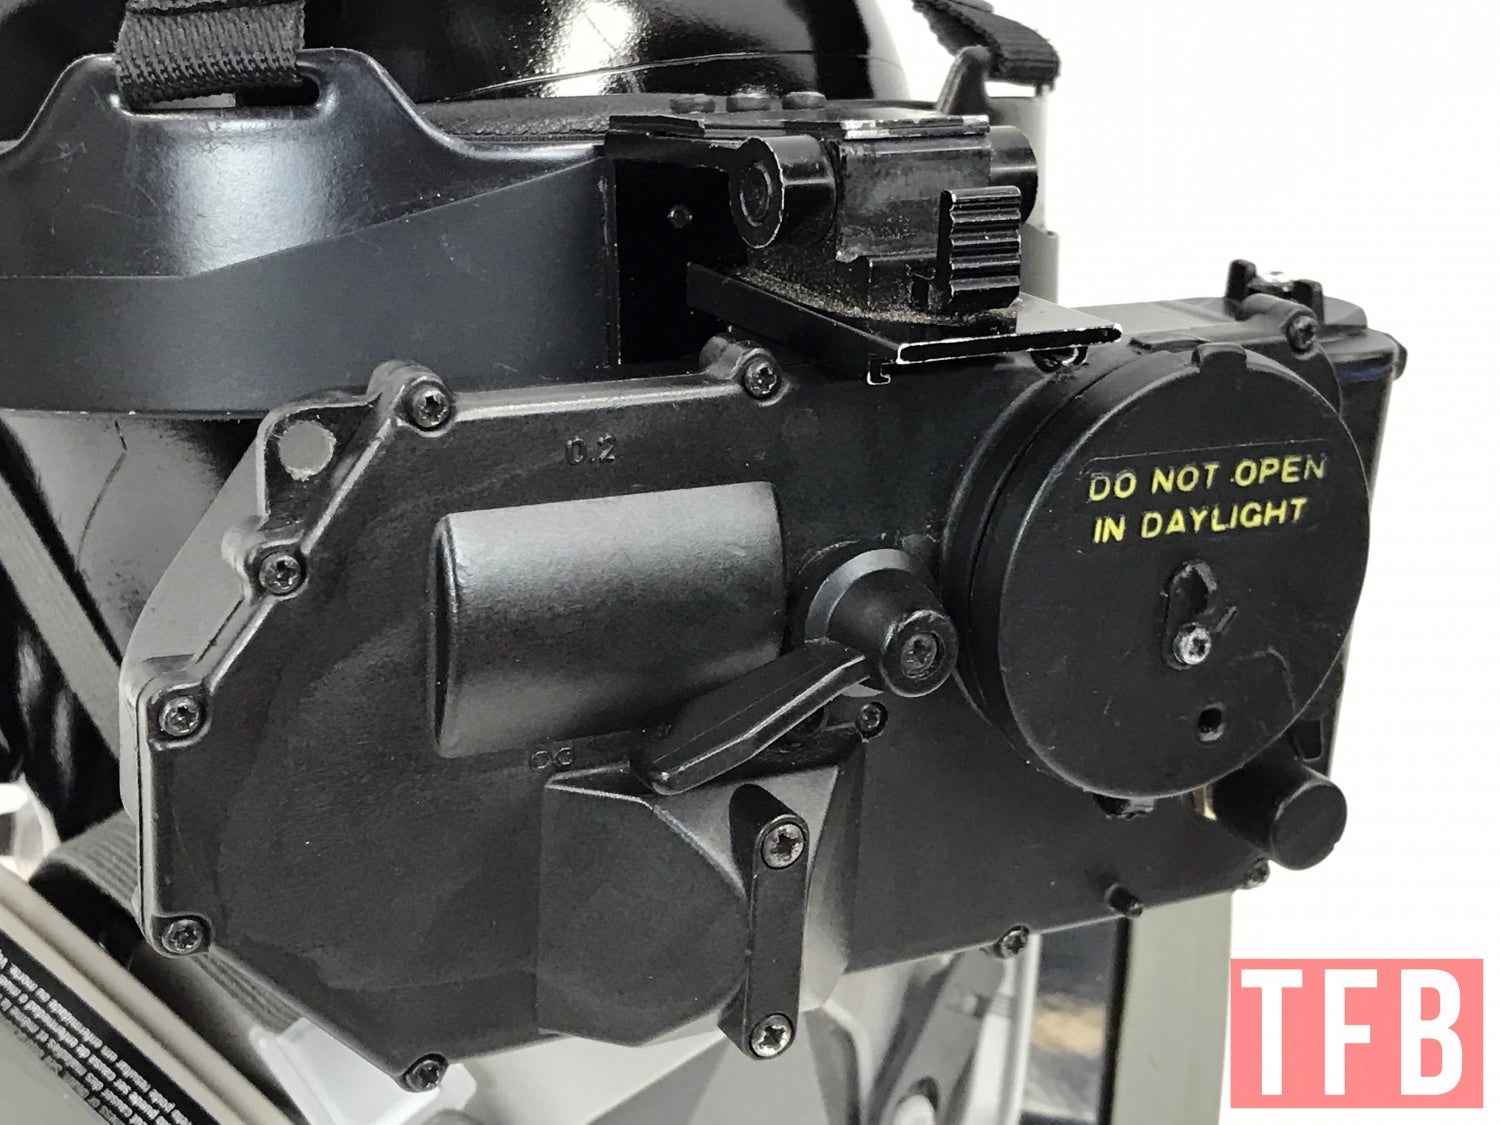
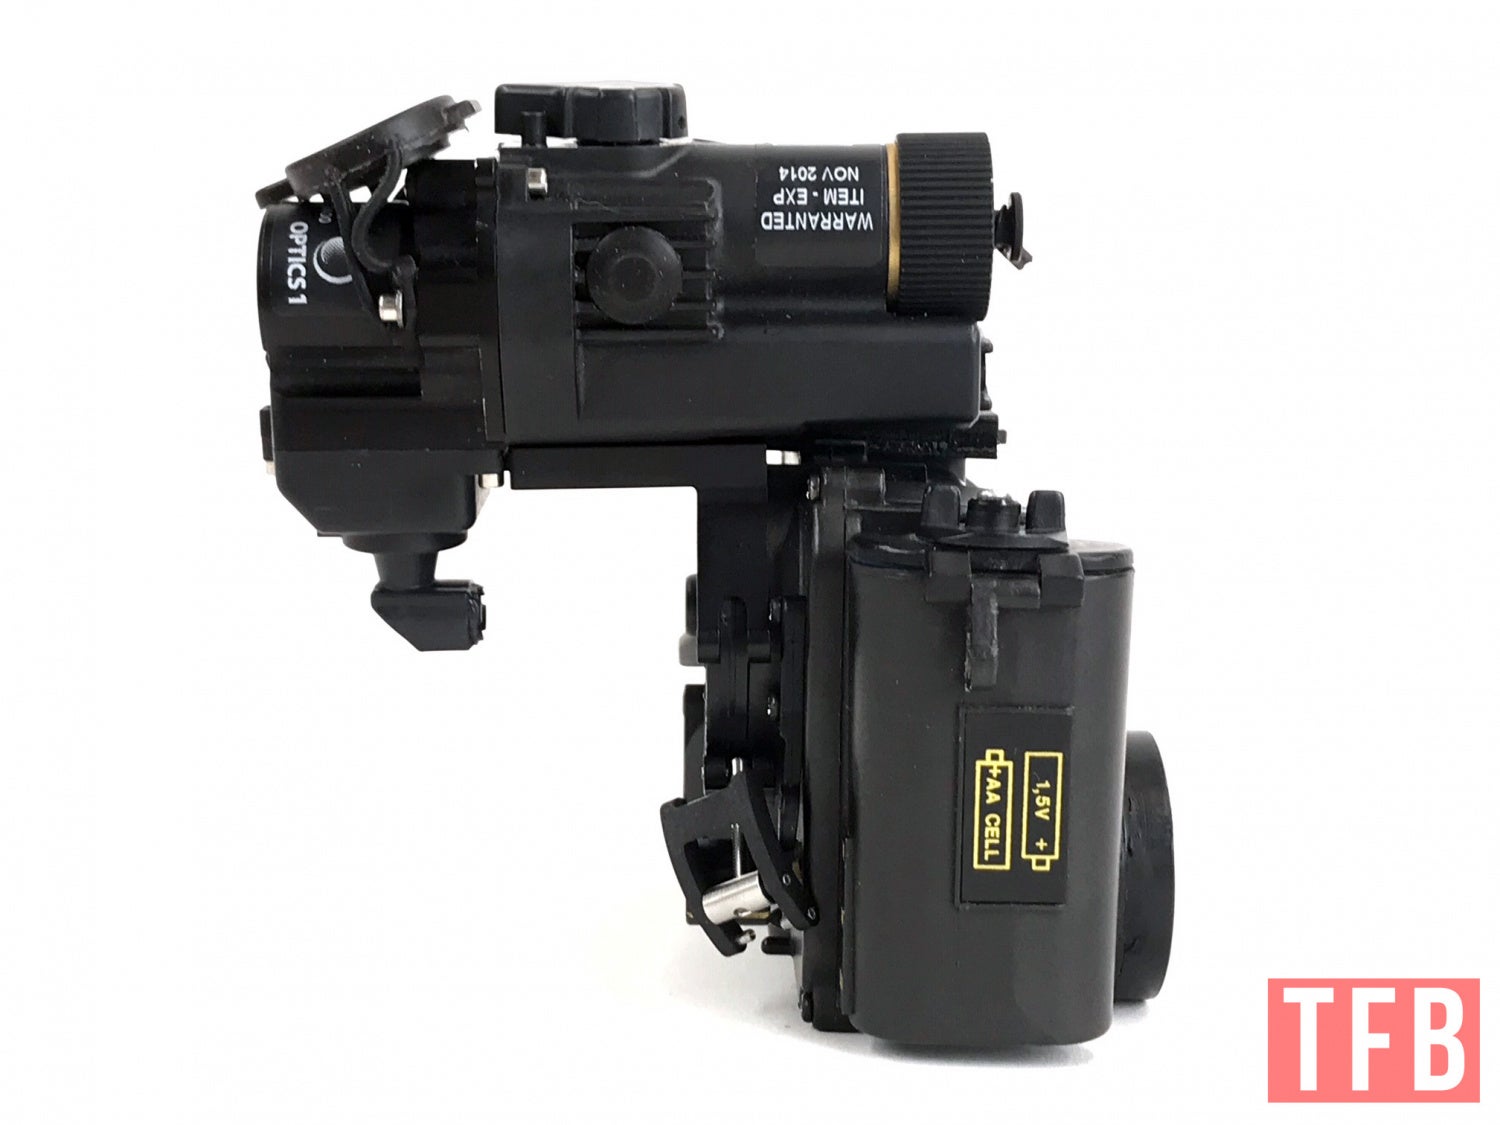
The SIMRAD GN1 is powered by two AA batteries.
The power switch is on the front of the housing. Rotate the knob upwards to turn it on, Click it up one more turn and the IR illuminator turns on. There is a plastic tab which you can see below. That is to block off the knob from accidentally activating the IR illuminator. However, B. Pedersen thinks I have an aftermarket switch.

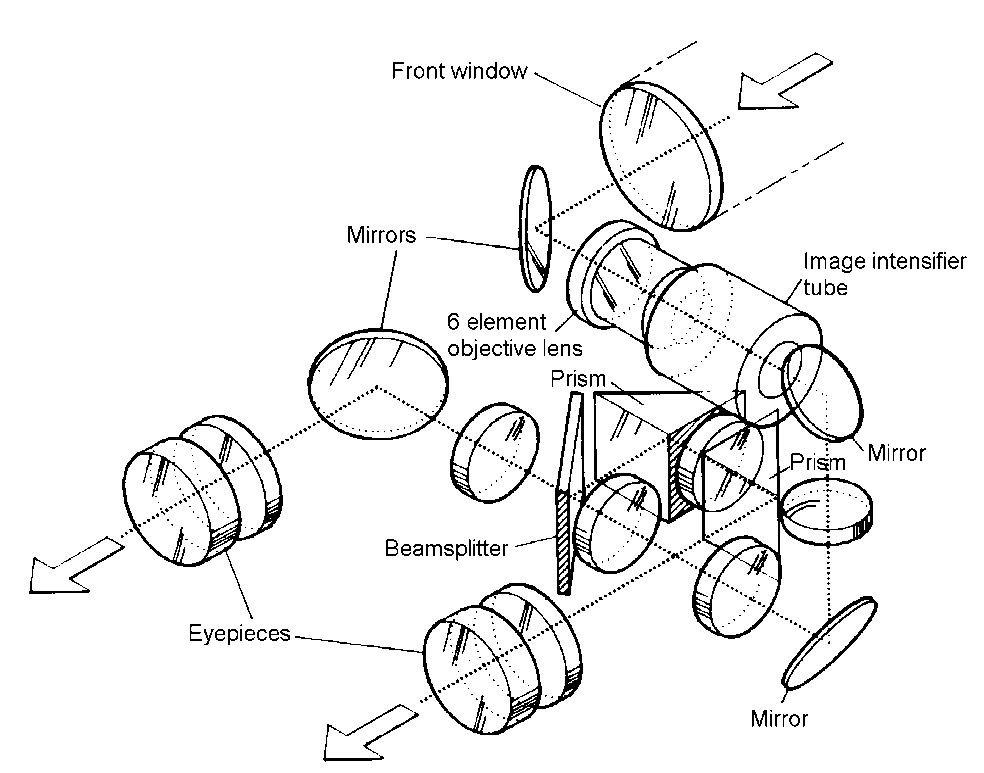
Why am I so excited about Lucie and now the GN1? While they are both biocular designs like the PVS-7, their design and aesthetics are a complete departure from traditional night vision goggles. It has a unique design that looks very industrial. It feels like this were pulled right out of a cyberpunk movie or Japanese Anime. The major difference between the GN1 versus the PVS-7 is how the NVGs are oriented. The PVS-7 is a straight forward linear design. Light enters the objective lens, goes through the 10130 image intensifier tube then the image goes through the collimator which houses a beam splitter. The flipped image is split to produce two identical images. The images on both sides then hits their respective mirrors to correct the image orientation and to get the images to shine through the rear eyepieces.

Yellow represents the image correct orientation. Blue is the mirrored image after hitting the beam splitter.
Building The SIMRAD GN1
I acquired the SIMRAD GN1 housing from an individual in Germany. Originally he was selling it with a Photonis intensifier tube. I have better tubes than that so he was willing to pull the tube out and just sell the housing to me. Which means I have to crack the housing open and install the tube myself. How hard could it be?
Installing the intensifier tube is actually very easy. You just need to remove 15 small screws so you can pop open the housing.

Below is what it looks like without the image intensifier tube. One of the cool things about the GN1 is that it takes regular ANVS style 10160 tubes. Whereas the PVS-7 and Thales LUCIE both take 10130 tubes. They are not interchangeable and the 10130 tubes are obsolete. No one uses them in modern night vision goggle designs. So while the GN1 design is 30 years old you can install a super tube with the best specs.

I made the mistake of removing this maze of mirrors. Remember how the PVS-7 bends light to get into your eyeballs? The GN1 is the most convoluted design I have ever seen in a night vision goggle. It is even more complicated than the PVS-21.
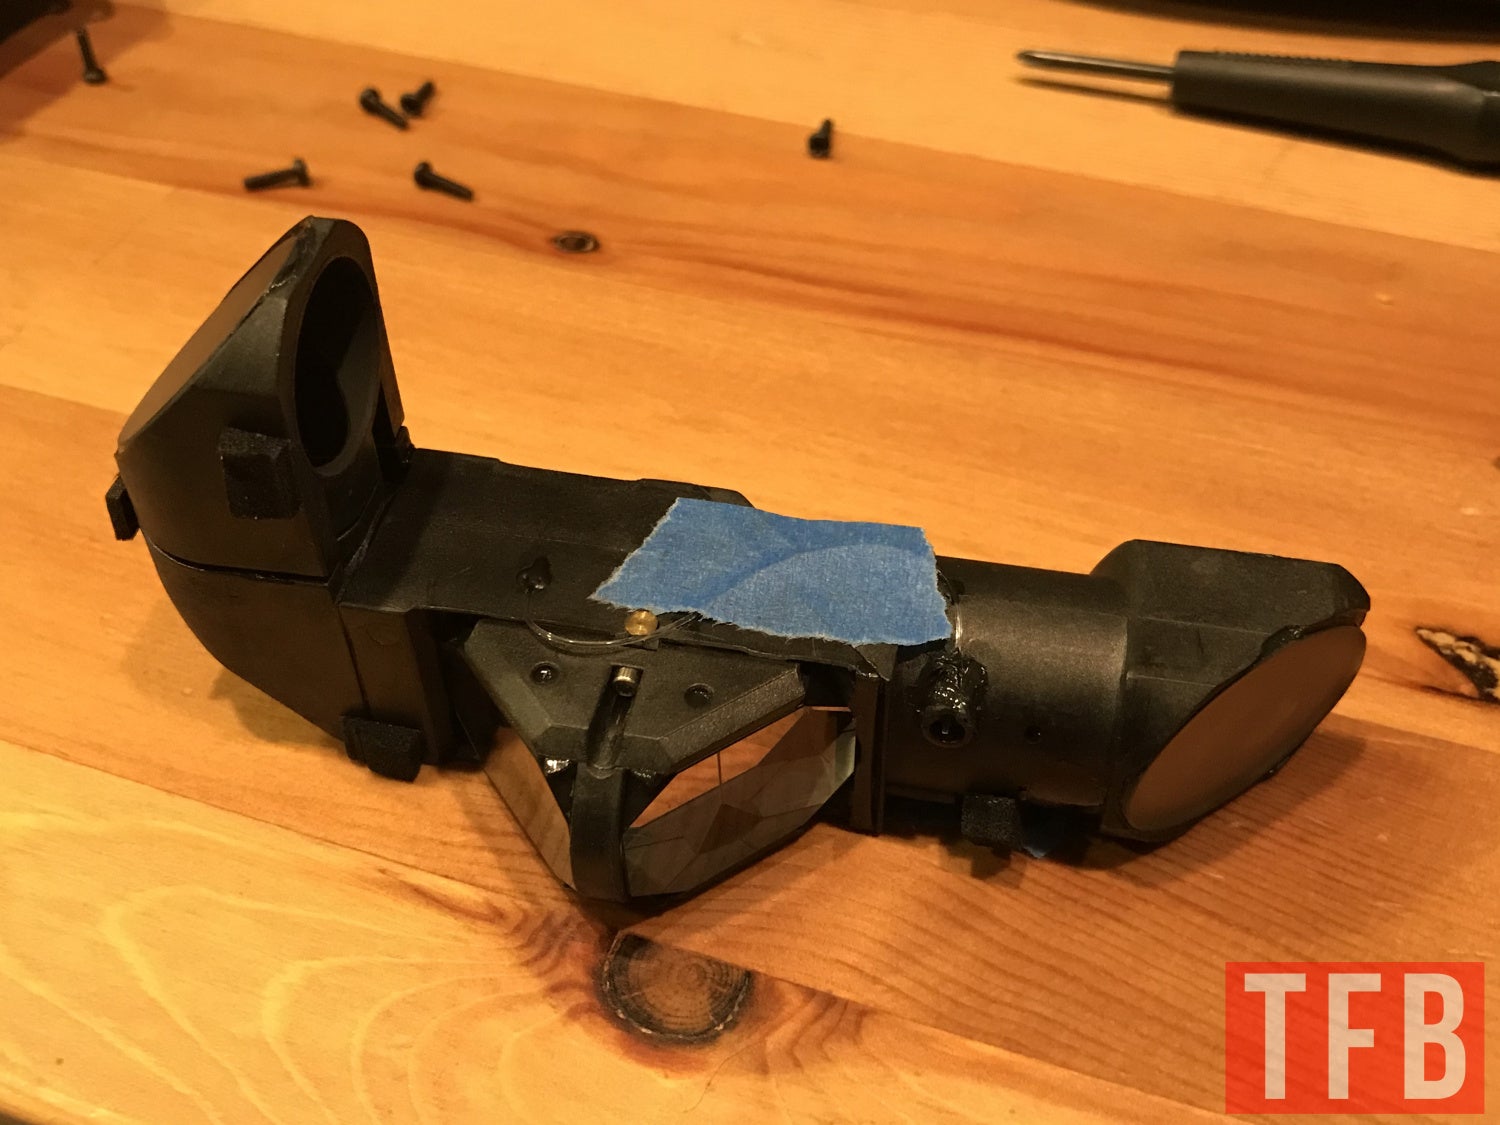
GN1 bends light with this hall of mirrors and prisms to get the light into your eyes.
The blue tape is holding the right periscope to the left side assembly. In between the two parts is a piece of coated glass that acts like a prism. It is oriented facing forwards to you the reader. I made a map to show the path of the light to share how complicated this device is.
So the yellow path is the light and image in the correct orientation. Every time it hits a mirror or prism the image is flipped/mirrored. So starting at the bottom of the photo below, light enters the front of the GN1 through the large window. It hits the mirror behind it and the light/image is bounced 90° to the left. The blue represents the image has been reversed from the mirror. There it continues through to the real objective lens and then into the image intensifier tube directly behind it. Light exits the tube and hits a second mirror that redirects the image downwards where it is met a third mirror which bounces the light back to the right underneath the image intensifier tube. Here is where it gets tricky. The image is still mirrored. It hits the thin prism and the image is split. The green path is one image which continues inline to a fifth mirror which bounces the image and corrects the mirroring for your left eye. Going back to the prism, the same image is bounced off the prism (the fourth mirror), corrected for mirroring and now it goes forwards out of the housing and hits the sixth mirror where the image is flipped again. Here the light makes a sort of U-Turn by hitting the seventh and last mirror which finally corrects the image for the mirroring so your right eye can see the same image as your left eye.
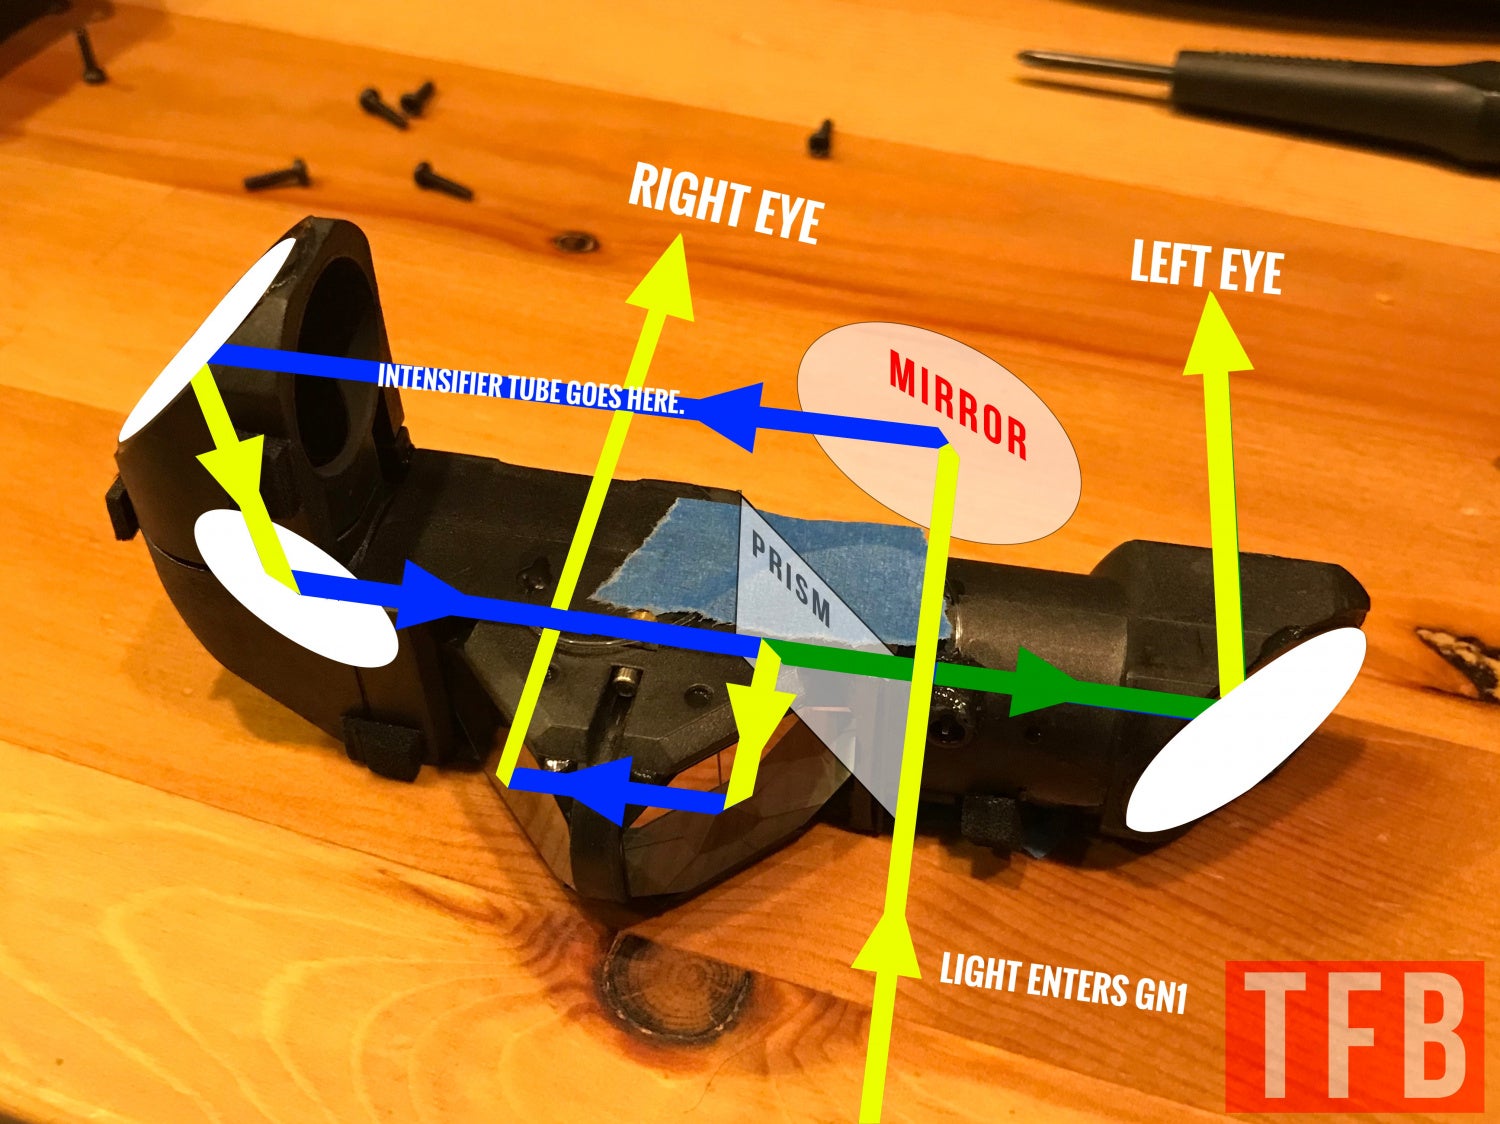
I am not sure why the SIMRAD GN1 needs to have that complicated set of turns at the prism. Instead they could have moved the prism glass over to the left. This way the image immediately bounces into your right eye and the split image continues its way to the fifth mirror and bounced into your left eye.
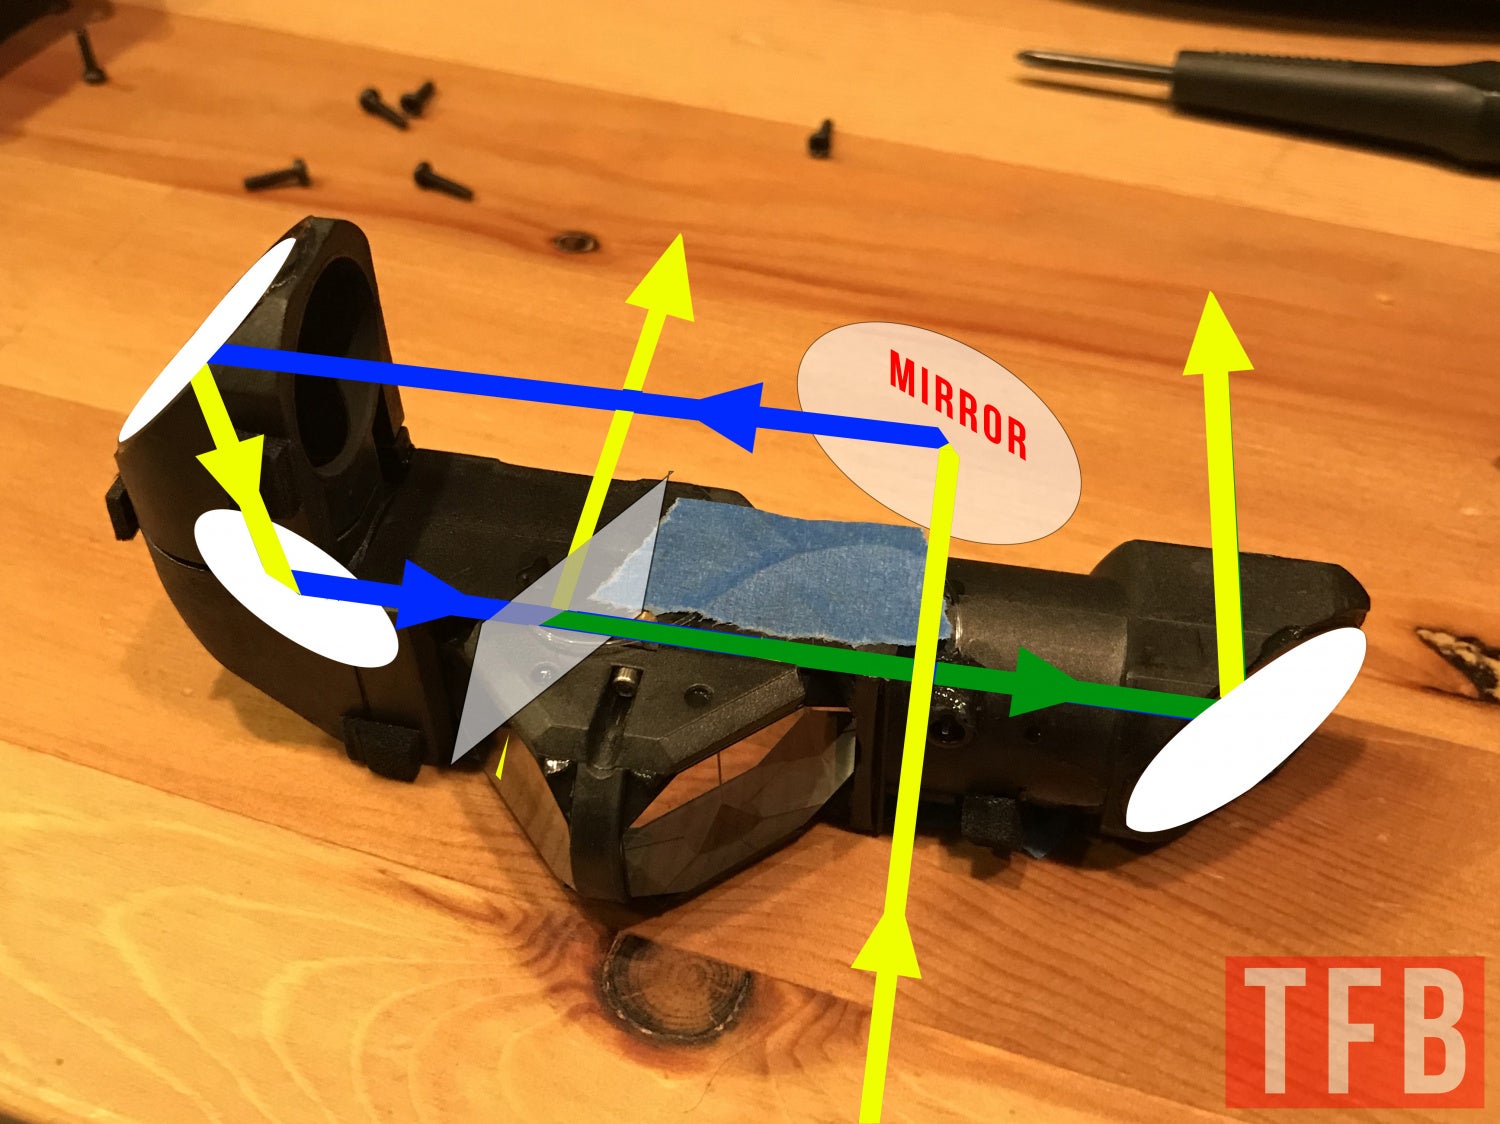
According to my friend Jayden of VG6 Precision, he used to do this type of optic design work when he lived in South Korea. The reason SIMRAD has the dual prism turn around for the right eyepiece is to keep the length of the light path the same as the left eye.
Another big thanks to B. Pedersen he got me digital copies of the manual and parts/accessories catalog and I pulled some of the technical drawings from those documents. Below is a diagram of the optical path. I got pretty close. But I did not realize that the hall of mirrors has so many lenses in it. Also what I labeled as a Prism is labeled as a beam splitter below.
My GN1 has some spots on the mirrors that won’t go away. There are some in the left eyepiece as well that do not show up in the right eyepiece. This is one of the downsides to the GN1 design. So many mirrored surfaces it is easy to get dust on them and cause artificial blems.

Here is what the front plate looks like from the inside. There is an IR LED illuminator and a red indicator LED. The red LED turns on when you activate the IR illuminator. The red LED light is carried into the field of view of your right eye via a single strand of fiber optic that is epoxied to the hall of mirrors.

The two screws in the front of the housing are there for purging and nitrogen fill.

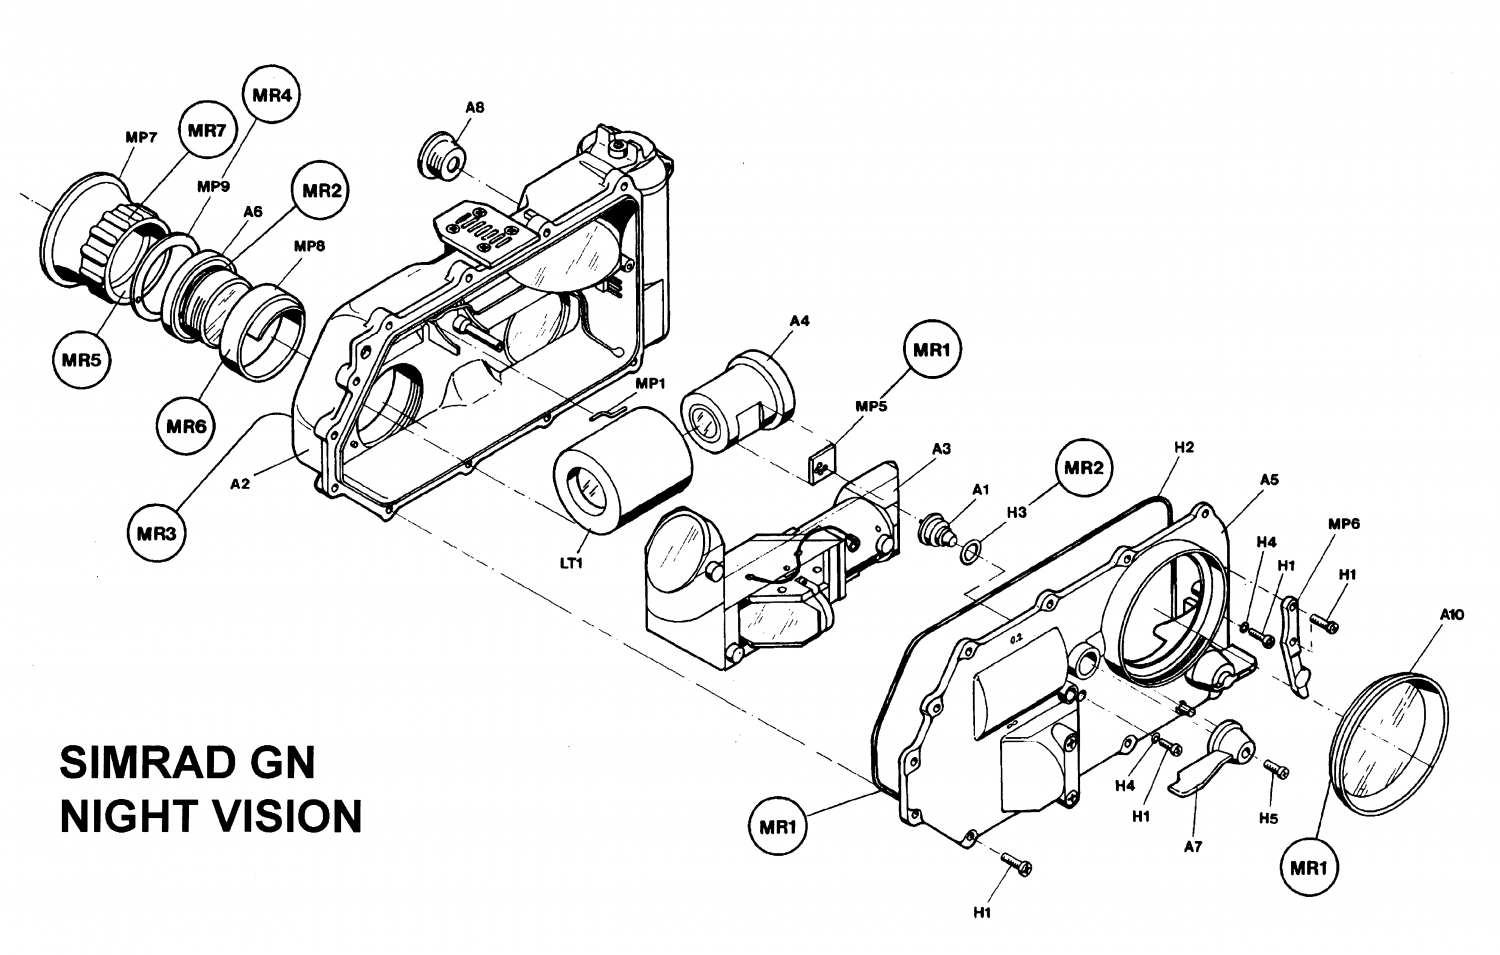
Here are some exploded diagrams from the GN1 manual.

In the manual there was a fantastic diagram of an image intensifier tube.

It says Phosphorous screen but it should be Phosphor screen.
5.0TECHNICAL SPECIFICATIONS
5.1OpticalNominal Values
Objective lens:
- focal length 26 mm
- relative aperture f/1
Magnification x1
Field of View 40o
Focusing range 0.2 m to ∞
Eyepiece diopter adjustment +2 to -6 D
Eye relief distance >20 mm
High contrast resolution 1.5 mrad
Interocular distance 66 mm
Exit pupil diameter 9 mm
5.2Physical (incl. batteries, excl. headmount)
Weight390 g
Size (wxhxd)155x73x58 mm
5.3Electrical
Power source2 standard 1.5 V AA cells
IR sourceLED
Battery life>80 h
Battery life, IR source on>40 h
5.4Image Intensifier Tube
Type of image intensifier tubeGEN 2 or GEN 3
5.5Environmental
Operating temperature-40 oC to +52 oC
Storage temperature-40 oC to +65 oC
Immersion1 m for 7 h
10 m for 2 h
Wearing And Using The GN1

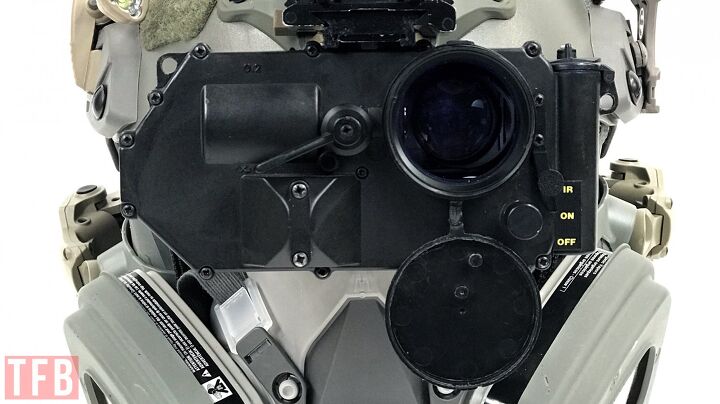
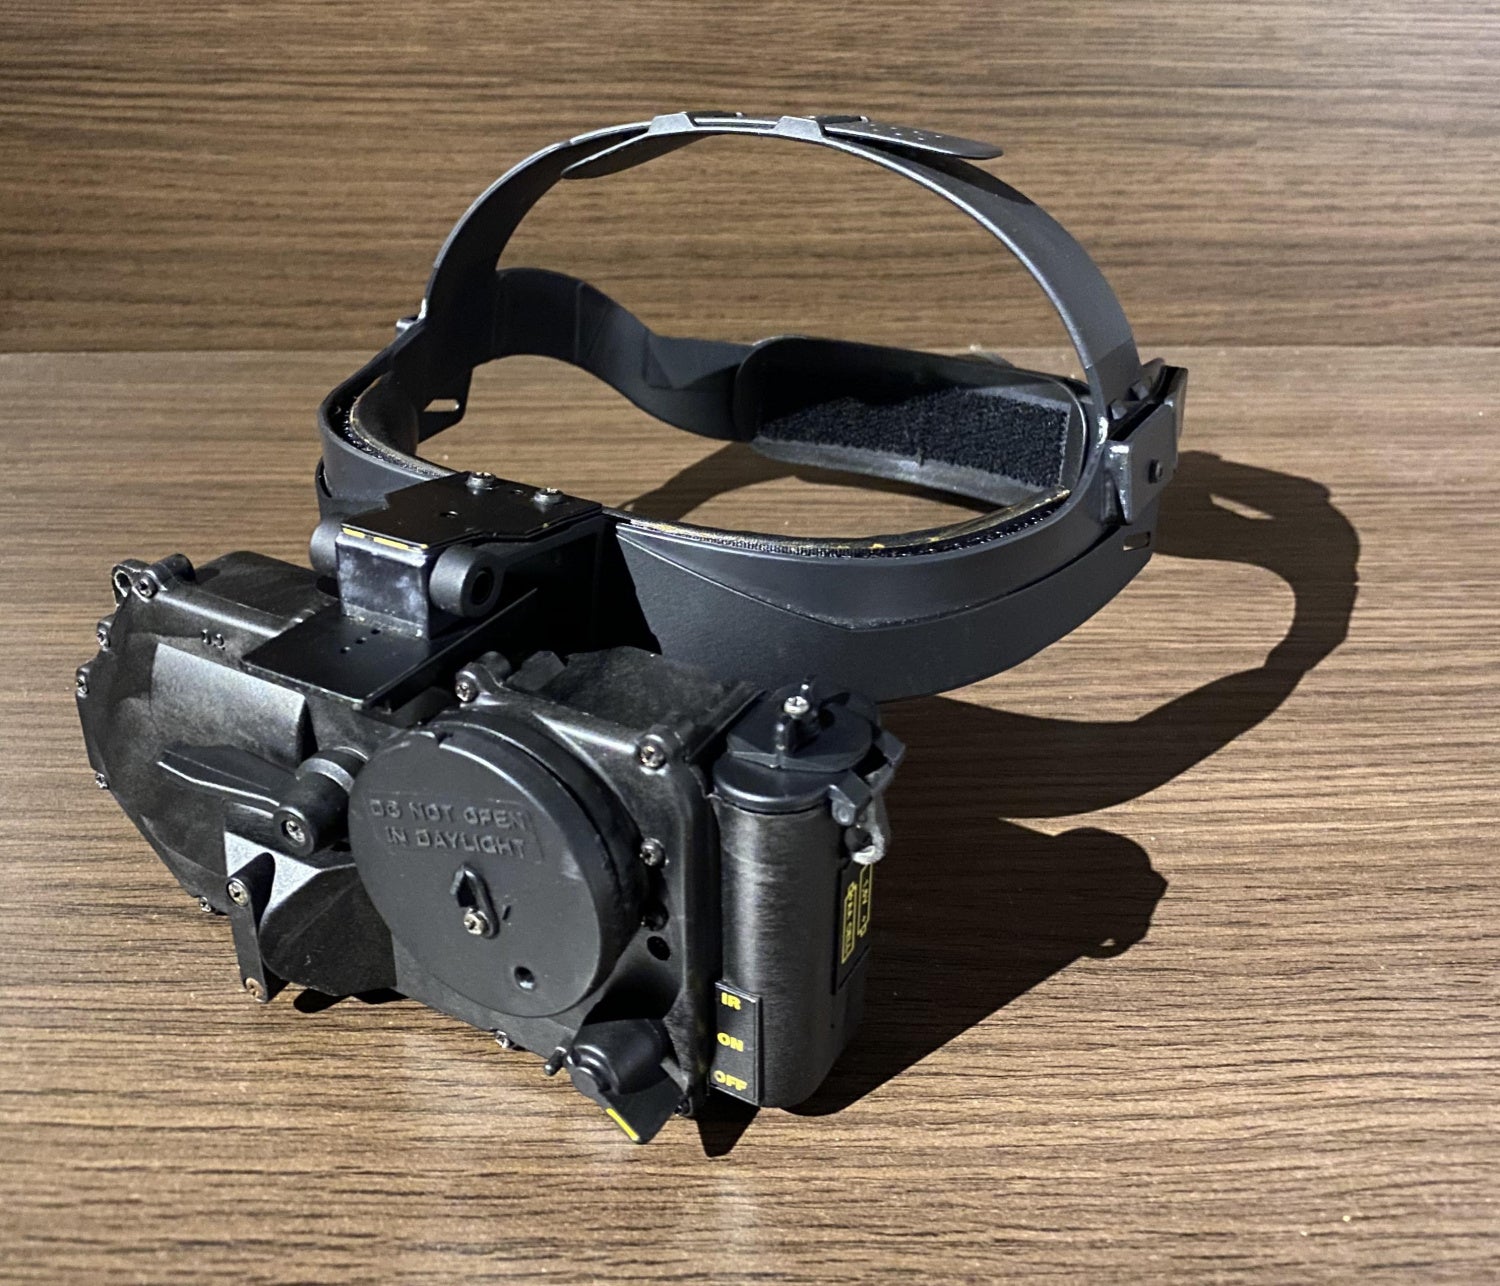
The GN1 was designed to be worn with a skull crusher. My GN1 came with one but it has seen better days. As you can see in the photos below, the GN1 is extremely low profile. 

Here is a photo I found online of a similar skull crusher but it looks updated. Mine has velcro straps This one does not. You will notice the GN1 in the photo below has a different style of power switch knob than mine. The knob has a large paddle. But that particular unit is missing the lockout tab like mine. If it had it, the paddle would hit the tab. Requiring you to push the tab down so the paddle can swing over the tab and activate the IR illuminator.
Since the GN1 is from the 90s, it predates the use of dovetails like the Wilcox dovetail and those found on Litton PVS-15s. The SIMRAD GN1 uses a proprietary plate to attach to the skull crusher mount.
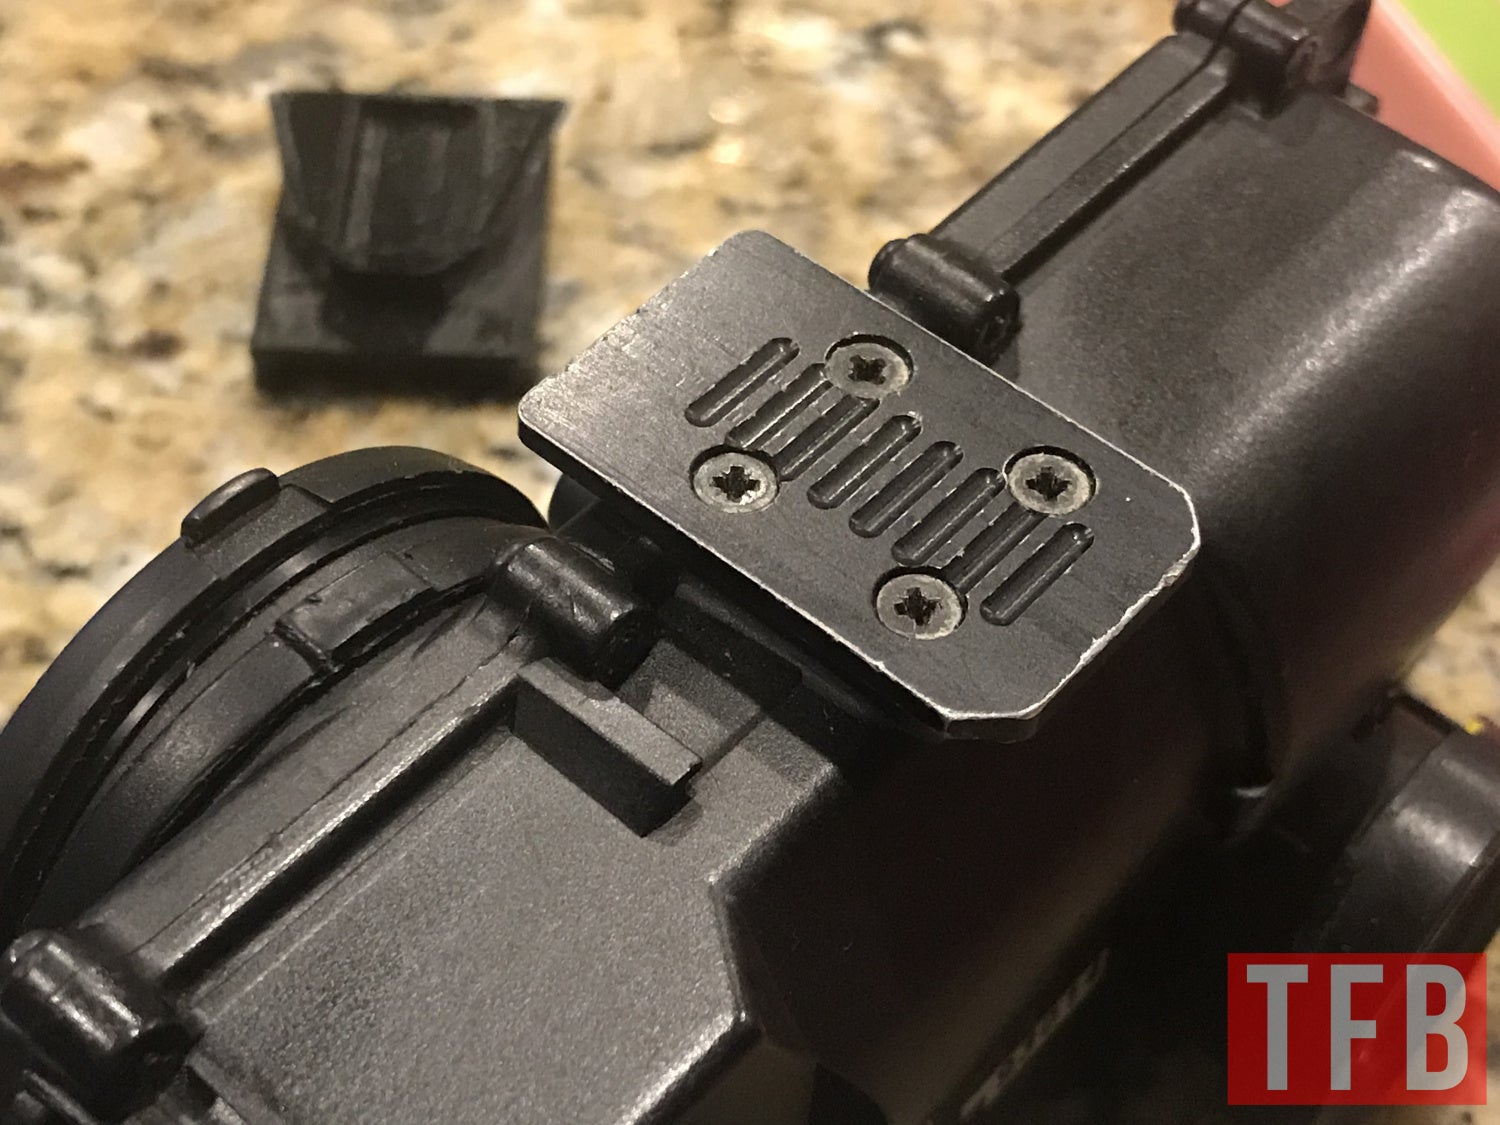
It is odd seeing the juxtaposition of the overly designed GN1 and the overly simplified mount on the skull crusher. It is like they spent all their time and energy on the goggles that they just whipped the mount up in less than an hour and called it a day.

It is just a piece of angled steel. Like two plates fused 90° to each other. There is a hinge so the mount can fold the goggles up. Tension is held in place by a flat steel plate.


Unfortunately, the mount design only allows for the goggles to lift up 90°.
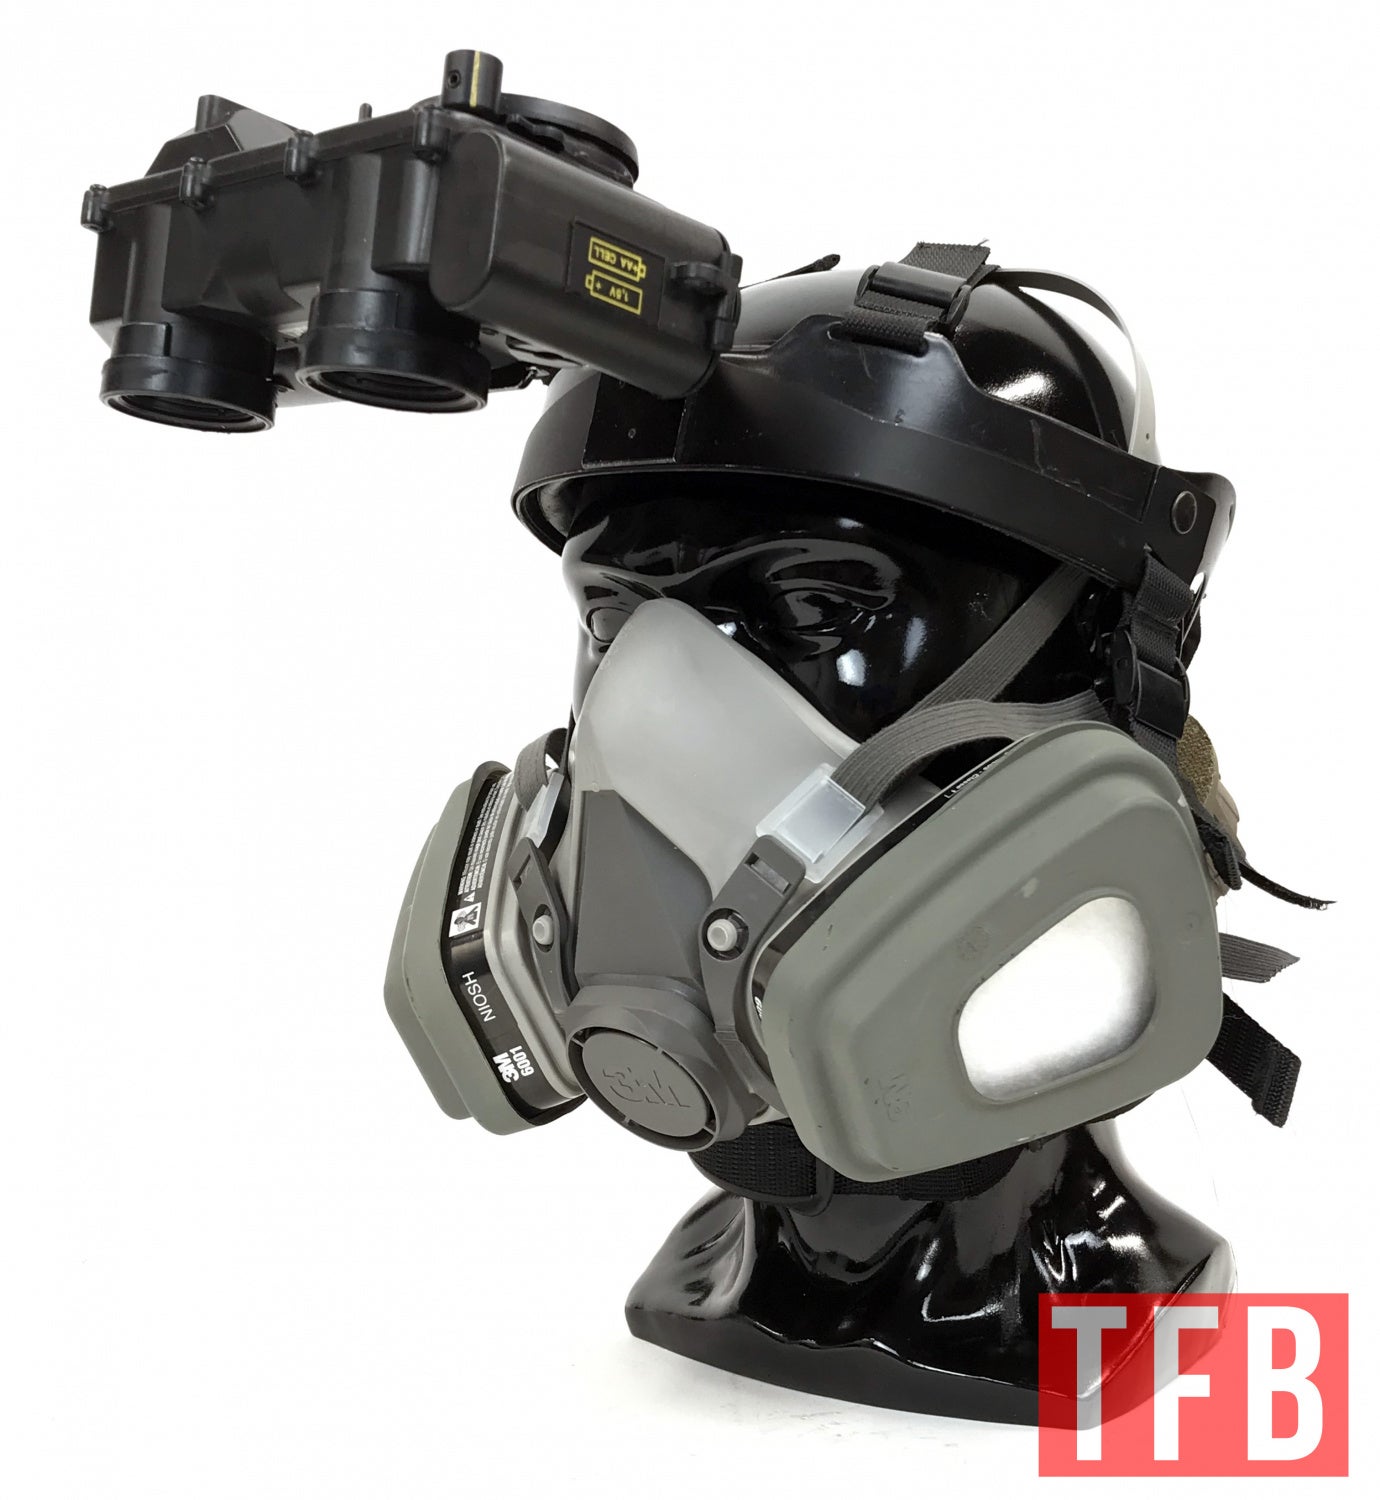
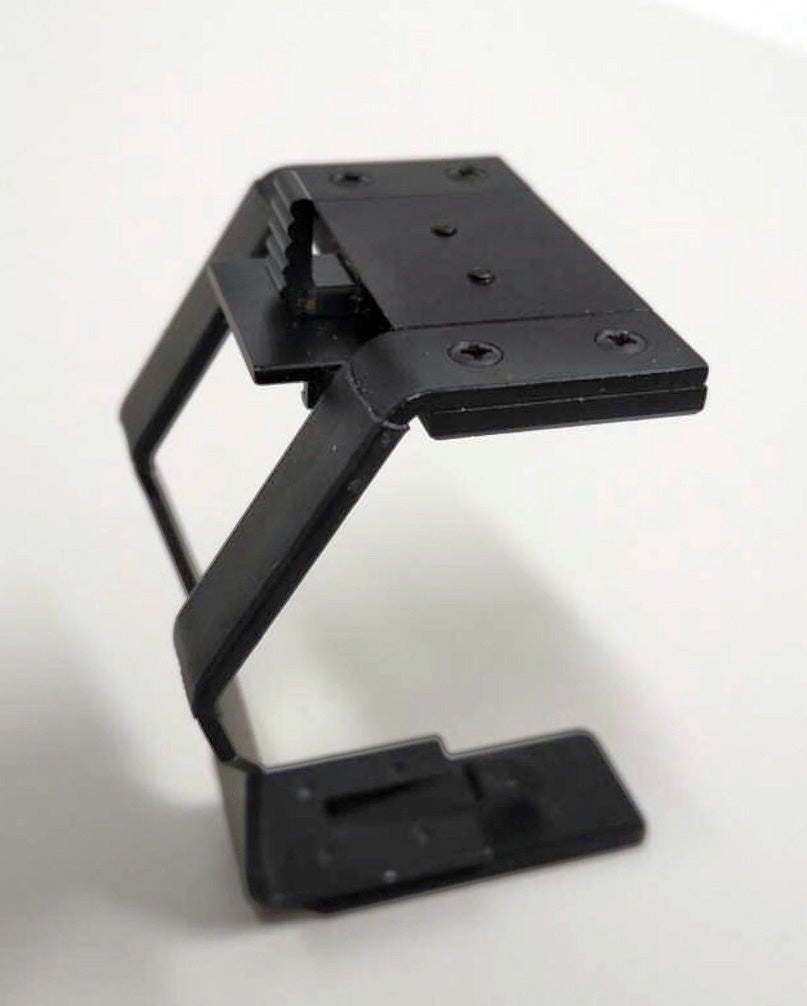
The guy I bought the GN1 from included this 3D printed dovetail adapter. It simply slides over the factory plate and allows me to use modern night vision mounts.
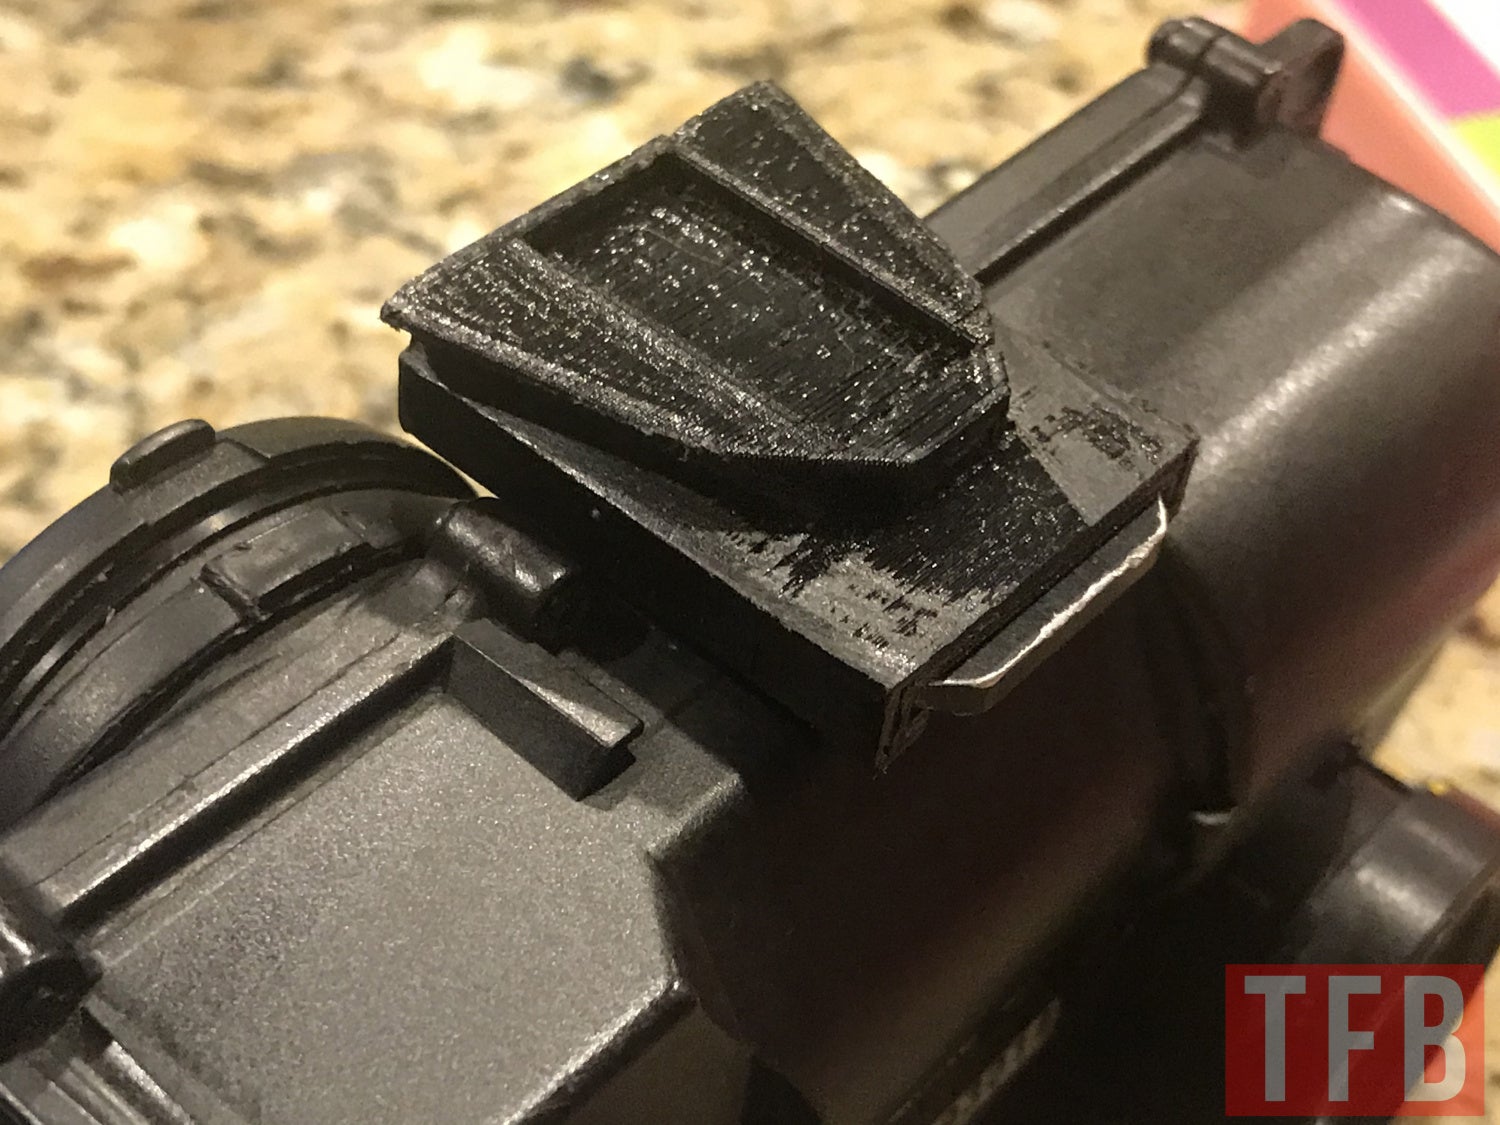
That is how I was able to mount the GN1 to my helmet.

While this works, it is not ideal. The GN1 was designed for use with a skull crusher, not a helmet. However, SIMRAD eventually made an adapter for the GN1 for use with helmets.
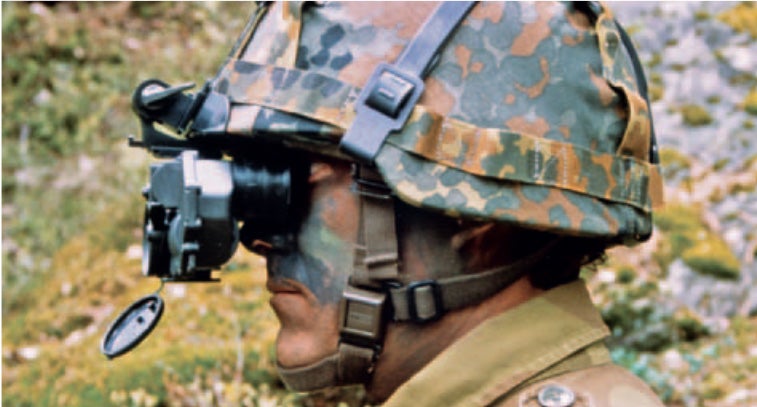
Photo by Rheinmetall Defense.
How did you fit the GN1 under the helmet?
I was inverted.
Yes, they turned the GN1 180° and suspended the unit with a bracket. If you notice the normal orientation of the GN1 positions the eyepieces low near the bottom of the GN1 body while the rest of the housing sits higher. This prevents the GN1 from getting closer to your eyes. Take a look again at the photo of the soldier above. If you turn the GN1 upside down, the eyepieces are higher up which means nothing else is above them to hit the helmet.
Here are some photos B. Pedersen sent me of how the inverter bracket looks like.


Rheinmetall has a new mount with a hinge that allows the GN1 to fold all the way up.
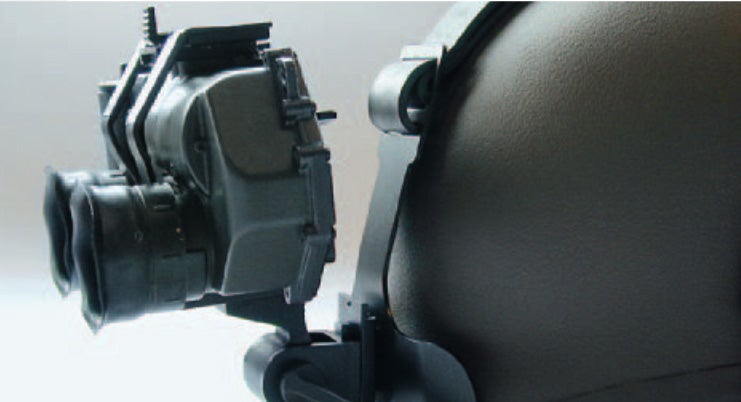
Photo by Rheinmetall Defense
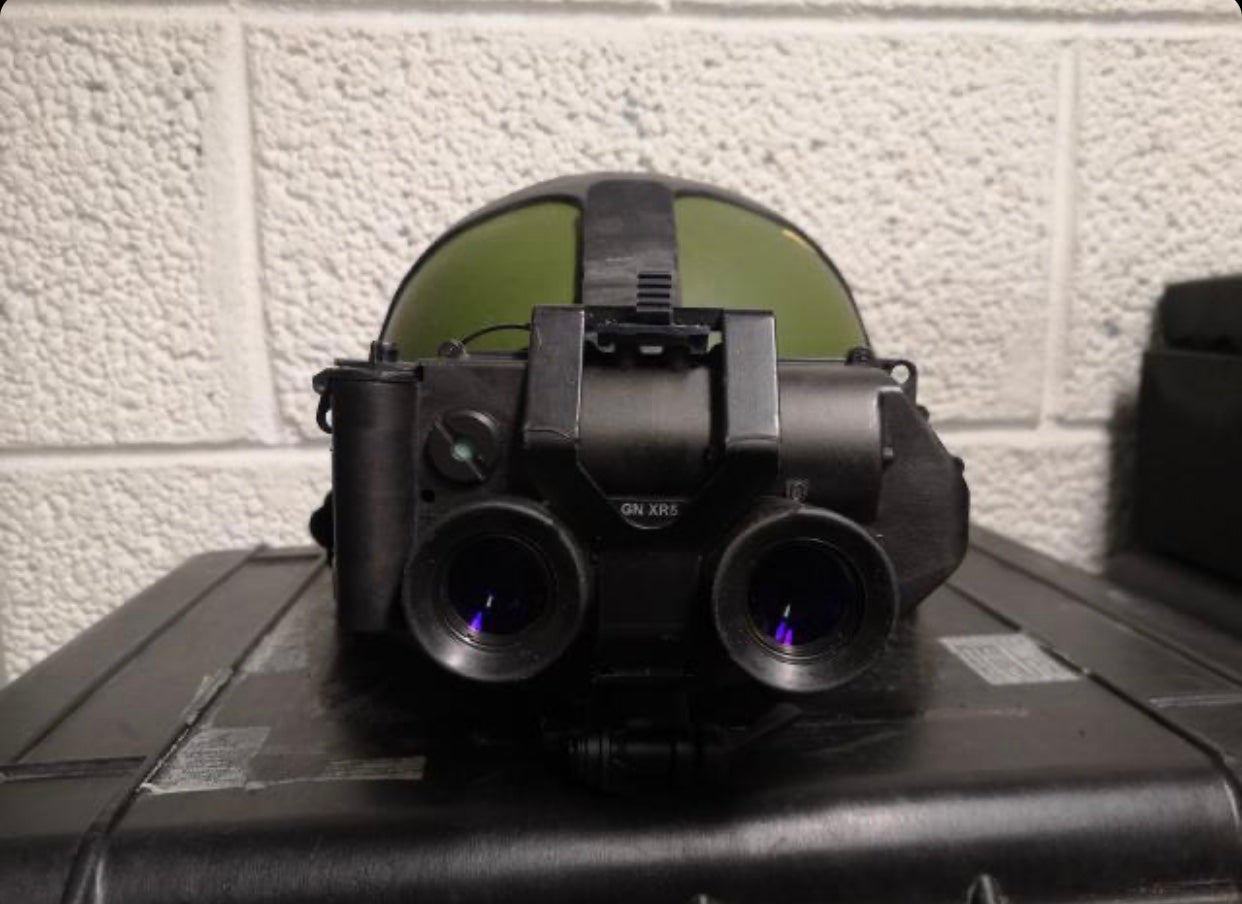
Photo by B. Pedersen

Photo by B. Pedersen

Photo by B. Pedersen
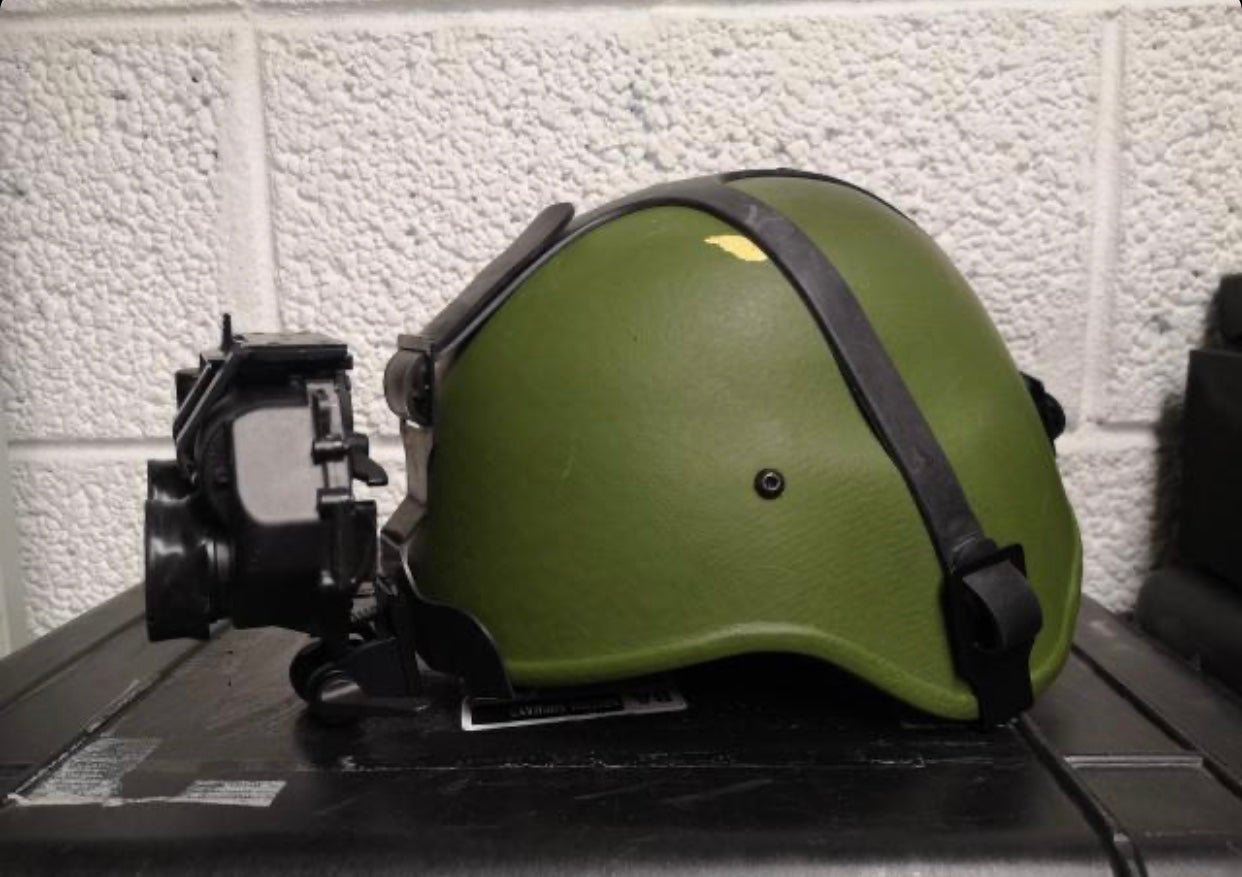
Photo by B. Pedersen
Aiming With The GN1
So shooting guns with a biocular night vision device like the PVS-7 or in this case, the SIMRAD GN1 is not as easy as shooting with a monocular like a PVS-14 or dual tube set up. The problem is where the objective lens is positioned on the housing. The PVS-7 positions the objective lens in the middle of the housing. While it is not inline with your left or right eye, it is at the same height as your eyes. So if you used a pistol with a red dot, you could easily aim passively. Even though the GN1 objective lens is on the left-hand side of the housing you could use a handgun with a red dot. However, trying to passively aim through a rifle optic would be very difficult. The problem is how high the objective lens is in relation to the eyepieces. This means your optic has to be even taller to be in view of the GN1 to look through it.
Inverting the GN1 with the inverter adapter bracket repositions the objective lens lower and on the right-hand side. Great for right-handed shooters but not for left-handed shooters. Now the objective lens if low and to the right. Perfect for rifle optics at a normal height like lower 1/3 or absolute co-witness.
Here is a little experiment hand holding the GN1 upside down while looking through a Leupold LCO and Leupold D-EVO. By inverting the objective lens, it positions it lower and makes it perfect for aiming passively through normal height rifle optics.
GN1 Thermal Fusion
Using a larger diameter bracket I was able to mount my PAS-29 COTI to the GN1 and achieve thermal fusion.

Due to the way the mount is attached, I cannot bring the COTI closer to the objective lens so the field of view is smaller than normal.
Final Thoughts About The GN1
The concept and execution of GN1 is amazing. It just looks so cool and it works well. Even though the hall of mirrors seems overly complicated, it manages to keep everything in a small and compact system. Almost as if they folded a night vision goggle into itself to keep it small.
I have one gripe about the GN1 and this applies to the LUCIE as well (as far as I can tell from photos of the LUCIE). It is the fact that you cannot adjust the eyepieces to match your PD (Pupillary Distance). It is fixed and I find it a hair too wide for my liking. The GN1 has a 66mm PD according to the manual. I have a 60mm PD. The PVS-7 does have adjustable PD but that system is very simplified making it easy to incorporate PD adjustments. In order for the eyepieces of the GN1 to translate left and right, the beam splitter and fifth mirror, for the right eye, would have to be able to slide left and right with the eyepiece. And there is no room for it to do that.
Speaking of eyepieces, when I first installed a tube into the GN1, I used my blemished Harris filmed white phosphor tube just to have white phosphor in the GN1. I fired up the GN1 and noticed immediately something was going on with the prism and it affected the color of the white phosphor image.

Left eye white phosphor. You can see the black specks, those are blems in the mirrors but don’t show up in the right eye image.
Take a look at the two images. The top one was taken looking through the left eyepiece. Below was taken looking through the right eyepiece.

Right eye image has a green tint compared to the left eye.
This is not a discrepancy due to the iPhone camera white balance. I have seen some cameras film white phosphor and it turns the image more blue or gray compared to the iPhone image. But these two photos were taken with the same phone and it is a pretty close representation of what I saw with my own eyes looking through the GN1.
I switched out the tube for my blemished PSQ-20 Insight image intensifier tube. It has a weird pigtail that wraps around the body of the tube and adds two more contact points to the tube. The ribbon is rather thick and gets shredded when I install that tube into a tight housing like a PVS-18. Since the GN1 is a simple clamshell and you drop the tube in sideways there is no risk to further damaging the pigtail. Also this tube has a unique pseudo crosshair looking blemish and in a biocular device, both eyes will see the same blem. In a binocular system, it is possible to have tubes with the same blem. Especially if they were both on and looking at the same thing when the blem happened. Often these two blems will collimate and you will see just one blem but for some people, they still see two blems.

I paid $1800 for the GN1 and that was without an image intensifier tube. While that is more than a complete PVS-7 or dual tube night vision housing, I was fine with that price given how rare these are. I plan to make a custom adapter that will allow me to use Wilcox dovetail more securely than a friction fit 3D printed part. At the same time, I plan to make a custom bracket that will allow me to attach a dovetail to the bottom of the GN1 so I can invert the GN1 for use with rifle optics.
At the moment the GN1 eyepieces do not allow for the use of PVS-14 style eyecups or retaining rings. The eyecups that came with the GN1 felt gross and slimy so I ripped them off. I don’t like running eyepieces but I do want to make an adapter to attach my LPMR PV recorder so I can film what I see while wearing the GN1 and the LPMR mounts to a PVS-14 eyecup retaining ring.
While I love the GN1 for its unique looks and design, it is relegated to recreational use. I would always prefer to run my regular dual tube night vision goggles for shooting guns in the dark or if I want to drive a car at night with the lights off. Binocular systems give you better spatial awareness than a biocular system. Try walking around and reaching for things with only one eye. Sort of like that with the GN1 but both eyes sees the same image. I hope you enjoyed this edition of Friday Night Lights. I enjoyed sharing this interesting piece of Norwegian Night Vision.