 Your Privacy Choices

When I teach people about precision rifle shooting I like to explain the rifle is a tool, while the scope is a ruggedized precision instrument. Each click of the turret only moves the erector assembly about 7/10 of a thousandth (.0007) of an inch. For perspective, a typical sheet of printer paper is 3 thousandths (.003) of an inch or about 4 times thicker. Consistent scope tracking is critical to a shooter’s ability to dial the required elevation for a shot at a given range and make a first-round hit. I say “consistent” vs “accurate” for a reason. We will cover that more in the “Accounting for Error” section. In this article, I will cover 3 ways to test how accurately your scope is tracking. I will also provide some ways to work with a scope that is not tracking 100% correctly.
What is Scope Tracking?
Scope tracking is the act of ensuring the movement of the erector assembly and consequently, the reticle matches the value denoted on the scope’s turret (ie. 1/10 Mil. or ¼ MOA). An additional aspect of scope tracking is return to zero. If a scope tracks 100% correctly it will return to zero, but not all scopes that return to zero track 100% correctly.

Scope dial reads 14 mils. That is 140 clicks. If this scope tracked 4% shy it would only be around 13.5 mils of actual internal adjustment.
Why is scope tracking important?
If you are a Minute of Paper Plate (MOPP) shooter and don’t any shoot further than 200 yards you have nothing to worry about, continue on with your ways and disregard this article. If, however, you are a shooter looking to eliminate variables in your shooting system to allow you to make accurate and precise shots at long range, scope tracking is a must.
Let’s look at it this way. Say you are shooting a 6.5 Creedmoor that needs 10 mils. of elevation to reach 1000 yards. Unbeknownst to you, the optic you are using is tracking 4% shy. So, you get your “come-up” of 10 mils. and dial your scope up to 10 on the elevation knob. You take a deep breath, exhale fully and squeeze the trigger. Miss. You hit low by about 14 inches. Now you start asking yourself, “Did pull the shot at the last second?” “Did I have a slow round?” “Maybe a downdraft.” Nope, none of the above. It was simply a mechanical error in your rifle scope. The dial read 10 but the erector assembly holding the lens with the reticle on it had only moved enough for 9.6.
How to find the error
Like most things in life, you get what you pay for. The same is true with scope tracking testing. Below are three different options for testing a scope, each with its own level of precision and subsequently cost.
The Collimator
Advantages: This form of testing is done in a very controlled environment, therefore, atmospheric variables like humidity or the direction of the light are controlled for, which leads to accurate and repeatable results
Disadvantages: The cost is far beyond what the average consumer can spend to test their scope.
Summary of Method: A collimator is a device which focuses light into parallel or “collimated” beams. For the purpose of this article, we are talking about the industrial-grade versions most scope manufacturers use in the building and testing of their scopes. A good collimator can cost between $9,000-$15,000. Using this method a scope is placed in a rest (precision V-blocks) and the tester views a collimated image of a graduated scale (Mils. or MOA) The tester can then dial a change into the erector assembly via either the elevation or windage turret and observe if the reticle moved the appropriate distance on the collimated scale. See this youtube link for an example https://www.youtube.com/watch?v=gdq-keZWZXU.

Photo courtesy of Zero Compromise Optics. View through a scope on a Collimator
Scope Tracking Base
Advantages: Less costly and more portable than a collimator. Eliminates the shooter and rifle from the equation.
Disadvantages: Testing is generally conducted in a less controlled environment and therefore optical effects like mirage or the effects of Snell’s Law can contribute to error.
Summary of Method: This is the method I use for all of the scopes I put on customers rifles as well as my own. Here is a link to my review of the tool I use https://www.thefirearmblog.com/blog/2019/04/24/targets-usa-scope-tool/. I am confident that similar results could be achieved through the use of a homemade fixture as long as the scope does not move during testing. The process goes as follows: A target with fixed measurement points is set up at an exact known distance (i.e 3.6 inches at 10 yards or 36 inches at 100 yards, both should read 10 Mil. in the scope). Next, the parallax is dialed out of the scope. This can be checked by changing your eye position behind the scope vertically (nodding) or horizontally (shaking your head) ensuring the reticle does not move in relation to the target. After the parallax is removed the subtensions in the reticle can be checked against the reference target. At this point, things are pretty much the same as the collimator. The turrets are dialed and the results are viewed against the reference target.

The scope tracking base I use as well as my graduated test target.
Live Fire/Box Testing
Advantages: No extra equipment required. It has the potential to show how the scope will perform under recoil.
Disadvantages: Does not control for the above mentioned optical effects. Does not control for environmental effects on the projectile. Does not control for the accuracy of the rifle/shooter combination.
Summary of method: As a gun-writer specializing in long-range shooting, nothing drives me crazier than reading an article or seeing a review in which the reviewer qualifies a scope’s tracking ability by showing how it performed in a “box test”. Usually, these boxes measure less than 18 inches corner to corner and at most, the shooter fired 3 shots per location. On top of all that the groups are usually in the neighborhood of ¾ MOA and invariably the reviewer looks at it and says “this scope tracked pretty good.”
Let’s take a closer look at this practice. First, at 100 yards, which is where these tests are usually shot, 18” only represents 17.19 MOA or 69 clicks. For a Mil. scope it only represents 5 Mils. or 50 clicks. Since 50 is a round number lets use Mils. for the rest of this example. The final key piece of information for this equation is at 100 yards .1 mil/ per click equals .36 of an inch. So, if the shooter’s deviation in group size is .75” that is more than 2 clicks ( 2 clicks of 50 is 4%) on the turret. The error can hide within the group size. This means a scope would have to be tracking at least 5% off just for the effects to show up on target.

Don’t be a MOPP/FUDD
My recommendations for making life fire testing as effective as possible are as follows:
Shoot the test at 50 or 25 yards depending on how close your scope will focus or be parallax free. This will allow you to 1) Get more adjustment on a smaller target. 2) Be less affected by environmental factors. 3) Have a more refined point of aim. 4) More easily measure out the exact distance to the target with a measuring tape. Move the scope 100 clicks (this will make the math easier). Shoot 5 shots or perform the test multiple times and take the average (larger statistical sample size.) Use the ballisticX app for very precise measurements and adjustment to zero corrections based on the group average. In the photo, you can see my $200 Bushnell from 10 years ago tracks strong at 110% (Actual Point of impact ATZ divided by predicted dialed point of impact ATZ multiplied by 100 for percent) 10.96 mils. (ATZ actual) divided 10 mils (ATZ predicted) equals 1.096 multiplied by 100 equals 109.6%.

Using BallisticX to accurately measure group center and distance to Point of Aim (POA)
Accounting for Error
In the example above my old bushy was tracking around 110% (Good effort). This basically means for every 10 clicks I get 1 extra. One easy way to work around this is not to dial at all. If the scope has a good reticle I can use that instead of dialing. My Bushnell has a Mil-Dot reticle so I can just use holdovers. If I need more elevation than the 5 mils. below the crosshair, I can simply zero where the thin line meets the thick line in the upper portion of the reticle. This would essentially give me 10 mils of hold-over reference points. At this point, all I am asking my $200 scope to do is hold zero. If I am set on dialing I can do 2 things. 1) Use the rule of thumb method in my case I would just dial 9 clicks for every 10 called for in my data, i.e a come-up of 5.2 mils. is 52 clicks (5 groups of 10 clicks). I will dial 5 clicks less than 52 which would be 47 clicks. 2) The other, more accurate, approach is to enter percent error into your ballistic calculator. In Applied Ballistics it is called the “correction factor” in my case I would have a correction factor of 1.096 which represents the scope tracking strong at 110%.
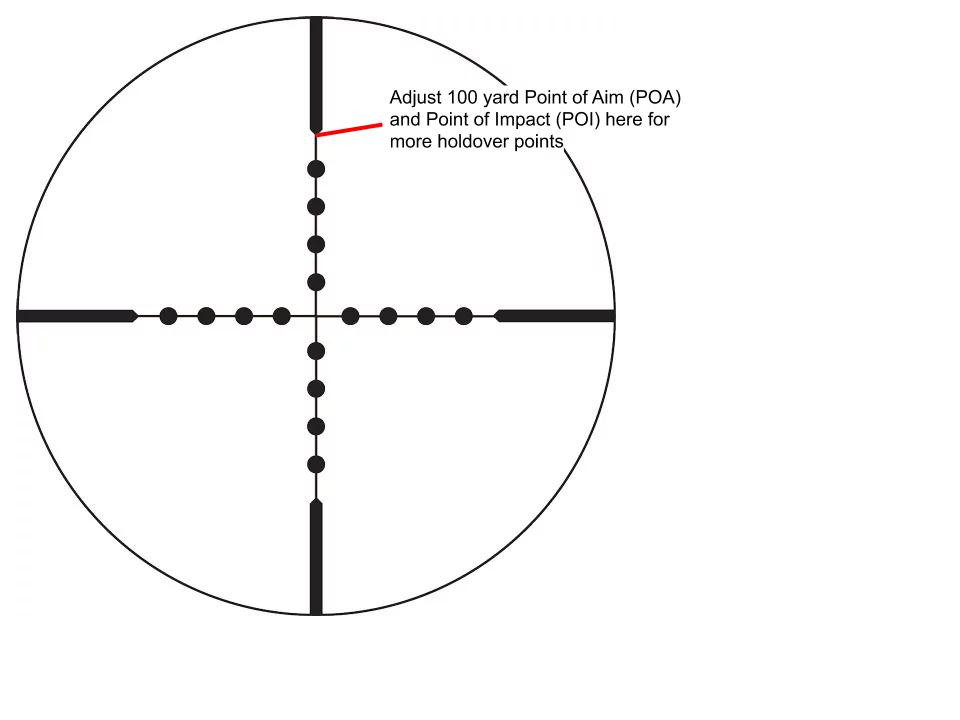
Alternate use of Mildot reticle.
Conclusions and Recommendations
In my testing, it is a pretty poor scope that is not able to track within plus or minus 4%. As I stated earlier with the accuracy of most shooter/rifle combinations 2% error would be able to hide inside the dispersion of the group. Realistically if the shooter is looking to get the most out of their equipment they need to test it in the best way they can. As far as consumer-grade options are concerned some form of stable scope tracking base is the best solution. Barring that live fire is the only other alternative. If you must live fire test, be sure to fire enough rounds to get a statistically significant group average and be very precise with your measurements both on target and in distance between shooter and target. Use the scope turrets as your measuring point and not the muzzle when measuring the distance from the shooter to the target. Just remember if you put in the hard work upfront with a systematic approach the results will follow. Most of all get out there and enjoy your shooting.
Writer’s Note: I would like to extend my special thanks to Jeff Huber for his willingness to share his knowledge in this field. I consulted him at various points throughout the writing of this article to ensure it’s technical accuracy. Jeff has over 28 years in the optics business. His most recent endeavor has been to produce a competition/tactical scope of the highest order, and to that end, he has started a company called Zero Compromise Optics https://www.thefirearmblog.com/blog/2019/01/30/shot-2019-zero-compromise-optic/.