 Your Privacy Choices
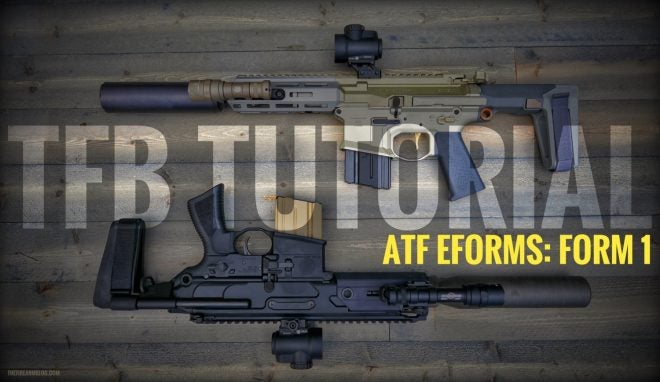
Can we all agree that paying a $200 tax and waiting six to nine months to cut a rifle barrel from 16.1 inches to 14.5 inches is extremely ridiculous? Yet, if you live in the United States, legally making a rifle with short barrel requires an application process that makes car loan and college application processors jealous. Whereas companies like SB Tactical have done a great job in showing us that the NFA laws and regs are arbitrary and don’t do anything to prevent violent crime, the law of the land is that rifles with barrel lengths shorter than 16” and shotguns with barrel lengths shorter than 18” need a tax stamp. So, for those of you who still want a rifle with a stock or a vertical fore grip, the following TFB Tutorial on the ATF EForm system may help you get your tax stamp faster than the paper submission process.
As a refresher, the rule change known as ATF 41F in July of 2016 required all applicants to undergo a background check, including entities like trusts and corporations. Remember, 41F did not actually close a “loophole”. First, prior to the change, applicants using a trust were still required to fill out a 4473 and pass a NICS check. And while responsible persons weren’t required to follow these steps, nothing changed the definition of a prohibited person. Handing an NFA item to a prohibited person, trustee or not, was and still is against federal law. Requiring a background check does not magically keep firearms out of the hands of criminals.
But I digress…
In 2013, the ATF implemented a electronic submission system for National Firearms Act applications as well as other regulatory requirements. While the system is far from perfect, it is a much needed technological advancement to the NFA. Unfortunately, the 41F rule change requirements all but killed the EForm system for consumer use. But last month the ATF took the first step in making EForms relevant again by reopening the use of the 5320.1 – Application To Make A National Firearms Act Firearm. The overwhelming majority of Form 1s are focused on Short Barreled Rifles, but of course other NFA items can be made as well.
Why use the EForm system? As Y2K-ish as the system feels, it is still a lot more up to date than filling out paperwork. And, for the time being, EForm Form1 applications are seeing one to three week approvals.


TFB TUTORIAL: Using The ATF Eforms NFA Application System
Let’s take this EForm process step by step, shall we.
Step 1: Create An Account – https://eforms.atf.gov/
This part is fairly self explanatory. If you already have an Eforms account, go ahead and login. If not, click on the green ‘Register’ button at the bottom of the page.
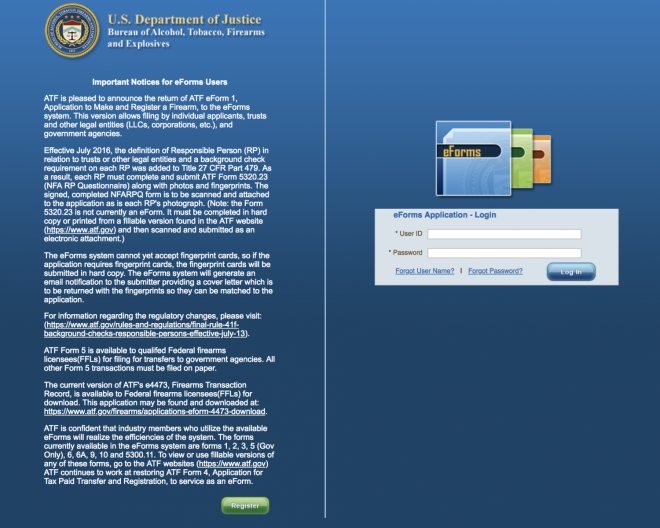
Registering requires you to enter all of the standard biographical information and to pick a password.

Hit the ‘Register’ button and wait for that beautiful confirmation email. Now you can login with your new username and password.
TFB TUTORIAL Step 2: Start An ATF Form 5320.1 – Form 1
If this is your first time logging in, the left side of the splash screen under ‘My Forms’ should be blank. Otherwise your forms and their various status will show up as an expandable list.
In the top left menu bar you can view and edit personal information in the ‘My Profile’ option. Also The ‘FAQ’ actually contains useful information worthy of your time. And the ‘Ask The Experts’ tab is very useful – I received answers to my questions in a short amount of time (more on that later).

To start your Form 1 application, hit the tiny white arrow in the blue slider bar until you get to the green FORM 1 icon. Click on it and begin your journey.

TFB TUTORIAL Step 3: Applicant Type
Choose whether you are going to apply as an individual or an entity such as a trust or LLC. If you are filing as an entity, make sure you have your trust or incorporation documents available for upload.
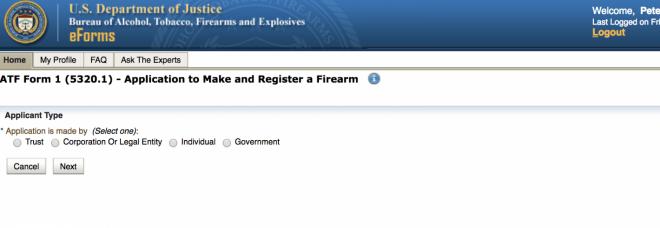
Now click ‘Next’ at the bottom on the ‘Intended Use Of Form’ screen. After you read all the information, of course.

TFB TUTORIAL Step 4: Application
As a maker who is not applying on behalf of a government agency, you have to pay the $200 tax to make an NFA Firearm. Check the ‘Tax Paid ($200)’ radio button.
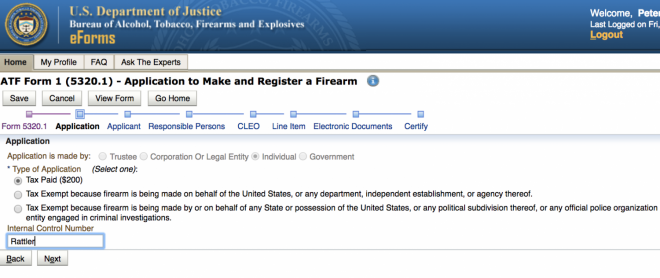
You don’t have to set an ‘Internal Control Number’ but it is helpful if you are planning on submitting multiple forms. After submission, the splash page with your approved/submitted/draft forms will list them with the Internal Control Number (example: “Rattler”) and the ATF’s Control Number (example: 2019000000).
TFB TUTORIAL Step 5: Applicant
You may recognize this page as being similar to the Form 4473 criminal history questionnaire. Start by entering FFL information (if you have a license). Enter the required personal information in the remaining blocks below.

Now answer the drop down questions about your past.
HINT: fantasizing about being one of Deniro’s crew in the movie Heat is not a disqualifier.
TFB tutorial Step 6: Responsible Persons
Even if you are filing as an individual, you are a responsible person and need to fill this section out completely. Start at the left and work your way to the right. I couldn’t get this page to display correctly on an iPad, so now s is a good time to mention that using a computer is the best way to go for using the archaic EForm system.
If you are filing as an entity, everyone who is considered a Responsible Person in your trust or LLC needs to fill out an ATF 5320.23 Responsible Person Questionnaire. All Responsible Persons must be listed on this page and their 5320.23 forms uploaded using the ‘Choose File’ button seen below. It’s grayed out (inactive) if filing as an individual.

Next, you need to upload a 2×2 passport style photo under the ‘Photo’ column. There’s nothing fancy expected here, just take a picture with your phone and crop it into a square. Or use one of the many passport photo apps on Google Play or the Apple App Store.
Moving down the line, it’s highly recommended that you include your social security number. If you don’t, be prepared to wait an eternity for your background check to clear. Everything else is self explanatory, except for the UPIN field. 99% of applicants do not have a UPIN. If you have one, you already know you need to use it.
PRO TIP: “Yes Please” is not an available answer for the ‘Sex’ question.

TFB TUTORIAL Step 7: CLEO
The 41F rule change transformed the Chief Law Enforcement Officer (CLEO) certification to simply a notification. Enter your CLEO’s information here. The system will email you a copy of the form that you will mail to your CLEO.

TFB TUTORIAL STEP 8: Firearm Line Item
Finally, after all this time, we start to talk about guns. Isn’t bureaucracy grand?
Hit the ‘Add Firearm’ button at the left/middle of the screen to start entering the identifying information for the NFA item you will be making.

From here, a three step wizard will walk you through the process. First, add in the manufacturer for your firearm. The field may start to auto populate; once entered hit the Verify Manufacturer button. After selecting the manufacturer country, click the ‘Next’ button at the bottom of the page.
If you are making a silencer or are using a home built firearm (80% lower build), select the ‘Manufacturer Code’ radio button. Enter ‘FMI’ and click ‘Verify Manufacturer’. The code will verify as ‘FORM 1 REGISTRATION’.

On the next screen there is a series of drop down menus. Assuming you are building a Short Barreled Rifle (SBR) select that option from the ‘Product Type’ menu.
IMPORTANT: The ‘Model’ drop down menu is a bit of a trap. The suggestions listed here are all from user input from previous application submissions. Which means that it is full of incorrect models that may have disapproved. ALWAYS use the information exactly as it is engraved on your firearm.
If you don’t see the exact model listed that is engraved on your firearm, check the ‘My item description is not in the list, create new item.’ box. And then enter the proper information.

- Enter the Caliber and the unit of measure in the next two drop down boxes.
- Enter the Length Of Barrel of your SBR as it will be built.
- Enter the Overall Length of your SBR as it will be built. For this measurement, place the adjustable stock in its fully extended position and measure from the end of the stock to the bare muzzle of the barrel.
- Enter the Serial Number of your firearm exactly as it appears on the engraving of the firearm.
- Enter a Description (optional) such as “Short Barreled Rifle”.
- Enter an answer for ‘State Why You Intend To Make Firearm’. Example: “All Lawful Purposes”.
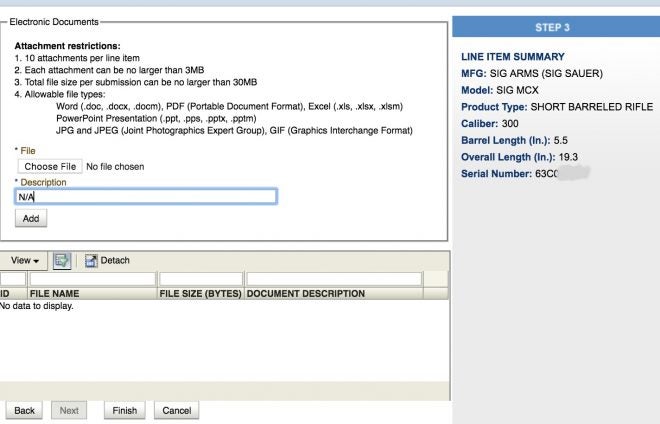
For Step 3, you can include a file like a diagram or a picture and a description of the file you are uploading. Having had a few error corrections of my own, I highly suggest taking a picture of the serial number and the manufacturing markings on your firearm. Homebuilt silencer and firearm makers may want to include a diagram of the proposed build, but it is not required.
Click ‘Finish’ and all the information on your firearm should now show up as a Line Item on the splash screen.

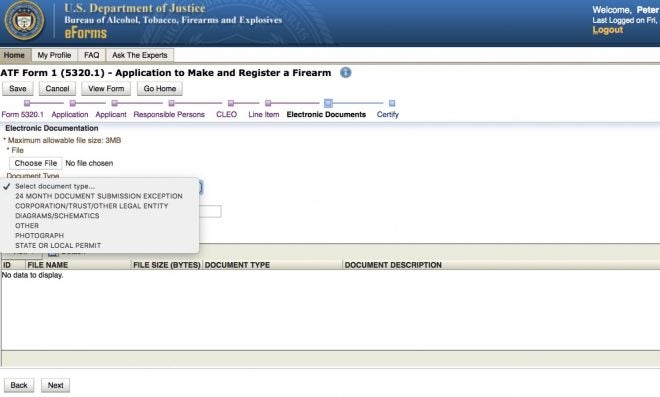
Tfb tutorial Step 9: Electronic Documents
This tab is fairly self explanatory. If you are filing as an entity, select the type of documents you are uploading and select the file from your local drive. A successful file upload will populate in the lower box.
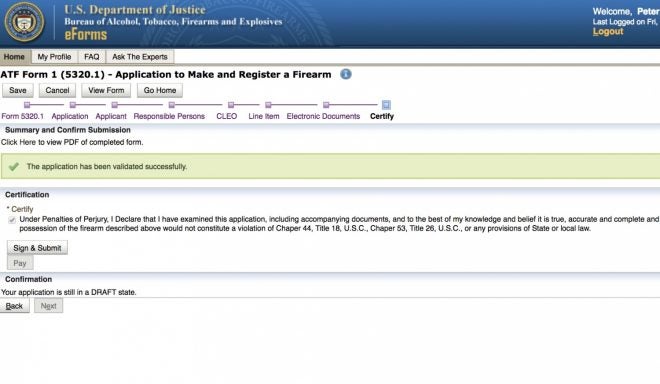
Tfb Tutorial Step 10: Certify and pay
Check the “I’m being truthful” box under the ‘Certification’ heading. Then click the ‘Pay’ button.
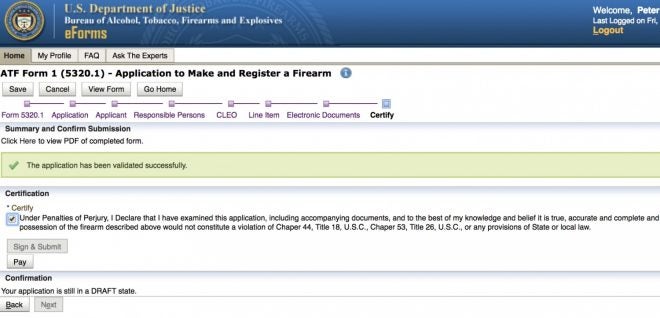
CAUTION: If you are blocking pop-up windows, the payment screen will not show up. You may have to manually agree to “show pop-up windows” in the browser header bar.
Enter all of your billing information in the fields below.
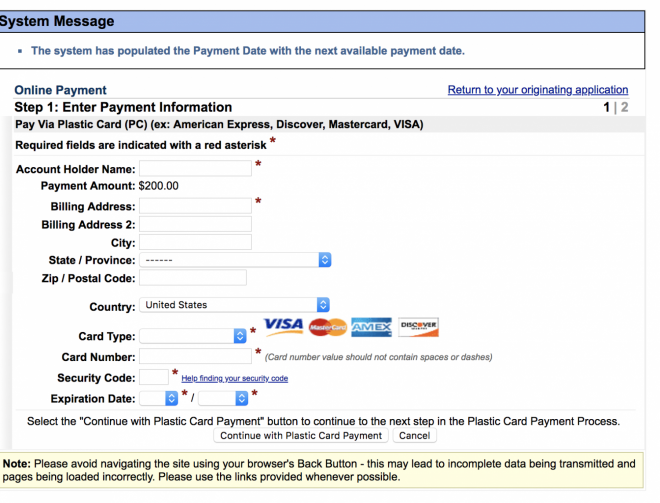
Verify the displayed information and enter your email address to receive a receipt.
PRO TIP: Copy your spouse on the $200 transaction for maximum transparency.

Success. Follow the instructions to complete the form.

Click the ‘Sign & Submit’ button upon returning to the ‘Certify’ screen.
You will need to re-enter your password for verification and certification purposes.

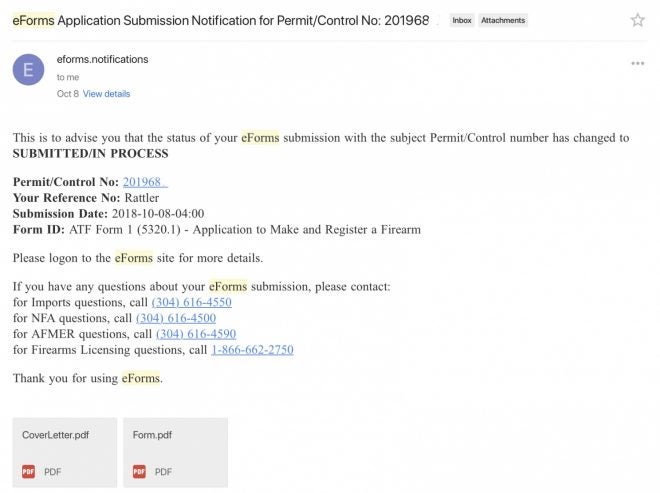
Tfb tutorial Step 11: Verify your form is Submitted/In Process
You will be returned to the home page. Click on the ‘SUBMITTED/IN PROCESS’ category under ‘My Forms’ on the left hand side of the screen. From here you can verify the form has been submitted and see a copy of the draft (SUBMITTED) Form 1.

Clicking the eye icon in the ‘Actions’ column will let you look over your submitted form.

Almost immediately after clicking ‘SUBMIT’, you should receive an email showing that your applications is now in the ‘SUBMITTED/IN PROCESS’ status.
CAUTION: Two documents (the cover letter for sending your fingerprint cards and the above SUBMITTED Form 1) are attached to this email. However, mobile mail applications will not display the attachments. Use a web browser or a computer to view and download the attachments.

Above, no attachments. Below, attachments. It’s like magic. Or a curse.
CAUTION: Don’t forget to mail the CLEO portion of your form to the person/address you listed in that section.
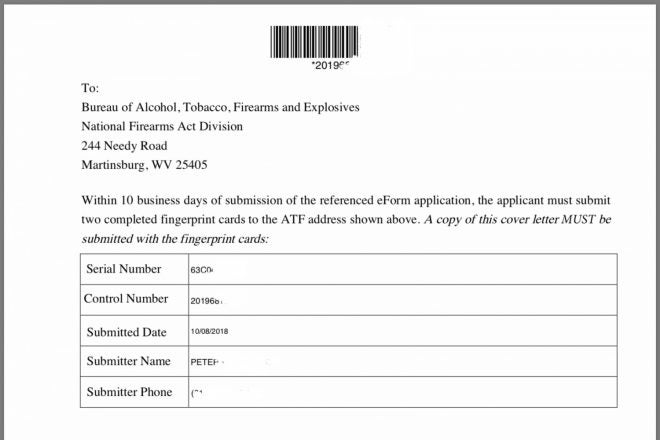
Tfb tutorial Step 12: Cover Letter and Fingerprint cards.
Start by printing out the attached cover letter. Follow the simple directions.
If you don’t have fingerprint cards, you can request them for free from the ATF here. Your local FFL/SOT also may have some they are willing to donate to your cause. Or you can buy some on Amazon here.
While you are on Amazon, pick up an inkless fingerprint pad like this one.
NOTE: Yes, you can roll your own prints. After watching one of the many available YouTube videos, you’ll be an expert.
CAUTION: Make sure to complete all the necessary biographical information on the fingerprint cards to include signatures, your social security number, etc.
Mail your two cards and the cover sheet to the address listed below your name. I suggest using USPS Priority Mail. It includes a tracking number so you can make sure your package is delivered.
Tfb Tutorial Step 13: Approval

Let me be clear, no one is promising you three-week approvals. But, for the moment, it appears that we are being blessed with quick turnarounds.
If all goes well, you’ll receive an email informing you that your form’s status has been changed to ‘APPROVED’. Like the cover letter email, you approved Form 1 will be attached as a PDF, but may not show up on mobile devices. You will not receive an approved form in the mail, nor will you receive an actual $200 NFA Stamp.
Special Considerations
The EForm system is down all day every Wednesday. It probably has something to do with maintenance, the tides or solar flares. Plan accordingly.

Make sure you double check your information at every step along the way. An error will slow your approval time and increase your frustration levels.
Go forth and NFA. https://eforms.atf.gov/
FINAL NOTE: This guide should be be used as an unofficial reference only. All official guidance can be found in the instructions on the Form 1 or through the ATF EForm system.
We are committed to finding, researching, and recommending the best products. We earn commissions from purchases you make using the retail links in our product reviews. Learn more about how this works.