 Your Privacy Choices
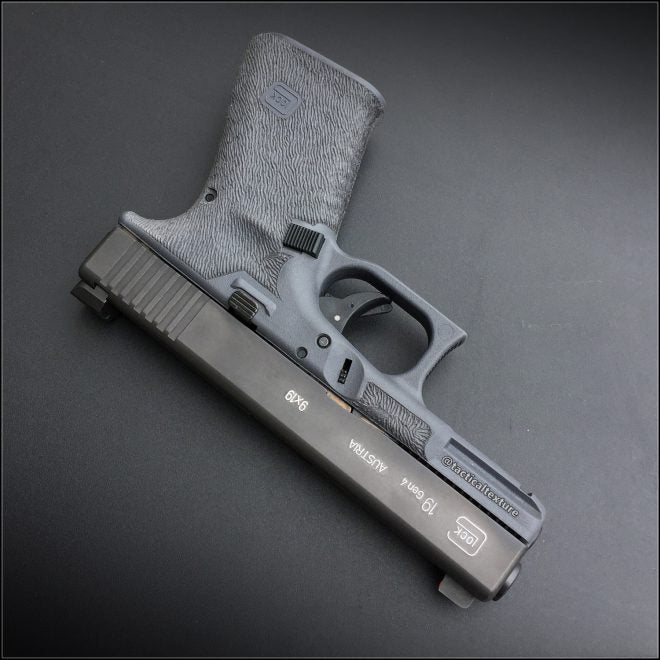
Mike over at Tactical Texture and Triggers has turned out what I believe to be the prettiest Glock 19 frame enhancement job I have seen yet. Starting with a box stock Glock 19 in the newly released gray color, Mike spends many hours with the pistol to not only add functionality but also enhance its visual appeal.
Even though the factory stippling on the Glock 19 Gen4 is excellent, there is always room for improvement. It appears that the Glock 19 only got the texture enhanced on its frame and where the support thumb would rest.
We reached out to Mike to see what goes into putting together a texture job this attractive, instead of me mincing the master’s words, you should hear it from him.
A lot of people refer to it as stippling, or “stipple job”, but what I, and most shops, do is far more involved. A hobbyist who does not care what his gun looks like will just take a soldering iron and add texture to the areas that are not aggressive enough for him. If you check out Kyle Defoor’s blog/page, he does this. The work looks like crap, but that’s OK because all people like this are interested in is improving the function of the gun. As a professional, not only must my work function perfectly, but it must be aesthetically pleasing as well.
The more accurate term for what I do is called a “Frame Enhancement” service, and it has 3 parts.
The hardest, and longest part of the process is the grinding stage. This is where (using a dremel and various sanders), you remove the factory texture, and reshape parts of the gun. This is the dirty stage that produces things like: trigger guard undercuts, Glove Bevels, mag release scallops and mag cutouts. On some gun this process alone takes hours, especially when you are trying to finish the polymer into a smooth, attractive and refined product. I have developed some techniques that speed up the sanding part, which takes up a HUGE chunk of time if you try and do it by hand.
Next for me is what I call the “Layout” stage. I do a recessed border on my custom guns. While I won’t give out any info on the proprietary techniques I’ve developed for doing this, it is a tedious process that requires the steady hands of a surgeon to do correctly. While there are tools involved, this is also done free-hand, with no templates. I use only a pencil and straight edge. This recessed border is what separates the higher end, more expensive shops from the guys that charge less. It took me a long time to figure out how this was done, but it was the hill I was willing to die on since the overall look of the finished product is head and shoulders above just doing the texture on the parts of the frame.
The stippling, or what I call “texture work” is the last stage, and this, while tedious and time consuming, is the easiest of the stages. For me this is all done free-hand with a wood burner, one line at a time. I don’t use a bit and just tap the frame. I’m actually drawing on it with the wood burner. This stage takes me more than twice as long as shops that use a bit, but the texture I developed is well worth it in both feel and looks.
Again this entire process take hours and hours to do correctly. I’ve always said that most people have the SKILL to do what I do, but very few have the patience to do it. That’s also the reason I, and other shops that do high end work like this, charge so much. There is just so many hours invested in it.
If someone asked me to give some advice to someone just starting out it would be these 3 things:
- Practice on everything you can. When I started out, I practiced on airsoft guns that were a working replica of a Glock. I probably did a dozen or more before I touched a real gun. Nowadays you can practice on the modular Sig frames for the P320/P250. They will run about $30-$40, but are actual parts of that gun. Another good thing is practicing on the Glock mag loaders. These are the plastic things that come with a Glock that assist you in loading a mag. They are made out of the same, or at least a very similar polymer to what the Glocks are. You want to get good at doing Glocks, too. They make up about 90% of my business.
- Be unique. You want to come up with a layout and texture that is your own. Try to avoid copying other shops. My layout is recognizable, as is my texture. I would say I could name off about half a dozen shops that have a layout and texture that is unique to them. Same thing with the sublte (or drastic) differences in the way certain areas look, like frame flats or mag scallops.
- Finally BE LEGAL. If you are going to just do this on your own guns, OR a non-serialized part like the Sig frames, you do not need an FFL. However, if you are going to be working on any handgun frame that has a serial number (which is most anything else), you MUST have an FFL. If you try to fly under the radar, you better pray that the ATF doesn’t find out or it will not end well for you. “
Wise words from someone who clearly knows how to add some extra grip to a Glock frame. With the process explained in a bit more detail and spending some time looking at the product myself, I can see why his work carries a price tag of $445 to start. After all, time isn’t cheap. You can learn more about Mike’s work over at his website HERE.