 Your Privacy Choices

Since leaving Google in mid-2012, I’ve been searching for firearms stuff that overlaps with technology. While at SHOT Show earlier this year, I was walking down the aisle on my way to the next booth on my list, when all of a sudden a guy literally jumped in front of me and said “hey, have you seen this?!” There was a computer on the table, and that combined with the guy’s excitement got me interested enough to stop and take a short break from a full day of walking the convention floor.
The guy turned out to be Bullseye Camera System founder Nick Skrepetos. His product is a camera system which you put down range pointing at your target, and a laptop screen on your bench will show you your hits. No more squinting through spotting scopes was the promise from this potential snakeoil salesman (for the record, Nick is a really nice guy, and not a slimy salesperson. I just wanted to use the phrase “snakeoil salesman” somewhere in this article). Nick told me about the unique thing about his camera system was its low cost, compared to other camera systems of the same caliber (Nick mentioned a $1500 figure). I had never used a camera system of this type, so I don’t have anything to compare it to. Therefore, my review is only going to cover my experience with the Bullseye Camera System. How well did it work, or not work? Here we go.
I tested the 1,000 yard model which includes a signal booster. There is also a 500 yard model that costs less. You also have the option of buying a netbook, or you can supply your own computer. Mobile support for iOS and Android device is in the works.
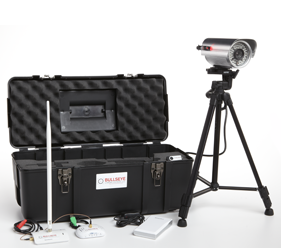
The camera and accessories unpacked from the toolbox. Photo courtesy of Bullseye Camera.
The Bullseye Camera system comes in a foam-lined plastic toolbox which stores the entire system. A netbook can easily be stacked on top of everything and still allow the lid to lock.
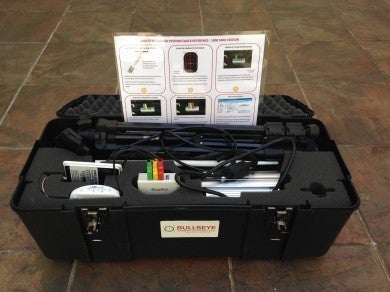
The Bullseye Camera system comes in a nice and simple black toolbox with foam padding to protect and store the camera, wi-fi camera, signal booster, tri-pod, cables, battery pack, laptop, and instructions. Setting up the system is very straightforward. You plug in the colored cables into the battery pack, align the camera with your target, and then sync the laptop to the camera. Notice how the camera is offset from the target, obviously so you do not shoot your camera. If you’re not confident with your accuracy, please practice before spending a few hundred bucks on a product like this.
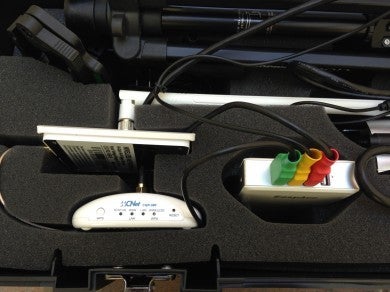
A closer look at the tripod, wi-fi antenna, signal booster, and battery pack with color-coded cables inside an organized foam-lined tool box.
With laptop in hand, I walked back 200 yards to my bench with my AR-15 chambered in 5.56mm. The Bullseye software has a number of features where you can load rifle and ballistics data to keep track of your shooting sessions. You can also create multiple user profiles so your friends and significant others can also keep track of their shots all in one session, without having to change targets between shooters. The software has a tool where you can keep track of each user’s shots. The user simply marks each shot with a colored shape of the user’s choice.
The software has two modes to track hits: 1) Shooting mode 2) Live Video.
Shooting mode requires the user to hit the spacebar after taking each shot. The screen then alternates between a freeze frame taken before the shot, and then a freeze frame that’s taken after the shot when you press the spacebar. You can clearly see the shot, but the small downside is that you have to break your hand grip from the rifle to press the spacebar.
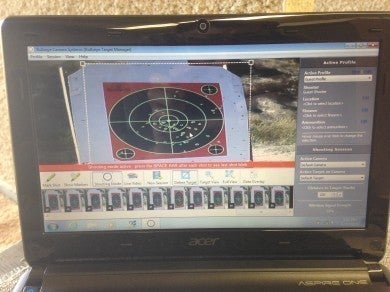
“Shooting mode.” I could clearly see each shot on the netbook screen. Side note: Even though I wasn’t aiming for the bull with each shot, I had some flyers!

Here’s what the numbered circles look like when a shooter wants to manually tag shots. Data from each shooting session can be saved.
Live Video mode is exactly what it sounds like. You see a live video feed as you take each shot. I could keep my cheek weld and hands in a ready position on the rifle while I just moved my eyes over the screen. When you first start shooting at a target, it’s quite easy to see where the first ten or so shots land. However, once I got above fifteen shots, it became really hard to tell where they were landing, and so that’s when I switched over to Shooting mode.
Be advised that the system works best when you can clearly see a mark through the paper, so the lighting and color of the background behind your target could affect the system’s ability to detect shots. Using a Shoot-N-C type target helps ensure reliable detection, and I’m sure a number of paper targets will work just fine. Nick said that they are continually making software and hardware updates to address any shortcomings in this area.
So at the end of the day, I was really pleased with the system because I really hate squinting through spotting scopes. I think the Bullseye Camera System fills a nice need for the shooter who shoots enough to hate spotting scopes, but can’t necessarily afford a $1500 system.
At $449 for the 500-yard edition (netbook not included), the Bullseye Camera System could hit the sweet spot for many shooters.