 Your Privacy Choices
It’s a class like this that gives one true appreciation for the craftsmanship of Nighthawk, Wilson Combat, and the other high-end 1911 manufacturers. I was naive to thinking that working for a firearms company, which we produce thousands of products each month on CNC and engineer and program new products daily would serve as a basis by which to leap into a properly hand-fit 1911.
Author’s Note: I paid for all my supplies, travel, and the class personally as this was the “last ditch” effort for a fun trip until a new “little gunner” shows up in my household. Neither Larry Vickers nor TFB asked me to attend this class or write about it. This review is a personal opinion only. I went through everything a normal student would.
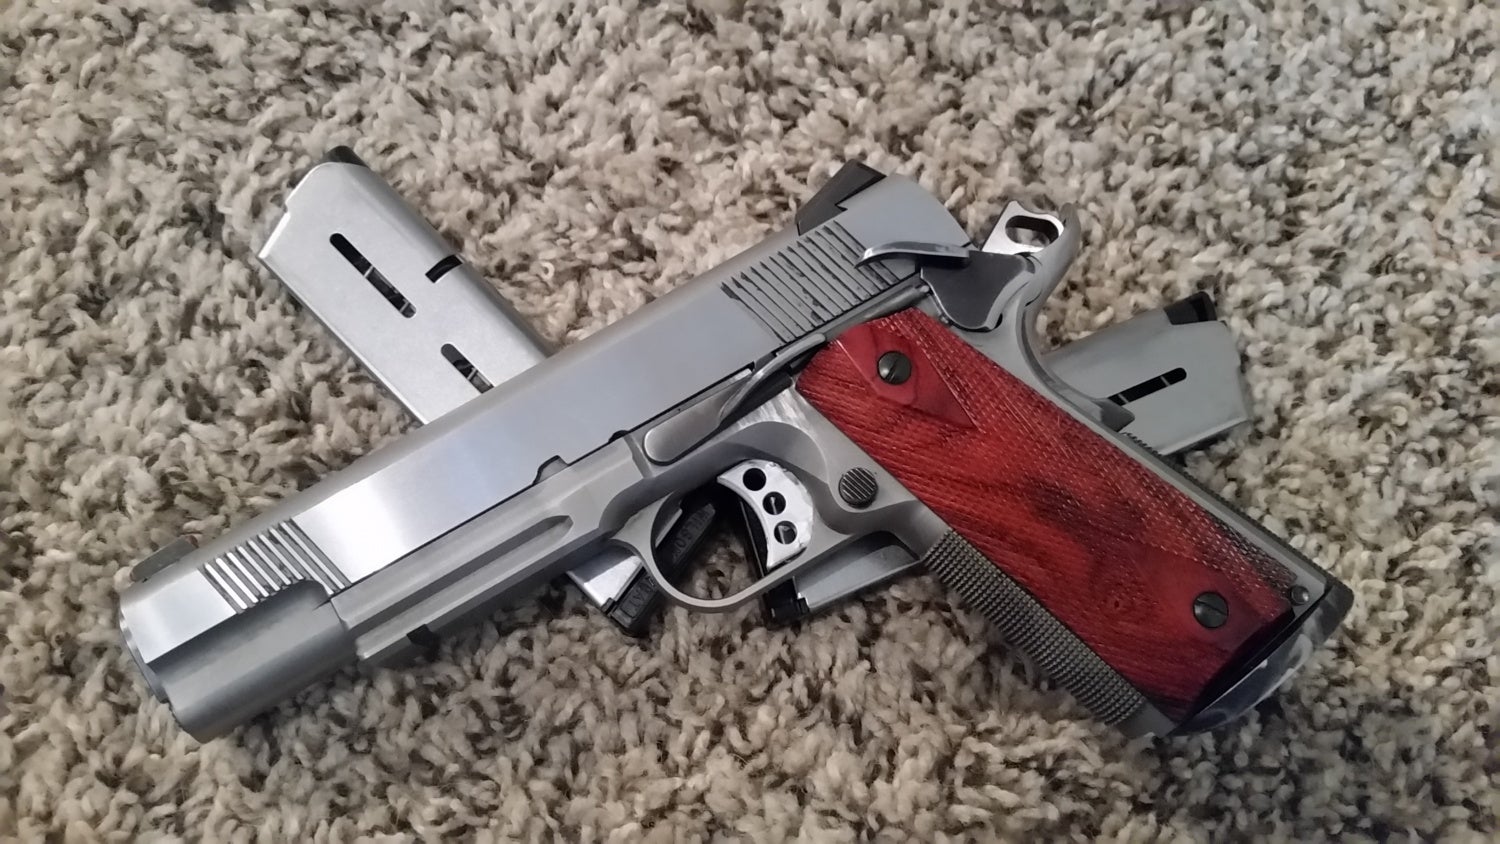
I had grandiose ideas about how awesome my handgun would be upon leaving the class, having something that would shame the earlier mentioned companies. Those ideas were wrong, but that does not mean the class was not worth attending. I did leave with a functional high-quality and hand-fit handgun, which does have a mark of personal pride. It also bears the marks of my brutish filing, a botched barrel fitting, and garish extended magazine well blending. I have much left to learn.
Still, the class was valuable on teaching one the little tips and tricks to get one started on the road to being a true 1911 gunsmith. The real question is: was it worth the cost of money, time, supplies, sweat, and more than a few cuts, bruises, and burns?
What is the Class?
Basically, its taking one from an armorer to a full gunsmith on the platform, which is not an easy task. Rather than waste prose attempting to cover all the details, the description is pulled from Larry’s website:
1911 gunsmithing; – 6 days – This picks up where the armorers course leaves off and allows the student to build a complete custom 1911 from a box of oversize gunsmith fit parts; complete details of fitting an oversize match barrel, slide to frame fit, fitting and blending thumb and grip safeties, trigger job, complete blending of all components for a custom pistol are covered. In addition metal checkering is discussed and practiced on a limited scale. Recommended parts and sources are also covered. This is the complete package and is a great start to anyone wanting to do get into building custom 1911′s. Students of this course have had very positive comments thus far. Max class size is 7 and a specific tool and part list (student supplied) is part of this course.
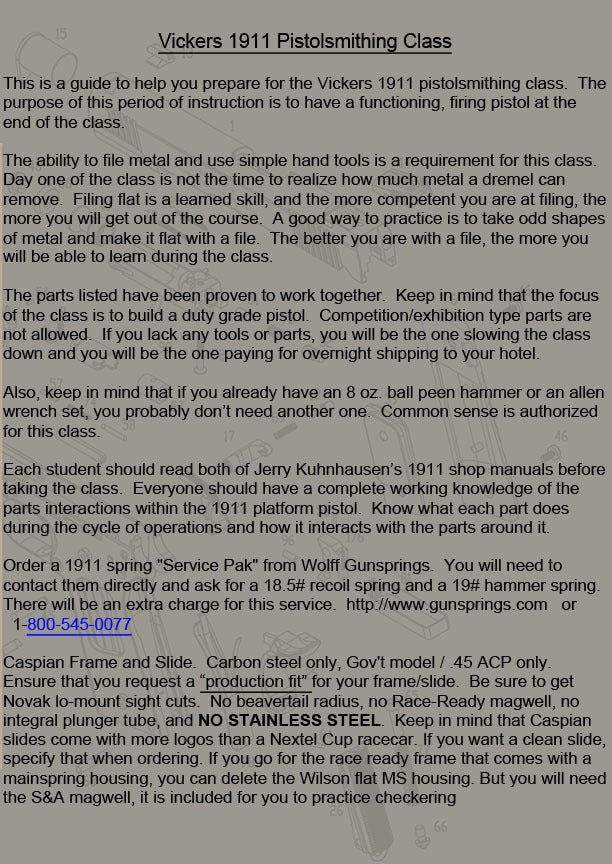
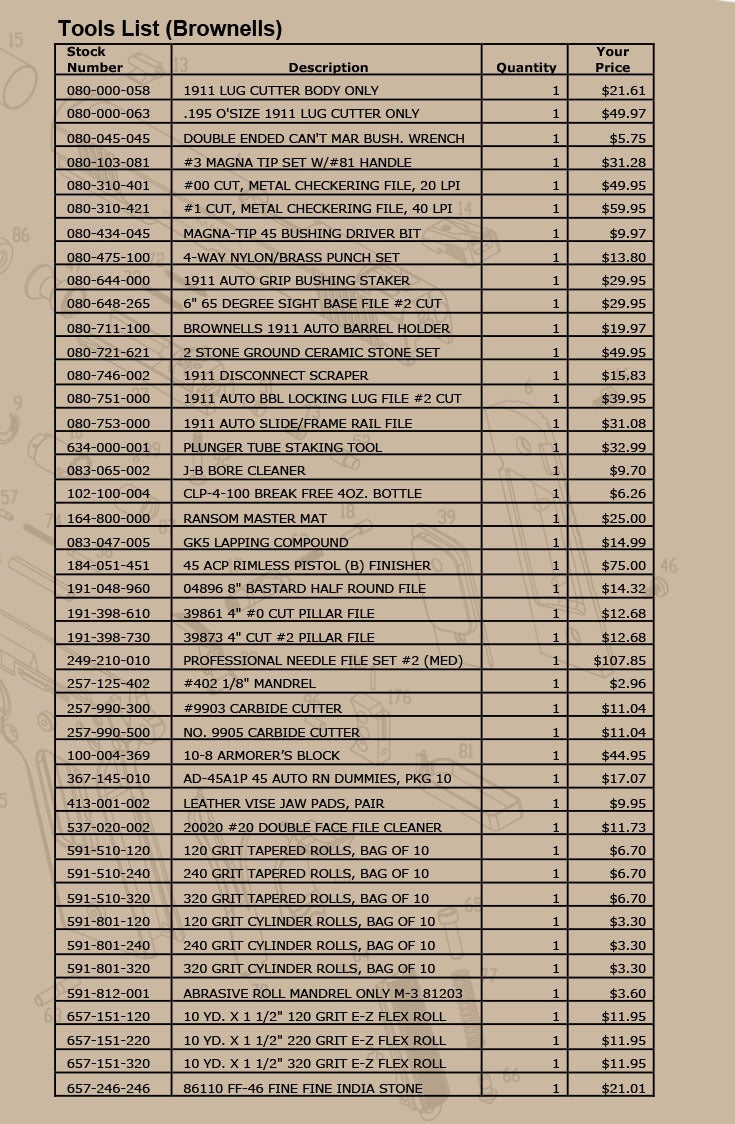
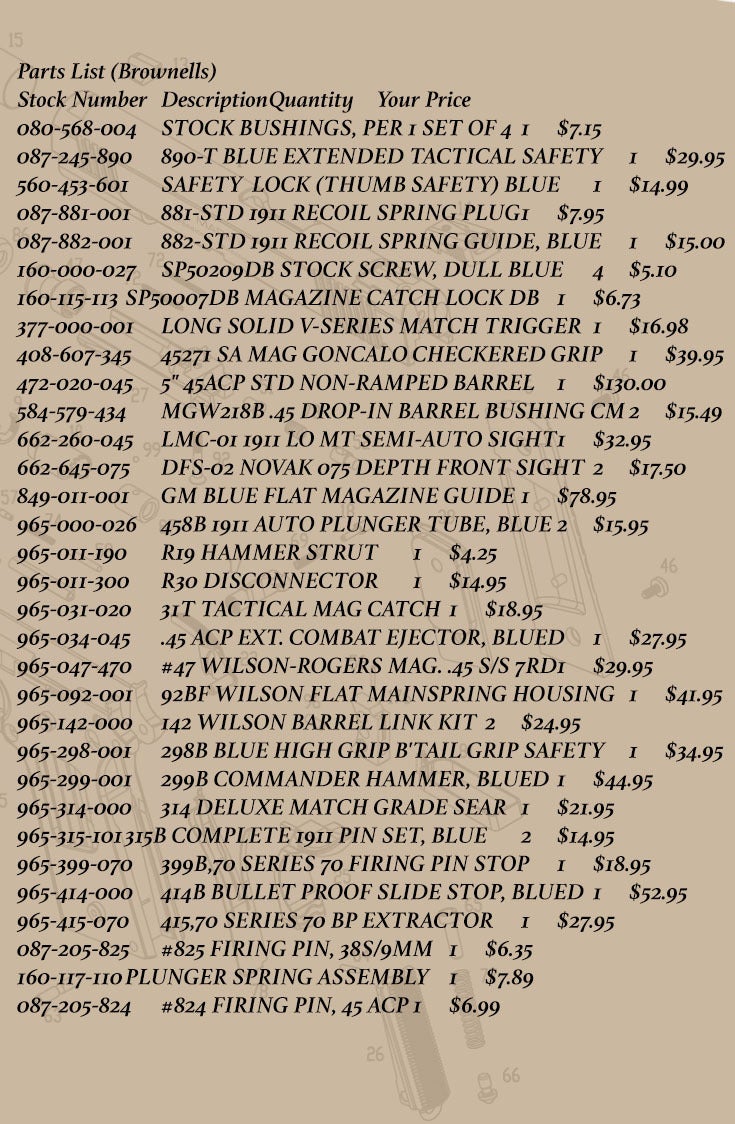
Larry pulls no punches warning those who would come to the class. There is a detailed tool list and pre-requisites to be successful that should be followed:


Costs:
The class originally was supposed to be co-taught by Jason Burton of Heirloom Precision, but due to a scheduling issue, Jason was not able to attend. The original admission price was reduced from $3,000 to $2,500.
Tooling was about $1,300, not including calipers and mics, which I owned prior to the class. Travel came in at about $2,000 for airplane ticket to Denver, rental car, food, and reimbursing family for a place to stay in the area.
From there, parts for the handgun were another $900 as I went to a semi-custom frame and slide from Caspian (Note- Caspian has awesome customer service).
Total bill for the week? $5,700. Expensive, but as a last-hurrah, I was OK with it.
The Class Itself:
I arrived a day early to ensure I could pick-up some last minute supplies like ammunition without having to worry about flying with them. I scouted out the class location (which from the outside is a rather non-descript warehouse) and proceeded to settle in with family with whom I was staying with in Boulder.
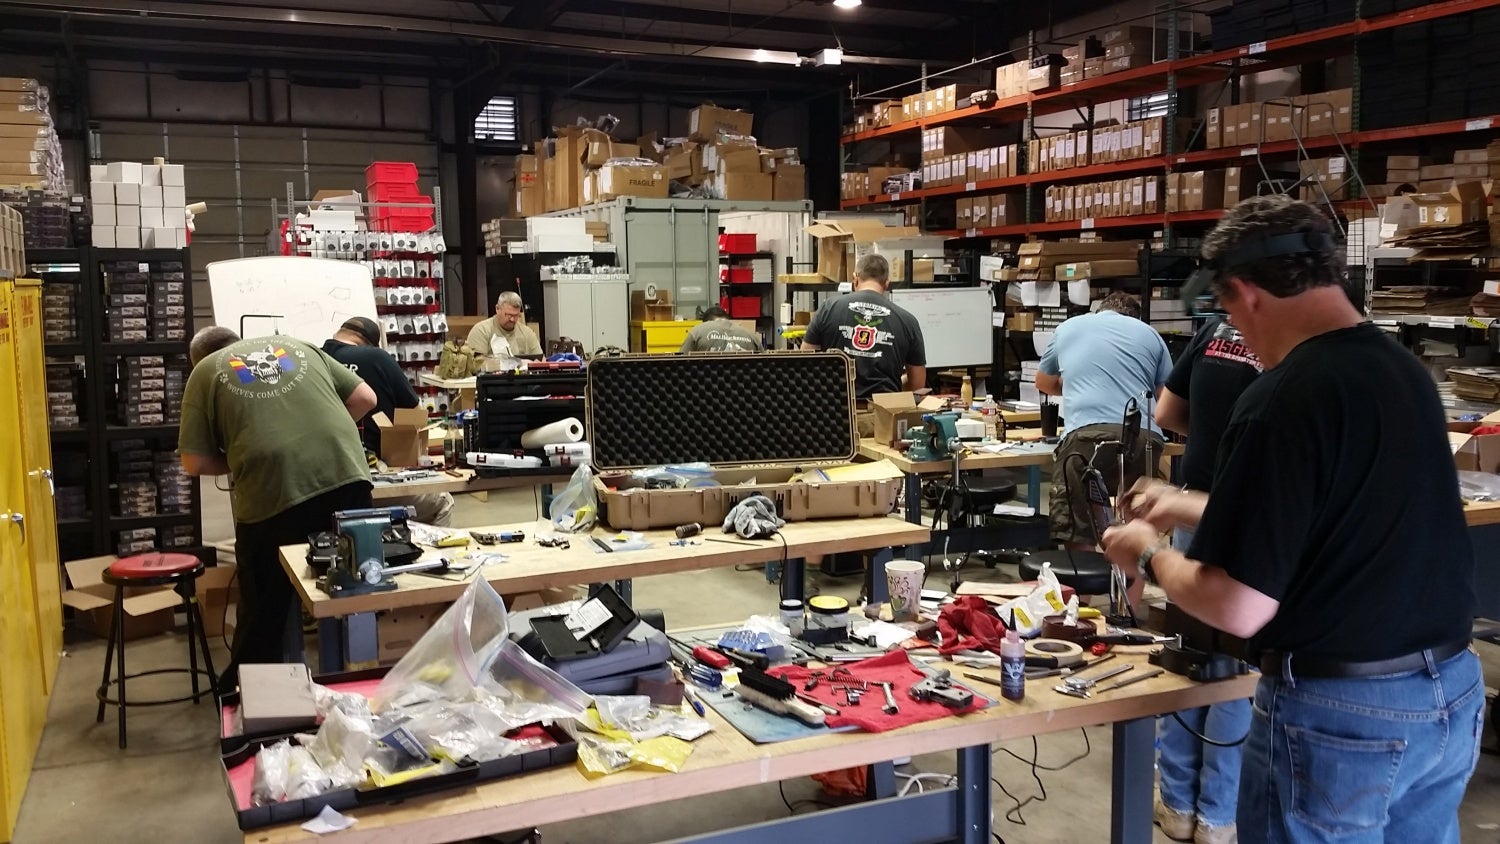
Arriving early Monday morning, my fellow classmates and I were surprised by the professional outfit at Mile High Shooting Accessories. They had cleared out section of warehouse and had ten work-ready tables and vices for students ready to go. A pleasant surprise, as most classes tend to force students to share either tables and/or vices which can be a logistical problem.
My fellow students were a diverse bunch. I was on the second to last table on the left. In front of me there was a certified gunsmith and a veterinarian from California. To the right and front was an enthusiastic young man with relatively little experience (but the best attitude I have ever seen). Behind him were two brothers, both dentists and one a former Marine. and finally to my rear was a father and son; the father was a senior IT manager at a major Web 2.0 company.
Larry arrived about 1/2 hour later than Mile-High told us to be there with little fanfare (there was no actual communication on start-times for the class on the first day) and upon setting down his bag, introduced himself in two short sentences.
Having never met him prior to that morning, he was an incredible juxtaposition. Dressed in an old Wilson Combat t-shirt, cargo shorts, and well-worn flip-flops, he is of short stature but took on a larger-than-life persona. For those who have watched his videos know Larry’s scratched-vinyl record voice well and the round belly seemed to amplify it it amply. (I would assume they don’t need a mic when recording.)
It was “off to the races” from about 30 seconds in. Within the first hour, the class had gone through parts inventory and already onto frame to slide fit with Larry using a whiteboard and dry-erase markers to show the basics of each step. There were no demos, samples, or parts to showcase what perfect was. The students were expected to know or at least be stubborn enough to figure it out the hard way.
Day 1:
- Inventory
- Slide to Frame Fit
- Start Barrel to Slide Fit
Day 2:
- Finish Barrel to Slide Fit
- Barrel, Slide, and Frame Fit, Head-spacing
- Choosing Links, Barrel Assembly, & Feed Ramps
Day 3:
- Finish Barrel Fit
- Beavertail Fit
- Extractor, Retention Plate, & Firing Pin Fitment
Day 4:
- Bushing Fit to Barrel
- Ejector Fit
- Assemble mainspring housing
- Magazine Catch
- Start Trigger Job
Day 5:
- Finish Trigger Job
- Final Assembly
- Test Firing
Day 6:
- (If at a range, some range time)
- Zeroing
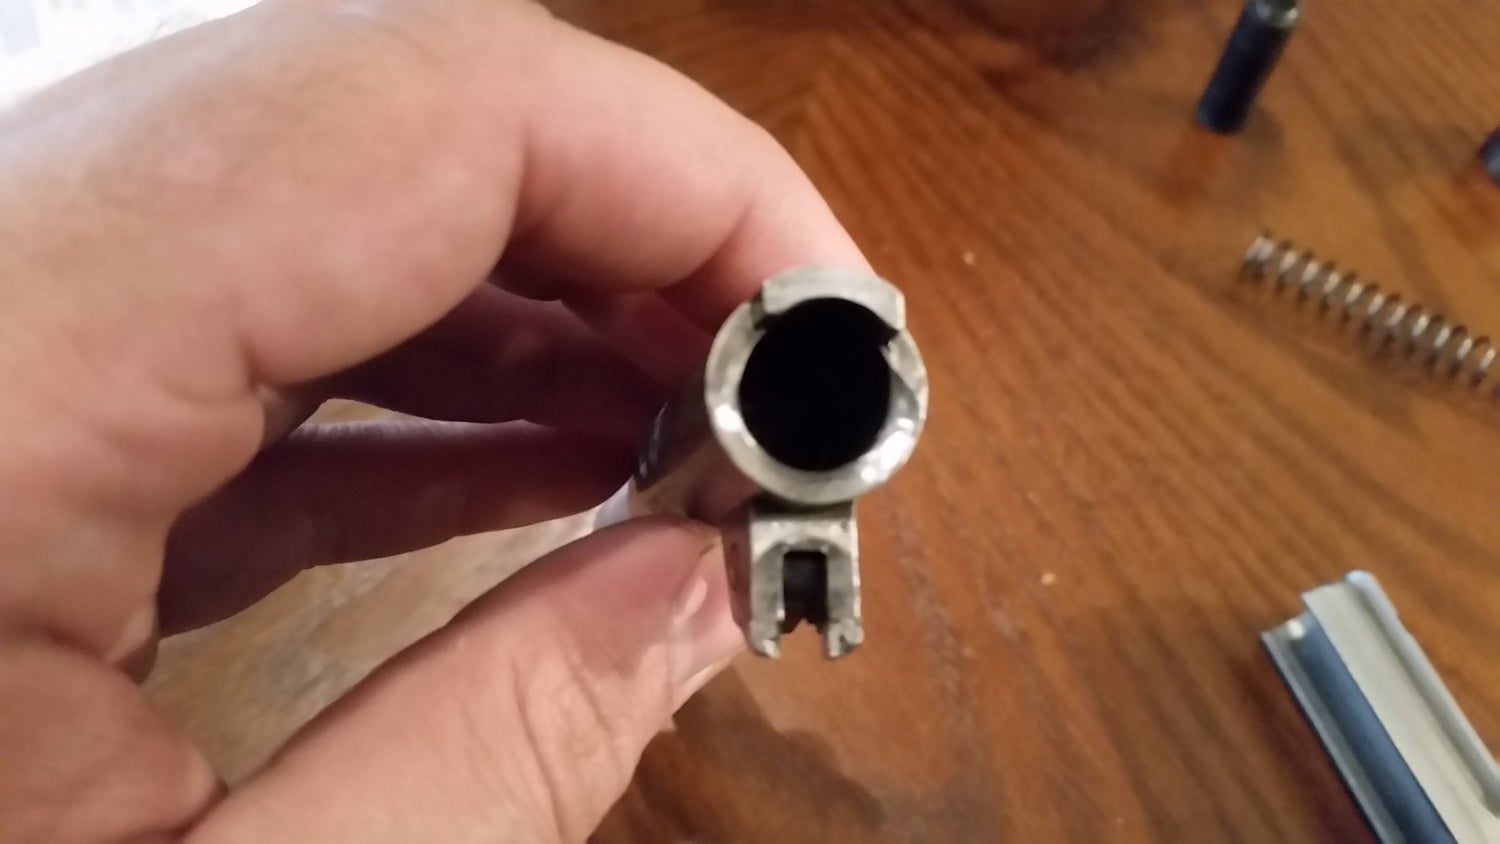
While the tasks to complete each day were minimal, each took painstaking time to work through, especially using fine hand files. Each step has to be checked and re-checked on the steel to de-conflict any interference between parts. The barrel fit to the frame and slide is a slow affair and if one does not keep their head down and just work, can fall into despair or anger here quickly. But, getting them together well is the foundation that the handguns are based on.
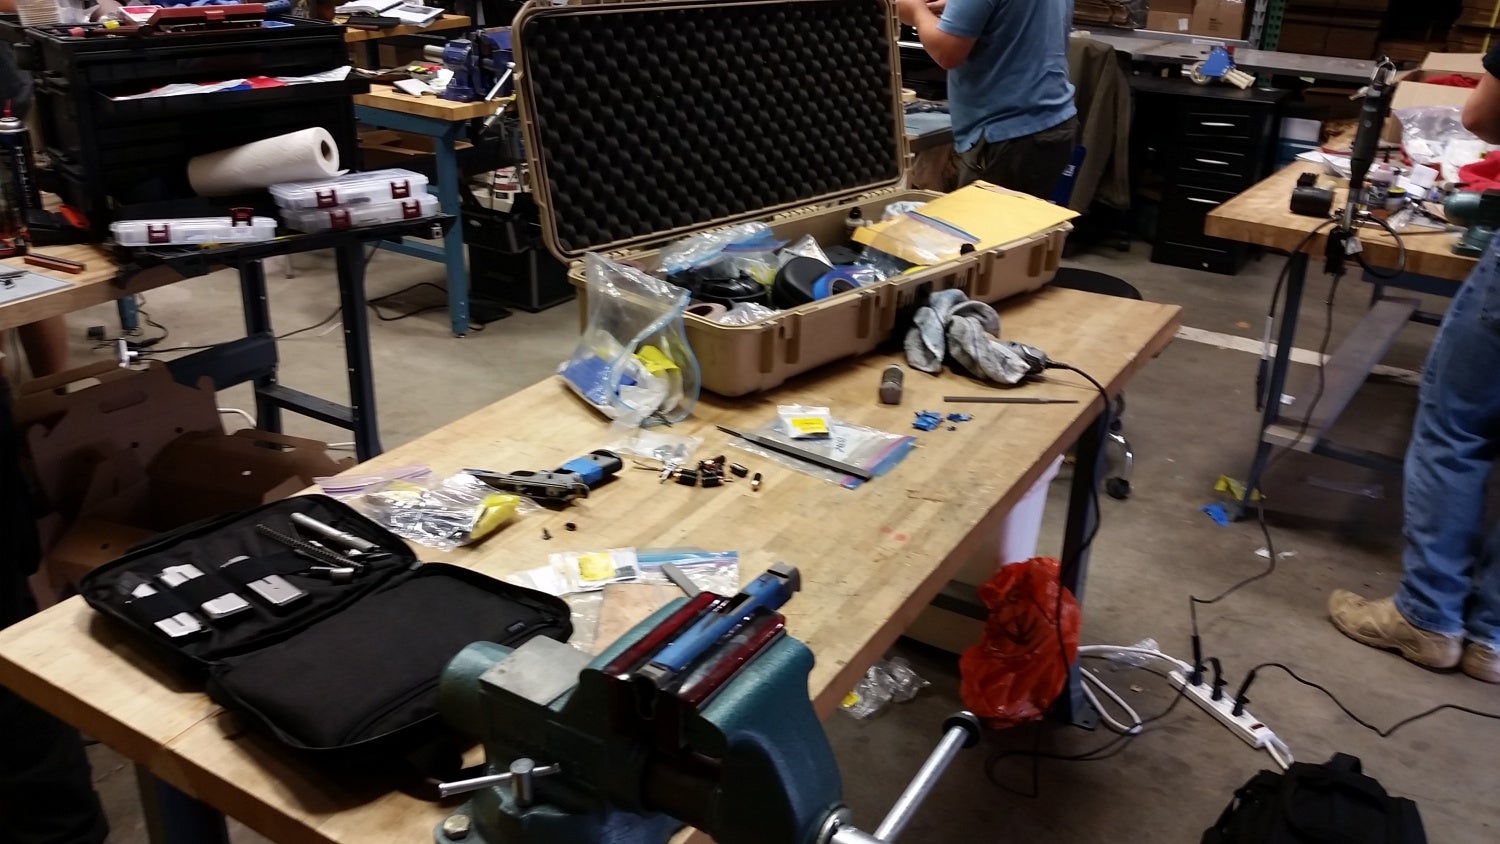
My desk is the one with the open case.
Larry’s Style:
Prepare for “big boy rules”. Ask questions when you need help or get to work. When asking questions about the steps, Larry was generally good although could make one feel stupid. I think its important to note that the students are in the class because we don’t know the answer to the question, but we always knew he meant well.
However, in the case of a “big name instructor” class, one goes not just for the knowledge, but for the man imparting said knowledge. There were technically astute people in the class, but we made mistakes–often. Those mistakes could have been caught if Larry was paying attention even every few minutes to our activities. Instead, he seemed distant, and instead of working on his own handgun (which he says he normally does), Larry was on a tablet working on unrelated items. Its like going on a date and she keeps her phone out instead of enjoying the moment.
The Result:
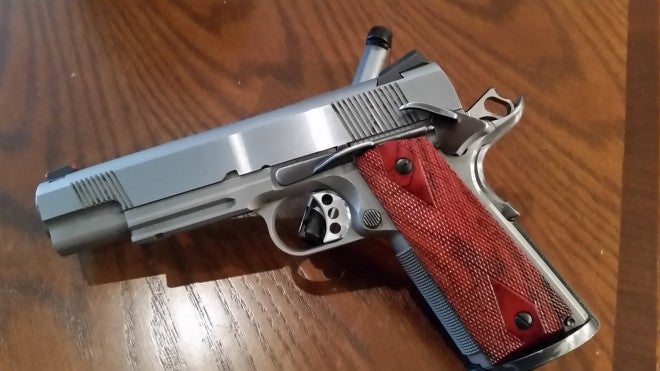
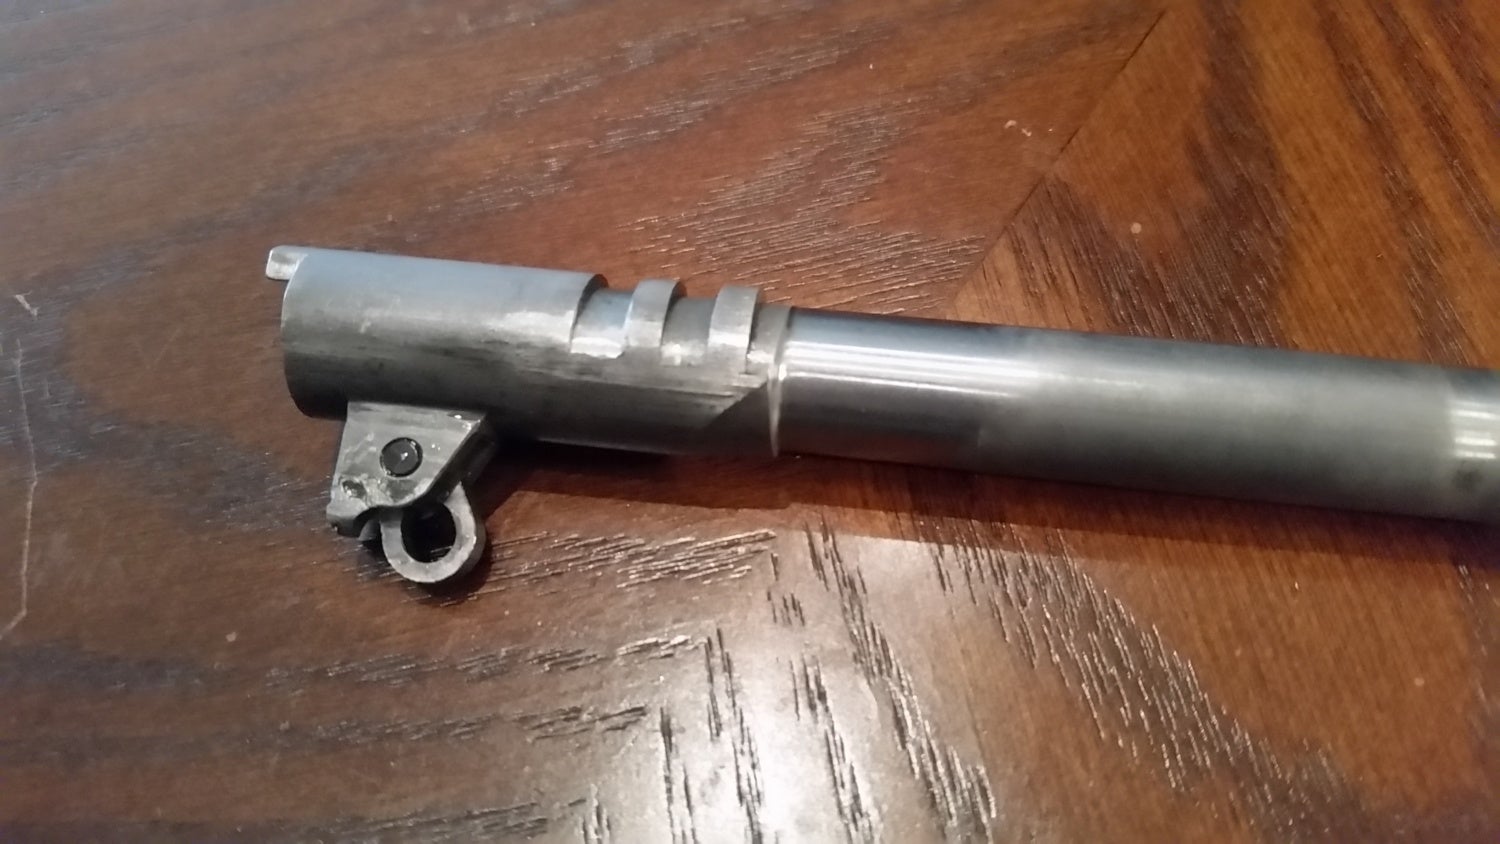
I have a handgun that I am proud of, but suspect that it would be difficult to sell as a custom gun. It bears all the imperfections that I put into it, of which there are many. I royally screwed up milling the barrel lug, instead from the rear of the lug versus the front as I should have. The firing pin retention plate repeatedly bashed the frame as I forgot the firing pin spring, and the frame rails aren’t perfectly vertical, but with the barrel lock-up, its incredibly solid.
From there, I have a litany of tips and tricks from classmate’s and Larry’s experience to draw upon for future builds. Key information was what is considered good components, especially parts that are near perfect fit from the factory cutting time needed to hand-fit and little things like what are the best filing techniques for barrel lugs and similar.
In short, I feel prepared to build and learn from my second pistol. It won’t be perfect, but I’m not sure anything ever will be as I will always know the imperfections.
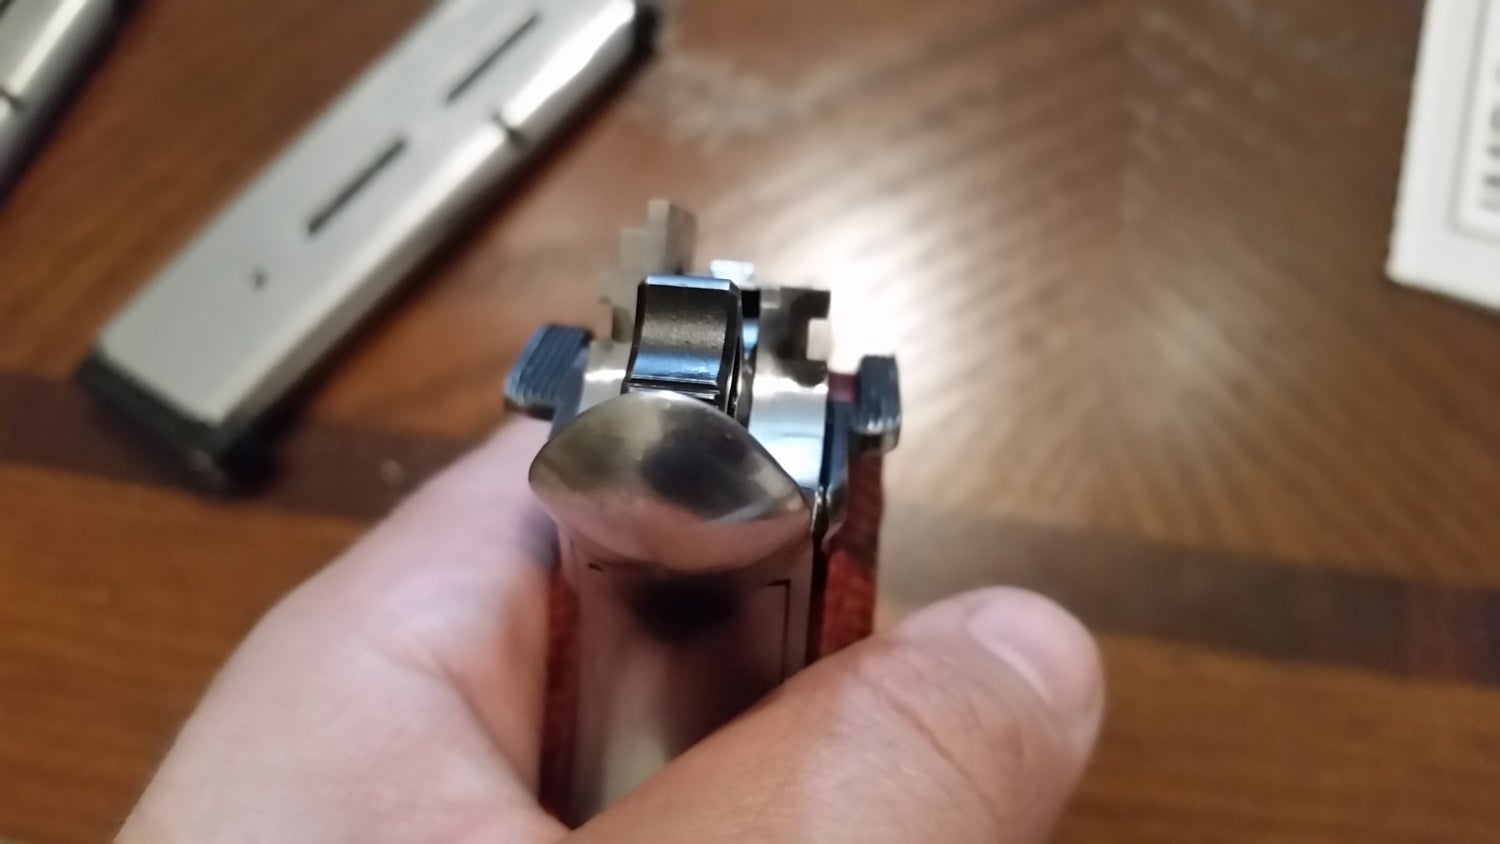
If one looks closely, you can see the cant towards the low left on the right-hand frame rail.
-
 Left side of my welded up barrel lug.
-
 Ugly, but keeps working 500 rounds in!
-
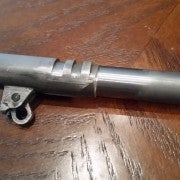 Right hand view. Easier to see the weld here.

The Good:
- One does learn all the steps needed to custom-fit and finish a 1911 from gunsmith parts, but it does not give one the experience to do it right the first time, every time. That’s near impossible, but it lays the foundation for future success.
- Mile High Shooting Accessories, which put on the event, was a fantastic host, having tables, vices, and their gunsmiths available to help out the doofuses in the class (like yours truly).
- Despite the cost, one does leave with nearly all the tools needed for smithing the handgun. Buy once, cry once.
- My fellow classmates were awesome people. Varied backgrounds but all loved the 1911 and were there to learn more. High-end classes tend to attract high-end people.
The Notable:
- The class is run by “big boy rules” meaning figure it our yourself or man up and ask questions.
- The tool list was exhaustive, but much heartache could have been avoided if the list recommended purchase a few extra of commonly screwed-up components such as barrels, links, etc. In my case, I ended up over-nighting a few components at significant cost.
- Larry is every bit the personality presented in his articles, videos, etc. Loud, strongly opinionated, and knowledgeable is a good combination for a charismatic, if abrasive person.
- While not expressly included in the class, would like to see some work on the special options and more detail on checkering and funneled magazine wells.
The Bad:
- I polled the class prior to leaving and at the time they did not feel that Larry was always “there” with us.
- Would like to see some better communication from Larry prior to the class, checking on if parts are good, arrival times, and a syllabus with the tips and tricks for each part would be excellent value-adders.
- No certificate or anything is provided to show successful completion of the class. This would be a nice touch. I, for one, would proudly hang it in my office.
Final Thoughts & Verdict:
Until the lunch with Larry on Thursday, I would have said that the class was not worth it for the money, time, effort, etc. Putting this in terms of money, for $16,000 (eight students times an estimated $2,000 class fee from each), the instructor can afford to be with us both professionally and personally.
Despite this, I find myself appreciating the hard-won knowledge more as I am already whittling on a second handgun that is heads-and shoulders above the first; though not without its own faults. Larry said that it took him about six handguns before it all “clicked” and that will likely be the case (if not more) for myself. Another couple of years of this, and I am confident I can make heirloom-quality pieces for my friends and family.
As such, I come to two recommendations, of which either would make the class “worth it” from a subjective standpoint and if both were present, a do-not-miss experience for the true enthusiast or hopeful gunsmith.
- Students should show-up with the pre-requisites, tooling (and extra parts for inevitable screw-ups), and a can-do attitude that does not accept set-backs and a gung-ho mentality to take advantage of the knowledge in the room. Do not be afraid to ask direct questions and do not be afraid if the answers are equally direct. Socialize with classmates and work to pull the passion and knoledge from the instructor.
- Larry is an awesome person, full of hard-won experience, a brimming passion for the platform, and energy. Reach out to the students on a personal level, pay attention to what they are doing, and walk around the room more. Focus on the class, not a tablet. Every time he stopped by my desk, something good to great came from the encounter and my handgun is better because of it.
All said and done, my 1911 is ready to go for outside services. What do you think I should do? Cerakote, blueing, QPQ Nitride, or leave it bright?
